实战篇最详细的Rollup打包项目教程
Posted 前端开发小陈
tags:
篇首语:本文由小常识网(cha138.com)小编为大家整理,主要介绍了实战篇最详细的Rollup打包项目教程相关的知识,希望对你有一定的参考价值。
介绍
本文带你一起使用 Rollup 打包项目,实现以下功能:
- 自动将 dependencies 依赖声明为 externals
- 支持处理外部 npm 依赖
- 支持基于 CommonJS 模块引入
- 支持 typescript,并导出声明文件
- 支持 scss,并添加前缀
- 支持自动清除调试代码
- 打包输出文件保留原始模块结构
- 支持按需加载
一、什么是 rollup
rollup 是一个 javascript 模块打包器,可以将小块代码编译成大块复杂的代码,例如 library 或应用程序。
二、为什么是 rollup
为什么是 rollup 而不是 webpack 呢?
rollup的特色是 ES6 模块和代码 Tree-shaking,这些 webpack 同样支持,除此之外 webpack 还支持热模块替换、代码分割、静态资源导入等更多功能。
当开发应用时当然优先选择的是 webpack,但是若你项目只需要打包出一个简单的 bundle 包,并是基于 ES6 模块开发的,可以考虑使用 rollup。
rollup 相比 webpack,它更少的功能和更简单的 api,是我们在打包类库时选择它的原因。
三、支持打包的文件格式
rollup 支持的打包文件的格式有 amd, cjs, es\\esm, iife, umd。其中,amd 为 AMD 标准,cjs 为 CommonJS 标准,esm\\es 为 ES 模块标准,iife 为立即调用函数, umd 同时支持 amd、cjs 和 iife。
四、快速开始
1. 安装
npm install --global rollup
2. 基础打包
新增文件 src/main.js:
// src/main.js
import foo from "./foo.js";
export default function () console.log(foo);
新增文件 src/foo.js:
export default "hello world!";
项目根目录下新增文件 rollup.config.js:
export default input: "src/main.js",output: file: "bundle.js",format: "cjs",,
;
运行命令:
rollup -c
得到产物 bundle.js:
"use strict";

var foo = "hello world!";

// src/main.js
function main() console.log(foo);


module.exports = main;
这时我们使用 Rollup 将 src/main.js、src/foo.js打包成功,完成了第一个 bundle,。

3. 引入外部资源
更新 src/main.js,添加外部资源 lodash-es 引入:
// src/main.js
import foo from "./foo.js";

import  sum  from "lodash-es";

export default function () console.log(foo);console.log(sum[(1, 2)]);
再次打包 rollup -c,发现有报错 (!) Unresolved dependencies:

这是因为当项目中引入外部资源时,如 npm 包,rollup 不知道如何打破常规去处理这些依赖。
有 2 种方法引入外部资源:
- 添加插件
@rollup/plugin-node-resolve将我们编写的源码与依赖的第三方库进行合并; - 配置 external 属性,告诉 rollup.js 哪些是外部的类库。
3.1 resolve 插件
@rollup/plugin-node-resolve 插件让 rollup 能够处理外部依赖。
安装:
yarn add @rollup/plugin-node-resolve -D
更新 rollup.config.js:
import resolve from "@rollup/plugin-node-resolve";
export default plugins: [resolve()],
;
重新打包得到产物,已经包含了 lodash-es:
"use strict";

var foo = "hello world!";

/**
 * This method returns the first argument it receives.
 *
 * @static
 * @since 0.1.0
 * @memberOf _
 * @category Util
 * @param * value Any value.
 * @returns * Returns `value`.
 * @example
 *
 * var object =  'a': 1 ;
 *
 * console.log(_.identity(object) === object);
 * // => true
 */
function identity(value) return value;


/**
 * The base implementation of `_.sum` and `_.sumBy` without support for
 * iteratee shorthands.
 *
 * @private
 * @param Array array The array to iterate over.
 * @param Function iteratee The function invoked per iteration.
 * @returns number Returns the sum.
 */
function baseSum(array, iteratee) var result,index = -1,length = array.length;while (++index < length) var current = iteratee(array[index]);if (current !== undefined) result = result === undefined ? current : result + current;return result;


/**
 * Computes the sum of the values in `array`.
 *
 * @static
 * @memberOf _
 * @since 3.4.0
 * @category Math
 * @param Array array The array to iterate over.
 * @returns number Returns the sum.
 * @example
 *
 * _.sum([4, 2, 8, 6]);
 * // => 20
 */
function sum(array) return array && array.length ? baseSum(array, identity) : 0;


// src/main.js

function main() console.log(foo);console.log(sum([1, 2]));


module.exports = main;
成功运行:

3.2 external 属性
有些场景下,虽然我们使用了 resolve 插件,但可能我们仍然想要某些库保持外部引用状态,这时我们就需要使用 external 属性,来告诉 rollup.js 哪些是外部的类库。
更新 rollup.config.js:
import commonjs from "@rollup/plugin-commonjs";
import  nodeResolve  from "@rollup/plugin-node-resolve";

export default input: "src/main.js",output: file: "bundle.js",format: "esm",name: "test",,plugins: [nodeResolve(), commonjs()],external: ["react"],
;
3.3 external 插件
每个类库都要手动添加至 externals 未免太麻烦,这时候可以用 rollup-plugin-node-externals 插件,自动将外部类库声明为 externals。
安装:
yarn add rollup-plugin-node-externals -D
更新 rollup.config.js:
import externals from "rollup-plugin-node-externals";

export default [plugins: [externals(devDeps: false, // devDependencies 类型的依赖就不用加到 externals 了。),],,
];
4. 引入 CommonJs 模块
4.1 CommonJs 插件
rollup.js 编译源码中的模块引用默认只支持 ES6+的模块方式 import/export。然而大量的 npm 模块是基于 CommonJS 模块方式,这就导致了大量 npm 模块不能直接编译使用。
需要添加 @rollup/plugin-commonjs 插件来支持基于 CommonJS 模块方式 npm 包。
安装:
yarn add @rollup/plugin-commonjs -D
更新 rollup.config.js:
import commonjs from "@rollup/plugin-commonjs";

export default plugins: [commonjs()],
;
更新 src/foo.js:
module.exports = text: "hello world!",
;
重新打包,打包成功:

5. 引入 Sass 资源
rollup-plugin-postcss 默认集成了对 scss、less、stylus 的支持。
5.1 打包支持 sass 文件
新增 src/foo.scss:
body background-color: red;display: flex;
更新 src/main.js:
// src/main.js
import foo from "./foo.js";
import "./foo.scss";

export default function () console.log(foo.text);
安装:
yarn add rollup-plugin-postcss -D
更新 rollup.config.js:
import commonjs from "@rollup/plugin-commonjs";
import  nodeResolve  from "@rollup/plugin-node-resolve";
import postcss from "rollup-plugin-postcss";

export default input: "src/main.js",output: file: "bundle.js",format: "esm",name: "test",,plugins: [nodeResolve(), commonjs(), postcss()],external: ["react"],
;
打包产物:
"use strict";

var foo = text: "hello world!",
;

function styleInject(css, ref) if (ref === void 0) ref = ;var insertAt = ref.insertAt;if (!css || typeof document === "undefined") return;var head = document.head || document.getElementsByTagName("head")[0];var style = document.createElement("style");style.type = "text/css";if (insertAt === "top") if (head.firstChild) head.insertBefore(style, head.firstChild); else head.appendChild(style); else head.appendChild(style);if (style.styleSheet) style.styleSheet.cssText = css; else style.appendChild(document.createTextNode(css));


var css_248z = "body \\nbackground-color: red;\\n";
styleInject(css_248z);

// src/main.js

function main() console.log(foo.text);


module.exports = main;
效果如图:

5.2 css 加前缀
安装:
yarn add autoprefixer -D
更新 packages.json:
"browserslist": ["defaults","not ie < 8","last 2 versions","> 1%","ios 7","last 3 iOS versions"]
更新 rollup.config.js:
import commonjs from "@rollup/plugin-commonjs";
import  nodeResolve  from "@rollup/plugin-node-resolve";
import autoprefixer from "autoprefixer";
import postcss from "rollup-plugin-postcss";

export default input: "src/main.js",output: file: "bundle.js",format: "umd",name: "test",,plugins: [nodeResolve(),commonjs(),postcss(plugins: [autoprefixer()],),],external: ["react"],
;
效果如图:

5.3 css 压缩
安装:
yarn add cssnano -D
更新 rollup.config.js:
import commonjs from "@rollup/plugin-commonjs";
import  nodeResolve  from "@rollup/plugin-node-resolve";
import autoprefixer from "autoprefixer";
import cssnano from "cssnano";
import postcss from "rollup-plugin-postcss";

export default input: "src/main.js",output: file: "bundle.js",format: "umd",name: "test",,plugins: [nodeResolve(),commonjs(),postcss(plugins: [autoprefixer(), cssnano()],),],external: ["react"],
;
效果如图:

5.4 抽离单独的 css 文件
更新 rollup.config.js:
export default [plugins: [postcss(plugins: [autoprefixer(), cssnano()],extract: "css/index.css",),],,
];
效果如图:

6. 引入 Typescript 资源
6.1 typescript 插件
修改 src/foo.js -> src/foo.ts:
export default text: "hello world!",
;
更新 src/main.js:
// src/main.js
import foo from "./foo.ts";
import "./foo.scss";

export default function () console.log(foo.text);
安装:
yarn add @rollup/plugin-typescript -D
更新 rollup.config.js:
import typescript from "@rollup/plugin-typescript";
export default [plugins: [typescript()];
];
成功支持 Ts 文件导出:

6.2 导出类型声明文件
更新 rollup.config.js:
import typescript from "@rollup/plugin-typescript";
export default [plugins: [typescript(outDir: "dist",declaration: true,declarationDir: "dist",)];
];
成功支持类型声明文件导出:

7. 打包产物清除调试代码
插件 @rollup/plugin-strip 用于从代码中删除 debugger 语句和函数。包括 assert.equal、console.log 等等。
安装:
yarn add @rollup/plugin-strip -D
更新 rollup.config.js:
import strip from "@rollup/plugin-strip";
export default [plugins: [strip()];
];
8. 打包输出文件保留原始模块结构
上面我们的 output 配置是这样的:
output: dir: path.dirname('dist/bundle.js'),format: 'es',
打包产物如下:

那么怎么才能把 index.js、index2.js 改成 foo/index.js、hello/index.js 呢?
修改 output,更新 rollup.config.js:
output: dir: path.dirname('dist/bundle.js'),format: 'es',exports: 'named', // 指定导出模式(自动、默认、命名、无)preserveModules: true, // 保留模块结构preserveModulesRoot: 'src', // 将保留的模块放在根级别的此路径下,
这时打包产物就和源码的结构一致了:

9. 按需加载
rollup 支持输出格式为 es 模块化,就会按模块输出。
所以我们上面的配置已经实现了按需加载了。
五、一个真实的组件库的 rollup 打包配置
该项目支持:
- 打包输出文件保留原始模块结构
- 自动将 dependencies 依赖声明为 externals
- 支持处理外部 npm 依赖
- 支持基于 CommonJS 模块引入
- 支持 typescript,并导出声明文件
- 支持 scss,并添加前缀
- 支持自动清除调试代码
- 支持按需加载
1. 安装
npm i rollup -g

yarn add @rollup/plugin-commonjs @rollup/plugin-node-resolve @rollup/plugin-strip @rollup/plugin-typescript rollup-plugin-postcss rollup-plugin-node-externals autoprefixer -D
2. 配置
项目根目录下新增 rollup.config.js:
import commonjs from "@rollup/plugin-commonjs";
import resolve from "@rollup/plugin-node-resolve";
import strip from "@rollup/plugin-strip";
import typescript from "@rollup/plugin-typescript";
import autoprefixer from "autoprefixer";
import path from "path";
import externals from "rollup-plugin-node-externals";
import postcss from "rollup-plugin-postcss";

import pkg from "./package.json";

export default [input: "./src/index.ts", // 入口文件output: [// 出口文件dir: path.dirname(pkg.module),format: "es", // es模块导出,支持按需加载name: pkg.name,exports: "named", // 指定导出模式(自动、默认、命名、无)preserveModules: true, // 保留模块结构preserveModulesRoot: "src", // 将保留的模块放在根级别的此路径下,],plugins: [// 自动将dependencies依赖声明为 externalsexternals(devDeps: false,),// 处理外部依赖resolve(),// 支持基于 CommonJS 模块引入commonjs(),// 支持 typescript,并导出声明文件typescript(outDir: "es",declaration: true,declarationDir: "es",),// 支持 scss,并添加前缀postcss(plugins: [autoprefixer()],),// 清除调试代码strip(),],,
];
更新 packages.json:
"module": "es/index.js","types": "es/index.d.ts","files": ["es"]
项目结构:

打包产物:

小结
本文介绍了 rollup 的各个功能的使用方法,rollup 自身能力较弱,依靠插件完成完整的组件库打包。
可以直接拷贝文中配置,实现一个按需加载的组件库打包。
希望能对你有所帮助,感谢阅读~
最后
最近找到一个VUE的文档,它将VUE的各个知识点进行了总结,整理成了《Vue 开发必须知道的36个技巧》。内容比较详实,对各个知识点的讲解也十分到位。
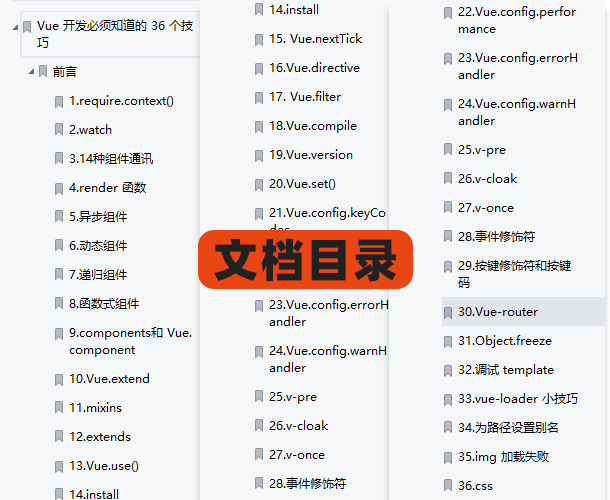
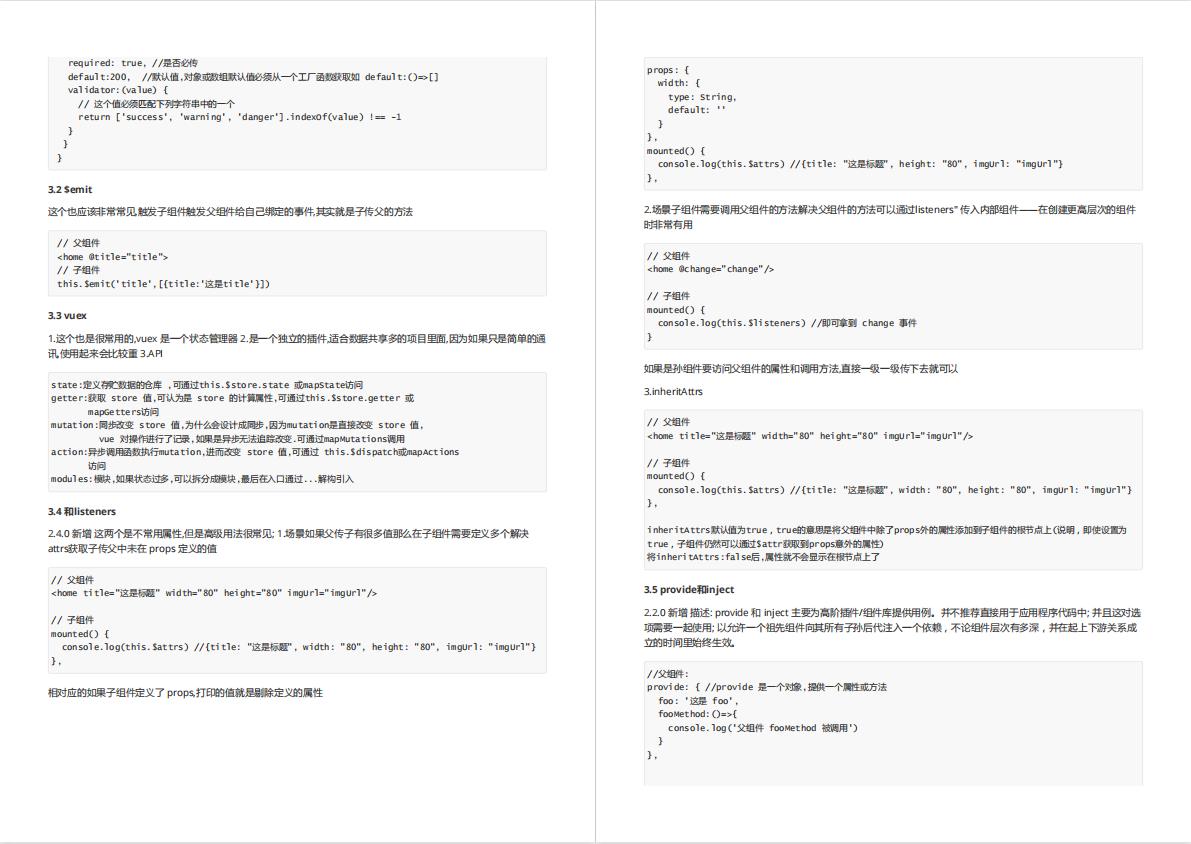
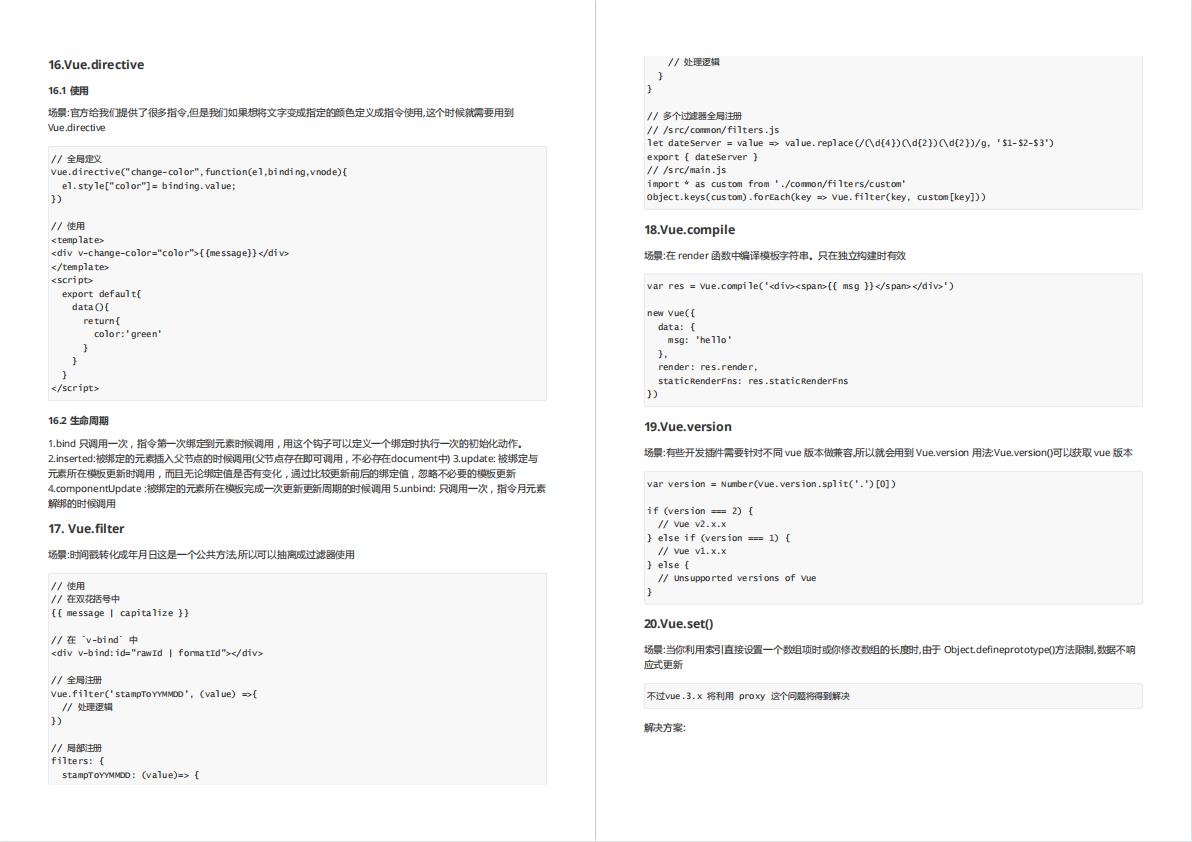
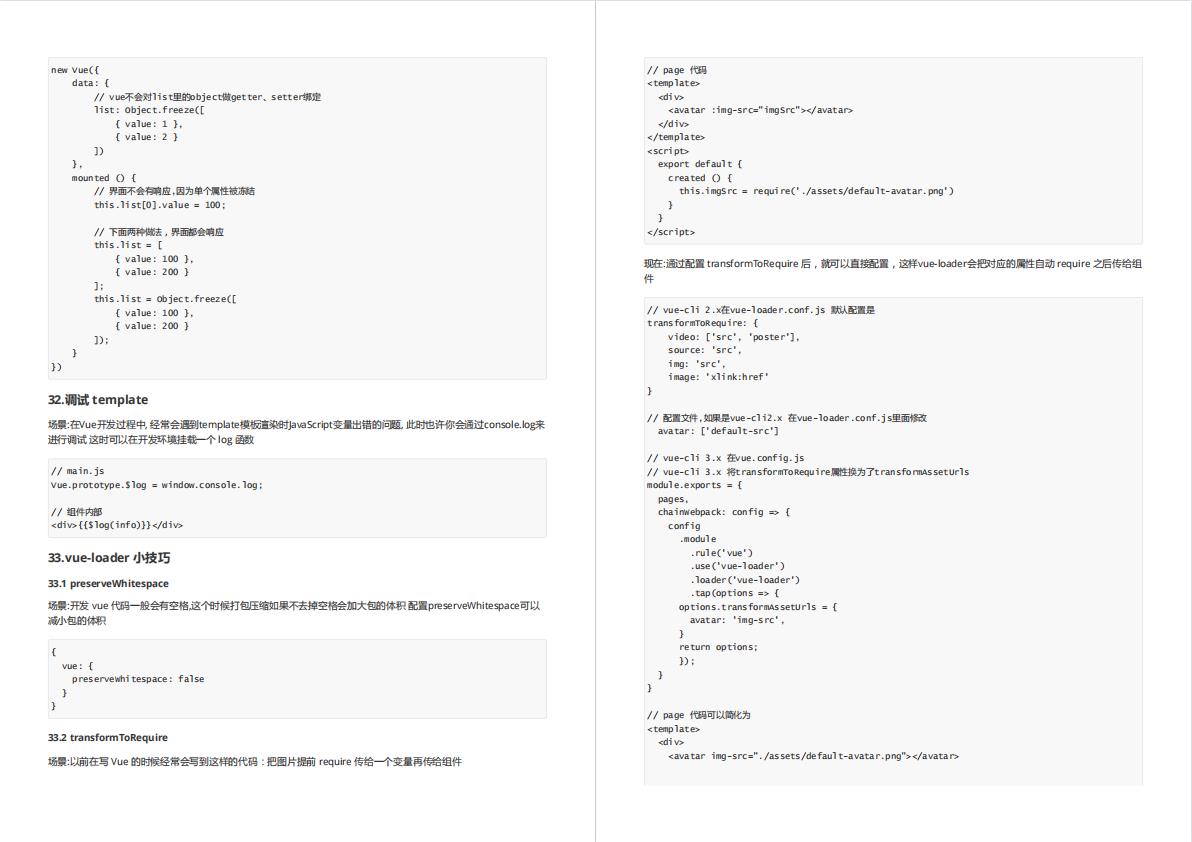
有需要的小伙伴,可以点击下方卡片领取,无偿分享
手把手ios苹果打包——遇见项目实战|超详细的教程分享
六年代码两茫茫,不思量,自难忘
6年资深前端主管一枚,只分享技术干货,项目实战经验
关注博主不迷路~
文章目录
前言
本教程手把手教你用weex+eeui框架打测试包ipa安装到手机(打正式包也有介绍)。
eeui项目创建可看我的另一篇文章一文带你吃透eeui安卓开发
weex介绍

Weex是一个构建移动端跨平台UI框架。Weex使开发人员能够使用类似Web的语法通过单一代码库构建iOS、Android和Web应用。 Vue.js和Rax(提供类React语法前端框架)这两个前端框架被广泛应用于Weex页面开发,同时Weex也对这两个前端框架提供了最完善的支持。
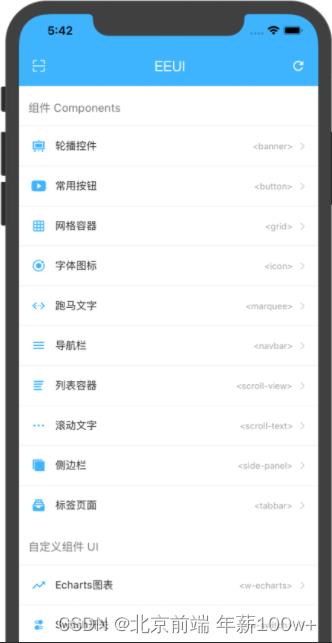
eeui介绍
使用 Vue.js 跨平台开发高质量原生(Android/iOS)应用。
eeui 支持实时同步预览,即修改完代码可以立即查看效果
一、安装CocoaPods
1.CocoaPods介绍
CocoaPods是OS X和iOS下的一个第三类库管理工具,通过CocoaPods工具我们可以为项目添加被称为“Pods”的依赖库(这些类库必须是CocoaPods本身所支持的),并且可以轻松管理其版本,可以简单理解为ios的maven库。
CocoaPods有两个明显的优势:
1、在引入第三方库时它可以自动为我们完成各种各样的配置,包括配置编译阶段、连接器选项、甚至是ARC环境下的-fno-objc-arc配置等。
2、使用CocoaPods可以很方便地查找新的第三方库,这些类库是比较“标准的”,而不是网上随便找到的,这样可以让我们找到真正好用的类库。在使用CocoaPods之后,我只需要将用到的第三方开源库放到一个名为Podfile的文件中,然后执行pod install。CocoaPods就会自动将这些第三方开源库的源码下载下来,并且为我的工程设置好相应的系统依赖和编译参数。
2.CocoaPods的安装
打开终端:>_
1、查看当前Ruby版本
ruby -v
2、升级Ruby环境,首先需要安装rvm(第一步要下载一些东西等两分钟左右)
curl -L get.rvm.io | bash -s stable
source ~/.bashrc
source ~/.bash_profile
3、查看rvm版本
rvm -v
显示如下(或者是其他版本)
rvm 1.29.3 (latest) by Michal Papis, Piotr Kuczynski, Wayne E. Seguin [https://rvm.io]
4、列出ruby可安装的版本信息
rvm list known
显示如下
# MRI Rubies
[ruby-]1.8.6[-p420]
[ruby-]1.8.7[-head] # security released on head
[ruby-]1.9.1[-p431]
[ruby-]1.9.2[-p330]
[ruby-]1.9.3[-p551]
[ruby-]2.0.0[-p648]
[ruby-]2.1[.10]
[ruby-]2.2[.10]
[ruby-]2.3[.7]
[ruby-]2.4[.4]
[ruby-]2.5[.1]  // 重点在这里 重点在这里 重点在这里
[ruby-]2.6[.0-preview2]   // 测试版
ruby-head
.....
5、安装一个ruby版本(这里我选择的是2.5.1版本,当然你也可以选择其他的)
rvm install 2.5.1
注意:安装过程中需要两次按下 Enter 键, 第二次按下后需要输入电脑访问密码(不可见,只管输入就行)
如果你电脑没有安装Xcode和Command Line Tools for Xcode以及Homebrew 会自动下载安装,建议提前安装这三者
这里很多小伙伴会遇到错误,大部分是因为没有安装Homebrew造成,所以所以所以要提前安装比较好
/usr/bin/ruby -e "$(curl -fsSL https://raw.githubusercontent.com/Homebrew/install/master/install)"
6、设置为默认版本
rvm use 2.5.1 --default
7、更换源
sudo gem update --system
gem sources --remove https://rubygems.org/
gem sources --add https://gems.ruby-china.com/
8、为了验证你的Ruby镜像是并且仅是ruby-china,执行以下命令查看
gem sources -l
如果是以下结果说明正确,如果有其他的请自行百度解决
*** CURRENT SOURCES ***
常见问题
9、这时候才正式开始安装CocoaPods
sudo gem install -n /usr/local/bin cocoapods
10、如果安装了多个Xcode使用下面的命令选择(一般需要选择最近的Xcode版本)
sudo xcode-select -switch /Applications/Xcode.app/Contents/Developer
11、安装本地库
pod setup
12、执行以上命令后
Setting up CocoaPods master repo
  $ /usr/bin/git clone https://github.com/CocoaPods/Specs.git master --progress
  Cloning into 'master'...
  remote: Counting objects: 1879515, done.
  remote: Compressing objects: 100% (321/321), done.
  Receiving objects:  21% (404525/1879515), 73.70 MiB | 22.00 KiB/
然后就是漫长的等待,当然,网络好的情况下会更快…
如果一直安装不成功请参考这里
13、下载安装完成之后可执行下列命令检查是否可用(第一次使用可能要等一会)
pod search AFNetworking
14、CocoaPods的具体使用
新建一个Xcode工程,使用终端cd到工程目录下
创建Podfile文件:
pod init
之后就可以在项目目录里看到一个Podfile文件
打开Podfile文件:
open Podfile
添加:
pod 'AFNetworking'
保存后退出
开始下载:
pod install
CocoaPods版本
pod --version
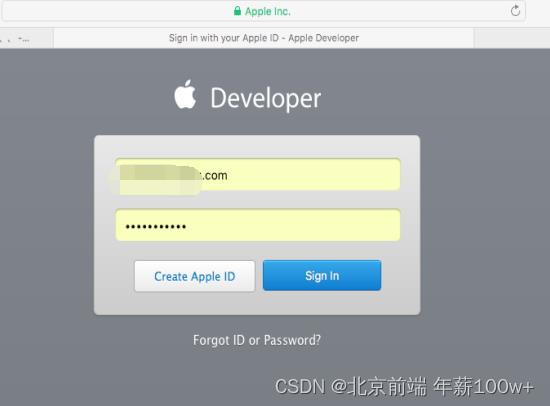
二、登录开发者中心
- 打开链接developer

点击Account
2.输入帐号密码,点击Sign In 按钮登录
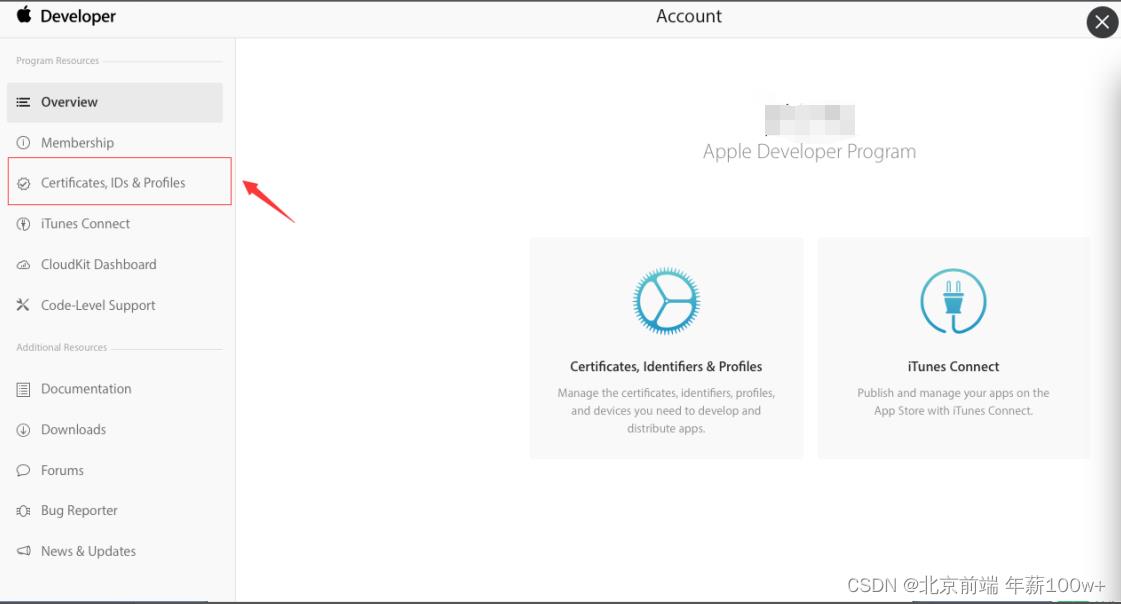
3.登录后,点击Certificates,Ldentifiers & Prlfiles,进入页面,所有证书相关的都在这里进行
二、申请appid
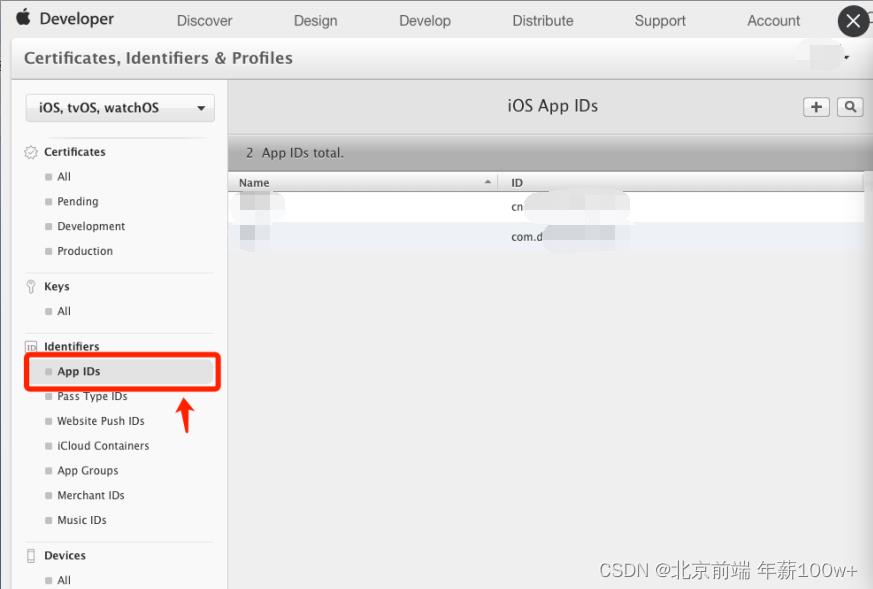
1.点击App IDs,进入页面
-
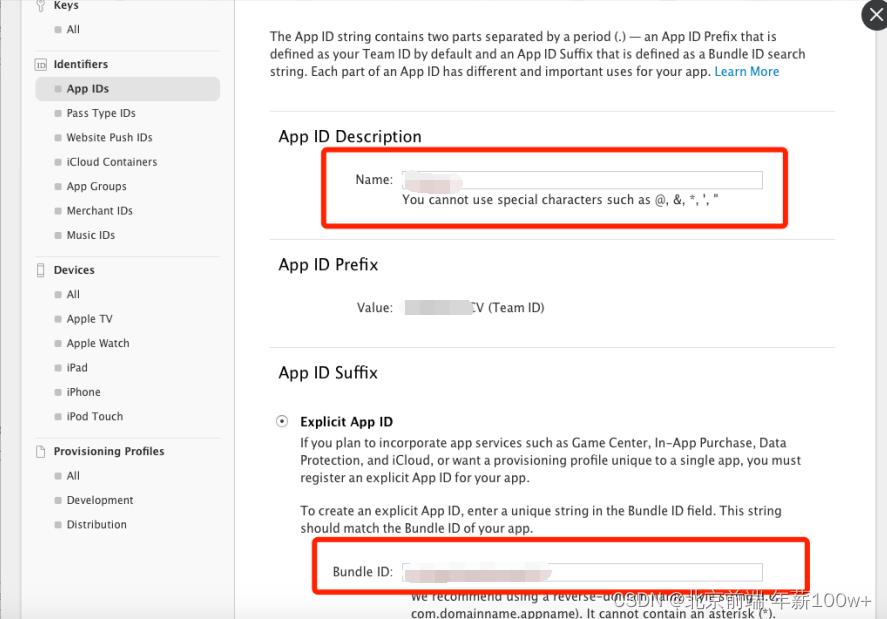
点击右上角的 + 号 来添加一个 APP ID,对于要发布到Appstore上的程序, 都有一个唯一的AppId
-
填写说明:
Name:可以用APP的名称拼音,不能使用特殊字符。
Bundle ID:建议使用 com.yourcompany.yourappname的格式;
PS: Bundle ID 需要和XCode中 Bundle identifier一致
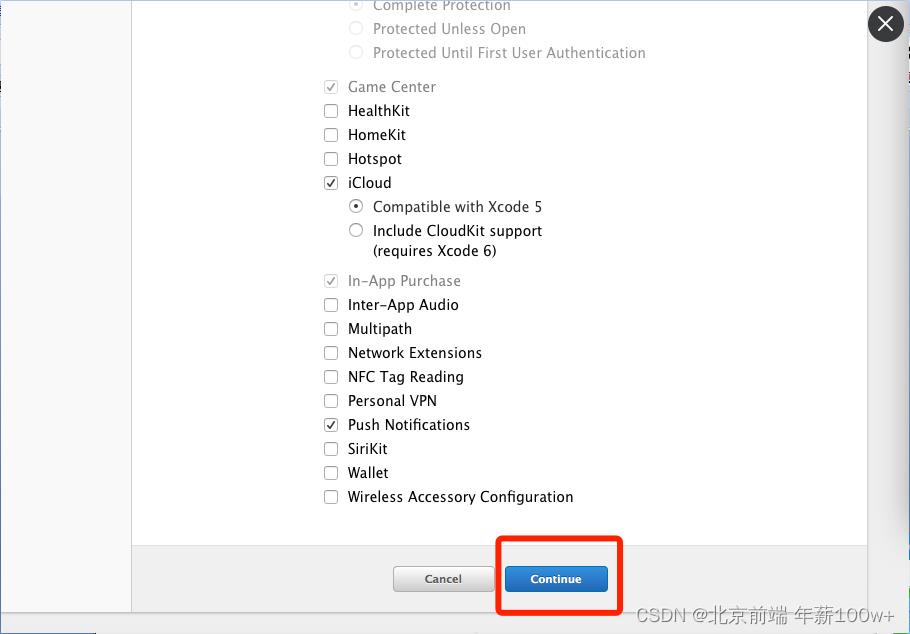
如果想要支持推送服务和iCould等也可以在这儿配置:
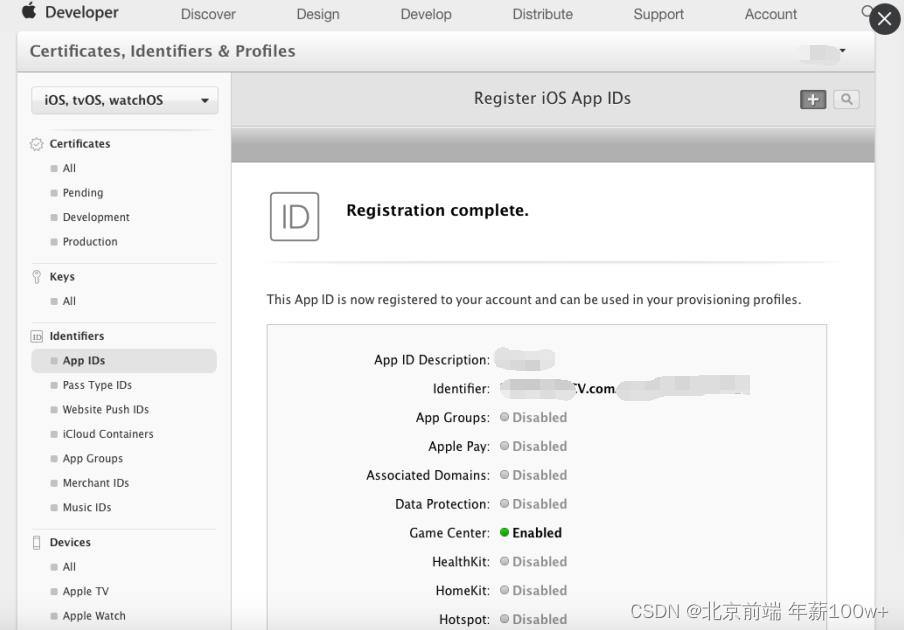
出现以下页面,说明申请appid成功!
三、申请发布证书(Mac系统)
1.获取证书请求文件
钥匙串访问 —> 证书助理 —> 从证书颁发机构请求证书
在下图所示的界面,
用户电子邮件地址:填你申请idp的电子邮件地址;
常用名称:默认;
CA空;
选择存贮到磁盘;
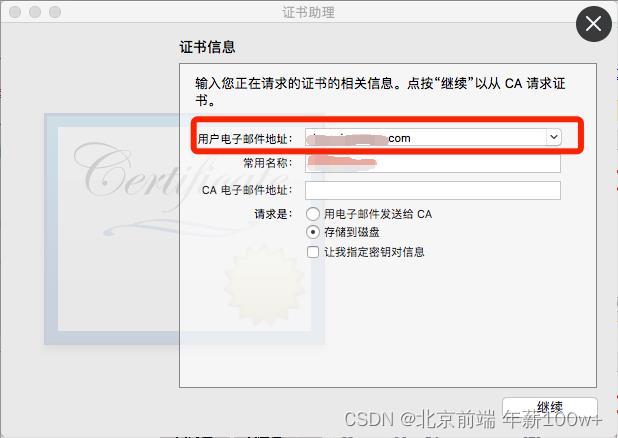
点击"继续"
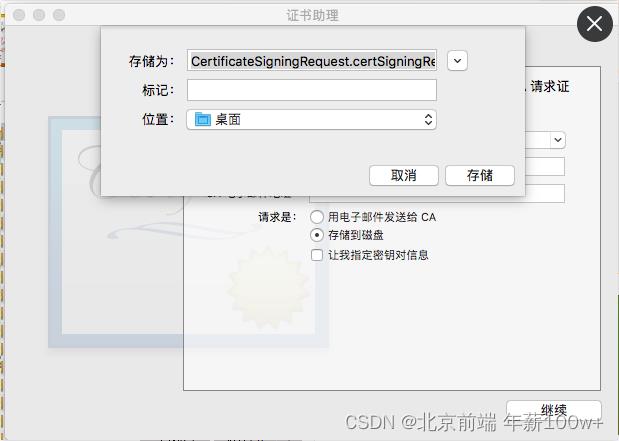
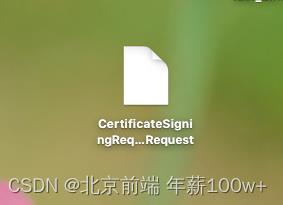
点击“存储:,你就可以看到你的桌面多了一个CertificateSigningRequest.certSigningRequest的证书请求文件。
- 获取p12文件
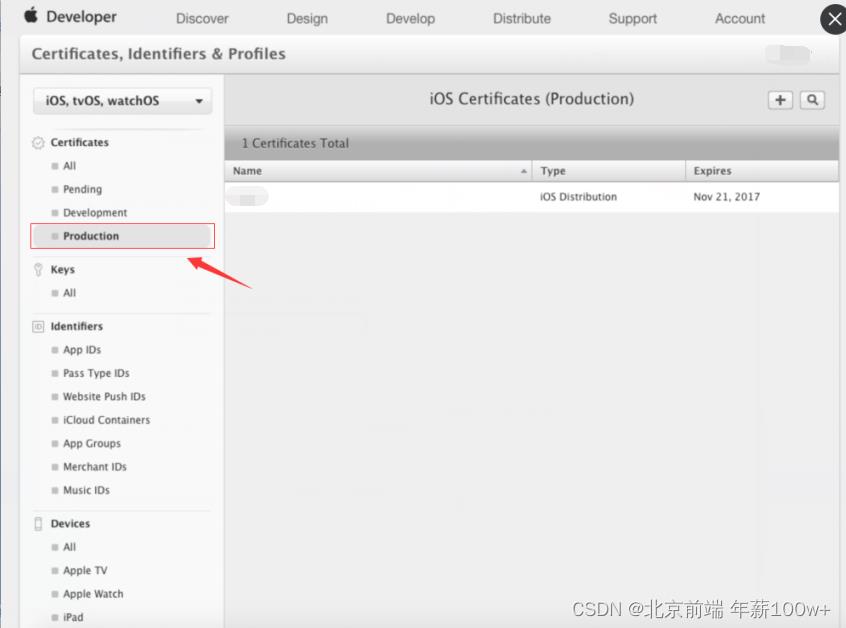
进入Certificates,Ldentifiers & Prlfiles页面,点击左边 Certificates 中的 Production
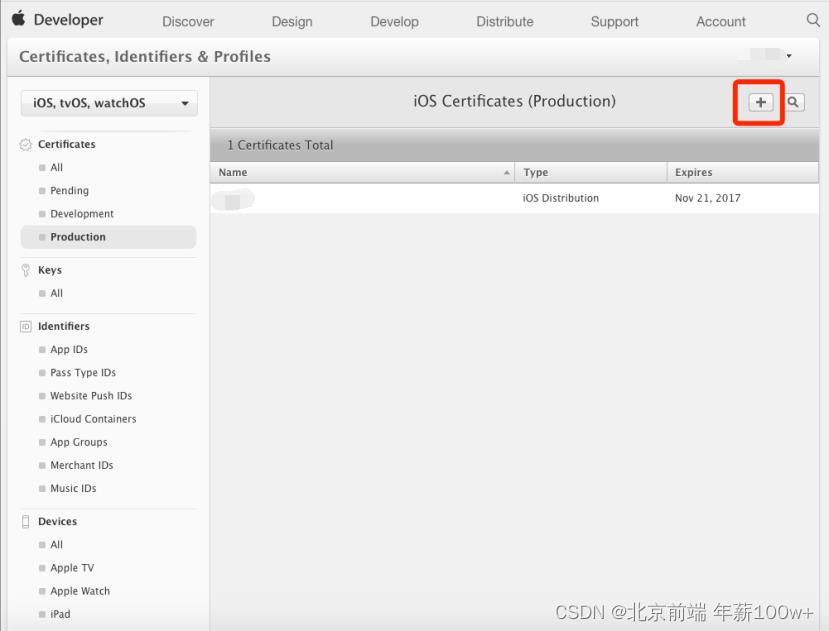
点击 + 号
直接勾选 App Store and Ad Hoc
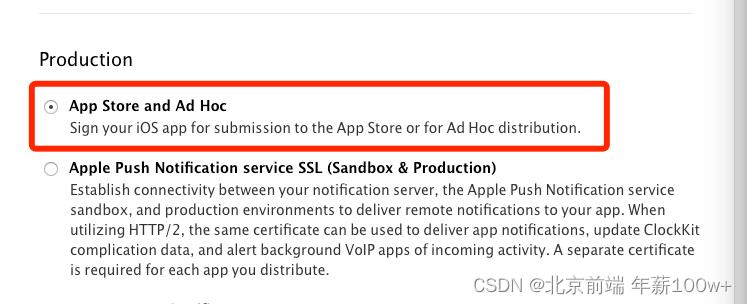
点击Continue
出现以下页面,点击 Choose file
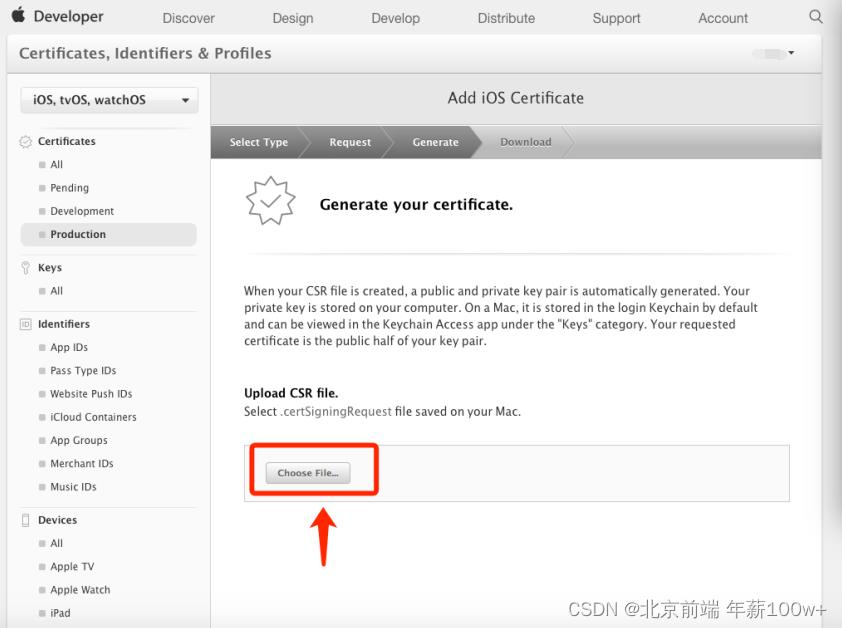
选择我们前面生成在桌面的证书请求文件,点击continue
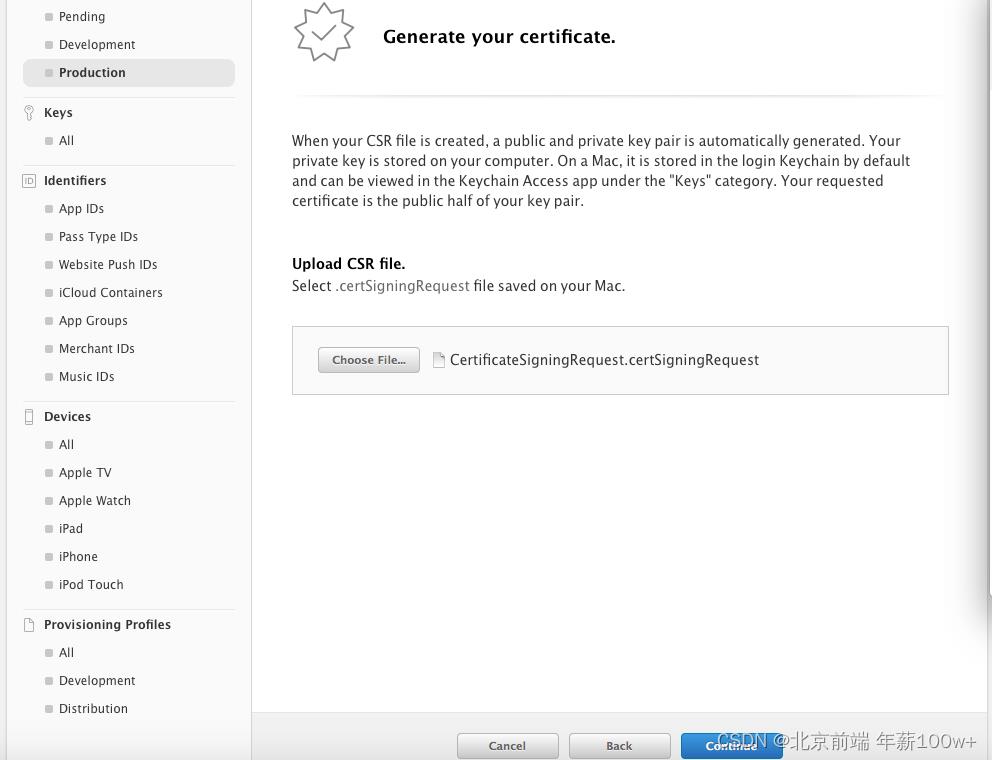
点击"download"下载你生成的证书
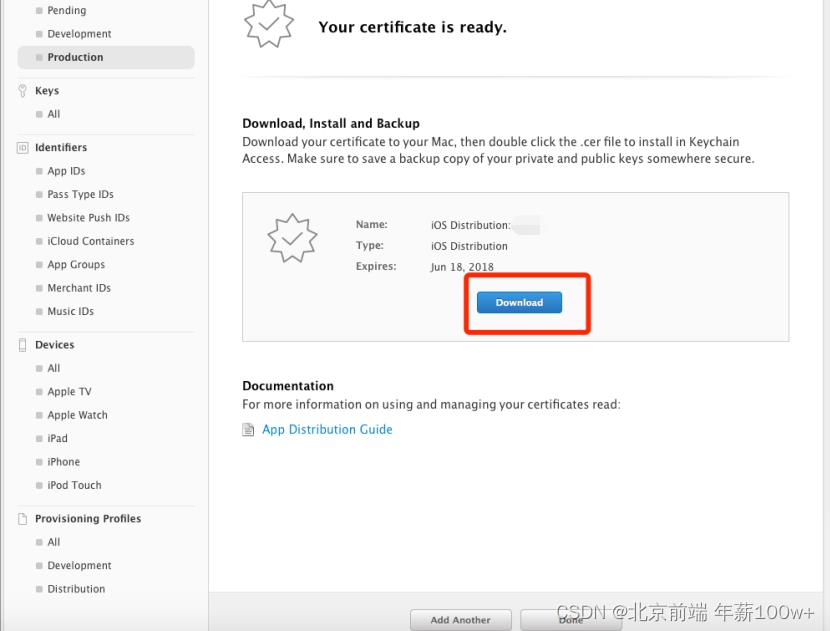
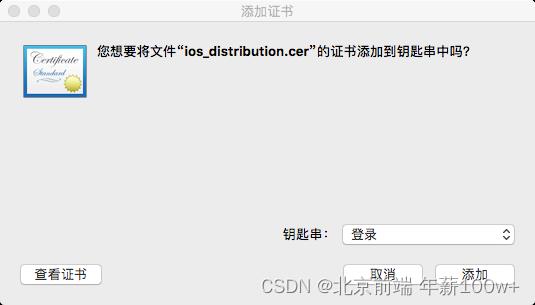
双击文件安装,
钥匙串:登录
点击添加
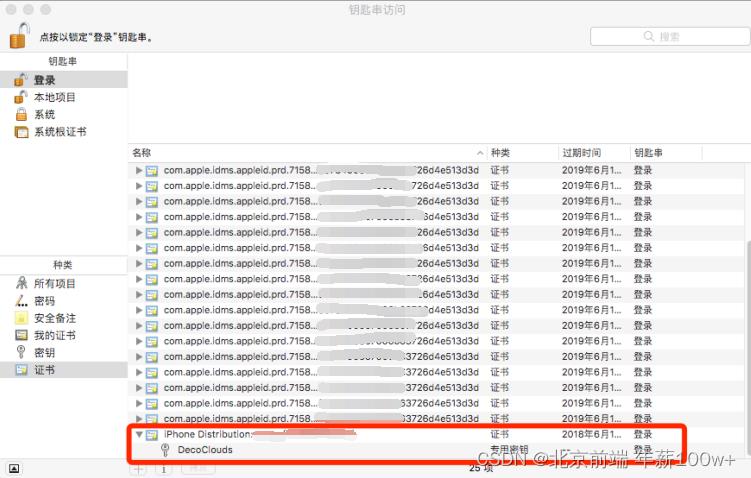
查看你的钥匙串,应该有下面这一行Iphone Distribution的证书,,这个证书有一个小三角可以点击,展开后有一个对应的密钥。
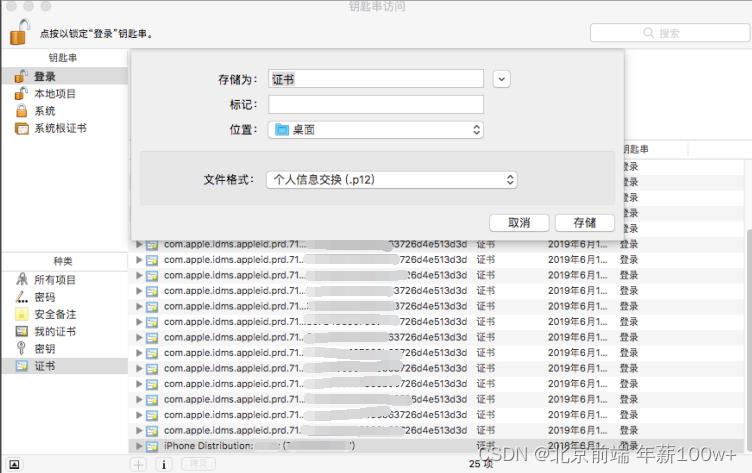
现在发布证书已经安装了,我们选择这个证书,右击,选择导出"iphone Distribution:…",如下:
给你要导出的证书起个名字,如“证书”,选择一个存的位置,注意,保存成P12的信息交换文件
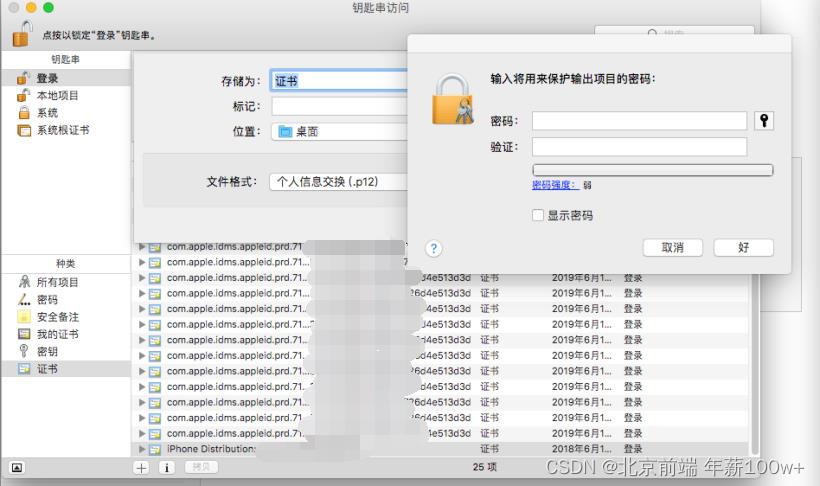
输入将来保护输出项目的密码,后面在打开证书文件时需要这个密码登录
现在你就有了发布程序需要的p12文件。
3.生成provisioning文件
在下图左边选择 Provisioning Profiles 选项下的 Distribution,来生成一个发布的准备文件:
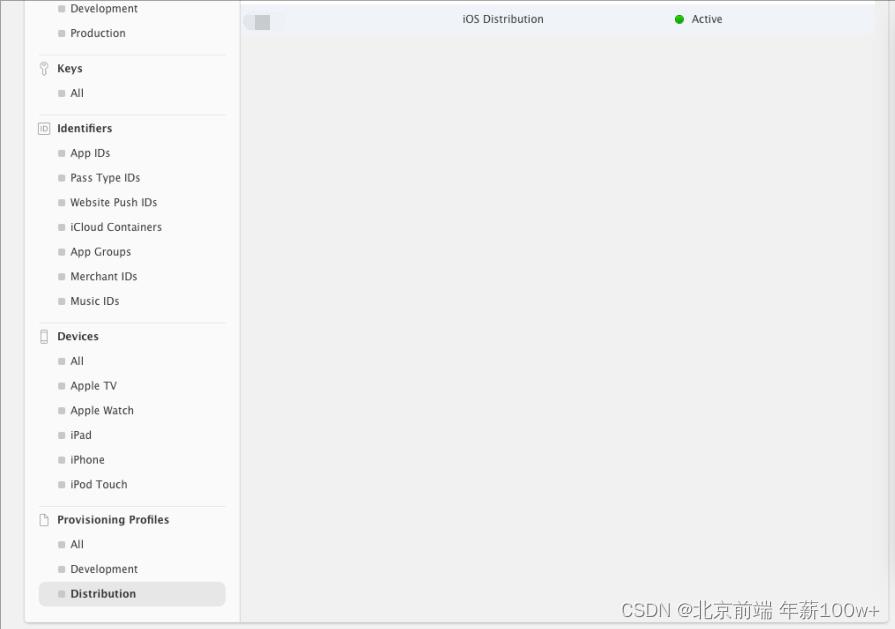
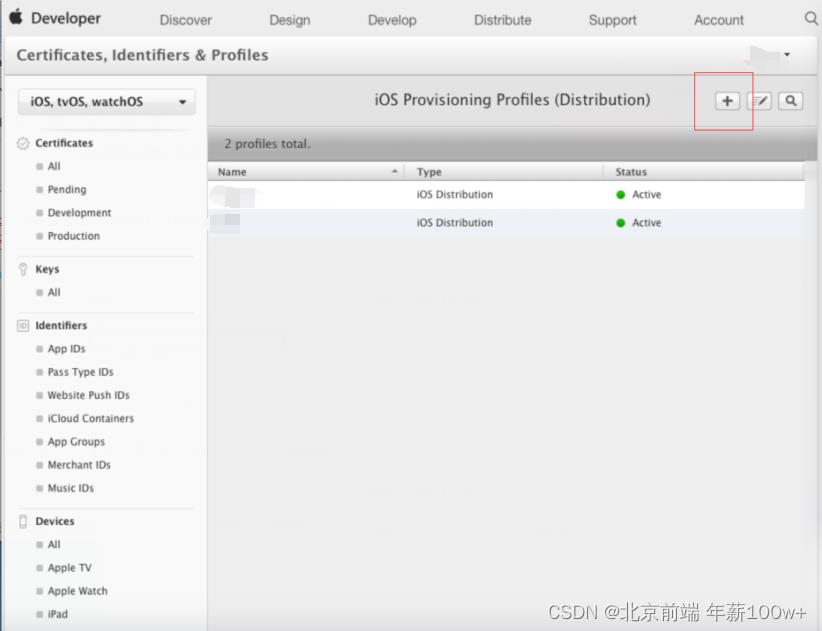
点击 + 号
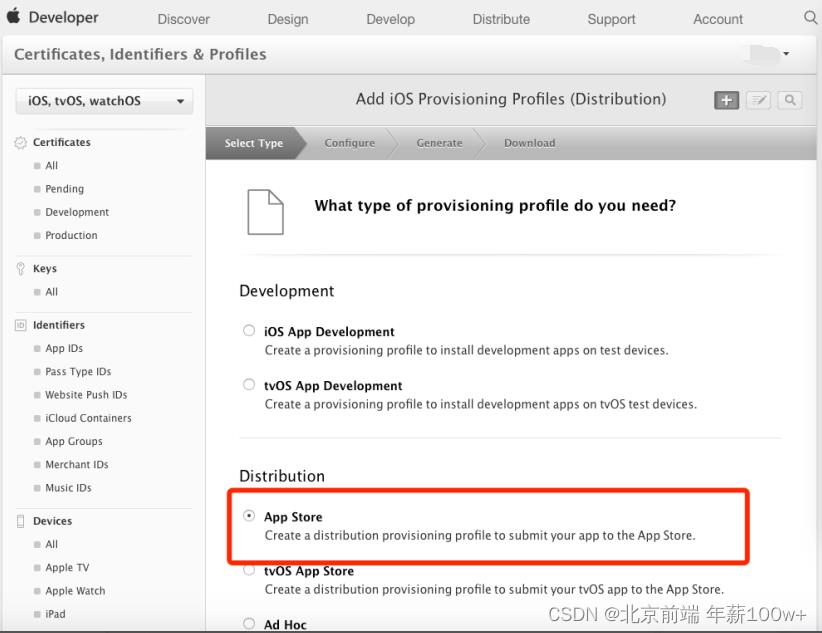
选择 App Store,其它不用管,点击下面的 Continue 按钮
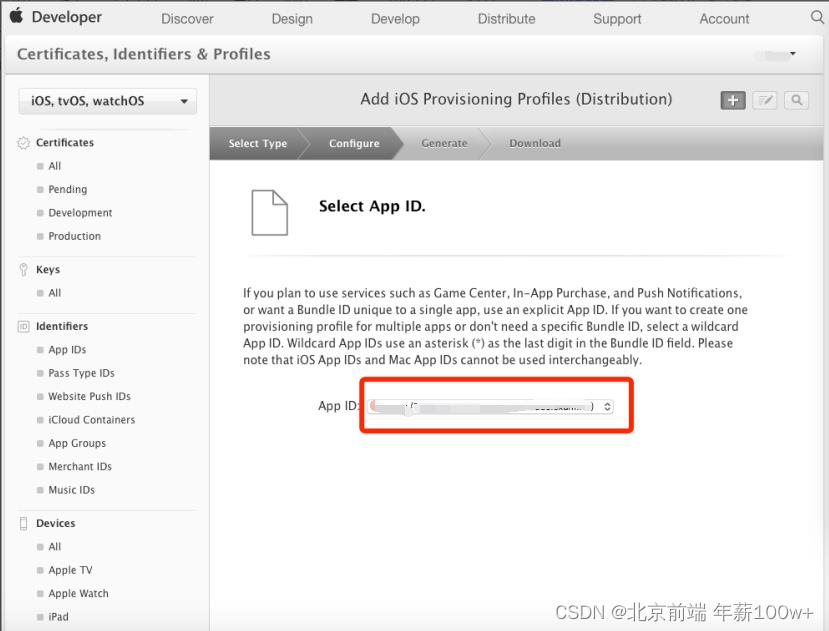
然后如下图中,选择我们前面创建的App ID ,点击下面的 Continue 如下图:
然后出现以下这个页面,选择最新的
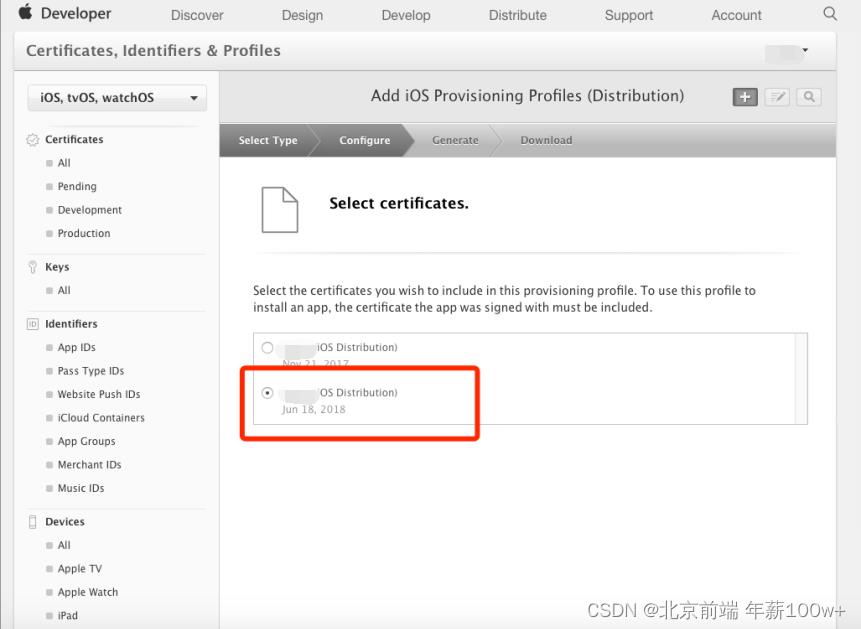
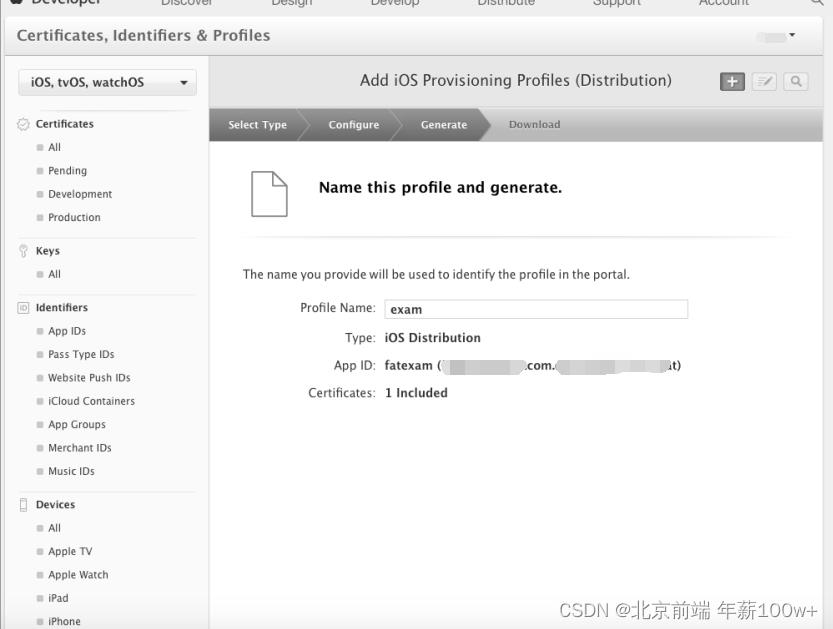
在新的页面中填写 Profile name,文件名称,下面的App ID,检查确认是我们之前创建的 appid,这个必须一致。确认后提交:
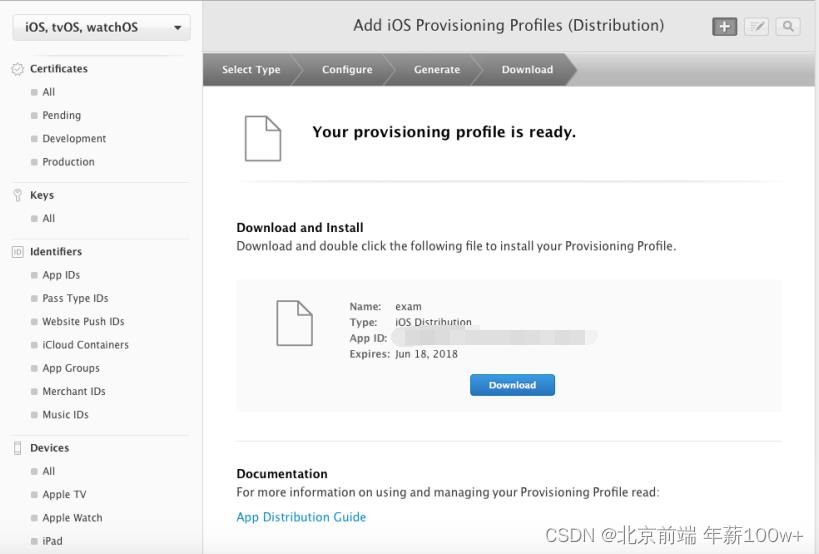
点击download,下载provisioning

四、添加测试手机设备
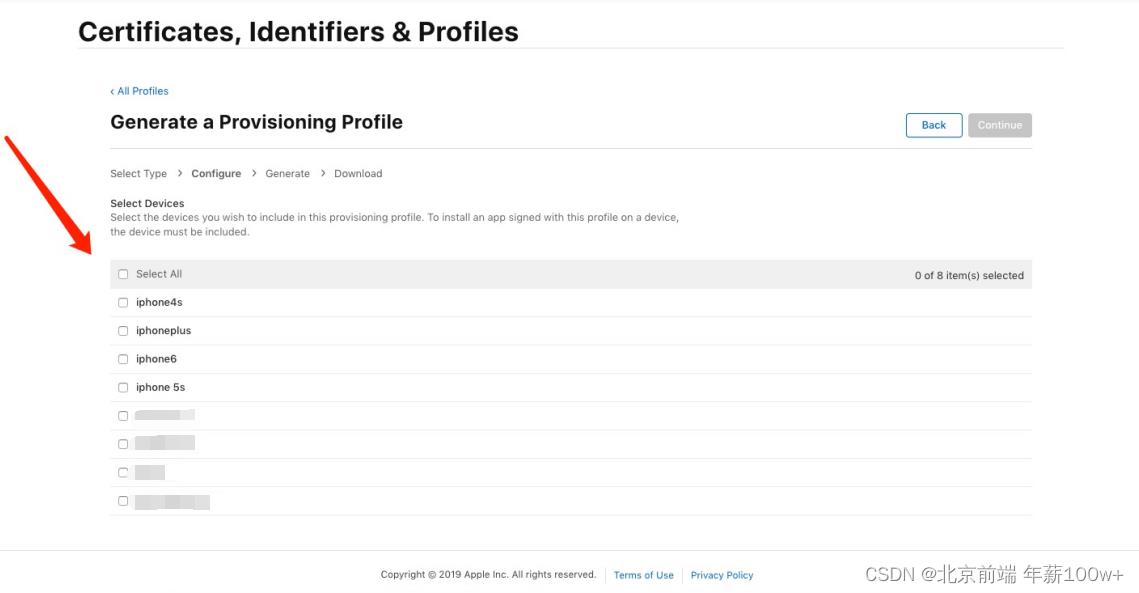
点击加号添加测试手机
需要使用iphone的uuid码
可使用iTunes获取手机UUID码(具体自行百度)
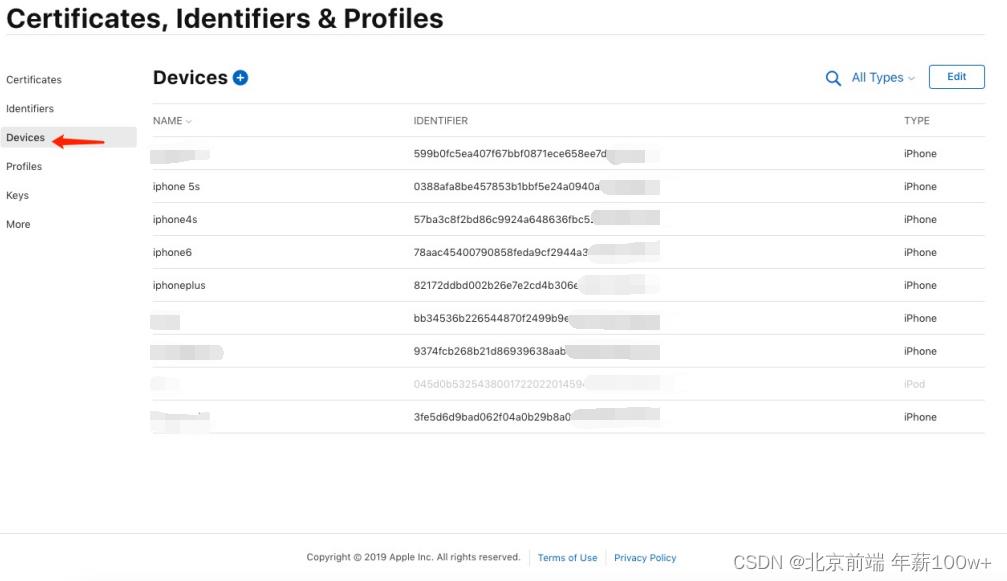
添加设备后在profile选择要测试的设备后生效(否则不能安装到手机)
五、打包
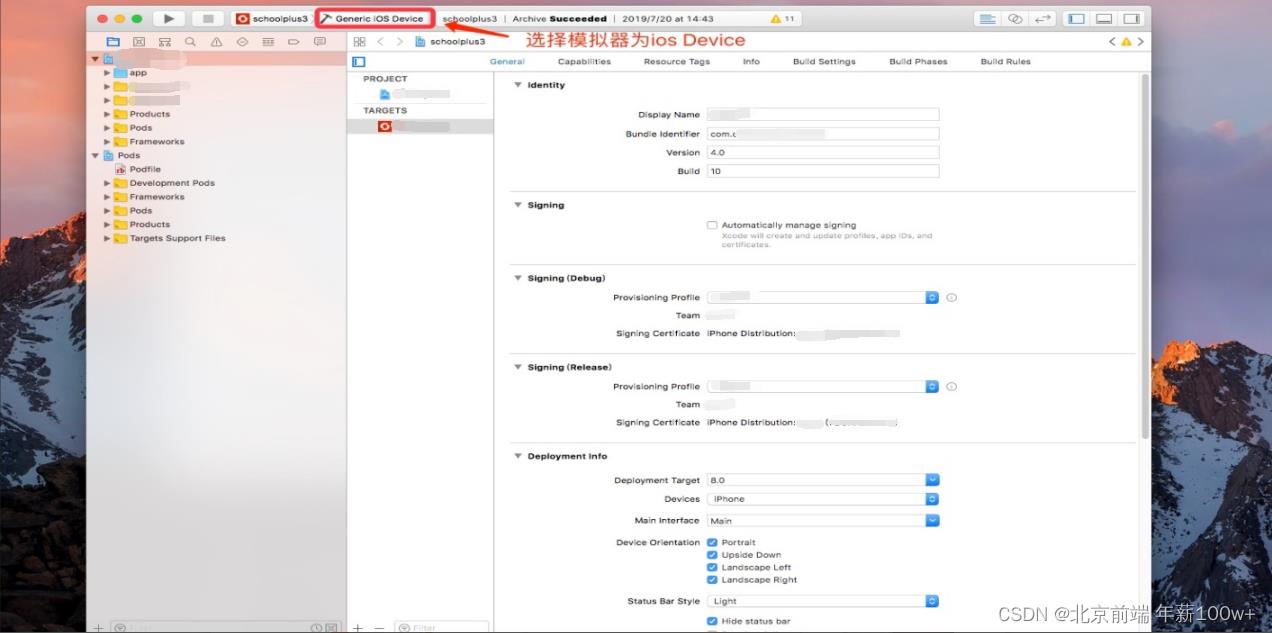
在xcode打开ios项目
打开的路径是:项目目录下\\platforms\\ios\\eeuiApp
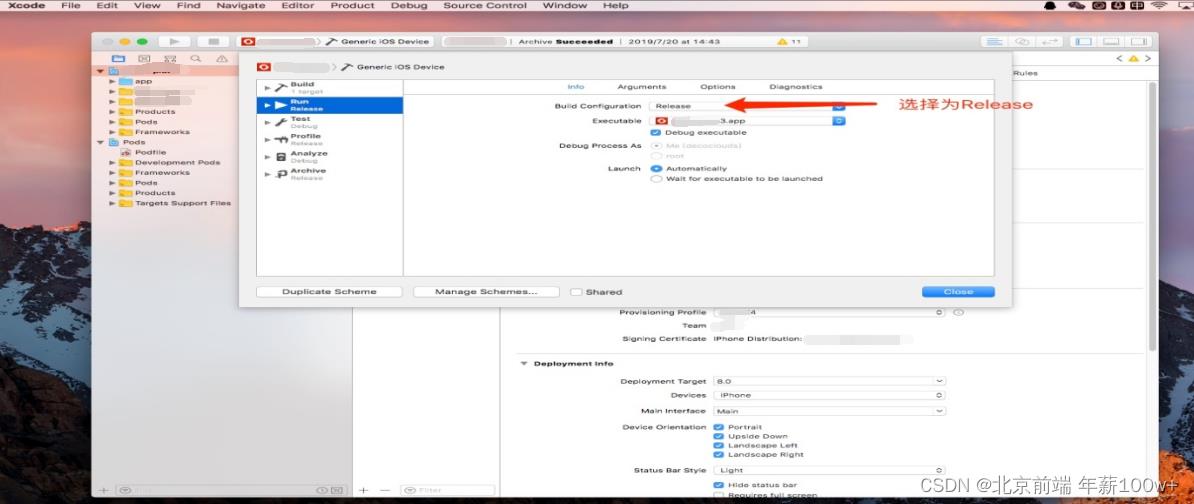
选择模拟器为ios Device
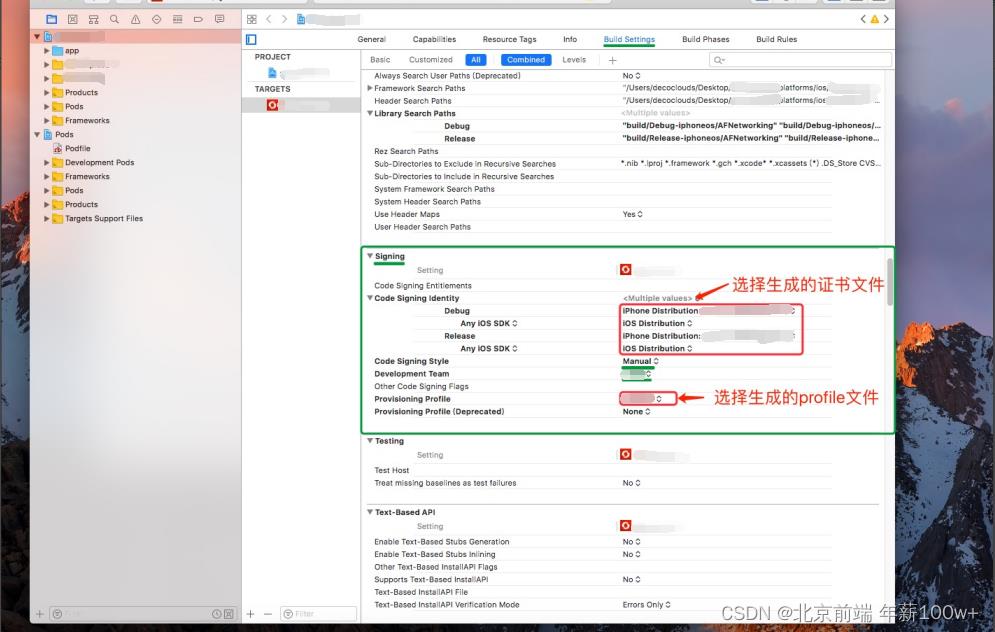
选择证书文件,prefile文件
选择为发布包
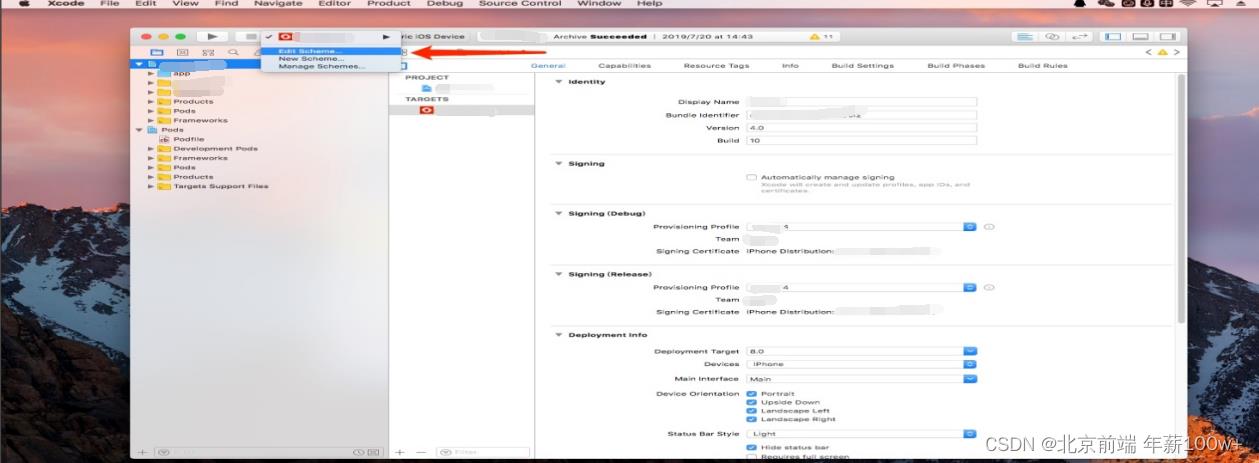
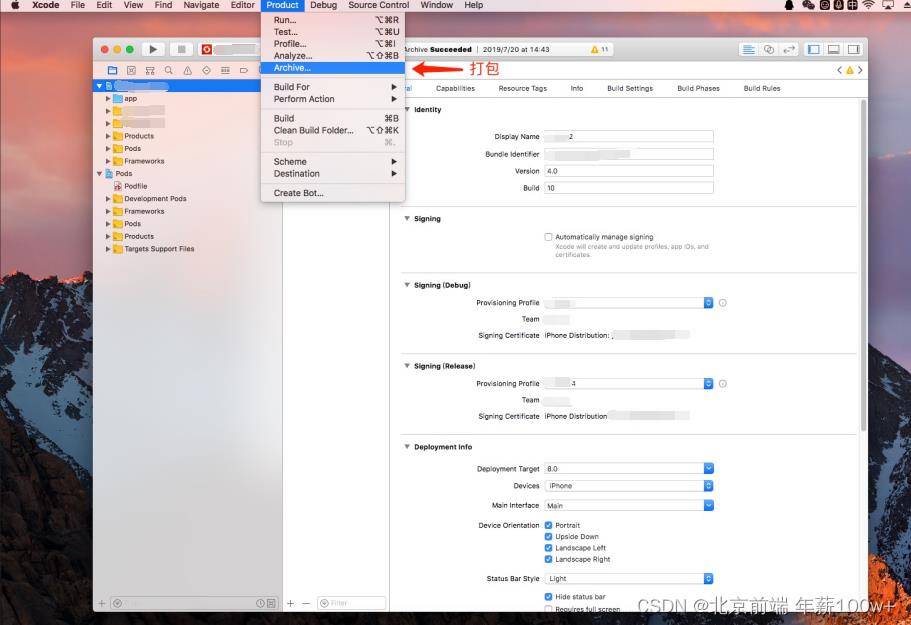
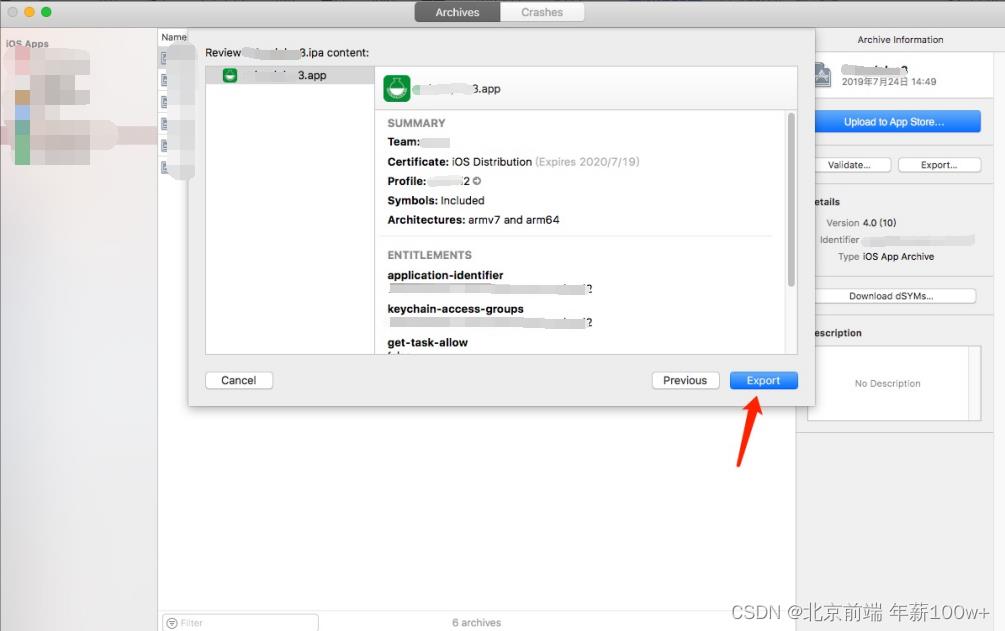
打包
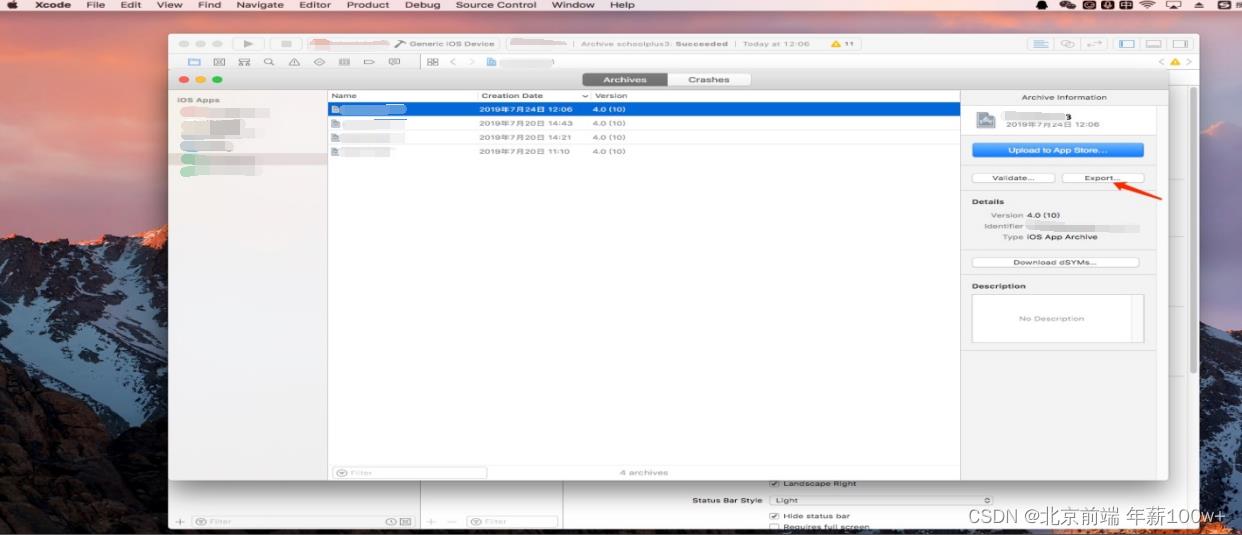
导出
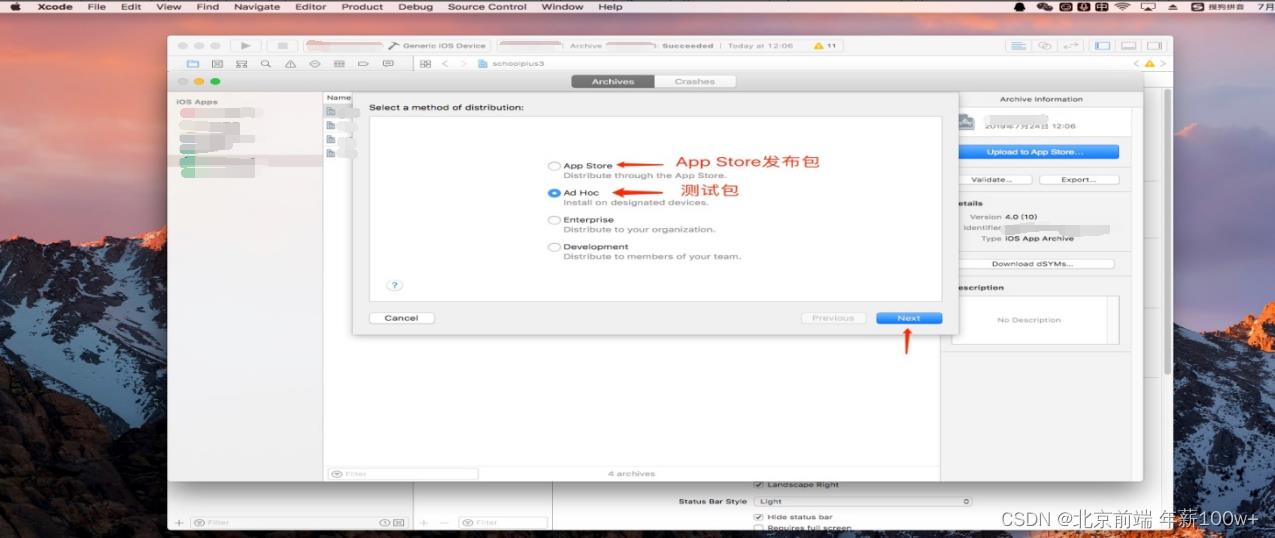
这里我们选择打一个测试包(打正式包则选择app store)
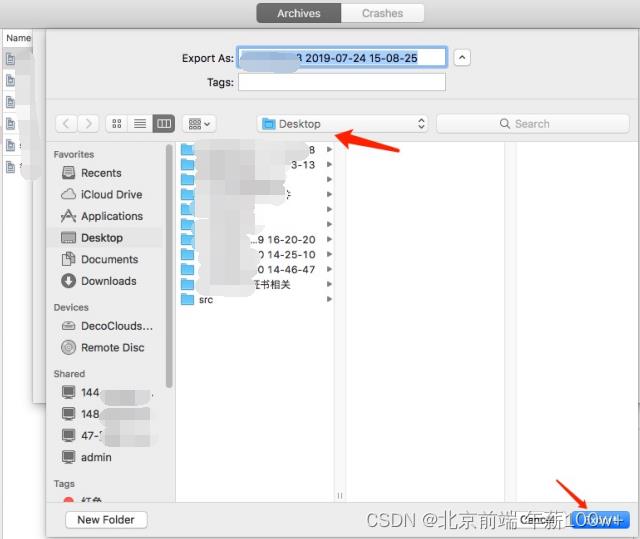
导出到桌面

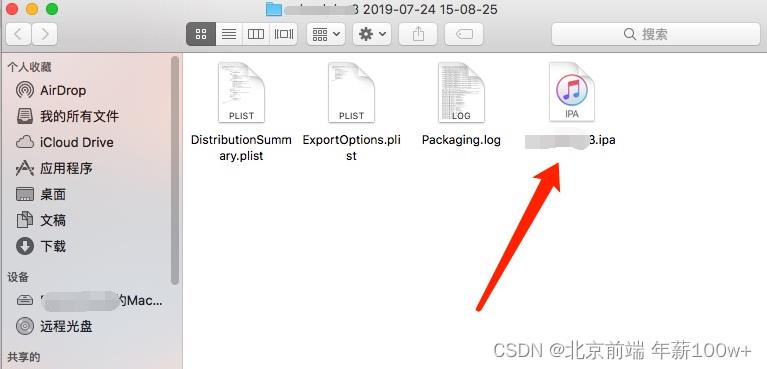
成功打包出ipa包
六、安装到手机
因为苹果ipa无法直接安装ipa,我们找一个第三方安装助手即可
这里我们用爱思助手
下载爱思助手下载
连接手机到电脑

安装

安装成功即可
完成!
总结
每个新手都被各种配置、证书、打包和发布等事情折腾,以及后面iOS包审核。众所周知,苹果App Store规定非常严格,不过过程虽然复杂,但是在过程中我们确实能学习到很多,也能磨砺耐心。
✨原 创 不 易 , 还 希 望 各 位 支 持
👍 点 赞 , 你 的 认 可 是 我 创 作 的 动 力 !
⭐️ 收 藏 , 你 的 青 睐 是 我 努 力 的 方 向 !
✏️ 评 论 , 你 的 意 见 是 我 进 步 的 财 富 !
以上是关于实战篇最详细的Rollup打包项目教程的主要内容,如果未能解决你的问题,请参考以下文章
vite3+vue3 项目打包优化实战之-视图分析(rollup-plugin-visualizer)CDN引入依赖分包gzip压缩history404问题