Spring我抄袭了Spring,手写一套MySpring框架。。。
Posted 掉头发的王富贵
tags:
篇首语:本文由小常识网(cha138.com)小编为大家整理,主要介绍了Spring我抄袭了Spring,手写一套MySpring框架。。。相关的知识,希望对你有一定的参考价值。
这篇博客实现了一个简单版本的Spring,主要包括Spring的Ioc和Aop功能
文章目录
- 这篇博客实现了一个简单版本的Spring,主要包括Spring的Ioc和Aop功能
🚀@ComponentScan注解
ComponentScan做的事情就是告诉Spring从哪里找到bean
@Retention(RetentionPolicy.RUNTIME)
@Target(ElementType.TYPE)
public @interface ComponentScan

	String[] value() default ;
✈️@Component注解
@Component是spring中的一个注解,它的作用就是实现bean的注入
@Target(ElementType.TYPE)
@Retention(RetentionPolicy.RUNTIME)
public @interface Component

	String value() default "";
🚁在spring中ioc容器的类是ApplicationContext
所以我们需要创建一个ApplicationContext,有参构造传入config的class
public class ApplicationContext

    public ApplicationContext(Class configClass)
存放bean的map
public class ApplicationContext

 	private final Map<String, Object> singletonObjects = new ConcurrentHashMap<>(256);

    public ApplicationContext(Class configClass)
拿到ComponentScan的值
public class ApplicationContext

    private final Map<String, Object> singletonObjects = new ConcurrentHashMap<>(256);


    public ApplicationContext(Class configClass)
        //查看是否有ComponentScan注解
        if (configClass.isAnnotationPresent(ComponentScan.class))
            ComponentScan componentScanAnnotation = (ComponentScan) configClass.getAnnotation(ComponentScan.class);
            String[] paths = componentScanAnnotation.value();
拿到该路径下所有的class文件
public class ApplicationContext

    private final Map<String, Object> singletonObjects = new ConcurrentHashMap<>(256);


    public ApplicationContext(Class configClass)
        //查看是否有ComponentScan注解
        if (configClass.isAnnotationPresent(ComponentScan.class))
            ComponentScan componentScanAnnotation = (ComponentScan) configClass.getAnnotation(ComponentScan.class);
            String[] paths = componentScanAnnotation.value();
            for (String path : paths)

                //拿到包路径
                ClassLoader classLoader = ApplicationContext.class.getClassLoader();
                URL resource = classLoader.getResource(path.replace(".", "/"));
                //拿到该路径下所有的class文件
                File file = new File(resource.getFile());
                if (file.isDirectory())
                    File[] files = file.listFiles();
                    for (File f : files)
注册有Component注解的bean
public class ApplicationContext

    private final Map<String, Object> singletonObjects = new ConcurrentHashMap<>(256);


    public ApplicationContext(Class configClass)
        //查看是否有ComponentScan注解
        if (configClass.isAnnotationPresent(ComponentScan.class))
            ComponentScan componentScanAnnotation = (ComponentScan) configClass.getAnnotation(ComponentScan.class);
            String[] paths = componentScanAnnotation.value();
            for (String path : paths)

                //拿到包路径
                ClassLoader classLoader = ApplicationContext.class.getClassLoader();
                URL resource = classLoader.getResource(path.replace(".", "/"));
                //拿到该路径下所有的class文件
                File file = new File(resource.getFile());
                if (file.isDirectory())
                    File[] files = file.listFiles();
                    for (File f : files)
                        try
                            String filePath = f.getPath();
                            //拿到com.masiyi.service.MySpringConfig
                            String sub = filePath.substring(filePath.indexOf("com"), filePath.indexOf(".class"));
                            String classes = sub.replace("\\\\", ".");
                            Class<?> aClass = classLoader.loadClass(classes);
                            //注册有Component注解的bean
                            if (aClass.isAnnotationPresent(Component.class))
                                Object bean = aClass.getDeclaredConstructor().newInstance();
                                Component component = aClass.getAnnotation(Component.class);
                                String beanName = component.value();
                                if ("".equals(beanName) || beanName == null)
                                    singletonObjects.put(f.getName().split("\\\\.")[0], bean);
                                 else
                                    singletonObjects.put(beanName, bean);


                         catch (ClassNotFoundException | InvocationTargetException | InstantiationException | IllegalAccessException | NoSuchMethodException e)
                            e.printStackTrace();
🚂测试类
现在我们最基础的spring的ioc已经基本实现了,我们新建一个测试类来测试
public class Test
    public static void main(String[] args)
        ApplicationContext applicationContext = new ApplicationContext(MySpringConfig.class);
🚊MySpringConfig类,统一的配置类
@ComponentScan("com.masiyi.service")
public class MySpringConfig
🚞OrderService类,一个普通的bean
@Component
public class OrderService
🚲来测试一下功能
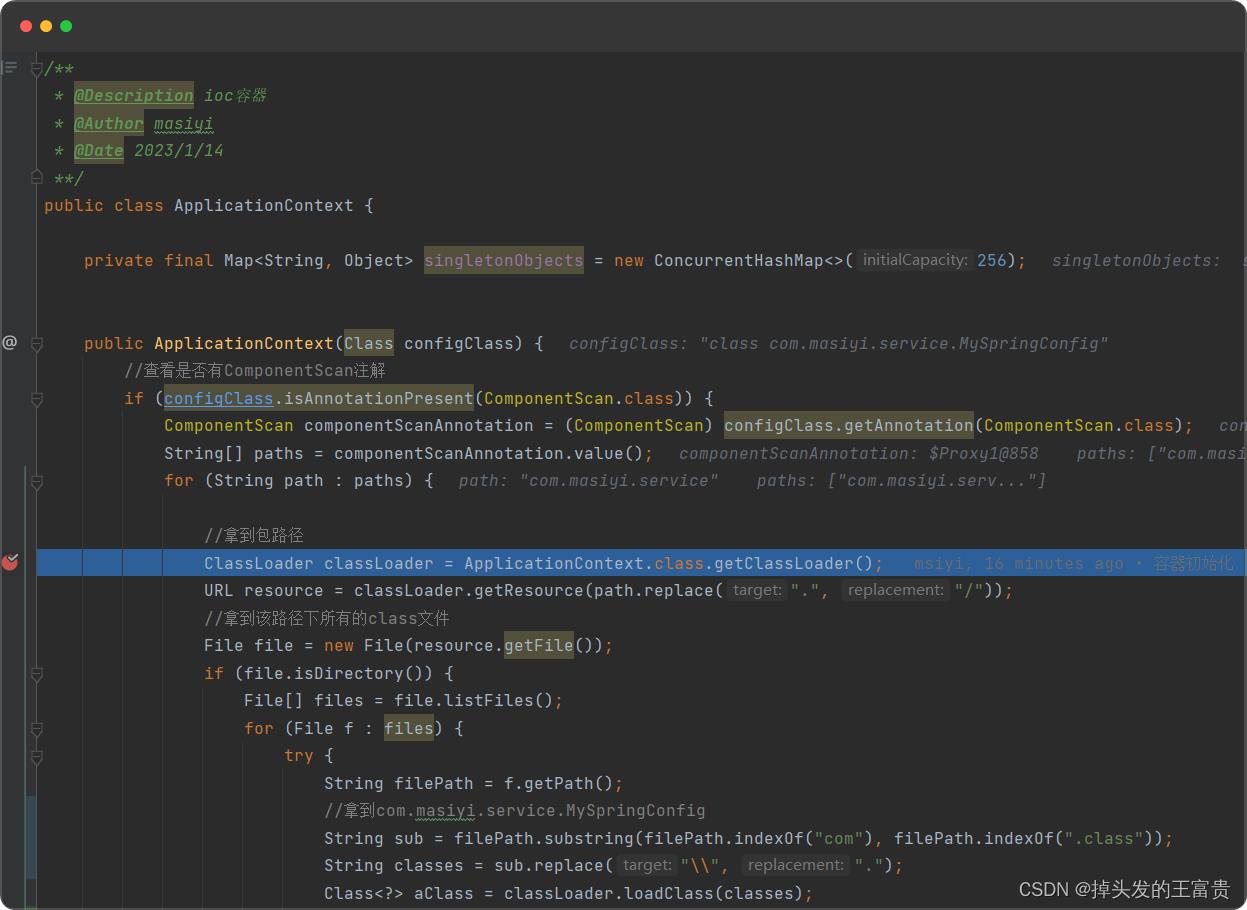
拿到包路径
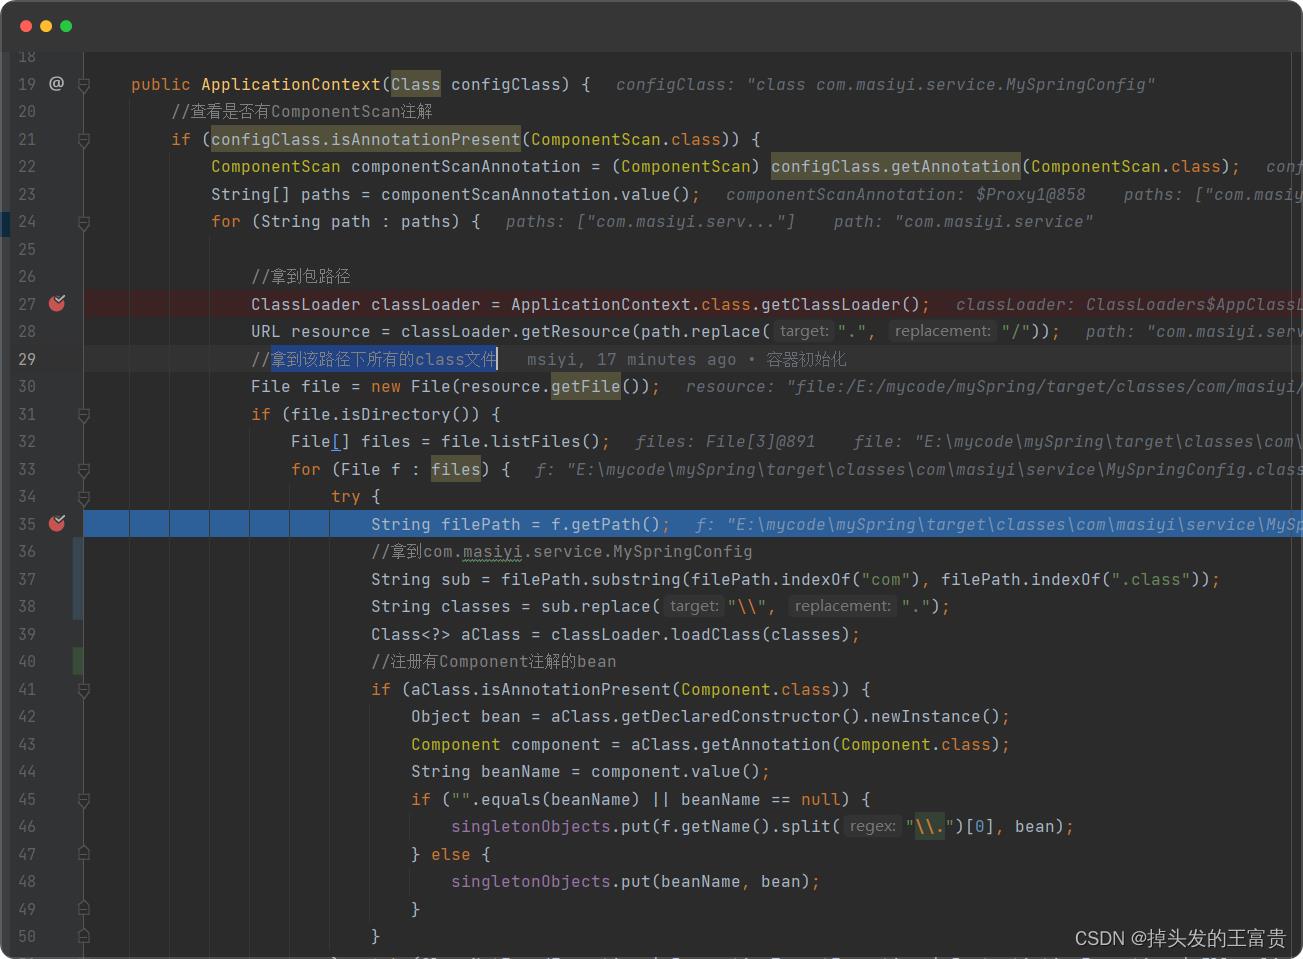
拿到该路径下所有的class文件
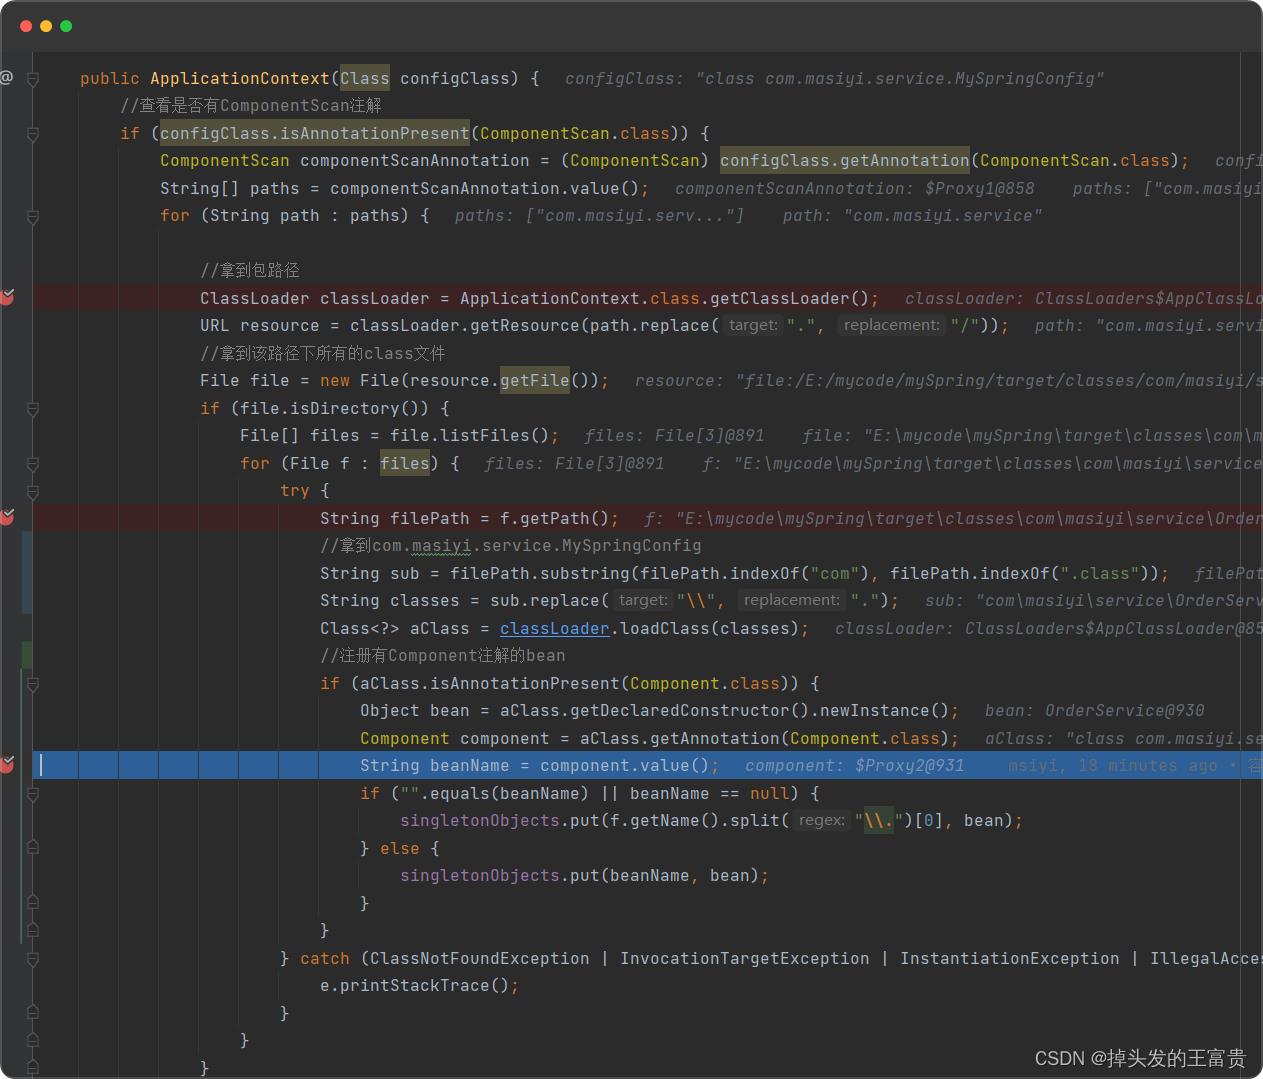
注册有Component注解的bean
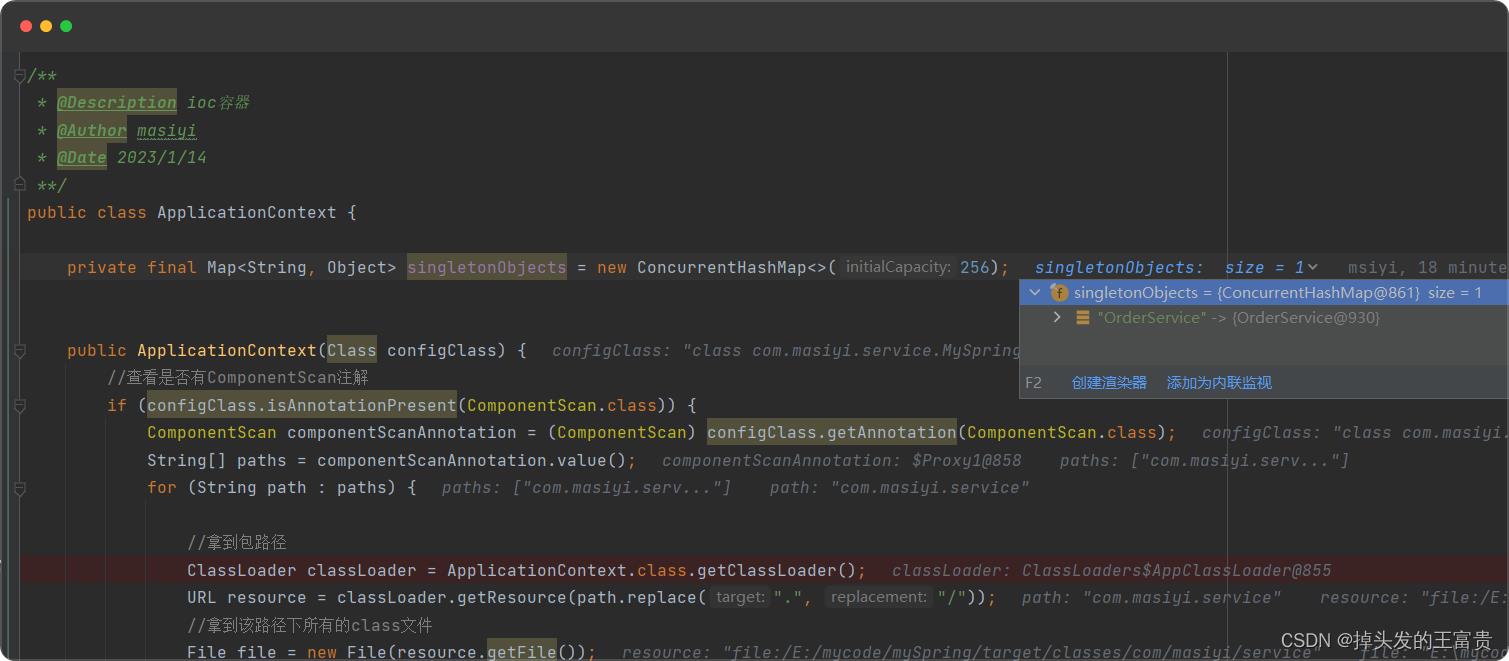
注册进ioc
getBean方法
  public Object getBean(String beanName)
        return this.singletonObjects.get(beanName);
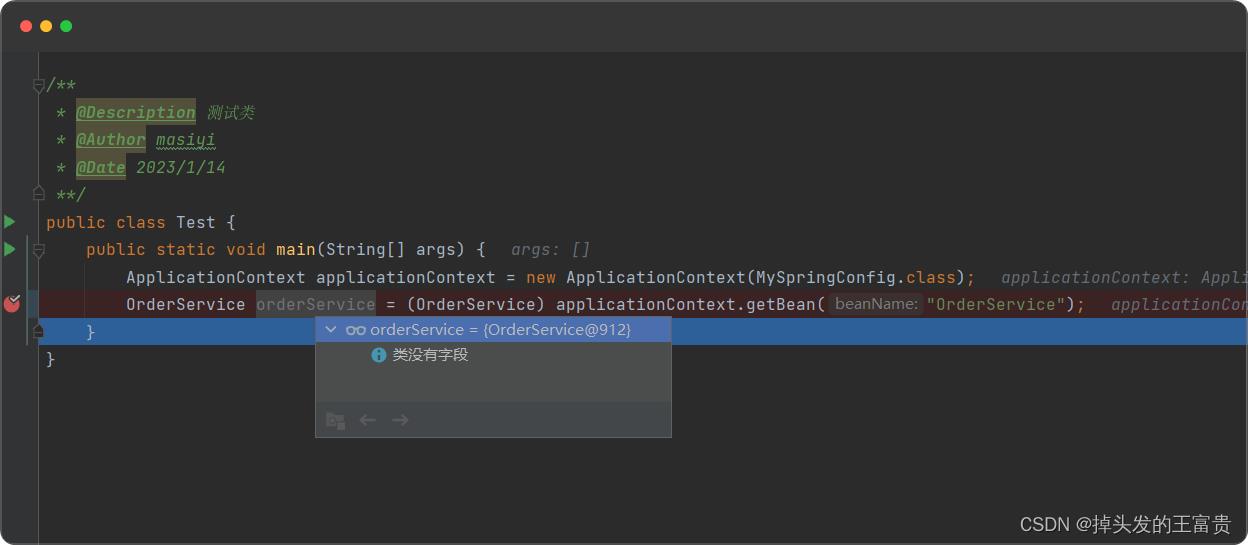
🚡@Scope注解
@Scope注解是 Spring IOC 容器中的一个作用域
🚟BeanDefinition 类
BeanDefinition 是定义 Bean 的配置元信息接口,可以理解为创建bean过程中的一个中间类,扩展bean,存储更多的信息
public class BeanDefinition
    private String scope;
    private Class aClass;

    public String getScope()
        return scope;


    public void setScope(String scope)
        this.scope = scope;


    public Class getaClass()
        return aClass;


    public void setaClass(Class aClass)
        this.aClass = aClass;
🚠要实现我们的@scope注解,我们需要改造一下我们的代码
把createBean方法抽离出来
  private void createBean(String beanName,Class<?> aClass)
        //注册有Component注解的bean
        if (aClass.isAnnotationPresent(Component.class))

            Component component = aClass.getAnnotation(Component.class);
            BeanDefinition beanDefinition = new BeanDefinition();
            if (aClass.isAnnotationPresent(Scope.class))
                Scope scope = aClass.getAnnotation(Scope.class);
                beanDefinition.setScope(scope.value());
             else
                beanDefinition.setScope("singleton");

            beanDefinition.setaClass(aClass);

            String value = component.value();
            if ("".equals(value))
                beanDefinitionMap.put(beanName, beanDefinition);
             else
                beanDefinitionMap.put(value, beanDefinition);
扫描ComponentScan注解的方法体改一下
🚜然后我们从beanDefinitionMap中实例化bean
        //将bean实例化到一级缓存中
        for (String beanName : beanDefinitionMap.keySet())
            BeanDefinition beanDefinition = beanDefinitionMap.get(beanName);
            //单例
            if ("singleton".equals(beanDefinition.getScope()))
                try
                    Object bean = beanDefinition.getaClass().getDeclaredConstructor().newInstance();
                    singletonObjects.put(beanName, bean);
                 catch (Exception e)
                    e.printStackTrace();
getBean方法也需要改造
public Object getBean(String beanName)
        BeanDefinition beanDefinition = this.beanDefinitionMap.get(beanName);
        if (beanDefinition == null)
            throw new NullPointerException();

        if ("singleton".equals(beanDefinition.getScope()))
            //如果是单例,直接返回缓存里的bean
            return this.singletonObjects.get(beanName);
         else
            try
                //如果是多例,直接返回新的bean
                return beanDefinition.getaClass().getDeclaredConstructor().newInstance();
             catch (Exception e)
                e.printStackTrace();


        return null;
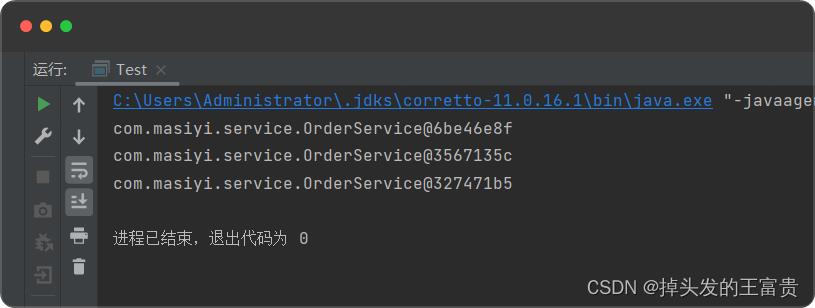
🚙我们来看一下效果

这是没有加scope注解

返回的bean都是一个对象
我们给bean加上scope注解

返回来的bean每个都不一样
🚘@Autowired注解
spring中实现依赖注入的注解
@Target(ElementType.CONSTRUCTOR, ElementType.METHOD, ElementType.PARAMETER, ElementType.FIELD, ElementType.ANNOTATION_TYPE)
@Retention(RetentionPolicy.RUNTIME)
public @interface Autowired
🚗UserService类,orderservice注入该类
@Component("userService")
public class UserService
@Component
public class OrderService
    @Autowired
    private UserService userService;


    public UserService getUserService()
        return userService;
🚗要使@Autowired注解生效,将bean实例化到一级缓存中方法需要改造一下
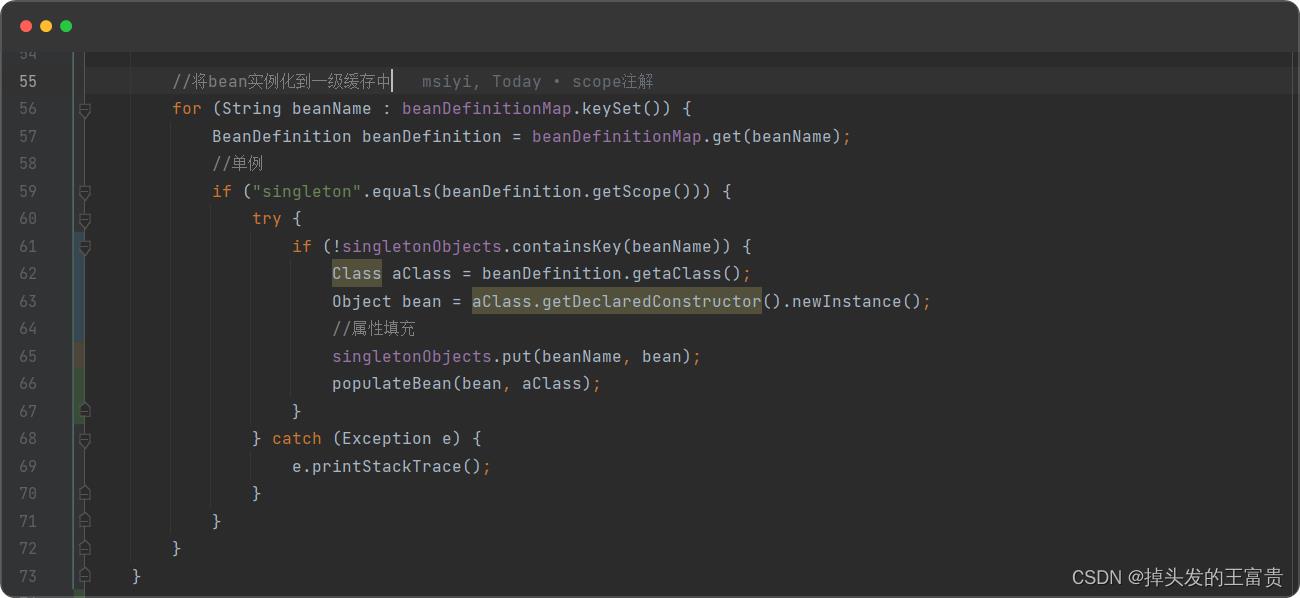
新增populateBean方法,用来初始bean
    private void populateBean(Object bean, Class aClass)
        Field[] declaredFields = aClass.getDeclaredFields();
        for (Field declaredField : declaredFields)
            if (declaredField.isAnnotationPresent(Autowired.class))
                declaredField.setAccessible(true);
                try
                    declaredField.set(bean, getBean(declaredField.getName()));
                 catch (IllegalAccessException e)
                    e.printStackTrace();
getBean方法也需要改造一下
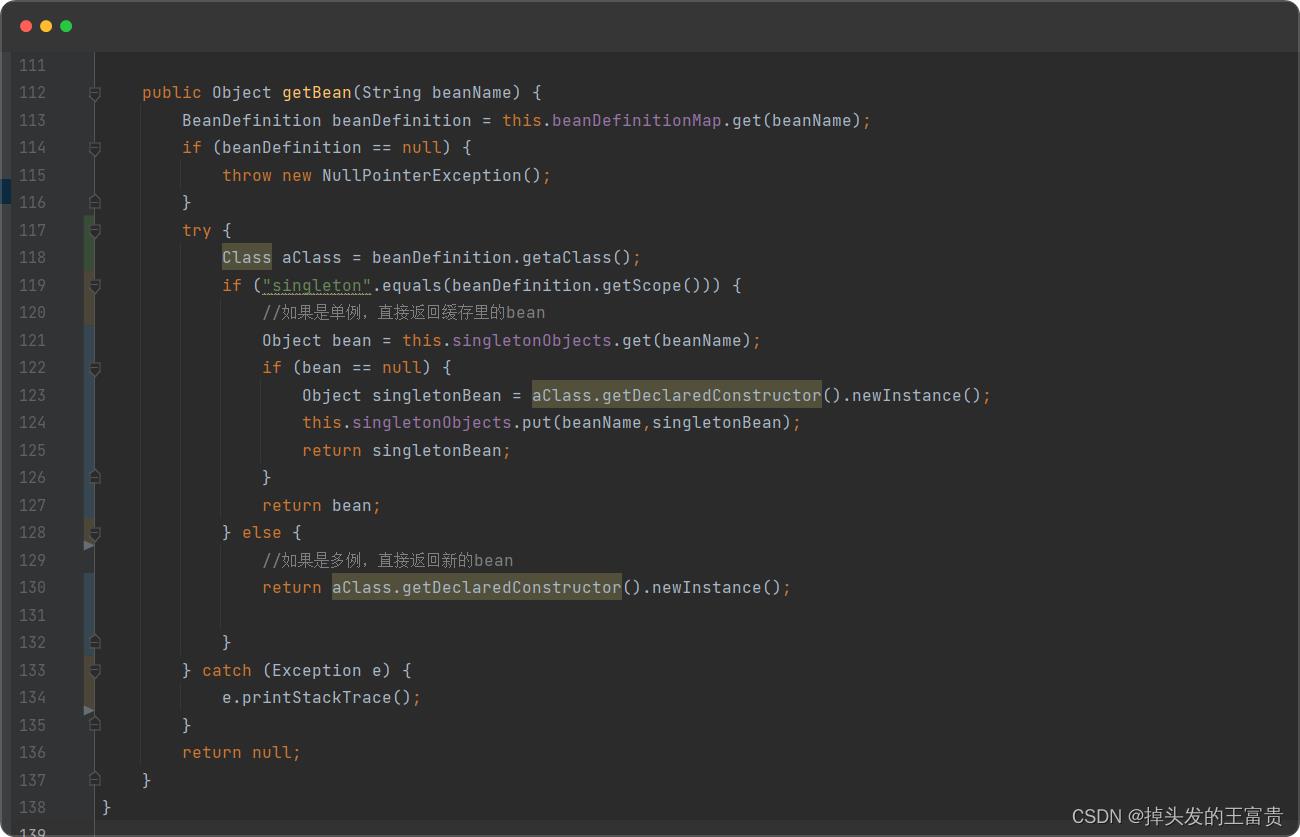
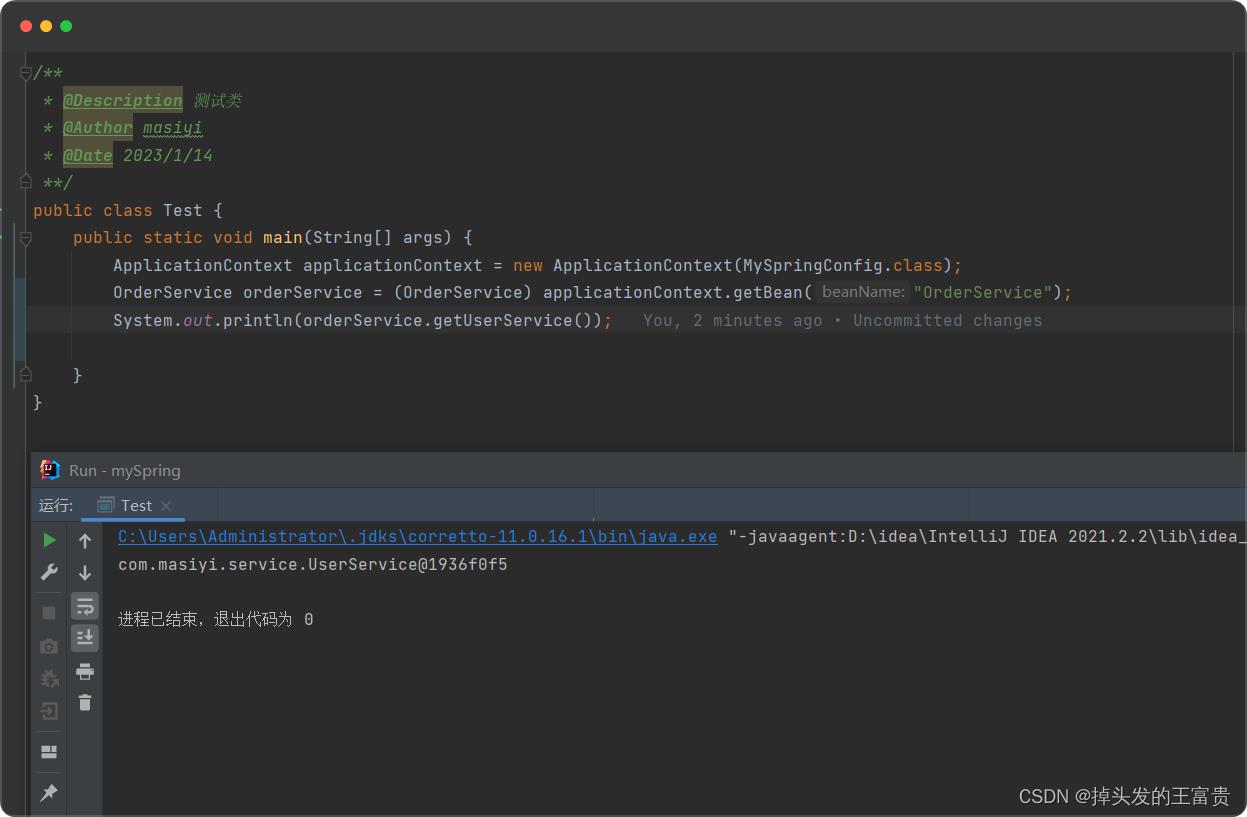
这样我们的orderservice里面的userservice就有值了
🚕BeanPostProcessor接口
该接口在显示调用初始化方法的前后添加我们自己的逻辑
public interface BeanPostProcessor
    /**
     * 之前
     * @param bean
     * @param beanName
     * @return
     */
    default Object postProcessBeforeInitialization(Object bean, String beanName)
        return bean;


    /**
     * 之后
     * @param bean
     * @param beanName
     * @return
     */
    default Object postProcessAfterInitialization(Object bean, String beanName)
        return bean;
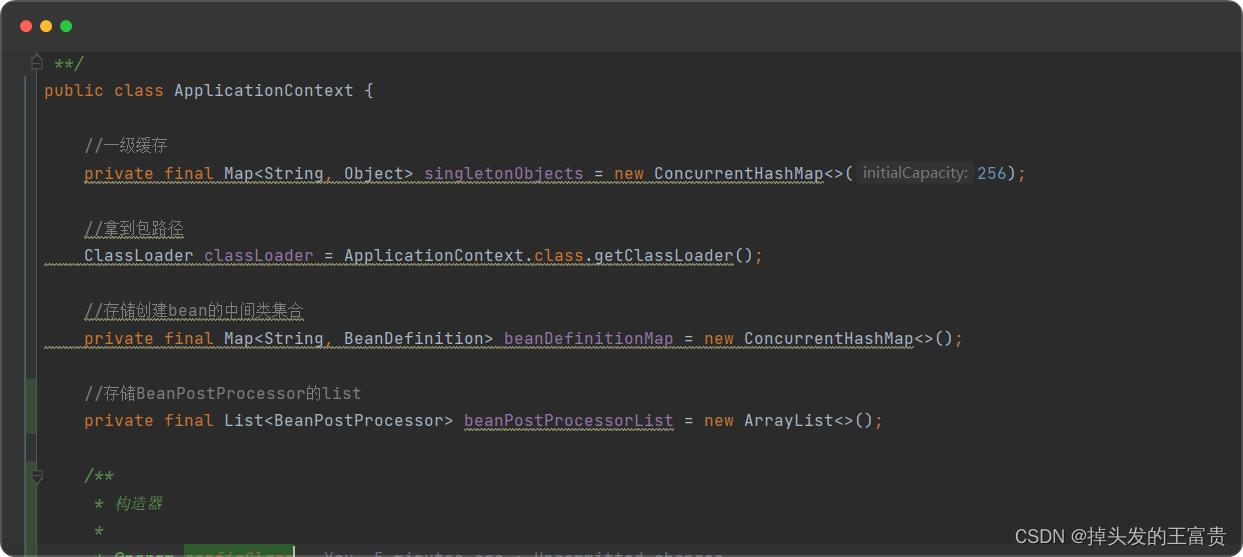
我们创建存储BeanPostProcessor的list
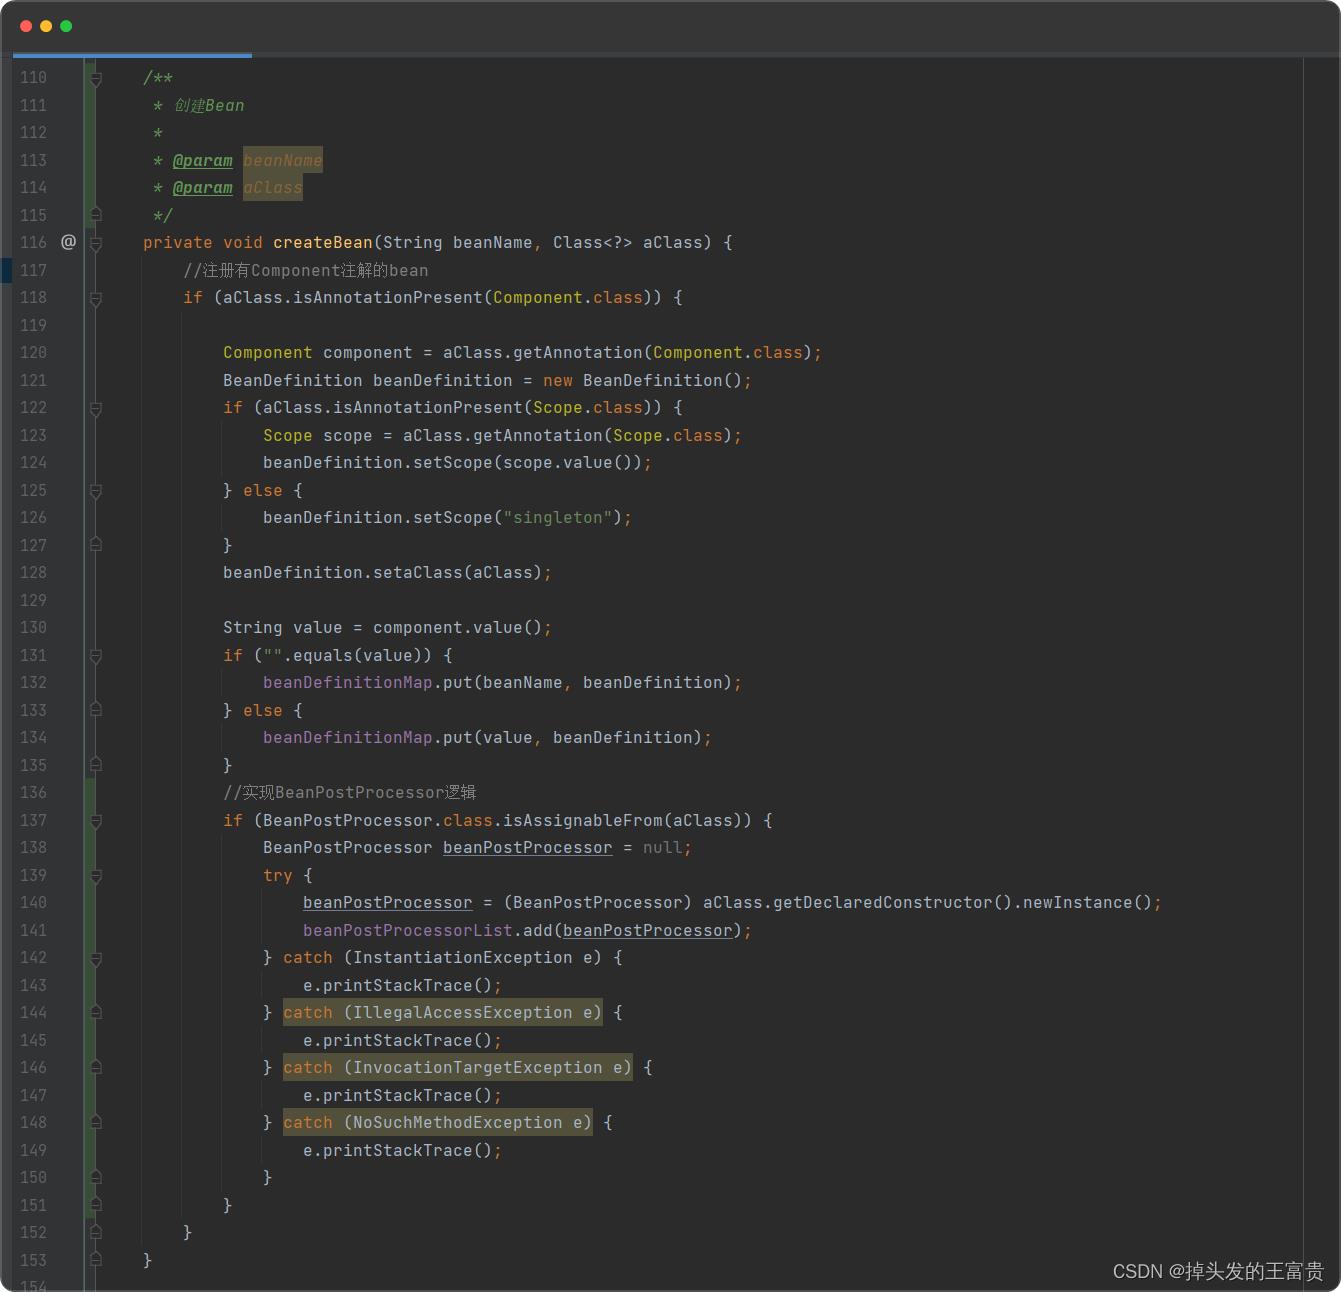
在扫描的时候添加BeanPostProcessor
🚖添加自己的BeanPostProcessor
@Component
public class OrderPostProcessor implements BeanPostProcessor
    /**
     * 之前
     *
     * @param bean
     * @param beanName
     * @return
     */
    @Override
    public Object postProcessBeforeInitialization(Object bean, String beanName)
        System.out.println(beanName+"执行前");
        return BeanPostProcessor.super.postProcessBeforeInitialization(bean, beanName);


    /**
     * 之后
     *
     * @param bean
     * @param beanName
     * @return
     */
    @Override
    public Object postProcessAfterInitialization(Object bean, String beanName)
        System.out.println(beanName+"执行后");
        return BeanPostProcessor.super.postProcessAfterInitialization(bean, beanName);
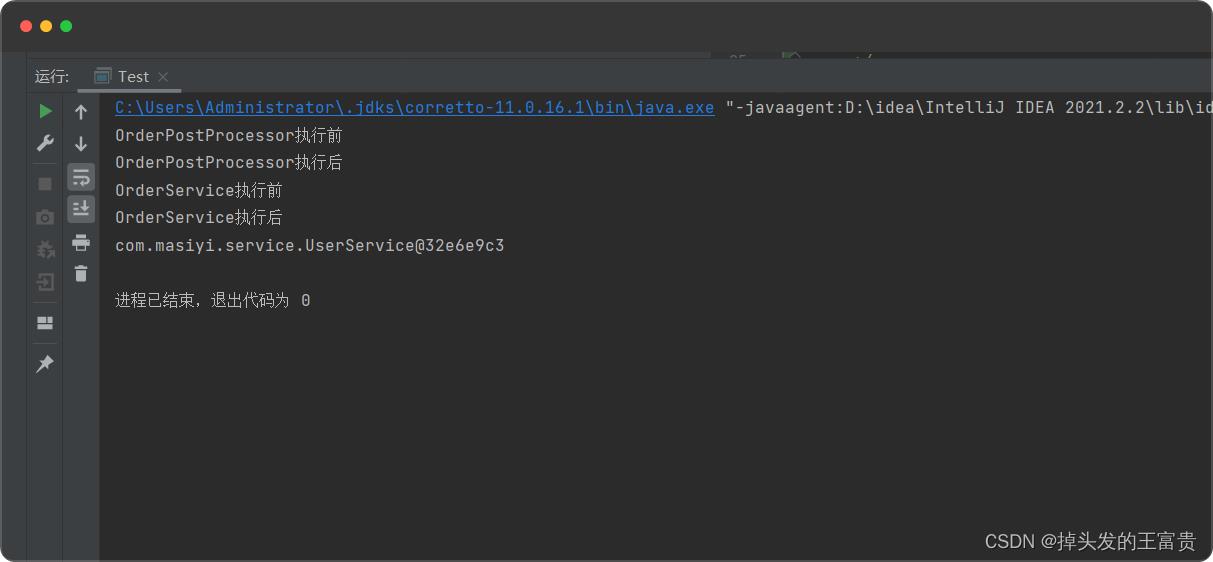
实例化的时候执行BeanPostProcessor逻辑
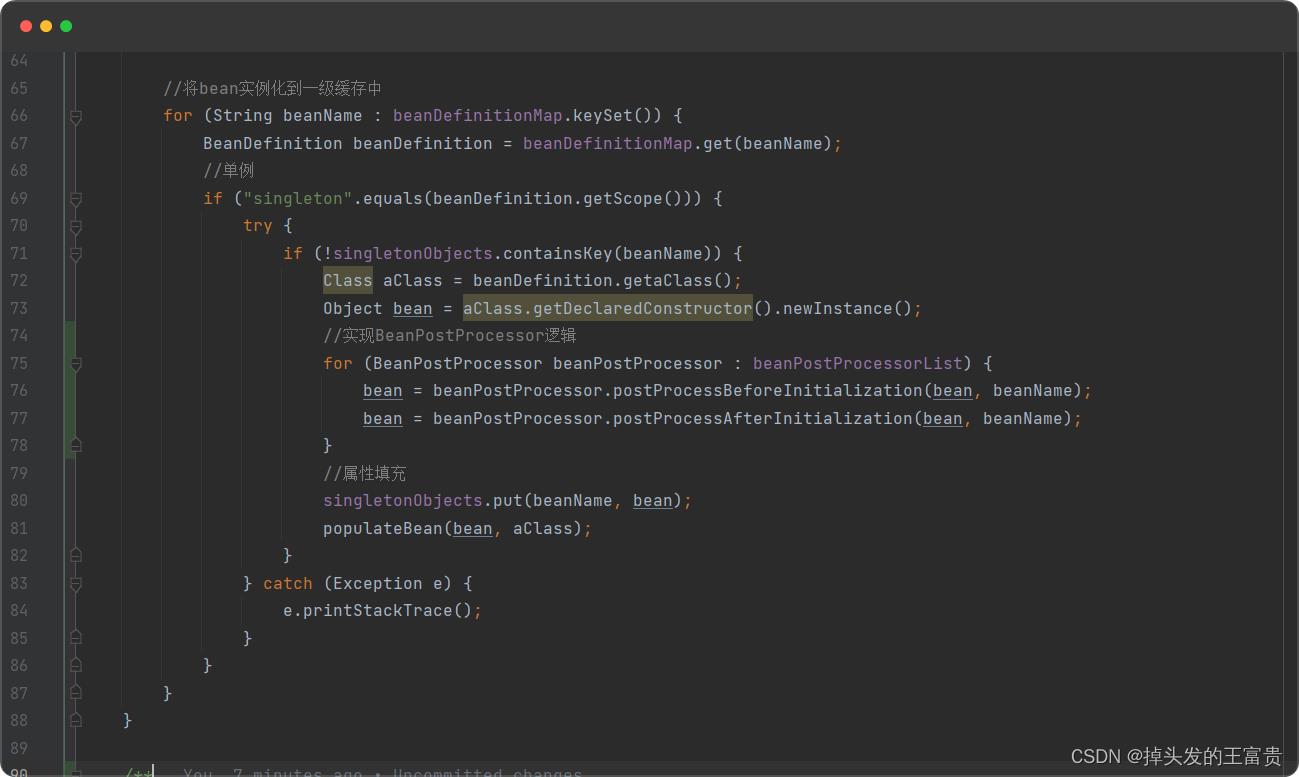
运行结果
🚛Aop
jdk的动态代理是基于接口生成的代理对象
public interface OrderInterface
void test();
我居然手写了Spring框架
手写完了
刚参加工作那会接触java还是用的struct的时代,后面在SSH火爆时代的时候我转战.net,多年之后公司转java技术栈已经是Spring的天下,源码嚼了很多遍于是很想尝试把这套东西用在.net平台上。社区有个Spring.net项目已经多年不维护了,而且还是xml配置模式非基于注解的,无法与现有的SpringBoot项目同日而语。在SpringBoot项目中的常用的注解和扩展机制我都在这个项目中实现了,可以看下面介绍的已实现的功能一览!
Annotation是注解的意思,在java项目里面 注解的概念和 csharp里面的 Attribute 的概念是一样的。
本项目是基于Autofac(巨人的肩膀)的基础之上构建,选择用Autofac是它扩展性非常好,在实现Spring的细节上提供了便捷
本项目的所有实现都参考Spring的设计思想,但是并不是纯粹的把java的代码换成csharp,功能上效果是和Spring看齐的,但代码实现上是自己实现的
本项目的目的
基于参考 Java的 Spring注解方式开发思想,
所有容器的注册 和 装配 都是依赖标签来完成。
这样一来 一方面很容易分清楚 哪些是DI 哪些非DI, 哪些是拦截器,哪些需要拦截器,轻松实现切面编程,
代码也好看,吸收java的spring框架的优越的地方,配合.net语法的优越性,编程效率能够大大提升。
本篇文章主要介绍高阶玩法,基础玩法可以看项目wiki
开源地址:https://github.com/yuzd/Autofac.Annotation
支持的标签一览
标签名称 使用位置 使用说明 AutoConfiguration 打在class上面 自动装配class里面带有Bean标签的方法 Bean 打在方法上面 配合AutoConfiguration标签使用 Component 打在class上面 自动注册 Autowired 打在构造方法的Parameter,类的Property,类的Field 自动装配 PropertySource 打在class上面 配合Value标签使用,设置Value的数据源,支持json,xml,支持资源内嵌 Value 打在构造方法的Parameter,类的Property,类的Field 静态/动态(例如nacos)数据装配,支持强大的EL表达式 Pointcut 打在class上面 切面配置,一个切面拦截N多个对象,配合Before After AfterReturn AfterThrows Around 实现拦截器链 Import 打在继承了ImportSelector的class上面 扩展注册Component Order 打在了class上面,和Compoment一起使用 值越小的越先加载 Conditional 打在class或者方法上面 条件加载,自定义实现的 ConditionOnBean 打在标有Bean注解的方法上面 条件加载 ConditionOnMissingBean 打在标有Bean注解的方法上面 条件加载 ConditionOnClass 打在class或者方法上面 条件加载 ConditionOnMissingClass 打在class或者方法上面 条件加载 ConditionOnProperty 打在class或者方法上面 条件加载 ConditionOnProperties 打在class或者方法上面 条件加载 PostConstruct 打在方法上面 当类初始化完成后调用 PreDestory 打在方法上面 当容器Dispose前调用
基本使用略过
基本使用可以参考详细的wiki文档:
Wiki
下面讲讲高阶玩法
1. 拦截器原理简单介绍
用了Castle.Core组件 把你想要实现拦截器的目标类生成一个代理类。
然后织入拦截器,有2种方式
类拦截器:class + 方法为virtual的方式
这种方式需要 从容器中是根据一个classType来获取到目标实例
接口型拦截器:interface + 方法重写的方式
这种方式需要 从容器中是根据一个interfaceType来获取到目标实例
拦截器开关
在你想要实现拦截的目标类上打开开关 【[Component(EnableAspect = true)]】,如上面的解释,打开Aspect开关标识这个class你想要走代理包装,还可以根据InterceptorType属性值设定你是哪种方式的拦截器
InterceptorType属性 解释 Class 使用class的虚方法模式 【默认方式】 Interface 使用接口模式
目的是打个标签就能够拦截目标方法
使得我们自定义的方法能够
在指定的目标方法执行之前先执行(比如参数校验)
或者在指定的目标方法执行之后执行(比如说检验返回值,或其他收尾工作)
或者环绕目标的方法,比如日志or事务:TransactionScope或者记录方法执行的时间或者日志
拦截器标签 拦截器类型 使用说明 AspectArround(抽象标签类) 环绕拦截 重写OnInvocation方法 AspectBefore(抽象标签类) 前置拦截器 重写Before方法 AspectAfter(抽象标签类) 后置拦截器(不管目标方法成功失败都会执行) 重写After方法 AspectAfterReturn(抽象标签类) 后置拦截器(只有目标方法成功才会执行) 重写AfterReturn方法 AspectAfterThrows(抽象标签类) 错误拦截器(只有目标方法失败才会执行) 重写AfterThrows方法
每个拦截器方法都有一个
拦截器的方法参数 AspectContext 属性说明
名称 说明 ComponentContext DI容器,可以从中取得你已注册的实例 Arguments 目标方法的参数 TargetMethod 目标方法的MethodInfo ReturnValue 目标方法的返回 Method 目标方法的代理方法MethodInfo
前置拦截器 (Before)
首先要自己写一个类继承 前置拦截器AspectBefore(抽象标签类)
实现该抽象类的Before方法
public class TestHelloBefore:AspectBefore
{
public override Task Before(AspectContext aspectContext)
{
Console.WriteLine("TestHelloBefore");
return Task.CompletedTask;
}
}
[Component(EnableAspect = true)]//注意这里需要打开开关 否则无效
public class TestHello
{
[TestHelloBefore]
public virtual void Say()
{
Console.WriteLine("Say");
}
}
前置拦截器方法的执行顺序为:先执行 TestHelloBefor的Before方法再执行你的Say方法
后置拦截器 (After) 不管目标方法成功还是抛异常都会执行
首先要自己写一个类继承后置拦截器AspectAfter(抽象标签类)
实现该抽象类的After方法
public class TestHelloAfter:AspectAfter
{
//这个 returnValue 如果目标方法正常返回的话 那就是目标方法的返回值
// 如果目标方法抛异常的话 那就是异常本身
public override Task After(AspectContext aspectContext,object returnValue)
{
Console.WriteLine("TestHelloAfter");
return Task.CompletedTask;
}
}
[Component(EnableAspect = true)]
public class TestHello
{
[TestHelloAfter]
public virtual void Say()
{
Console.WriteLine("Say");
}
}
执行顺序为:先执行你的SayAfter方法再执行 TestHelloAfter的After方法
这里要特别注意的是 After 拦截器 是不管你的目标方法(SayAfter是成功还是抛异常)
都被会执行到的
成功返回拦截器 (AfterReturn)只有目标方法成功的时候才会执行
首先要自己写一个类继承拦截器AspectReturn(抽象标签类)
实现该抽象类的After方法
public class TestHelloAfterReturn:AspectAfterReturn
{
//result 是目标方法的返回 (如果目标方法是void 则为null)
public override Task AfterReturn(AspectContext aspectContext, object result)
{
Console.WriteLine("TestHelloAfterReturn");
return Task.CompletedTask;
}
}
[Component(EnableAspect = true)]
public class TestHello
{
[TestHelloAfterReturn]
public virtual void Say()
{
Console.WriteLine("Say");
}
}
执行顺序为:先执行你的Say方法再执行 TestHelloAfterReturn的AfterReturn方法
如果你的Say方法抛出异常那么就不会执行TestHelloAfterReturn的AfterReturn方法
异常拦截器 (AfterThrows)
首先要自己写一个类继承拦截器AspectReturn(抽象标签类)
实现该抽象类的After方法
public class TestHelloAfterThrows:AspectAfterThrows
{
public override Task AfterThrows(AspectContext aspectContext, Exception exception)
{
Console.WriteLine(exception.Message);
return Task.CompletedTask;
}
}
[Component(EnableAspect = true)]
public class TestHello
{
[TestHelloAfterThrows]
public virtual void Say()
{
Console.WriteLine("Say");
throw new ArgumentException("exception");
}
}
执行顺序为:先执行你的Say方法再执行 TestHelloAfterThrows的AfterThrows方法
如果你的Say方法不抛出异常那么就不会执行 TestHelloAfterThrows的AfterThrows方法
环绕拦截器(Around)
注意:OnInvocation方法除了AspectContext参数以外 还有一个 AspectDelegate _next 参数,
需要在你的Around拦截器方法显示调用 _next(aspectContext) 方法,否则目标方法不会被调用
首先要自己写一个类继承拦截器AspectArround(抽象标签类)
实现该抽象类的OnInvocation方法
public class TestHelloAround:AspectArround
{
public override async Task OnInvocation(AspectContext aspectContext, AspectDelegate _next)
{
Console.WriteLine("around start");
await _next(aspectContext);
Console.WriteLine("around end");
}
}
[Component(EnableAspect = true)]
public class TestHello
{
[TestHelloAround]
public virtual void Say()
{
Console.WriteLine("Say");
}
}
方法的执行顺序为:
先执行TestHelloAround的OnInvocation方法
然后TestHelloAround的OnInvocation方法里面执行的 await _next(aspectContext); 就会执行被拦截方法TestHello的Say方法;
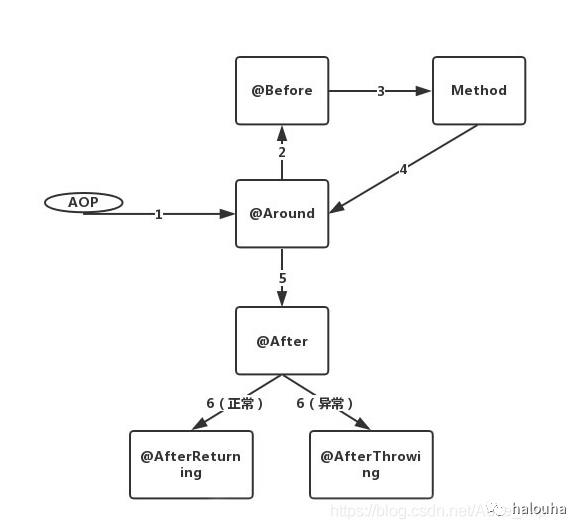
如果Around Befor After AfterReturn AfterThrows 一起用
正常case
[Component(EnableAspect = true)]
public class TestHello
{
[TestHelloAround,TestHelloBefore,TestHelloAfter,TestHelloAfterReturn,TestHelloAfterThrows]
public virtual void Say()
{
Console.WriteLine("Say");
}
}
代码的执行顺序为:
先执行TestHelloAround,打印 “around start” 然后执行到里面的_next(aspectContext)会触发下面
执行TestHelloBefore 打印 “TestHelloBefore”
执行目标方法 打印 “Say”
打印 “around end” TestHelloAround运行结束
执行TestHelloAfter 打印 “TestHelloAfter”
因为是目标方法成功执行 TestHelloAfterReturn 打印 “TestHelloAfterReturn”
由于是目标方法成功返回 没有异常,所以不会走进TestHelloAfterThrows
异常case
[Component(EnableAspect = true)]
public class TestHello
{
[TestHelloAround,TestHelloBefore,TestHelloAfter,TestHelloAfterReturn,TestHelloAfterThrows]
public virtual void Say()
{
Console.WriteLine("Say");
throw new ArgumentException("exception");
}
}
代码的执行顺序为:
先执行TestHelloAround,打印 “around start” 然后执行到里面的_next(aspectContext)会触发下面
执行TestHelloBefore 打印 “TestHelloBefore”
执行目标方法 打印 “Say”
打印 “around end” TestHelloAround运行结束
执行TestHelloAfter 打印 “TestHelloAfter”
因为是目标方法异常 执行 TestHelloAfterThrows 打印异常信息
如上述执行顺序和spring是一致的
多组的情况
public class TestHelloBefore1:AspectBefore
{
public override Task Before(AspectContext aspectContext)
{
Console.WriteLine("TestHelloBefore1");
return Task.CompletedTask;
}
}
public class TestHelloAfter1:AspectAfter
{
//这个 returnValue 如果目标方法正常返回的话 那就是目标方法的返回值
// 如果目标方法抛异常的话 那就是异常本身
public override Task After(AspectContext aspectContext,object returnValue)
{
Console.WriteLine("TestHelloAfter1");
return Task.CompletedTask;
}
}
public class TestHelloAfterReturn1:AspectAfterReturn
{
//result 是目标方法的返回 (如果目标方法是void 则为null)
public override Task AfterReturn(AspectContext aspectContext, object result)
{
Console.WriteLine("TestHelloAfterReturn1");
return Task.CompletedTask;
}
}
public class TestHelloAround1:AspectArround
{
public override async Task OnInvocation(AspectContext aspectContext, AspectDelegate _next)
{
Console.WriteLine("TestHelloAround1 start");
await _next(aspectContext);
Console.WriteLine("TestHelloAround1 end");
}
}
public class TestHelloAfterThrows1:AspectAfterThrows
{
public override Task AfterThrows(AspectContext aspectContext, Exception exception)
{
Console.WriteLine("TestHelloAfterThrows1");
return Task.CompletedTask;
}
}
//
public class TestHelloBefore2:AspectBefore
{
public override Task Before(AspectContext aspectContext)
{
Console.WriteLine("TestHelloBefore2");
return Task.CompletedTask;
}
}
public class TestHelloAfter2:AspectAfter
{
//这个 returnValue 如果目标方法正常返回的话 那就是目标方法的返回值
// 如果目标方法抛异常的话 那就是异常本身
public override Task After(AspectContext aspectContext,object returnValue)
{
Console.WriteLine("TestHelloAfter2");
return Task.CompletedTask;
}
}
public class TestHelloAfterReturn2:AspectAfterReturn
{
//result 是目标方法的返回 (如果目标方法是void 则为null)
public override Task AfterReturn(AspectContext aspectContext, object result)
{
Console.WriteLine("TestHelloAfterReturn2");
return Task.CompletedTask;
}
}
public class TestHelloAround2:AspectArround
{
public override async Task OnInvocation(AspectContext aspectContext, AspectDelegate _next)
{
Console.WriteLine("TestHelloAround2 start");
await _next(aspectContext);
Console.WriteLine("TestHelloAround2 end");
}
}
public class TestHelloAfterThrows2:AspectAfterThrows
{
public override Task AfterThrows(AspectContext aspectContext, Exception exception)
{
Console.WriteLine("TestHelloAfterThrows2");
return Task.CompletedTask;
}
}
[Component(EnableAspect = true)]
public class TestHello
{
[
TestHelloAround1(GroupName = "Aspect1",OrderIndex = 10),
TestHelloBefore1(GroupName = "Aspect1",OrderIndex = 10),
TestHelloAfter1(GroupName = "Aspect1",OrderIndex = 10),
TestHelloAfterReturn1(GroupName = "Aspect1",OrderIndex = 10),
TestHelloAfterThrows1(GroupName = "Aspect1",OrderIndex = 10)
]
[
TestHelloAround2(GroupName = "Aspect2",OrderIndex = 1),
TestHelloBefore2(GroupName = "Aspect2",OrderIndex = 1),
TestHelloAfter2(GroupName = "Aspect2",OrderIndex = 1),
TestHelloAfterReturn2(GroupName = "Aspect2",OrderIndex = 1),
TestHelloAfterThrows2(GroupName = "Aspect2",OrderIndex = 1)
]
public virtual void SayGroup()
{
Console.WriteLine("SayGroup");
}
}
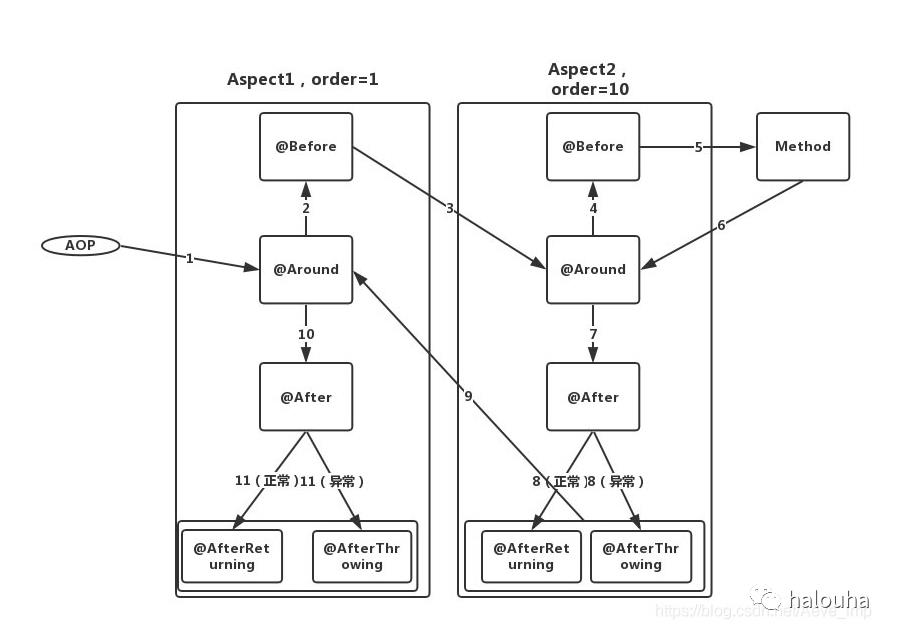
如上面的代码在目标方法上打了2组 那么对应的执行顺序是:
先执行TestHelloAround2 打印 “TestHelloAround2 start” 然后执行到里面的_next(aspectContext)会触发下面
执行TestHelloBefore2 打印 “TestHelloBefore2” 然后进入到
执行TestHelloAround1 打印 “TestHelloAround1 start” 然后执行到里面的 _next(aspectContext)会触发下面
执行TestHelloBefore1 打印 “TestHelloBefore1”
执行目标方法 SayGroup 打印 “SayGroup”
TestHelloAround1运行结束 打印 “TestHelloAround1 end”
执行 TestHelloAfter1 打印 “TestHelloAfter1”
执行 TestHelloAfterReturn1 打印 “TestHelloAfterReturn1”
TestHelloAround2运行结束 打印 “TestHelloAround2 end”
执行 TestHelloAfter2 打印 “TestHelloAfter2”
执行 TestHelloAfterReturn2 打印 “TestHelloAfterReturn2”
执行的顺序如下图
2. 面向切面编程
上面介绍了利用Aspect标签来完成拦截器功能
Aspect是一对一的方式,我想要某个class开启拦截器功能我需要针对每个class去配置。
比如说 我有2个 controller 每个controller都有2个action方法,
[Component]
public class ProductController
{
public virtual string GetProduct(string productId)
{
return "GetProduct:" + productId;
}
public virtual string UpdateProduct(string productId)
{
return "UpdateProduct:" + productId;
}
}
[Component]
public class UserController
{
public virtual string GetUser(string userId)
{
return "GetUser:" + userId;
}
public virtual string DeleteUser(string userId)
{
return "DeleteUser:" + userId;
}
}
如果我需要这2个controller的action方法都在执行方法前打log 在方法执行后打log
按照上一节Aspect的话 我需要每个controller都要配置。如果我有100个controller的话我就需要配置100次,这样我觉得太麻烦了。所以我参考了Spring的Pointcut切面编程的方式实现了,下面看如何用Pointcut的方式方便的配置一种切面去适用于N个对象。
定义一个切面:创建一个class 上面打上Pointcut的标签 如下:
Pointcut标签类有如下属性:
属性名 说明 Name 名称Pointcut切面的名称(默认为空,和拦截方法进行匹配,参考下面说明) RetType 匹配目标类的方法的返回类型(默认是%) NameSpace 匹配目标类的namespace(默认是%) ClassName 匹配目标类的类名称(和下面的AttributeType参数二选一必填) AttributeType 匹配特定的标签(和上面的ClassName参数二选一必填) MethodName 匹配目标类的方法名称(默认是%)
切面如何匹配
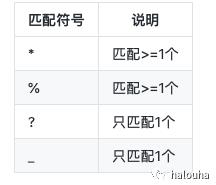
// *Controller 代表匹配 只要是Controller结尾的类都能匹配
// Get* 代表上面匹配成功的类下 所以是Get打头的方法都能匹配
[Pointcut(Class = "*Controller",Method = "Get*")]
public class LoggerPointCut
{
}
// *Controller 代表匹配 只要是Controller结尾的类都能匹配
// Get* 代表上面匹配成功的类下 所以是Get打头的方法都能匹配
[Pointcut(ClassName = "*Controller",MethodName = "Get*")]
public class LoggerPointCut
{
}
定义好了一个Pointcut切面后 需要定义这个切面的拦截方法(也叫切入点)
配合Pointcut切面标签,可以在打了这个标签的class下定义拦截方法,
在方法上得打上特定的标签,有如下几种:
切入点 说明 Before标签 在匹配成功的类的方法执行前执行 After标签 在匹配成功的类的方法执行后执行(不管目标方法成功还是失败) AfterReturn标签 在匹配成功的类的方法执行后执行(只是目标方法成功) AfterThrows标签 在匹配成功的类的方法执行后执行(只是目标方法抛异常时) Around标签 环绕目标方法,承接了匹配成功的类的方法的执行权
以上3种标签有一个可选的参数:Name (默认为空,可以和Pointcut的Name进行mapping)
因为一个class上可以打多个Pointcut切面,一个Pointcut切面可以根据name去匹配对应拦截方法
切入点标签所在方法的参数说明:
Around切入点 必须要指定 AspectContext类型 和 AspectDelegate类型的2个参数,且返回类型要是Task 否则会报错
除了Around切入点以外其他的切入点的返回值只能是Task或者Void 否则会报错
除了Around切入点以外其他的切入点可以指定 AspectContext类型 参数注入进来
After切入点 可以指定Returing参数,可以把目标方法的返回注入进来,如果目标方法抛异常则是异常本身
AfterReturn切入点 可以指定Returing参数,可以把目标方法的返回注入进来
AfterThrows切入点 可以指定 Throwing参数,可以把目标方法抛出的异常注入进来
只要你参数类型是你注册到DI容器,运行时会自动从DI容器把类型注入进来
可以使用Autowired,Value标签来修饰参数
/// <summary>
/// 第一组切面
/// </summary>
[Pointcut(NameSpace = "Autofac.Annotation.Test.test6",Class = "Pointcut*",OrderIndex = 1)]
public class PointcutTest1
{
[Around]
public async Task Around(AspectContext context,AspectDelegate next)
{
Console.WriteLine("PointcutTest1.Around-start");
await next(context);
Console.WriteLine("PointcutTest1.Around-end");
}
[Before]
public void Before()
{
Console.WriteLine("PointcutTest1.Before");
}
[After]
public void After()
{
Console.WriteLine("PointcutTest1.After");
}
[AfterReturn(Returing = "value1")]
public void AfterReturn(object value1)
{
Console.WriteLine("PointcutTest1.AfterReturn");
}
[AfterThrows(Throwing = "ex1")]
public void Throwing(Exception ex1)
{
Console.WriteLine("PointcutTest1.Throwing");
}
}
/// <summary>
/// 第二组切面
/// </summary>
[Pointcut(NameSpace = "Autofac.Annotation.Test.test6",Class = "Pointcut*",OrderIndex = 0)]
public class PointcutTest2
{
[Around]
public async Task Around(AspectContext context,AspectDelegate next)
{
Console.WriteLine("PointcutTest2.Around-start");
await next(context);
Console.WriteLine("PointcutTest2.Around-end");
}
[Before]
public void Before()
{
Console.WriteLine("PointcutTest2.Before");
}
[After]
public void After()
{
Console.WriteLine("PointcutTest2.After");
}
[AfterReturn(Returing = "value")]
public void AfterReturn(object value)
{
Console.WriteLine("PointcutTest2.AfterReturn");
}
[AfterThrows(Throwing = "ex")]
public void Throwing(Exception ex)
{
Console.WriteLine("PointcutTest2.Throwing");
}
}
[Component]
public class Pointcut1Controller
{
//正常case
public virtual void TestSuccess()
{
Console.WriteLine("Pointcut1Controller.TestSuccess");
}
//异常case
public virtual void TestThrow()
{
Console.WriteLine("Pointcut1Controller.TestThrow");
throw new ArgumentException("ddd");
}
}
[Component]
public class Pointcut2Controller
{
//正常case
public virtual void TestSuccess()
{
Console.WriteLine("Pointcut1Controller.TestSuccess");
}
//异常case
public virtual void TestThrow()
{
Console.WriteLine("Pointcut1Controller.TestThrow");
throw new ArgumentException("ddd");
}
}
按照上面的配置
Pointcut1Controller.TestSuccess 和 TestThrow 2个方法 会被匹配
Pointcut2Controller.TestThrow 和 TestThrow 2个方法 会被匹配
执行顺序
单个切面顺序如下图
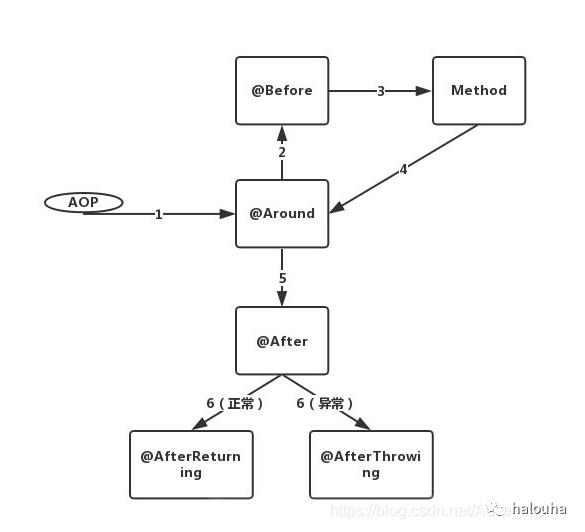
多个切面执行的顺序如下图
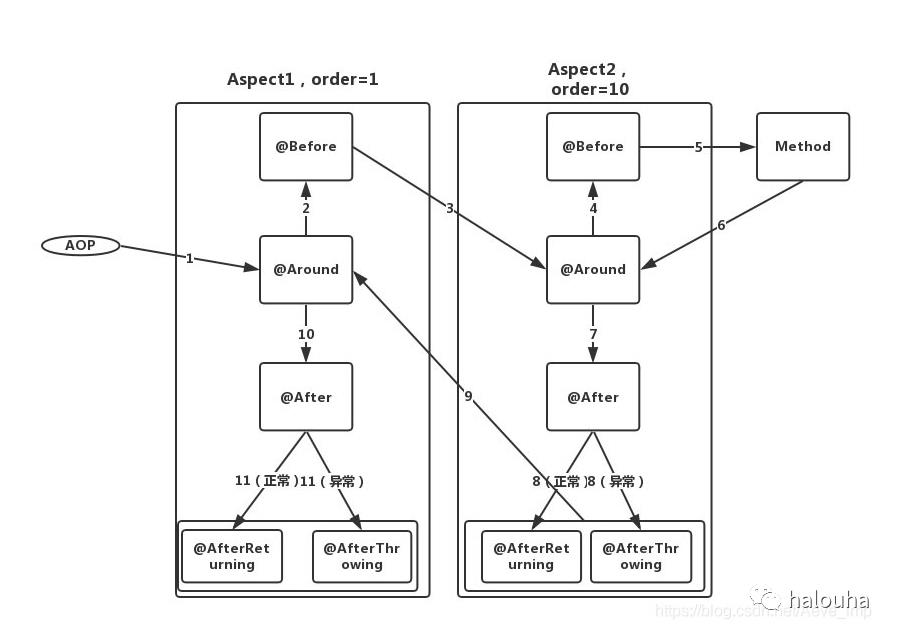
关于顺序是和上面用Aspect是一致的,只不过是1:N,1个切面来切N个目标
切面功能与Spring相比缺少了一个灵活的切点表达式,所以功能会弱很多,这块目前我还没有很好的设计思路,欢迎来教育!
3. BeanPostProcessor的设计
参考Spring框架,
在类的初始化过程中进行自定义逻辑而设计的BeanPostProcessor,有2个方法:
PostProcessBeforeInitialization
PostProcessAfterInitialization
1. PostProcessBeforeInitialization
该方法在bean实例化完毕(且已经注入完毕),属性设置或自定义init方法执行之前执行!
2. PostProcessAfterInitialization
该方法在bean实例化完毕(且已经注入完毕),在属性设置或自定义init方法执行之后
一个使用场景例子:自定义一个注解来封装自定义逻辑
先定义一个自定义注解
/// <summary>
/// 測試自己實現一個自定義註解
/// </summary>
[AttributeUsage(AttributeTargets.Field, AllowMultiple = false, Inherited = false)]
public sealed class Soa : Attribute
{
/// <summary>
/// 构造函数
/// </summary>
public Soa(Type type)
{
Type = type;
}
/// <summary>
/// 注册的类型
/// </summary>
internal Type Type { get; set; }
}
这个注解的名字叫Soa,然后有一个构造方法,传参为一个Class Type
下面需要实现一个BeanPostProcessor
[Component]
public class SoaProcessor : BeanPostProcessor
{
//在实例化后且属性设值之前执行
public object PostProcessBeforeInitialization(object bean)
{
Type type = bean.GetType();
找到bean下所有的字段
var fieldInfos = type.GetFields(BindingFlags.Instance | BindingFlags.NonPublic);
foreach (var field in fieldInfos)
{
//看字段上面有没有打Soa自定义注解
var soaAnnotation = field.GetCustomAttribute(typeof(Soa)) as Soa;
if (soaAnnotation == null)
{
continue;
}
//有的话根据注解的参数Type来实例化对象并设值
var instance = Activator.CreateInstance(soaAnnotation.Type) as ISoa;
if (instance == null)
{
continue;
}
field.SetValue(bean, instance);
}
return bean;
}
//不管返回
public object PostProcessAfterInitialization(object bean)
{
return bean;
}
}
好了,实现一个BeanPostProcessor就是写一个类继承并实现它的接口即可。
然后打上[Compoment]注册到容器中即可。
下面测试效果
[Component]
public class Test11Models1
{
[Soa(typeof(SoaTest1))]
private ISoa Soa1;
[Soa(typeof(SoaTest2))]
private ISoa Soa2;
public string getSoa1()
{
return Soa1.say();
}
public string getSoa2()
{
return Soa2.say();
}
}
public interface ISoa
{
string say();
}
public class SoaTest1 : ISoa
{
public string say()
{
return nameof(SoaTest1);
}
}
public class SoaTest2 : ISoa
{
public string say()
{
return nameof(SoaTest2);
}
}
单元测试一下
[Fact]
public void Test1()
{
var builder = new ContainerBuilder();
builder.RegisterSpring(r => r.RegisterAssembly(typeof(TestBeanPostProcessor).Assembly));
var container = builder.Build();
var isRegisterd = container.TryResolve(out Test11Models1 model1);
Assert.True(isRegisterd);
Assert.Equal("SoaTest1",model1.getSoa1());
Assert.Equal("SoaTest2",model1.getSoa2());
}
Test11Models1这个类打了[Compoment]注册到容器,当从容器获取它的时候会走到上面的SoaProcessor。然后识别到里面有打了自定义注解[Soa],并根据注册的参数实例化。
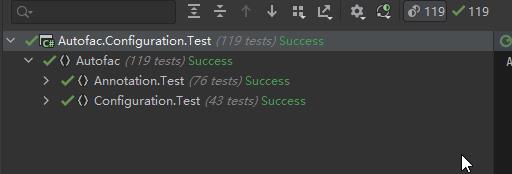
Spring是一个非常庞大的框架,里面包含了非常多的细节,比如处理依赖循环,单例如何Autowired多例,FactoryBean,代理类的生成以及兼容async await,新出的valueTask的方法代理等等,这个项目是我2018年开始写的,多次重构,每次重构也是反映对spring源码的理解程度不一样;这个过程非常有趣(一次次推翻我自以为看了源码就‘懂了’spring),目前最新版4.0.4 基本上包含了常用的spring功能,还会不断更新(看我是否越来越‘懂’spring),感兴趣可以看看单元测试
我是正东,学的越多不知道也越多。如果决定去深究一个东西, 一定要完全搞懂, 并认真总结一篇博客让以后能在短时间拾起来 ( 因为不搞懂你很难写一篇半年后还能理解的博客 )
欢迎白嫖点赞!


以上是关于Spring我抄袭了Spring,手写一套MySpring框架。。。的主要内容,如果未能解决你的问题,请参考以下文章
阿里P8架构师手写笔记:Spring源码+JVM+MySQL+Kafka+Tomcat
Spring提供的BeanUtils源码剖析(附手写copyProperties方法)
Spring提供的BeanUtils源码剖析(附手写copyProperties方法)