Spring Cloud Stream 进行服务之间的通讯
Posted 维晟
tags:
篇首语:本文由小常识网(cha138.com)小编为大家整理,主要介绍了Spring Cloud Stream 进行服务之间的通讯相关的知识,希望对你有一定的参考价值。
Spring Cloud Stream
Srping cloud Bus的底层实现就是Spring Cloud Stream,Spring Cloud Stream的目的是用于构建基于消息驱动(或事件驱动)的微服务架构。Spring Cloud Stream本身对Spring Messaging、Spring Integration、Spring Boot Actuator、Spring Boot Externalized Configuration等模块进行封装(整合)和扩展,下面我们实现两个服务之间的通讯来演示Spring Cloud Stream的使用方法。
整体概述

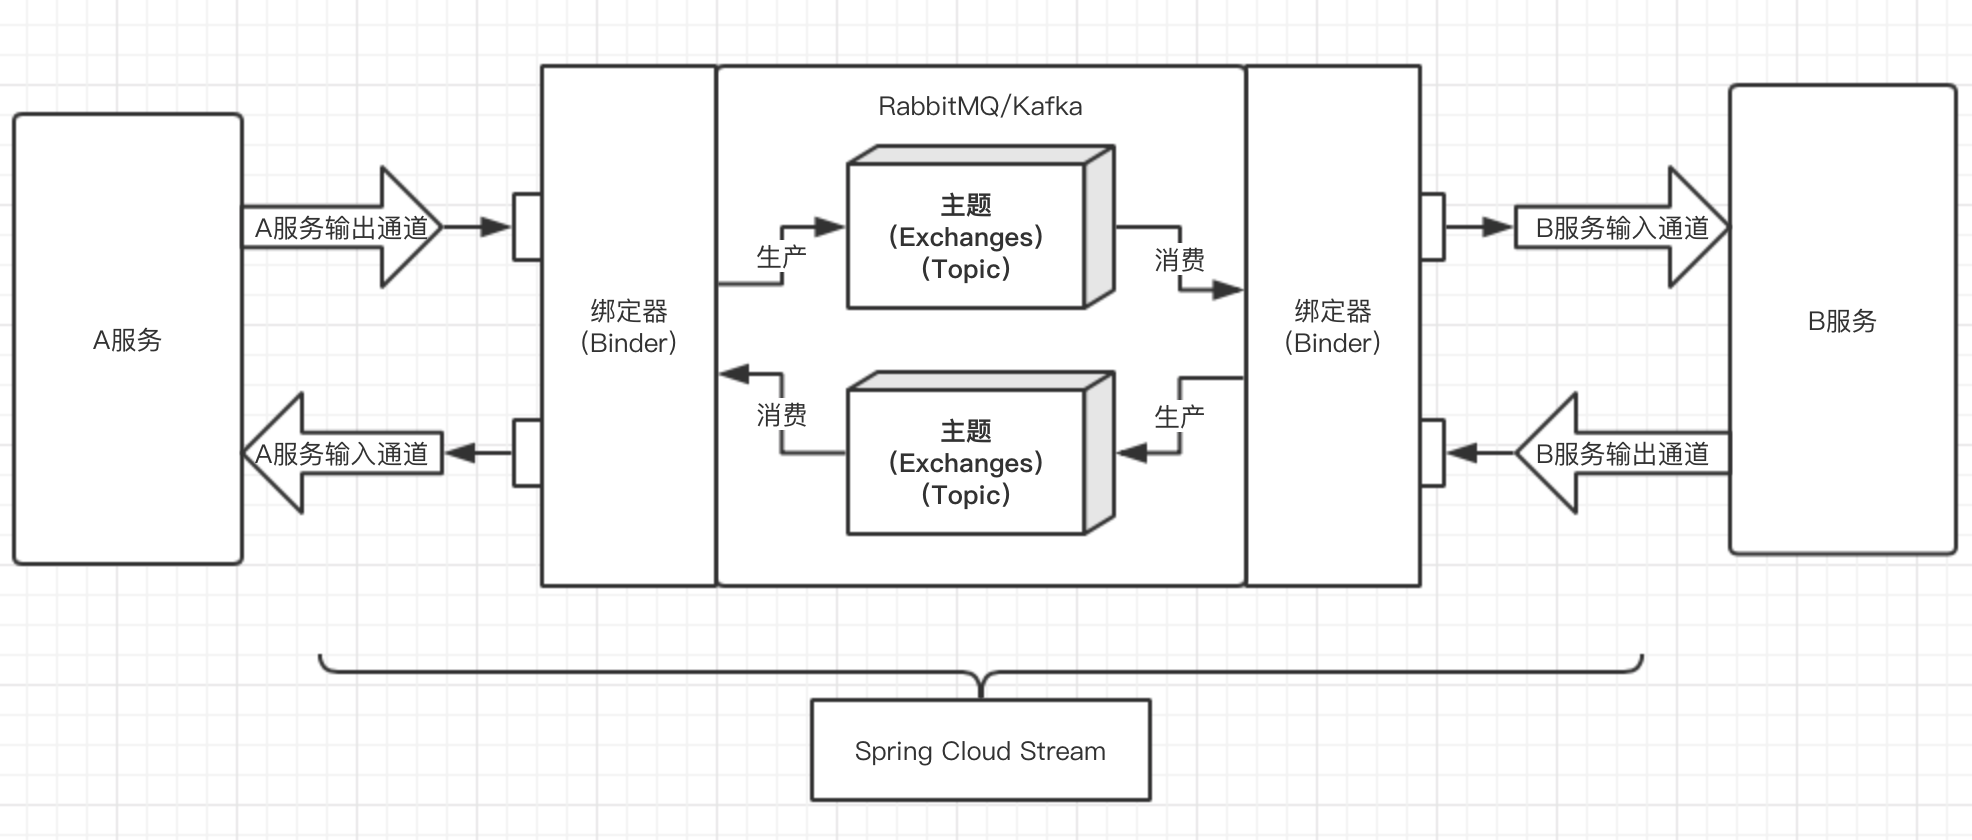
服务要想与其他服务通讯要定义通道,一般会定义输出通道和输入通道,输出通道用于发送消息,输入通道用于接收消息,每个通道都会有个名字(输入和输出只是通道类型,可以用不同的名字定义很多很多通道),不同通道的名字不能相同否则会报错(输入通道和输出通道不同类型的通道名称也不能相同),绑定器是操作RabbitMQ或Kafka的抽象层,为了屏蔽操作这些消息中间件的复杂性和不一致性,绑定器会用通道的名字在消息中间件中定义主题,一个主题内的消息生产者来自多个服务,一个主题内消息的消费者也是多个服务,也就是说消息的发布和消费是通过主题进行定义和组织的,通道的名字就是主题的名字,在RabbitMQ中主题使用Exchanges实现,在Kafka中主题使用Topic实现。
准备环境
创建两个项目spring-cloud-stream-a和spring-cloud-stream-b,spring-cloud-stream-a我们用Spring Cloud Stream实现通讯,spring-cloud-stream-b我们用Spring Cloud Stream的底层模块Spring Integration实现通讯。
两个项目的POM文件依赖都是:
<dependencies>
        <dependency>
            <groupId>org.springframework.cloud</groupId>
            <artifactId>spring-cloud-stream</artifactId>
        </dependency>

        <dependency>
            <groupId>org.springframework.cloud</groupId>
            <artifactId>spring-cloud-stream-binder-rabbit</artifactId>
        </dependency>
        <dependency>
            <groupId>org.springframework.boot</groupId>
            <artifactId>spring-boot-starter-test</artifactId>
            <scope>test</scope>
        </dependency>
        <dependency>
            <groupId>org.springframework.cloud</groupId>
            <artifactId>spring-cloud-stream-test-support</artifactId>
            <scope>test</scope>
        </dependency>
    </dependencies>
spring-cloud-stream-binder-rabbit是指绑定器的实现使用RabbitMQ。
项目配置内容application.properties:
spring.application.name=spring-cloud-stream-a
server.port=9010

#设置默认绑定器
spring.cloud.stream.defaultBinder = rabbit

spring.rabbitmq.host=127.0.0.1
spring.rabbitmq.port=5672
spring.rabbitmq.username=guest
spring.rabbitmq.password=guest
spring.application.name=spring-cloud-stream-b
server.port=9011
#设置默认绑定器
spring.cloud.stream.defaultBinder = rabbit
spring.rabbitmq.host=127.0.0.1
spring.rabbitmq.port=5672
spring.rabbitmq.username=guest
spring.rabbitmq.password=guest启动一个rabbitmq:
docker pull rabbitmq:3-management

docker run -d --hostname my-rabbit --name rabbit -p 5672:5672 -p 15672:15672 rabbitmq:3-management
编写A项目代码
在A项目中定义一个输入通道一个输出通道,定义通道在接口中使用@Input和@Output注解定义,程序启动的时候Spring Cloud Stream会根据接口定义将实现类自动注入(Spring Cloud Stream自动实现该接口不需要写代码)。
A服务输入通道,通道名称ChatExchanges.A.Input,接口定义输入通道必须返回SubscribableChannel:
public interface ChatInput {

    String INPUT = "ChatExchanges.A.Input";

    @Input(ChatInput.INPUT)
    SubscribableChannel input();
}
A服务输出通道,通道名称ChatExchanges.A.Output,输出通道必须返回MessageChannel:
public interface ChatOutput {

    String OUTPUT = "ChatExchanges.A.Output";

    @Output(ChatOutput.OUTPUT)
    MessageChannel output();
}
定义消息实体类:
public class ChatMessage implements Serializable {

    private String name;
    private String message;
    private Date chatDate;

    //没有无参数的构造函数并行化会出错
    private ChatMessage(){}

    public ChatMessage(String name,String message,Date chatDate){
        this.name = name;
        this.message = message;
        this.chatDate = chatDate;
    }

    public String getName(){
        return this.name;
    }

    public String getMessage(){
        return this.message;
    }

    public Date getChatDate() { return this.chatDate; }

    public String ShowMessage(){
        return String.format("聊天消息:%s的时候,%s说%s。",this.chatDate,this.name,this.message);
    }
}
在业务处理类上用@EnableBinding注解绑定输入通道和输出通道,这个绑定动作其实就是创建并注册输入和输出通道的实现类到Bean中,所以可以直接是使用@Autowired进行注入使用,另外消息的串行化默认使用application/json格式(com.fastexml.jackson),最后用@StreamListener注解进行指定通道消息的监听:
//ChatInput.class的输入通道不在这里绑定,监听到数据会找不到AClient类的引用。
//Input和Output通道定义的名字不能一样,否则程序启动会抛异常。
@EnableBinding({ChatOutput.class,ChatInput.class})
public class AClient {

    private static Logger logger = LoggerFactory.getLogger(AClient.class);

    @Autowired
    private ChatOutput chatOutput;

    //StreamListener自带了Json转对象的能力,收到B的消息打印并回复B一个新的消息。
    @StreamListener(ChatInput.INPUT)
    public void PrintInput(ChatMessage message) {

        logger.info(message.ShowMessage());

        ChatMessage replyMessage = new ChatMessage("ClientA","A To B Message.", new Date());

        chatOutput.output().send(MessageBuilder.withPayload(replyMessage).build());
    }
}
到此A项目代码编写完成。
编写B项目代码
B项目使用Spring Integration实现消息的发布和消费,定义通道时我们要交换输入通道和输出通道的名称:
public interface ChatProcessor {

    String OUTPUT = "ChatExchanges.A.Input";
    String INPUT  = "ChatExchanges.A.Output";

    @Input(ChatProcessor.INPUT)
    SubscribableChannel input();

    @Output(ChatProcessor.OUTPUT)
    MessageChannel output();
}
消息实体类:
public class ChatMessage {
    private String name;
    private String message;
    private Date chatDate;

    //没有无参数的构造函数并行化会出错
    private ChatMessage(){}

    public ChatMessage(String name,String message,Date chatDate){
        this.name = name;
        this.message = message;
        this.chatDate = chatDate;
    }

    public String getName(){
        return this.name;
    }

    public String getMessage(){
        return this.message;
    }

    public Date getChatDate() { return this.chatDate; }

    public String ShowMessage(){
        return String.format("聊天消息:%s的时候,%s说%s。",this.chatDate,this.name,this.message);
    }
}
业务处理类用@ServiceActivator注解代替@StreamListener,用@InboundChannelAdapter注解发布消息:
@EnableBinding(ChatProcessor.class)
public class BClient {

    private static Logger logger = LoggerFactory.getLogger(BClient.class);

    //@ServiceActivator没有Json转对象的能力需要借助@Transformer注解
    @ServiceActivator(inputChannel=ChatProcessor.INPUT)
    public void PrintInput(ChatMessage message) {

        logger.info(message.ShowMessage());
    }

    @Transformer(inputChannel = ChatProcessor.INPUT,outputChannel = ChatProcessor.INPUT)
    public ChatMessage transform(String message) throws Exception{
        ObjectMapper objectMapper = new ObjectMapper();
        return objectMapper.readValue(message,ChatMessage.class);
    }

    //每秒发出一个消息给A
    @Bean
    @InboundChannelAdapter(value = ChatProcessor.OUTPUT,poller = @Poller(fixedDelay="1000"))
    public GenericMessage<ChatMessage> SendChatMessage(){
        ChatMessage message = new ChatMessage("ClientB","B To A Message.", new Date());
        GenericMessage<ChatMessage> gm = new GenericMessage<>(message);
        return gm;
    }
}
运行程序
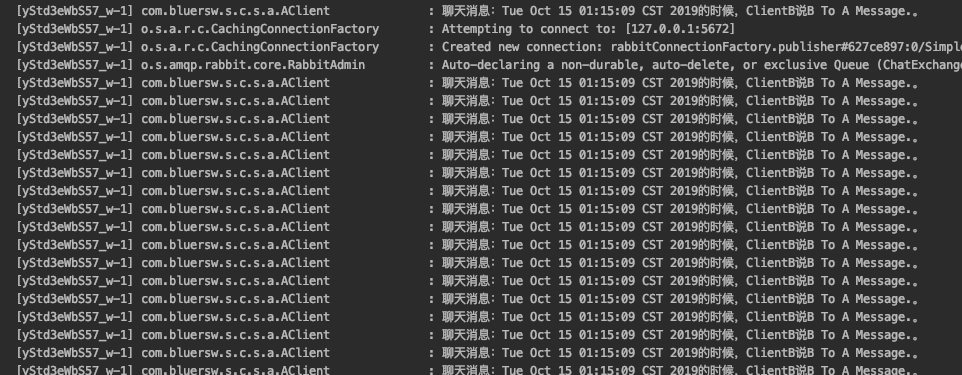
启动A项目和B项目:


源码
Github仓库:https://github.com/sunweisheng/spring-cloud-example
以上是关于Spring Cloud Stream 进行服务之间的通讯的主要内容,如果未能解决你的问题,请参考以下文章
SpringCloud - Spring Cloud 之 Stream构建消息驱动微服务框架(十九)
Spring Cloud Stream整合Rabbit之重复投递