Spring基础学习注解实现自动装配
Posted yddd-g
tags:
篇首语:本文由小常识网(cha138.com)小编为大家整理,主要介绍了Spring基础学习注解实现自动装配相关的知识,希望对你有一定的参考价值。
在IOC容器中学习相关注解(常用)
1. @Autowired
a.作用对象:(官网解释)
1. You can apply the @Autowired annotation to constructors:
2.you can also apply the @Autowired annotation to "traditional" setter methods:
3.You can also apply the annotation to methods with arbitrary names and/or multiple arguments:
4.You can apply @Autowired to fields as well and even mix it with constructors:
5.It is also possible to provide all beans of a particular type from the ApplicationContext by adding the annotation to a field or method that expects an array of that type:
6.Even typed Maps can be autowired as long as the expected key type is String. The Map values will contain all beans of the expected type, and the keys will contain the corresponding bean names:等
总结一下就是: 可以在构造器,set方法,任意方法和属性上,数组上,String类型的Map上等。
Notes:1. @Autowired默认按类型装配(这个注解是属业spring的),默认情况下必须要求依赖对象必须存在,如果要允许null值,可以设置它的required属性为false。
2.可以与@qualifier 共同使用, 当对象类型和名字发生冲突时,该注解可用于指定特定的对象。
1 @Autowired()
2 @Qualifier("cat")
可以找到id="cat"的bean
b.功能:它可以对类成员变量、方法及构造函数进行标注,完成自动装配的工作。 通过 @Autowired的使用来消除 set ,get方法。
2.@Resource
a.功能: @Resource的作用相当于@Autowired,只不过@Autowired按byType自动注入,而@Resource默认按 byName自动注入
@Resource有两个属性是比较重要的,分是name和type,Spring将@Resource注解的name属性解析为bean的名字,而type属性则解析为bean的类型。所以如果使用name属性,则使用byName的自动注入策略,而使用type属性时则使用byType自动注入策略。如果既不指定name也不指定type属性,这时将通过反射机制使用byName自动注入策略。
3.@Required
a.功能:@Required 注释应用于 bean 属性的 setter 方法,它表明受影响的 bean 属性在配置时必须放在 XML 配置文件中,否则容器就会抛出一个 BeanInitializationException 异常。下面显示的是一个使用 @Required 注释的示例。
https://www.w3cschool.cn/wkspring/9sle1mmh.html
这有一个很好的解释和例子关于@Required注解
使用@Autowired后的优点
原来我们需要手动注入之后才可以使用employee对象:
<bean id="car" class="com.ding.pojo.Car">
        <property name="employee" ref="employee"/>
若没有进行手动注入,不会从测试代码中 获取到employee对象。
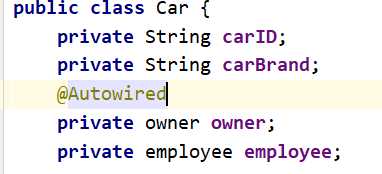
使用@Autowired之后
不需要手动注入。
<bean id="car" class="com.ding.pojo.Car"/>
只用在属性上进行@Autowired注释标注

在测试类中即可直接调用:
 1 public class MyTest {
 2     public static void main(String[] args) {
 3
 4         ApplicationContext context = new ClassPathXmlApplicationContext("applicationContext.xml");
 5
 6         Car car = (Car) context.getBean("car");
 7         car.getOwner().MyEmployment();
 8
 9     }
10 }
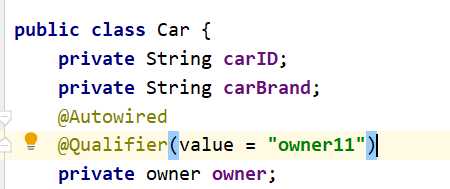
系统首先根据 bean中class类型进行确认,再和bean中id名进行确认,最后确定所定的注入对象。 若多个bean 名字不同,且类型相同则该注释失效。(可使用@Qualifier 进行唯一指定)
例如:
    <bean id="owner22" class="com.ding.pojo.owner"/>
   <bean id="owner11" class="com.ding.pojo.owner"/>
运行相同代码会报如下错误:

此时加上@Qualifier注释如下,代码可正常编译:

运行结果:

如分享内容中有问题的地方,还望您多加指出,感谢您的浏览。
以上是关于Spring基础学习注解实现自动装配的主要内容,如果未能解决你的问题,请参考以下文章
Spring学习-----Spring使用@Autowired注解自动装配
Spring的自动装配及注解开发(“最易懂得Spring学习”)
spring框架学习:Bean的装配方式 ——基于注解的装配自动装配