Spring Sleuth和Zipkin跟踪微服务
Posted 微服务框架
tags:
篇首语:本文由小常识网(cha138.com)小编为大家整理,主要介绍了Spring Sleuth和Zipkin跟踪微服务相关的知识,希望对你有一定的参考价值。
随着微服务数量不断增长,需要跟踪一个请求从一个微服务到下一个微服务的传播过程, Spring Cloud Sleuth 正是解决这个问题,它在日志中引入唯一ID,以保证微服务调用之间的一致性,这样你就能跟踪某个请求是如何从一个微服务传递到下一个。
如果你有使用AOP拦截Servlet的经验,做一个基于AOP的简单服务统计和跟踪很容易。但要像Zipkin那样能够跟踪服务调用链就比较困难了。所谓调用链,就是A服务调用B服务,B服务又调用了C、D服务。这样一个链要想统计跟踪,要写不少代码。而Spring Cloud Sleuth能让你不写一行代码的情况下完成这些。
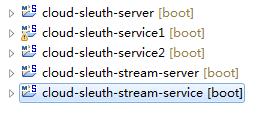
本文涉及5个spring boot工程:

前三个验证基本的Sleuth使用,后面两个演示如果使用消息中间件作为Zipkin的源,以及如果将Zipkin的监控数据配置到mysql数据库。由于前者和后者在配置方面相差较大,因此有必要将其分开展示。简单的Sleuth应用,在这里是指Sleuth http应用,就是Sleuth通过http请求的方式将监控日志推送到Zipkin服务器。如图所示,cloud-sleuth-server其实就是Zipkin Server它接收来自微服务cloud-sleuth-service1和cloud-sleuth-service2的监控日志推送,cloud-sleuth-service1调用了cloud-sleuth-service2,形成一个简单的调用链。其中cloud-sleuth-service1 pom配置:
<dependencies>
<dependency>
<groupId>org.springframework.boot</groupId>
<artifactId>spring-boot-starter-web</artifactId>
</dependency>
<dependency>
<groupId>org.springframework.boot</groupId>
<artifactId>spring-boot-starter-actuator</artifactId>
</dependency>
<dependency>
<groupId>org.springframework.cloud</groupId>
<artifactId>spring-cloud-starter-sleuth</artifactId>
</dependency>
<dependency>
<groupId>org.springframework.cloud</groupId>
<artifactId>spring-cloud-sleuth-zipkin</artifactId>
</dependency>
</dependencies>
SleuthClientApplication应用:
@SpringBootApplication
public class SleuthClientApplication {

	@Bean
	public RestTemplate restTemplate() {
		return new RestTemplate();
	}

	public static void main(String[] args) {
		SpringApplication.run(SleuthClientApplication.class, args);
	}
}

@RestController
class HomeController {

	private static final Log log = LogFactory.getLog(HomeController.class);
	@Autowired
	private RestTemplate restTemplate;

	private String url="http://localhost:9986";

	@RequestMapping("/service1")
	public String service1() throws Exception {
		log.info("service1");
		Thread.sleep(200L);
		String s = this.restTemplate.getForObject(url + "/service2", String.class);
		return s;
	}
}
application.properties:
spring.application.name=sleuthService1
server.port=9987
spring.zipkin.baseUrl=http://localhost:9966
spring.zipkin.enabled=true
只需要在pom文件里配置spring-cloud-sleuth-zipkin并且在配置文件里配置spring.zipkin.baseUrl,那么service1就可以把监控日志发送给目标是baseUrl指向的Zipkin服务器,就是会自动调用zipkin的某个rest接口将监控日志传给它。
Zipkin Server的pom配置:
<dependency>
<groupId>org.springframework.boot</groupId>
<artifactId>spring-boot-starter</artifactId>
</dependency>
<dependency>
<groupId>io.zipkin</groupId>
<artifactId>zipkin-ui</artifactId>
<scope>runtime</scope>
</dependency>
<dependency>
<groupId>io.zipkin.java</groupId>
<artifactId>zipkin-server</artifactId>
</dependency>
<dependency>
<groupId>org.springframework.cloud</groupId>
<artifactId>spring-cloud-starter-sleuth</artifactId>
</dependency>
<dependency>
<groupId>org.springframework.cloud</groupId>
<artifactId>spring-cloud-sleuth-zipkin</artifactId>
</dependency>
SleuthServerApplication:
@SpringBootApplication
@EnableZipkinServer
public class SleuthServerApplication {


	public static void main(String[] args) {
		SpringApplication.run(SleuthServerApplication.class,args);
    }
}
application.properties配置:
spring.application.name=sleuthServer
server.port=9966
至于service2,配置和service1一样,就是Application里面增加了servcie2 rest接口:
@SpringBootApplication
public class SleuthClientApplication {

	public static void main(String[] args) {
		SpringApplication.run(SleuthClientApplication.class, args);
	}
}

@RestController
class HiController {

	private static final Log log = LogFactory.getLog(HiController.class);

	@RequestMapping("/service2")
	public String hi() throws Exception {
		log.info("service2");
		Thread.sleep(100L);
		return "service2";
	}
}
运行后,访问service1,再按照zipkin server配置的端口打开zipkin server的监控页面,运行结果如下:

点开某一个请求后,会看到详细的调用链请求信息:

点开调用链的某个请求可以看更详细的请求信息:

上图所示,依次是:
Sleuthservcie1 Client Send:service1发起请求service2的时间戳。
Sleuthservcie2 Server Receive:service2收到请求的时间戳。
Sleuthservcie2 Server Send:service2处理完发送结果时间戳。
Sleuthservcie1 Client Receive:service1收到结果的时间戳。
图中最上方就是这个请求所用的总的时间,各个环节的处理请求时间一目了然。
如果是生产环境,一般需要用到第二套方案。就是先把日志发送到消息队列,然后再由zipkin接受,zipkin接收后保存日志到数据库。具体的配置也很简单,要注意的地方就是spring 官方的例子找不到消息中间件的具体配置,可能是在某个地方有默认,笔者还是自己配置了一下:
spring.sleuth.sampler.percentage=1.0
spring.rabbitmq.host=127.0.0.1
spring.rabbitmq.port=5672
spring.rabbitmq.username=guest
spring.rabbitmq.password=guest
spring.rabbitmq.virtualHost=/
消息队列只需要配置上就会自动创建队列。数据库配置也是如此,其官方例子中也有,只需配置上就会自动建表。
spring.datasource.schema=classpath:/mysql.sql
spring.datasource.url=jdbc:mysql://${MYSQL_HOST:localhost}:3306/test
spring.datasource.username=root
spring.datasource.password=123
spring.datasource.initialize=true
spring.datasource.continueOnError=true
spring.sleuth.enabled=false
zipkin.storage.type=mysql
具体参照源码,源码在老地方:
https://git.oschina.net/zhou666/spring-cloud-7simple
以上是关于Spring Sleuth和Zipkin跟踪微服务的主要内容,如果未能解决你的问题,请参考以下文章
Spring Cloud 微服务分布式链路跟踪 Sleuth 与 Zipkin
Spring Cloud 分布式链路跟踪 Sleuth + Zipkin + Elasticsear
Spring Cloud 分布式链路跟踪 Sleuth + Zipkin + Elasticsear
spring cloud 学习 - sleuth & zipkin 调用链跟踪
SpringCloud - Spring Cloud 之 Sleuth分布式链路跟踪;Zipkin埋点数据;Elastic Search 数据持久化(十八)