centos上使用squid+stunnel代理上网
Posted
tags:
篇首语:本文由小常识网(cha138.com)小编为大家整理,主要介绍了centos上使用squid+stunnel代理上网相关的知识,希望对你有一定的参考价值。
参考技术A 环境准备:服务端centos7海外服务器1台安装squid,客户端centos内网服务器一台安装stunnel,可以是你的工作网络1.安装squid
2.配置squid
3.启动squid
3.1安装stunnel服务端
4.客户端安装stunnel
5.启动stunnel
5.添加认证用户yang19
安装之后在浏览器设置代理即可:内网客户端ip:30898
shell代理上网配置:
在 ~/.bashrc里添加如下语句则有代理,取消之,则无。
编辑之后注意需要打开新的终端设置才会生效!!!
香港主机Squid+Stunnel代理搭建
1.说明
Squid,代理软件
Stunnel,数据包加密(貌似如果数据不加密,客户端的数据流无法传到squid服务端,原因你懂的!)
2.Squid安装略
3.安装完squid后需要以下操作
a.生成加密代理证书
openssl req -new > lidongbest5.csr
openssl rsa -in privkey.pem -out lidongbest5.key
openssl x509 -in lidongbest5.csr -out lidongbest5.crt -req -signkey lidongbest5.key -days 3650

b. 配置/usr/local/squid/etc/squid.conf
#http_port 3128   --注释
https_port 443 cert=/root/lidongbest5.crt key=/root/lidongbest5.key
#http_access deny all
http_access allow all
c.启动squid(启动完后可以用 ps -ef | grep 443 来查看443的加密代理端口是否启用,如果没有启用的话说明squid没有启动,这时可以进入squid的log文件来查看错误,我当时启动没成功是因为一个cache文件的权限问题和缺少一个access文件,这个查看log文件还是很容易定位并解决的 )
4.客户端安装stunnel
下载地址:ftp://ftp.stunnel.org/stunnel/
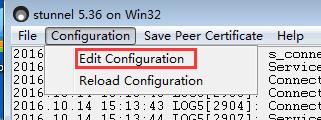
安装完启动后进行以下配置:

添加以下内容
[https]
client = yes
accept = 10.60.10.54:8088 --客户机IP
connect = 47.90.65.218:443 --squid服务端主机IP
保持退出后重载配置,如下

ok,完成
以上是关于centos上使用squid+stunnel代理上网的主要内容,如果未能解决你的问题,请参考以下文章