使用IDEA搭建Spring boot+Mybatis工程
Posted mcorleon
tags:
篇首语:本文由小常识网(cha138.com)小编为大家整理,主要介绍了使用IDEA搭建Spring boot+Mybatis工程相关的知识,希望对你有一定的参考价值。
简介
Spring boot特点:只使用一个核心配置文件,取消了一系列xml配置,甚至连web.xml都没有, 全部使用注解的方式完成WEB层的功能。框架内置Tomcat服务器,运行启动类中的Main函数即可启动。
下面就来搭建Spring boot+Mybatis工程
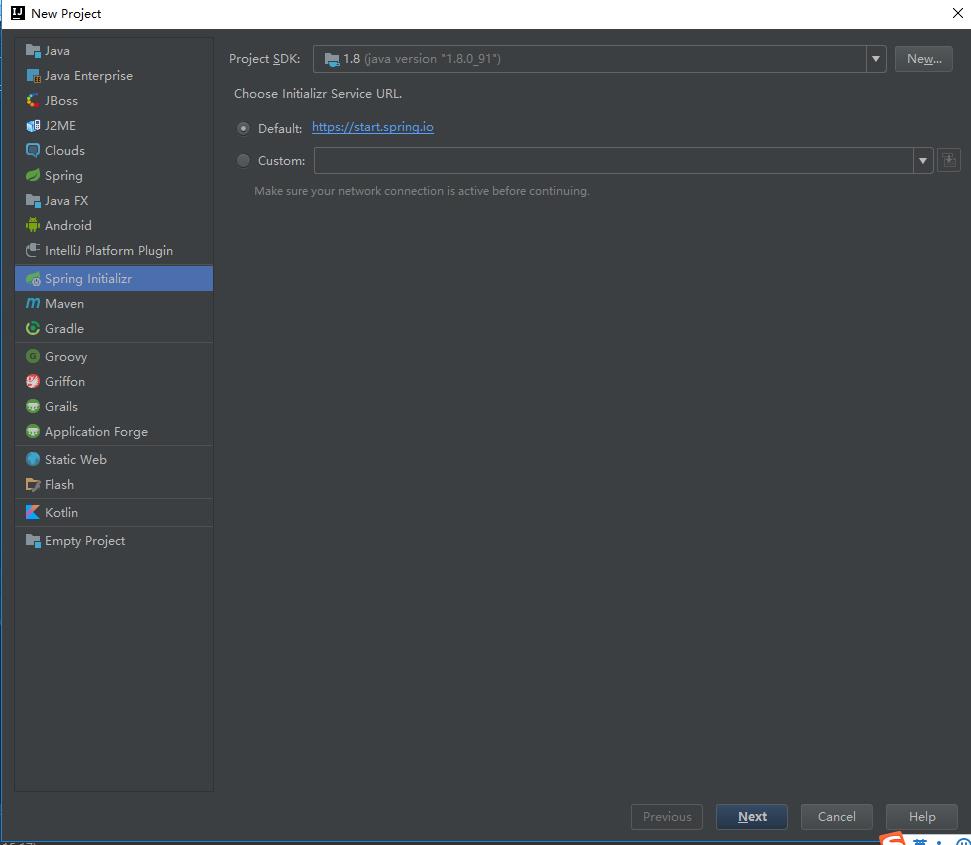
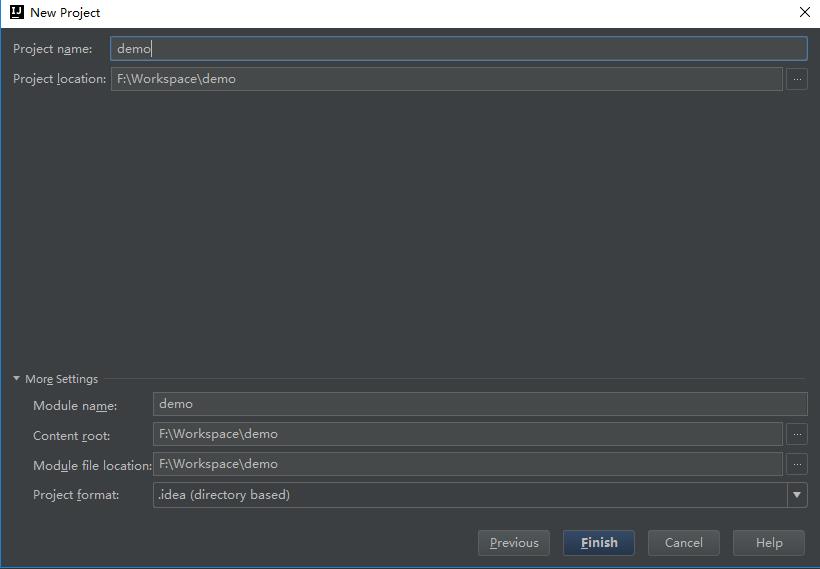
新建工程


勾上web,其他的不用

Finish

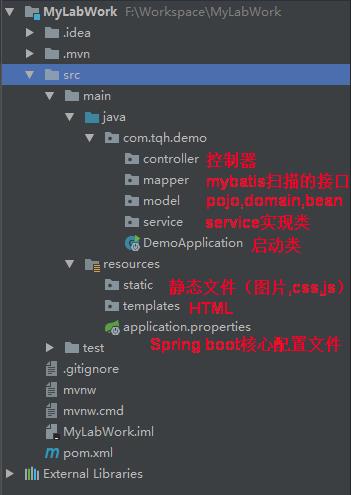
完善一下目录结构:

在pom.xml配置所有相关的依赖:
 1 <?xml version="1.0" encoding="UTF-8"?>
 2 <project xmlns="http://maven.apache.org/POM/4.0.0" xmlns:xsi="http://www.w3.org/2001/XMLSchema-instance"
 3     xsi:schemaLocation="http://maven.apache.org/POM/4.0.0 http://maven.apache.org/xsd/maven-4.0.0.xsd">
 4     <modelVersion>4.0.0</modelVersion>
 5
 6     <groupId>com.tqh</groupId>
 7     <artifactId>demo</artifactId>
 8     <version>0.0.1-SNAPSHOT</version>
 9     <packaging>jar</packaging>
10
11     <name>demo</name>
12     <description>Demo project for Spring Boot</description>
13
14     <parent>
15         <groupId>org.springframework.boot</groupId>
16         <artifactId>spring-boot-starter-parent</artifactId>
17         <version>1.5.9.RELEASE</version>
18         <relativePath/> <!-- lookup parent from repository -->
19     </parent>
20
21     <properties>
22         <project.build.sourceEncoding>UTF-8</project.build.sourceEncoding>
23         <project.reporting.outputEncoding>UTF-8</project.reporting.outputEncoding>
24         <mybatis-spring-boot.version>1.2.0</mybatis-spring-boot.version>
25         <mysql-connector.version>5.1.39</mysql-connector.version>
26         <java.version>1.8</java.version>
27     </properties>
28
29     <dependencies>
30         <dependency>
31             <groupId>org.springframework.boot</groupId>
32             <artifactId>spring-boot-starter-web</artifactId>
33         </dependency>
34
35         <dependency>
36             <groupId>org.springframework.boot</groupId>
37             <artifactId>spring-boot-starter-test</artifactId>
38             <scope>test</scope>
39         </dependency>
40         <dependency>
41             <groupId>org.springframework.boot</groupId>
42             <artifactId>spring-boot-starter-thymeleaf</artifactId>
43         </dependency>
44         <dependency>
45             <groupId>org.mybatis.spring.boot</groupId>
46             <artifactId>mybatis-spring-boot-starter</artifactId>
47             <version>${mybatis-spring-boot.version}</version>
48         </dependency>
49         <dependency>
50             <groupId>mysql</groupId>
51             <artifactId>mysql-connector-java</artifactId>
52             <version>${mysql-connector.version}</version>
53         </dependency>
54     </dependencies>
55
56     <build>
57         <plugins>
58             <plugin>
59                 <groupId>org.springframework.boot</groupId>
60                 <artifactId>spring-boot-maven-plugin</artifactId>
61             </plugin>
62         </plugins>
63     </build>
64
65
66 </project>
配置核心文件 application.properties:
 1 server.port=9090
 2 #视图层控制 用mvc方式访问templates下的html
 3 spring.mvc.view.prefix=classpath:/templates/
 4 spring.mvc.view.suffix=.html
 5 spring.mvc.static-path-pattern=/static/**
 6
 7 spring.thymeleaf.mode=HTML5
 8 spring.thymeleaf.encoding=UTF-8
 9 spring.thymeleaf.content-type=text/html
10 #开发时关闭缓存,不然没法看到实时页面
11 spring.thymeleaf.cache=false
12 #thymeleaf这样配置就可以直接访问static下的HTML(和mvc访问方式二选一)
13 spring.thymeleaf.prefix = classpath:/static/
14 spring.thymeleaf.suffix = .html
15
16 spring.datasource.url=jdbc:mysql://localhost:3306/labwork?useUnicode=true&characterEncoding=utf8
17 spring.datasource.username=root
18 spring.datasource.password=root
19 spring.datasource.driver-class-name=com.mysql.jdbc.Driver
20 mybatis.typeAliasesPackage=com.tqh.demo.model
测试的数据库自己建好,不赘述
测试
在model包 创建个Person类
 1 package com.tqh.demo.model;
 2
 3 public class Person {
 4
 5     private Integer id;
 6     private String name;
 7     private Integer age;
 8
 9     public Integer getId() {
10         return id;
11     }
12
13     public void setId(Integer id) {
14         this.id = id;
15     }
16
17     public String getName() {
18         return name;
19     }
20
21     public void setName(String name) {
22         this.name = name;
23     }
24
25     public Integer getAge() {
26         return age;
27     }
28
29     public void setAge(Integer age) {
30         this.age = age;
31     }
32
33     @Override
34     public String toString() {
35         return
36                 "id=" + id +
37                         ", name=\'" + name + \'\\\'\' +
38                         ", age=" + age
39                 ;
40     }
41 }
在Mapper包创建一个UserMapper
1 package com.tqh.demo.mapper;
2
3 import com.tqh.demo.model.Person;
4 import org.apache.ibatis.annotations.Select;
5 @Repository
6 public interface UserMapper {
7   @Select("SELECT * FROM Person WHERE id = #{id}")
8   Person selectUser(int id);
9 }
在Service包创建一个UserService
 1 package com.tqh.demo.service;
 2 import com.tqh.demo.model.Person;
 3
 4 public class UserService {
 5
 6      @Autowired
 7      UserMapper userMapper;
 8
 9      @Override
10     public Person selectUser(int id) {
11          return userMapper.selectUser(id);
12      }
13
14  }
在controller包新建一个UserController控制器
 1 package com.tqh.demo.controller;
 2
 3 import com.tqh.demo.service.UserService;
 4 import org.springframework.beans.factory.annotation.Autowired;
 5 import org.springframework.boot.autoconfigure.EnableAutoConfiguration;
 6 import org.springframework.web.bind.annotation.PathVariable;
 7 import org.springframework.web.bind.annotation.RequestMapping;
 8 import org.springframework.web.bind.annotation.RestController;
 9
10 @RestController
12 public class UserController {
13     @Autowired
14     private UserService userService;
15
16     @RequestMapping("/showUser/{id}")
17     public String selectUser (@PathVariable int id){
18         return userService.selectUser(id).toString();
19
20     }
21 }
编写启动类DemoApplication
 1 package com.tqh.demo;
 2
 3 import org.mybatis.spring.annotation.MapperScan;
 4 import org.springframework.boot.SpringApplication;
 5 import org.springframework.boot.autoconfigure.SpringBootApplication;
 6
 7 @MapperScan("com.tqh.demo.mapper")
 8 @SpringBootApplication
 9 public class DemoApplication {
10
11     public static void main(String[] args) {
12         SpringApplication.run(DemoApplication.class, args);
13     }
14 }
运行DemoApplication,打开浏览器访问http://localhost:9090/showUser/1,成功查询到数据库的数据

以上是关于使用IDEA搭建Spring boot+Mybatis工程的主要内容,如果未能解决你的问题,请参考以下文章