maven profile实现多环境打包
Posted Zhan
tags:
篇首语:本文由小常识网(cha138.com)小编为大家整理,主要介绍了maven profile实现多环境打包相关的知识,希望对你有一定的参考价值。
作为一名程序员,在开发的过程中,经常需要面对不同的运行环境(开发环境、测试环境、生产环境、内网环境、外网环境等等),在不同的环境中,相关的配置一般不一样,比如数据源配置、日志文件配置、以及一些软件运行过程中的基本配置。每次在不同环境部署程序时,都需要修改相应的配置文件,使之完成环境的配置。这么做存在一个比较大的问题:每次修改配置非常麻烦,而且配置错误会产生不可预估的影响,比如,在发布生产环境时用的开发环境的配置还好,但如果在开发环境下用生产环境的数据,将会造成生产数据的污染,导致生产环境崩溃。
目前JAVA相关的项目基本都是使用Maven来进行构建。在maven中实现多环境的构建可移植性需要使用profile,通过不同的环境激活不同的profile来达到构建的可移植性。
一、POM中profile的配置
首先是profile配置,在pom.xml中添加如下profile的配置:
<profiles>
    <profile>
        <!-- 本地开发环境 -->
        <id>dev</id>
        <properties>
            <profiles.active>dev</profiles.active>
        </properties>
        <activation>
            <activeByDefault>true</activeByDefault>
        </activation>
    </profile>
    <profile>
        <!-- 测试环境 -->
        <id>test</id>
        <properties>
            <profiles.active>test</profiles.active>
        </properties>
    </profile>
    <profile>
        <!-- 生产环境 -->
        <id>pro</id>
        <properties>
            <profiles.active>pro</profiles.active>
        </properties>
    </profile>
</profiles>
这里定义了三个环境,dev(开发环境)、test(测试环境)、pro(生产环境),其中开发环境是默认激活的(activeByDefault为true),这样如果在不指定profile时默认是开发环境。
同时每个profile还定义了两个属性,其中profiles.active表示被激活的profile的配置文件的目录。
二、工程目录
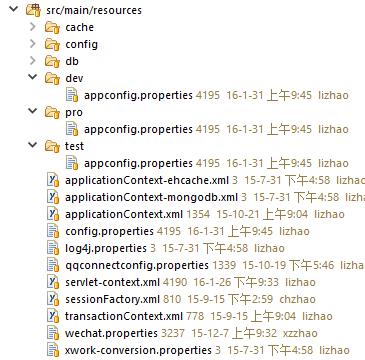
针对不同的环境,我们定义不同的配置文件,而这些配置文件都做为资源文件放到maven工程的resources目录下,即src/main/resources目录下,且各个环境的配置分别放到相应的目录下,而所有环境都公用的配置,直接放到src/main/resources目录下即可。如下图所示:
如图所示,开发环境、测试环境、生产环境的配置文件分别放到src/main/resources目录下的dev、test、pro三个子目录中,剩余公共的配置文件放于resources目录下。
三、POM文件中build配置
在pom中的build节点下,配置资源文件的位置,如下所示:
  <build>
        <resources>
            <resource>
                <directory>src/main/resources</directory>
                <!-- 资源根目录排除各环境的配置,防止在生成目录中多余其它目录 -->
                <excludes>
                    <exclude>test/*</exclude>
                    <exclude>pro/*</exclude>
                    <exclude>dev/*</exclude>
                </excludes>
            </resource>
            <resource>
                <directory>src/main/resources/${profiles.active}</directory>
            </resource>
        </resources>
    </build>
首先第一个资源文件位置src/main/resources需要排队提各个环境的配置文件,各个环境的配置我们在第二个节点中通过前面在profile中配置的profiles.active属性来指定。即src/main/resources/${profiles.active}。这样在激活指定的profile时,会加载指定目录下的配置文件,如当前激活的是pro profile,那么这个资源目录就是src/main/resources/pro。这样就达到了不同环境加载不同配置的目的。
五、项目编译生成
所有需要的配置就完成了,通过在运行maven命令时指定不同的profile即可构建不同环境需要的war包或发布到不同的环境了 。如:
mvn clean package -Ppro即构建出生产环境需要的war包
由于默认的profile是dev,所以如果我们不指定profile,那么加载就是开发环境dev下的配置文件了。即我们在本地开发测试时,不用关心profile的问题。
其它方法
在resource节点中可以增加如下节点
<resource>
    <directory>src/main/resources</directory>
    <!-- 资源根目录排除各环境的配置,使用单独的资源目录来指定 -->
    <excludes>
        <exclude>test/*</exclude>
        <exclude>pro/*</exclude>
        <exclude>dev/*</exclude>
    </excludes>
    <filtering>true</filtering>
</resource>
在某个resource中如果设置filtering为true,将会根据输入参数动态修改相关内容。
配置文件app.config中为
url=${url}方式一,使用profile的properties
<properties>
    <profiles.active>test</profiles.active>
    <url>localhost</url>
</properties>
maven在resources过程中会替换为localhost
方式二,使用命令参数-D
mvn clean package -Durl=localhost
同样的效果,都会copy资源文件的时候设置这个url的参数
参考链接
http://maven.apache.org/guides/introduction/introduction-to-profiles.html
http://www.petrikainulainen.net/programming/tips-and-tricks/creating-profile-specific-configuration-files-with-maven/
http://blog.csdn.net/mhmyqn/article/details/24501281
以上是关于maven profile实现多环境打包的主要内容,如果未能解决你的问题,请参考以下文章
Eclipse Maven profiles 多环境配置,测试环境与开发环境分开打包