手把手教你基于Springboot+Vue搭建个人博客网站
Posted 灰小猿
tags:
篇首语:本文由小常识网(cha138.com)小编为大家整理,主要介绍了手把手教你基于Springboot+Vue搭建个人博客网站相关的知识,希望对你有一定的参考价值。
Hello,你好呀,我是灰小猿,一个超会写bug的程序猿!
利用国庆期间做了一个基于springboot+vue的前后端分离的个人博客网站,今天在这里将开发过程和大家分享一下,手把手教你搭建一个自己专属的个人博客。
完整源码放置在Gitee上了,【源码链接】
小伙伴们记得⭐star⭐哟!
小伙伴们一键三连➕关注!灰小猿带你上高速啦🎉🎉🎉!
先看一下博客网站的演示视频:
⚡项目目录⚡
一、个人博客网站项目整体思路
整个项目的设计是前后端分离的,后端使用的是SpringBoot+MybatisPlus设计,前端使用Vue+ElementUI搭建页面。安全验证等操作由shiro安全框架完成,在进行前后端数据交互的时候采用路由传输,同时在前后端解决了跨域问题。博客实现登录功能,在未登录的情况下只能访问博客主页,在登录的状态下可以实现博客的发布与编辑功能。
整个博客主页的博客采用时间线的方式布局,先发布的文章会在最前面展示;博客编辑功能同时支持Markdown编辑器编辑。具体的功能实现小伙伴们继续往下看!
二、Java后端接口开发
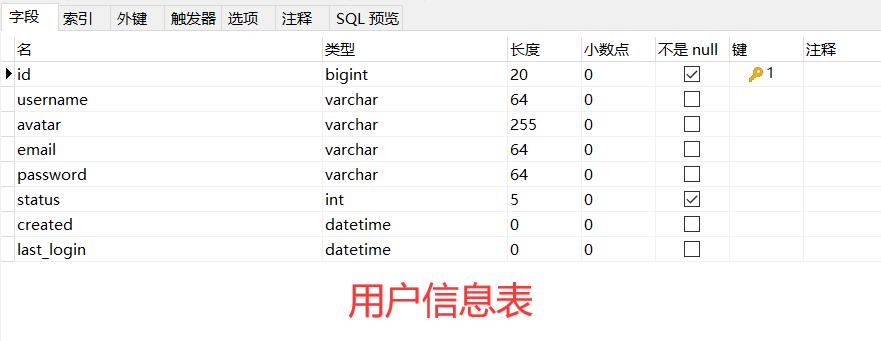
(1)数据库设计
在数据库设计上主要就是两个表,一个用户信息表和一个博客信息表,
博客信息表中的数据ID会和用户ID相对应。详细的表结构如下:

(2)整合MybatisPlus
平常我们使用的都是mybatis来做数据库操作,MybatisPlus是在Mybatis的基础上兴起的,我个人的理解是它在Mybatis和逆向工程的结合,可以直接读取我们的数据库,并且自动的生成*Mapper.xml、Dao、Service中的代码,提高我们的开发效率。
整合MybatisPlus的步骤如下:
第一步,导入所需jar包
在这里我们需要导入MybatisPlus所依赖的jar包,同时因为MybatisPlus需要涉及到代码的自动生成,所以还需要引入freemarker的页面模版引擎。
        <!--mp-->
        <dependency>
            <groupId>com.baomidou</groupId>
            <artifactId>mybatis-plus-boot-starter</artifactId>
            <version>3.2.0</version>
        </dependency>
        <!--freemarker模版引擎依赖-->
        <dependency>
            <groupId>org.springframework.boot</groupId>
            <artifactId>spring-boot-starter-freemarker</artifactId>
        </dependency>
        <dependency>
            <groupId>mysql</groupId>
            <artifactId>mysql-connector-java</artifactId>
            <version>5.1.37</version>
            <scope>runtime</scope>
        </dependency>
        <!--mp代码生成器-->
        <dependency>
            <groupId>com.baomidou</groupId>
            <artifactId>mybatis-plus-generator</artifactId>
            <version>3.2.0</version>
        </dependency>
第二步、写入配置文件
因为我们需要连接数据库嘛,所以当然需要用到数据库连接驱动,同时还需要在配置文件中进行配置,指定好我们的数据库驱动、用户名、密码、数据库名称这些。
同时还需要指定好MybatisPlus扫描的xml文件,
#配置数据库信息
spring:
  datasource:
    driver-class-name: com.mysql.jdbc.Driver
    url: jdbc:mysql://localhost:3306/vueblog?useUnicode=true&useSSL=false&characterEncoding=utf8&serverTimezone=Asia/Shanghai
    username: root
    password: ADMIN

#指定mybatisPlus扫描的xml文件
mybatis-plus:
  mapper-locations: classpath*:/mapper/**Mapper.xml
第三步、开启mapper接口扫描,添加分页插件
在这里需要实现一个分页插件PaginationInterceptor,使用该分页插件的目的很简单,就是让我们在每次查询到的结果以分页的形式展示出来。该插件是写在MybatisPlusConfig类下的,
同时还有一点需要注意的是,在添加该配置文件的时候我们需要在类上增加@MapperScan("")注解,在其中传入我们想要将接口写入到的包名,该接口的目的就是执行想要变成实现类的接口所在的包,如@MapperScan("com.gyg.mapper")
/**
 * mybatisPlus配置
 */
@Configuration
@EnableTransactionManagement
@MapperScan("com.gyg.mapper")   //指定变成实现类的接口所在的包
public class MybatisPlusConfig

    /**
     * 实现一个分页插件PaginationInterceptor
     * @return
     */
    @Bean
    public PaginationInterceptor paginationInterceptor()
        PaginationInterceptor paginationInterceptor = new PaginationInterceptor();
        return paginationInterceptor;
第四步、生成相关代码
想要通过mybatisplus生成代码,官方是给了我们一个工具类的,通过该工具类,我们可以写入自己的参数,然后就可以自动的生成相关的代码了。
工具类名叫:CodeGenerator ,使用时我们需要将其和springboot的启动类放置在同级目录下。启动运行之后,输入我们想要生成对应代码的表名即可。
工具类的代码比较长,我放置在了gitee上,【源码链接】
运行这个代码生成器我们就可以自动的生成相关数据表的mapper、dao、service等内容了!
现在数据库相关的代码已经是基本完成了,
(3)统一结果封装
由于我们的数据都是需要通过json串的形式返回给我们的前端页面的,所以我们就需要对返回的结果进行一个统一的封装。在这里我们可以自定义一个封装类Result,方便我们将数据以统一的格式返回出去。
该封装类中一般需要返回的信息有三个:
- 状态码code(如200表示操作正确,400表示异常)
- 结果消息msg
- 结果数据data
同时在封装类中定义全局方法,用于在不同的状态下返回不同的数据。封装类的代码如下:
import lombok.Data;

import java.io.Serializable;

/**
 * 封装一个返回统一格式数据的结果集
 */
@Data
public class Result implements Serializable

    private int code;   //200正常、非200异常
    private String msg;     //提示信息
    private Object data;    //返回数据

    public static Result success(Object data)
        return success(200,"操作成功",data);


    /**
     * 消息返回方法
     *
     * @param code
     * @param msg
     * @param data
     * @return
     */
    public static Result success(int code, String msg, Object data)
        Result r = new Result();
        r.setCode(code);
        r.setMsg(msg);
        r.setData(data);
        return r;


    public static Result fail(String msg)
        return fail(400,msg,null);


    public static Result fail(String msg, Object data)
        return fail(400,msg,data);


    public static Result fail(int code, String msg, Object data)
        Result r = new Result();
        r.setCode(code);
        r.setMsg(msg);
        r.setData(data);
        return r;
(4)整合shiro+jwt实现安全验证
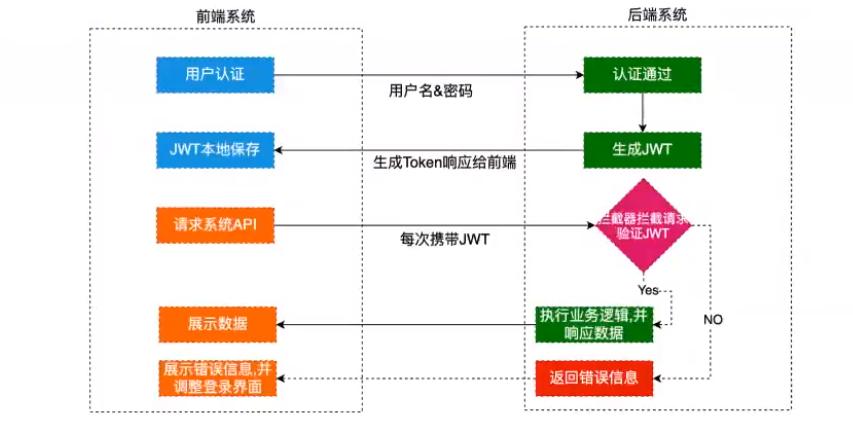
在进行安全验证的时候我采用的是shiro+jwt结合的方式,大概验证思路是这样的:
前端将登陆信息传送过来之后,通过shiro的Realm进行安全验证,如果验证不通过,那么直接将错误信息返回到前端。如果登录信息验证通过,就将用户信息存储到服务器端,然后通过jwtUtils工具类根据用户的ID生成一个token,并且将该token放入返回请求的请求头中,携带给浏览器,浏览器在接收到服务器的返回的请求的时候,就会解析并获取到该token,并将该token存储到本地;
这样在浏览器每次向服务器发送请求的时候都会从本地携带上该token,服务器也会对每次浏览器发送的请求进行验证,验证浏览器返回的token和服务器端保存的token是否相同。如果相同就放行进行处理;如果不相同就将错误信息返回到浏览器。
附上一个请求过程的图示:
安全验证所用到的类有:
- ShiroConfig:用于配置shiro的验证信息
- AccountRealm:用于对浏览器返回的登录信息进行验证
- JwtToken:封装和获取token中的数据
- AccountProfile:登录之后返回的用户信息的一个载体
- JwtFilter:jwt过滤器,用于过滤浏览器的请求
其中的代码比较多,我就放置在的Gitee上,小伙伴们可以在其中获取【源码链接】
(5)全局异常处理
无论我们平常在进行什么样的项目开发,进行全局异常处理都是一个非常好的习惯,进行全局异常处理,它可以将我们的错误信息用最简单的方式表示出来,并不会出现大量的报错信息。方便我们查阅,在这里我声明了几个在项目中经常会遇到的报错信息。
/**
 * 异常处理工具类
 */
@Slf4j
@RestControllerAdvice
public class GlobalExceptionHandler

    /**
     * 运行时异常
     * @param e
     * @return
     */
    @ResponseStatus(HttpStatus.BAD_REQUEST)     //判断返回消息是否正常
    @ExceptionHandler(value = RuntimeException.class)
    public Result handler(RuntimeException e)
        log.error("运行时异常---------->>>" + e);
        return Result.fail(e.getMessage());


    /**
     * shiro运行异常
     * @param e
     * @return
     */
    @ResponseStatus(HttpStatus.UNAUTHORIZED)     //判断返回消息是否正常,没有权限异常
    @ExceptionHandler(value = ShiroException.class)
    public Result handler(ShiroException e)
        log.error("shiro异常---------->>>" + e);
        return Result.fail(401,e.getMessage(),null);


    /**
     * 实体校验异常
     * @param e
     * @return
     */
    @ResponseStatus(HttpStatus.BAD_REQUEST)     //判断返回消息是否正常,没有权限异常
    @ExceptionHandler(value = MethodArgumentNotValidException.class)
    public Result handler(MethodArgumentNotValidException e)
        log.error("实体检验异常异常---------->>>" + e);
        BindingResult bindingResult = e.getBindingResult();
        ObjectError objectError = bindingResult.getAllErrors().stream().findFirst().get();
        return Result.fail(objectError.getDefaultMessage());


    /**
     * 处理断言异常
     * @param e
     * @return
     */
    @ResponseStatus(HttpStatus.BAD_REQUEST)     //判断返回消息是否正常,没有权限异常
    @ExceptionHandler(value = IllegalArgumentException.class)
    public Result handler(IllegalArgumentException e)
        log.error("断言异常异常---------->>>" + e);
        return Result.fail(e.getMessage());
(6)实体校验
在表单数据提交的时候,我们通常会对数据进行校验,比如不能为空,或长度不能小于指定值等,在前端我们可以通过js插件来完成,但是如果在后端的话,我们可以通过使用Hibernate validatior的方式来进行校验。
在springboot中已经自动集成了Hibernate validatior的校验,我们只需要在代码中直接使用就可以了。
所以我们只需要在实体的属性上添加相应的校验规则就可以了,比如在user实例类中:
/**
 *
 * @author 关注公众号:码猿编程日记
 * @since 2021-09-21
 */
@Data
@EqualsAndHashCode(callSuper = false)
@Accessors(chain = true)
@TableName("m_user")
public class User implements Serializable

    private static final long serialVersionUID = 1L;

    @TableId(value = "id", type = IdType.AUTO)
    private Long id;

    @NotBlank(message = "用户名不能为空")
    private String username;

    private String avatar;

    @NotBlank(message = "邮箱不能为空")
    @Email(message = "邮箱格式不正确")
    private String email;


    private String password;

    private Integer status;

    private LocalDateTime created;

    private LocalDateTime lastLogin;
(7)跨域问题
由于我们做的是前后端分离的项目,所以在请求发送上一定会出现同源策略的相关问题,这就需要我们解决跨域问题了,关于在前后端交互中解决跨域问题,我专门写了一篇博客,小伙伴们可以去看那一篇《SpringBoot与Vue交互解决跨域问题》
在springboot的后端解决跨域问题的策略比较简单,只需要添加一个类CorsConfig,并且让它实现WebMvcConfigurer接口, 其中代码如下,一般在开发的时候直接将代码复制过去就可以了。
import org.springframework.context.annotation.Configuration;
import org.springframework.web.servlet.config.annotation.CorsRegistry;
import org.springframework.web.servlet.config.annotation.WebMvcConfigurer;

/**
 * 解决跨域问题
 */
@Configuration
public class CorsConfig implements WebMvcConfigurer

    @Override
    public void addCorsMappings(CorsRegistry registry)
        registry.addMapping("/**")
                .allowedOriginPatterns("*")
                .allowedMethods("GET", "HEAD", "POST", "PUT", "DELETE", "OPTIONS")
                .allowCredentials(true)
                .maxAge(3600)
                .allowedHeaders("*");
(8)登录接口开发
登录接口的开发思路很简单,就是接收前端发送过来的登录信息,进行验证是否通过。同时还有一个退出登录的接口,传入用户的信息,确定是在登录状态时可以实现退出登录操作。
代码如下;
@RestController
public class AccountController

    @Autowired
    UserService userService;

    @Autowired
    JwtUtils jwtUtils;


    @PostMapping("/login")
    public Result login(@Validated @RequestBody LoginDto loginDto, HttpServletResponse response)

        System.out.println("用户名和密码:" + loginDto.getUsername() + " " + loginDto.getPassword());
//        获取到当前用户
        Subject subject = SecurityUtils.getSubject();
//        封装用户名和密码
        UsernamePasswordToken token = new UsernamePasswordToken(loginDto.getUsername(), loginDto.getPassword());

        System.out.println("封装用户名和密码成功!!!");

        try
//            使用shiro进行用户验证
            subject.login(token);
//            如果验证通过再根据用户名查找到该用户
            User user = userService.getOne(new QueryWrapper<User>().eq("username", loginDto.getUsername()));
            Assert.notNull(user, "用户不存在!");

            if (!user.getPassword().equals(loginDto.getPassword()))
                return Result.fail("密码错误!");

//            根据用户id生成一个jwt
            String jwt = jwtUtils.generateToken(user.getId());

//            将jwt写入
            response.setHeader("authorization", jwt);
            response.setHeader("Access-Control-Expose-Headers", "authorization");

            //            如果正确就返回用户信息
            return Result.success(MapUtil.builder()
                    .put("id", user.getId())
                    .put("username", user.getUsername())
                    .put("avatar", user.getAvatar())
                    .put("email", user.getEmail())
                    .map()
            );
         catch (UnknownAccountException e)
            return Result.fail("用户不存在2");
         catch (IncorrectCredentialsException e)
            return Result.fail("密码不正确2");


    /**
     * 退出登录
     *
     * @return
     */
    @RequiresAuthentication
    @GetMapping("/logout")
    public Result logout()
        Subject subject = SecurityUtils.getSubject();
//        AccountProfile profile = (AccountProfile) subject.getPrincipal();
//        System.out.println(profile.getId());
//        会请求到logout
        subject.logout();

        return Result.success("退出成功");


    @RequiresAuthentication
    @GetMapping("/testlogin")
    public Result testlogin()
        User user = userService.getById(1L);
        return Result.success(user);
(9)博客接口开发
博客接口中主要实现的功能有:返回主页信息,返回指定博客信息,编辑和发布博客、删除博客的功能,其中编辑和删除博客只有在登录状态下才能请求成功,其他两个请求无需进行登录。
代码如下:
/**
 * @author 关注公众号:码猿编程日记
 * @since 2021-09-21
 */
@RestController
//@RequestMapping("/blog")
public class BlogController

    @Autowired
    BlogService blogService;

    /**
     * 分页博客页
     *
     * @param currentPage
     * @return
     */
    @GetMapping("/blogs")
    public Result list(@RequestParam(defaultValue = "1") Integer currentPage)
        Page page = new Page(currentPage, 5);

        AccountProfile accountProfile =  (AccountProfile) SecurityUtils.getSubject().getPrincipal();
        System.out.println(accountProfile);

        IPage<Blog> pageDate = blogService.page(page, new QueryWrapper<Blog>().orderByDesc("created"));

        return Result.success(pageDate);


    /**
     * 查找指定的博客
     *
     * @param id
     * @return
     */
    @GetMapping("/blog/id")
    public Result detail(@PathVariable(name = "id") long id)

        Blog blog = blogService.getById(id);
//        用断言来来判断文章是否找不到
        Assert.notNull(blog, "该博客已经被删除!");

//        返回该博客数据
        return Result.success(blog);


    /**
     * @param blog
     * @return
     */
//    只有登录之后才能编辑
    @RequiresAuthentication
    @PostMapping("/blog/edit")
    public Result edit(@Validated @RequestBody Blog blog)

        System.out.println("编辑测试11111111111111111");
        System.out.println(blog.toString());
        System.out.println("当前用户ID:" + ShiroUtil.getProfile().getId());
        System.out.println(blog.toString());
//        System.out.println("当前用户id:" + ShiroUtil.getSubjectID());

        Blog temp = null;
        //      如果博客id不为空,就是编辑
        if (blog.getId() != null)
            temp = blogService.getById(blog.getId());
//            每一个用户只能编辑自己的文章
            Assert.isTrue(temp.getUserId().equals(ShiroUtil.getProfile().getId()), "你没有权限编辑");

         else
            //      如果id为空,就是添加
            temp = new Blog();
//            将这篇文章添加给当前用户的id
            temp.setUserId(ShiroUtil.getProfile().getId());
//            博客创建时间
            temp.setCreated(LocalDateTime.now());
            temp.setStatus(0);


        //  将两个对象进行复制,指定那些字段不复制
        //BeanUtil.copyProperties("转换前的类","转换后的类");
        BeanUtil.copyProperties(blog, temp, "id", "userId", "created", "status");

        //保存或者更新这一篇文章
        blogService.saveOrUpdate(temp);

        return Result.success("操作成功");


    /**
     * 根据博客ID删除博客
     * @param id
     * @return
     */
    @RequiresAuthentication
    @PostMapping("/blog/delete/id")
    public Result deleteBlog(@PathVariable("id") long id)
        System.out.println(id);
        System.out.println("------------");
//        int bid = Integer.parseInt(id);
        boolean isRemove = blogService.removeById(id);
        if (!isRemove)
            return Result.fail("删除失败!");

        return Result.success("删除成功!");
以上就是我们后台接口开发的全部过程,在开发完成之后需要进行相关的接口测试,测试完成无误之后就可以进行前台页面的开发了。
三、Vue前端页面开发
前端页面的开发我们是基于Vue和Element-Ui的,同时涉及axios发送请求,markdown编辑器的引入、登录验证、跨域请求等问题。
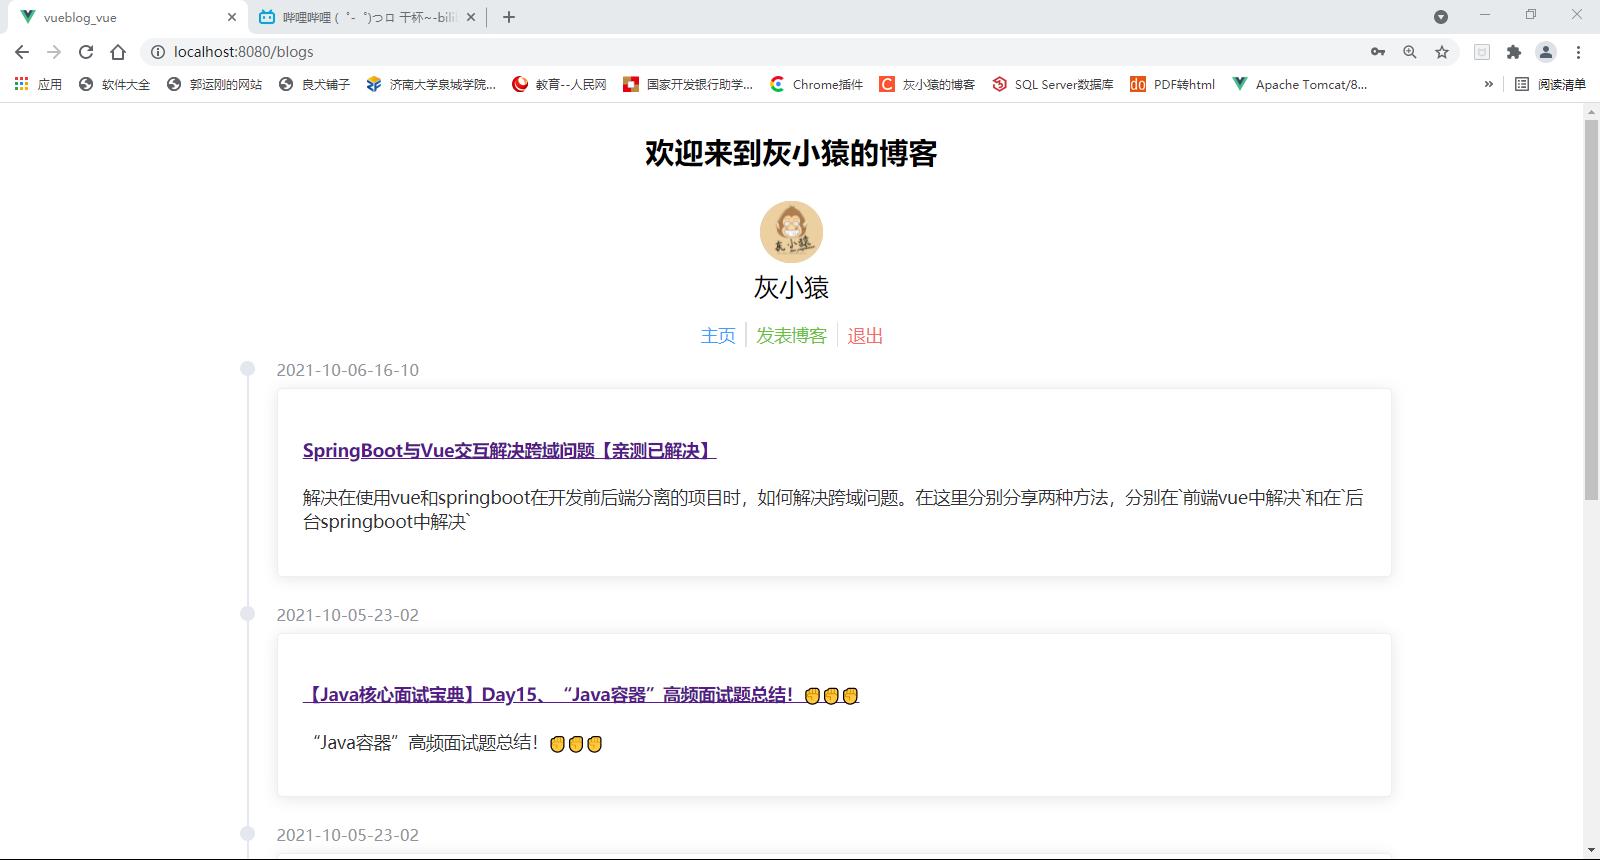
博客主页的页面是这样的:
接下来和大家分享一下前端页面的开发流程。
(1)安装Element-UI
Element-UI是进行前端开发的一个组件库,官网地址。这里面提供了各种已经开发好的组件供我们使用。
Element - The world's most popular Vue UI framework
使用该组件库我们首先是需要引入的。在vue的根目录下,输入如下命令:
# 切换到项目根目录
cd vueblog-vue
# 安装element-ui
npm install element-ui --save
之后打开项目的src目录下的main.js文件,引入Element-UI依赖。
import Element from 'element-ui'

import "element-ui/lib/theme-chalk/index.css"

Vue.use(Element)
到现在,组件库中的组件我们就可以任意使用了。
(2)安装axios
axios是一个基于promise的HTTP库,在我们进行前后端项目开发的时候,使用该工具可以提高我们的开发效率。【axios官网】
Axios的安装命令如下:
cnpm install axios --save
同样需要在main.js中全局引入axios,
import axios from 'axios'

Vue.prototype.$axios = axios
之后我们就可以通过this.$axios.get()来发起我们的请求了!
(3)配置页面路由
接下来是定义页面路由,定义页面路由的目的是我们在访问相应路径的时候,可以根据路由来确定到我们将要访问的页面。
在views文件夹中的页面有:
- BlogDetail.vue(博客详情页)
- BlogEdit.vue(编辑博客)
- Blogs.vue(博客列表)
- Login.vue(登录页面)
页面路由设置在router文件下的index.js中。配置如下:
/**
 * 路由注册中心
 */

import Vue from 'vue'
import VueRouter from 'vue-router'


//注册页面
import Login from '../views/Login.vue'
import Blogs from '../views/Blogs.vue'
import BlogEdit from '../views/BlogEdit.vue'
import BlogDetail from '../views/BlogDetail.vue'


Vue.use(VueRouter)

const routes = [

        path: '/',
        name: 'index',
        redirect: name: "Blogs"   //页面重定向
    ,

        path: '/blogs',
        name: 'Blogs',
        component: Blogs
    ,

        path: '/login',
        name: 'Login',
        component: Login
    ,

        path: '/blog/add',
        name: 'BlogAdd',
        component: BlogEdit,
        //添加权限访问,表示只有登录之后才能进行该操作
        meta:
            requireAuth: true

    ,

        path: '/blog/:blogId/edit',
        name: 'BlogEdit',
        component: BlogEdit,
        //添加权限访问,表示只有登录之后才能进行该操作
        meta:
            requireAuth: true

    ,

        path: '/blog/:blogId',
        name: 'BlogDetail',
        component: BlogDetail
    ,

]

const router = new VueRouter(
    mode: 'history',
    base: process.env.BASE_URL,
    routes
)

export default router
在上述代码中带有meta:requireAuth: true说明是需要登录之后才能访问的受限资源,后面我们路由权限拦截时候会讲到这个。
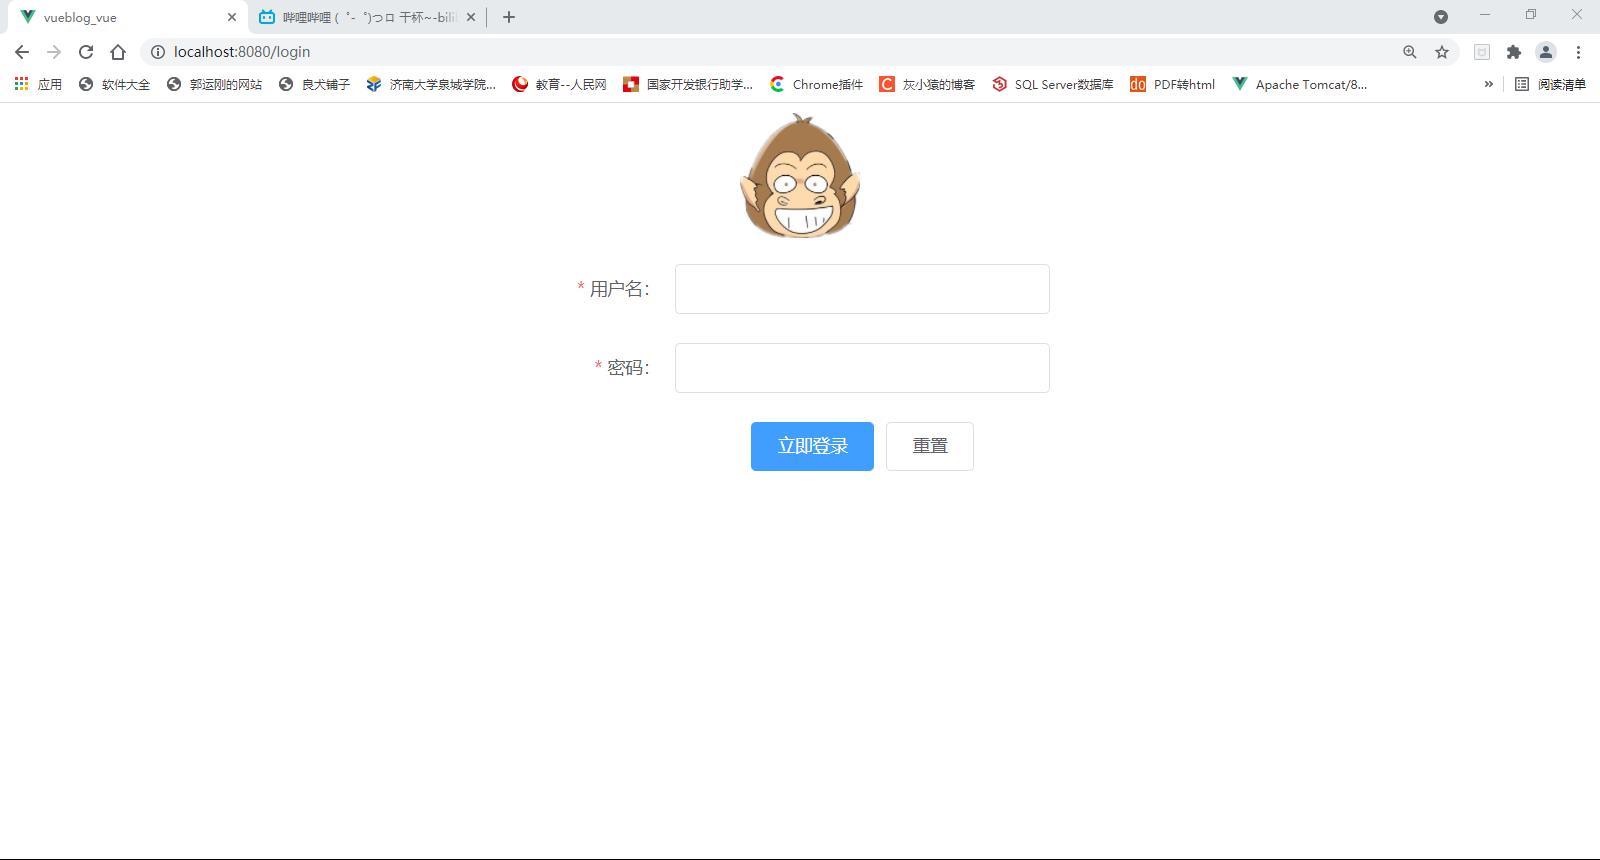
(4)登录页面
登录页面我们这里是由用户名和密码进行登录的,组件我采用了element-ui中的组件,所以在登录中直接就有了登录校验的功能,
登录验证
在这里点击登录按钮之后,会有一个验证登录的过程,简单说一下验证的思路,
我们发起登录请求之后,获取到它返回的请求,查看请求中是否存在我们需要的jwttoken,如果存在的,那么我们就将获取到的token和用户信息共享给我们的浏览器,之后跳转到主页。如果不存在,就弹窗提示,并且不做任何操作。
代码如下:
        methods:

            /**提交表单**/
            async submitForm(formName)
                this.$refs[formName].validate((valid) =>
                    if (valid)
                        // alert('submit!');
                        //提交登录信息
                        //获取到当前的this对象
                        const _this = this;
                        this.$axios.post("/login", this.ruleForm).then(res =>

                            console.log(res.data)
                            const jwt = res.headers["authorization"]
                            if (jwt === null)
                                this.$alert('用户名或密码错误!!', '提示',
                                    confirmButtonText: '确定',
                                    callback: action =>
                                        // _this.$router.push("/blogs")

                                );
                            else
                                const userInfo = res.data.data
                                console.log(jwt)
                                console.log(userInfo)

                                //把数据共享出去
                                _this.$store.commit("SET_TOKEN", jwt);
                                _this.$store.commit("SET_USERINFO", userInfo);

                                //获取
                                console.log(_this.$store.getters.getUser)
                                //页面跳转
                                _this.$router.push("/blogs")


                        );
                     else
                        console.log('error submit!!');
                        return false;

                );
            ,
            resetForm(formName)
                this.$refs[formName].resetFields();
token状态同步
在上述代码中,我们用到了$store来同步token和用户信息,那么这个同步是如何完成的呢,其实是我们在store文件下的index.js中进行了封装和设置。
存储token,我们用的是localStorage,存储用户信息,我们用的是sessionStorage。毕竟用户信息我们不需要长久保存,保存了token信息,我们随时都可以初始化用户信息。
index.js中的代码如下:
import Vue from 'vue'
import Vuex from 'vuex'

Vue.use(Vuex)

export default new Vuex.Store(
    state:
        // token: "",
        //用户的信息可以直接从浏览器中取出来
        token: localStorage.getItem("token"),
        //反序列化操作
        userInfo: JSON.parse(sessionStorage.getItem("userInfo"))
    ,
    mutations:
        /**类似set操作*/
        //给token赋值
        SET_TOKEN: (state, token) =>
            state.token = token;
            //将信息存储到浏览器中,以至于浏览器关闭时信息还在
            localStorage.setItem("token", token);
        ,
        //给userinfo赋值
        SET_USERINFO: (state, userInfo) =>
            state.userInfo = userInfo;
            //session会在每次浏览器关闭时清空,在重新登录后再生成
            //由于sessionStorage不能存储对象,所以要将其存储成字符串的形式
            sessionStorage.setItem("userInfo", JSON.stringify(userInfo));
        ,
        //移除用户信息
        REMOVE_INFO: (state) =>
            //移除用户信息时将用户所有的信息都置为空
            state.token = "";
            state.userInfo = ;
            localStorage.setItem("token", "");
            sessionStorage.setItem("userInfo", JSON.stringify(""));


    ,
    getters:
        /**类似get请求*/
        //获取用户信息
        getUser: state =>
            return state.userInfo;

    ,
    actions: ,
    modules:
)
定义全局axios拦截器
由于我们的登录有时候会出现密码输出错误的情况,虽然不需要做任何操作,但是有时候我们还是需要进行弹窗提示,这样对于这种错误信息的弹窗,我们就可以对其进行统一的封装和设置。所以我对axios设置一个拦截器,包括前置拦截和后置拦截,如果说我们返回数据的code或者status不正常就会弹窗提示相应的信息。
操作是在在src目录下创建一个文件axios.js(与main.js同级),定义axios的拦截:
import axios from "axios"
import Element from "element-ui"
import router from "../router"
import store from "../store";


//设置统一请求路径
axios.defaults.baseURL = "/api"
//前置拦截
axios.interceptors.request.use(config =>
    return config
)

/**
 * 对请求的返回数据进行过滤
 */
axios.interceptors.response.use(response =>
    let res = response.data;

    console.log("=================")
    console.log(res)
    console.log("=================")

    //如果状态码是200,直接放行
    if (res.code === 200)
        return response
     else
        //如果是用户名错误会直接断言处理,不会到达这一步!
        //弹窗提示!
        Element.Message.error('用户名或密码错误!', duration: 3 * 1000)
        //返回错误信息
        return Promise.reject(response.data.msg)

,
    //如果是非密码错误,会到达这一步
    error =>
        console.log(error)
        //如果返回的数据里面是空
        if (error.response.data)
            error.message = error.response.data.msg;

        //如果状态码是401,
        if (error.response.status === 401)
            store.commit("REMOVE_INFO")
            router.push("/login")


        //弹出错误信息
        Element.Message.error(error.message, duration: 3 * 1000)
        return Promise.reject(error)
)
之后别忘了在main,js文件中导入axios,js文件。
import './axios.js' // 请求拦截简单说一下这几个拦截的作用:
前置拦截:在请求之前的拦截,可以在其中统一为所有需要权限的请求装配上header的token信息,这样就不要在使用的时候再配置。
后缀拦截:在请求返回之后的拦截,可以在请求之后对返回的数据进行处理和验证,
(5)博客列表
在我们登录完成之后就会进入了博客的主页面,在该页面主要是展示了当前录入到系统中的博客信息,界面如下:

整个博客的显示是按照时间线的方式展开的,最后发布的博客会在第一个出现,同时你会发现在博客主页的头部会展示我们的一些基本信息,包括个人信息以及编辑和退出的功能,这个头部信息会一直显示在我们的页面中,所以为了能够实现代码复用,减少代码的使用量,我们将头部信息全部都抽取了出来,放置在了Header.vue页面中,
<template>
    <div class="m_content">
        <h3>欢迎来到user.username的博客</h3>
        <div class="block">
            <el-avatar :size="50" :src="user.avatar"></el-avatar>
            <div>user.username</div>
        </div>

        <div class="maction">
            <span><el-link type="primary" href="/blogs">主页</el-link></span>

            <el-divider direction="vertical"></el-divider>
            <span><el-link type="success" href="/blog/add">发表博客</el-link></span>

            <span v-show="!haslogin">
                <el-divider direction="vertical"></el-divider>
                <span><el-link type="warning" href="/login">登录</el-link></span>
            </span>

            <span v-show="haslogin">
                <el-divider v-show="haslogin" direction="vertical"></el-divider>
                <span ><el-link type="danger" @click="logout">退出</el-link></span>
            </span>

        </div>
    </div>
</template>

<script>

    export default
        name: "Header",
        data()
            return
                user:
                    username: "请先登录",
                    avatar: "https://cube.elemecdn.com/3/7c/3ea6beec64369c2642b92c6726f1epng.png"
                ,
                haslogin: false

        ,
        //写入方法
        methods:
            //退出登录
            logout()
                const _this = this;
                //发送退出登录请求
                _this.$axios.get("/logout",
                    //由于只有在登录的时候才能进行退出,所以将token信息携带回去
                    headers:
                        "authorization": localStorage.getItem("token")

                ).then(res =>
                    //清空数据信息
                    _this.$store.commit("REMOVE_INFO")
                    //返回到登录界面
                    _this.$router.push("/login")
                )
            ,
        ,
        //执行一个初始化操作
        created()
            //如果用户名存在,就回显出来
            if (this.$store.getters.getUser.username)
                this.user.username = this.$store.getters.getUser.username
                this.user.avatar = this.$store.getters.getUser.avatar
                this.haslogin = true


</script>

<style scoped>
    .m_content
        max-width: 960px;
        margin: 0 auto;
        text-align: center;


    .maction
        margin: 10px 0px;

</style>
如果在其他页面中需要该头部信息时,只需要将Header页面引用到该页面中,之后在内容中写入即可。如下:
import Header from "@/components/Header";

data()

  components: Header
然后模板中调用组件
<Header></Header>在该博客主页中包括博客分页,以及博客排列,因为我们使用了分页组件,所以在返回的信息会直接带有分页信息,我们直接拿来用就可以了。
<template>
    <div>
        <Header></Header>
        <div class="block">
            <el-timeline>
                <el-timeline-item :timestamp="blog.created" placement="top" v-for="blog in blogs">
                    <el-card>
                        <router-link :to="name:'BlogDetail',params:blogId:blog.id">
                            <h4>blog.title</h4>
                        </router-link>
                        <p>blog.description</p>
                    </el-card>
                </el-timeline-item>


            </el-timeline>
        </div>
        <el-pagination class="mpage"
                       background
                       layout="prev, pager, next"
                       :current-page="currentPage"
                       :page-size="pageSize"
                       :total="total"
                       @current-change=page
        >
        </el-pagination>
    </div>
</template>

<script>

    //导入公共的Header
    import Header from "../components/Header";

    export default
        name: "Blogs",
        //将Header注册进去
        components: Header,
        //返回的数据
        data()
            return
                blogs: ,
                currentPage: 1,  //当前页
                total: 0,    //总共多少页
                pageSize: 5  //每一页的数据个数

        ,
        mounted()
        ,
        methods:
            //请求指定页的方法
            page(currentPage)
                const _this = this;
                _this.$axios.get("/blogs?currentPage=" + currentPage,
                    headers:
                        "authorization": localStorage.getItem("token")

                ).then(res =>
                    console.log(res)
                    //从获取到的数据中进行赋值
                    _this.blogs = res.data.data.records
                    _this.currentPage = res.data.data.current
                    _this.total = res.data.data.total
                    _this.pageSize = res.data.data.size
                )

        ,
        created()
            this.page(1)


</script>

<style scoped>
    .mpage
        margin: 0 auto;
        text-align: center;

</style>
data()中直接定义博客列表blogs、以及一些分页信息。methods()中定义分页的调用接口page(currentPage),参数是需要调整的页码currentPage,得到结果之后直接赋值即可。然后初始化时候,直接在mounted()方法中调用第一页this.page(1)。
(6)博客编辑
博客编辑页面中我们可以对已经发布的博客进行编辑,也可以发布新的博文,但是该项功能是只有在登录的状态下才能使用的,在博客编辑页面中,我们引入了markdown编辑器,该编辑器有关于vue的支持。我们直接导入相关依赖拿来用就可以了,
Markdown编辑器引入
第一步、进入插件
Markdown编辑器中比较好用的插件是mavon-editor,首先我们需要安装相关插件。
cnpm install mavon-editor --save
第二步、全局注册
引入之后如果想要使用,当然是需要在main.js文件中全局注册的,
// 全局注册
import Vue from 'vue'
import mavonEditor from 'mavon-editor'
import 'mavon-editor/dist/css/index.css'

// use
Vue.use(mavonEditor)
第三步、定义到页面中
Markdown编辑器的使用,在注册到全局页面中之后,只需要我们在页面中使用如下代码引入即可。
<mavon-editor v-model="editForm.content"/>以上就是vue引入markdown编辑器的步骤了,
另外附上博客编辑页面的代码:
<template>
<div>
<Header></Header>
<div class="m_content">
<el-form :model="ruleForm" :rules="rules" ref="ruleForm" label-width="100px" class="demo-ruleForm">
<el-form-item label="标题" prop="title">
<el-input v-model="ruleForm.title"></el-input>
</el-form-item>
<el-form-item label="摘要" prop="description">
<el-input type="textarea" v-model="ruleForm.description"></el-input>
</el-form-item>
<el-form-item label="内容" prop="content">
<mavon-editor v-model="ruleForm.content"></mavon-editor>
</el-form-item>
<el-form-item>
<el-button type="primary" @click="submitForm('ruleForm')">立即发布</el-button>
<el-button @click="resetForm('ruleForm')">重置</el-button>
</el-form-item>
</el-form>
</div>
</div>
</template>
<script>
import Header from "../components/Header";
export default
name: "BlogEdit",
components: Header,
data()
return
ruleForm:
id: "",
title: '',
description: '',
content: '',
,
rules:
title: [
required: true, message: '请输入标题', trigger: 'blur',
min: 5, max: 100, message: '长度在 5 到 100 个字符', trigger: 'blur'
],
description: [
required: true, message: '请输入摘要', trigger: 'blur'
],
content: [
required: true, message: '请输入内容', trigger: 'blur'
],
;
,
mounted()
console.log(localStorage.getItem("token"))
,
methods:
submitForm(formName)
this.$refs[formName].validate((valid) =>
if (valid)
const _this = this
console.log(this.ruleForm)
//发送编辑的请求
_this.$axios.post("/blog/edit", this.ruleForm,
//添加请求头部token
headers:
"authorization": localStorage.getItem("token")
).then(res =>
console.log(res)
this.$alert('编辑操作成功!', '提示',
confirmButtonText: '确定',
callback: action =>
_this.$router.push("/blogs")
);
)
以上是关于手把手教你基于Springboot+Vue搭建个人博客网站的主要内容,如果未能解决你的问题,请参考以下文章
手把手教你用VUE开发后台管理系统:搭建SpringBoo 2.xt环境