OpenCV 例程200篇214. 绘制椭圆的参数详解
Posted YouCans
tags:
篇首语:本文由小常识网(cha138.com)小编为大家整理,主要介绍了OpenCV 例程200篇214. 绘制椭圆的参数详解相关的知识,希望对你有一定的参考价值。
【youcans 的 OpenCV 例程200篇】214. 绘制椭圆的参数详解
OpenCV提供了绘图功能,可以在图像上绘制直线、矩形、圆、椭圆等各种几何图形。
7.4 绘制椭圆
函数原型:
函数 cv.ellipse() 用来在图像上绘制椭圆轮廓、填充椭圆、椭圆弧或填充椭圆扇区。
cv.ellipse(img, center, axes, angle, startAngle, endAngle, color[, thickness=1, lineType=LINE_8, shift=0]) → img
cv.ellipse(img, box, color[, thickness=1, lineType=LINE_8]) → img
参数说明:
- img:输入输出图像,允许单通道灰度图像或多通道彩色图像
- center:椭圆中心点的坐标,(x, y) 格式的元组
- axes:椭圆半轴长度,(hfirst, hsecond) 格式的元组
- angle: 椭圆沿 x轴方向的旋转角度(角度制,顺时针方向)
- startAngle:绘制的起始角度
- endAngle:绘制的终止角度
- color:绘图线条的颜色,(b,g,r) 格式的元组,或者表示灰度值的标量
- thickness:绘制矩形的线宽,默认值 1px,负数表示矩形内部填充
- lineType:绘制线段的线性,默认为 LINE_8
- shift:点坐标的小数位数,默认为 0
注意事项:
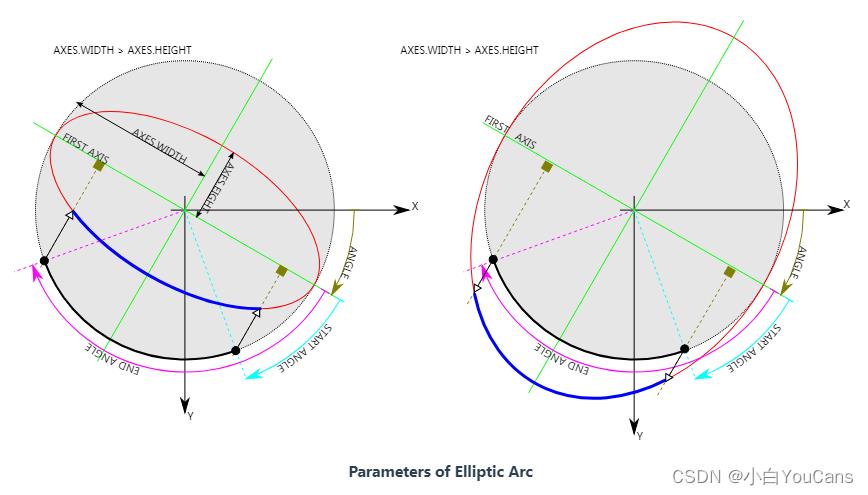
- 椭圆参数的定义比较复杂,很容易混淆,以下结合椭圆参数图(来自https://docs.opencv.org/)来解释。

-
axes 的值是椭圆的主轴长度的一半,而不是主轴长度。
很多资料中将 axes 表示为 (width, height),很容易被理解为椭圆长度方向和宽度方向的轴长,其实这是错误的。为了避免误解,本文使用 (hfirst, hsecond) 表示。
hfirst 是第一根轴,是指 X 轴顺时针旋转时首先遇到的轴,与长轴或短轴无关。hsecond 是第二根轴,是与第一根轴线垂直的轴。 -
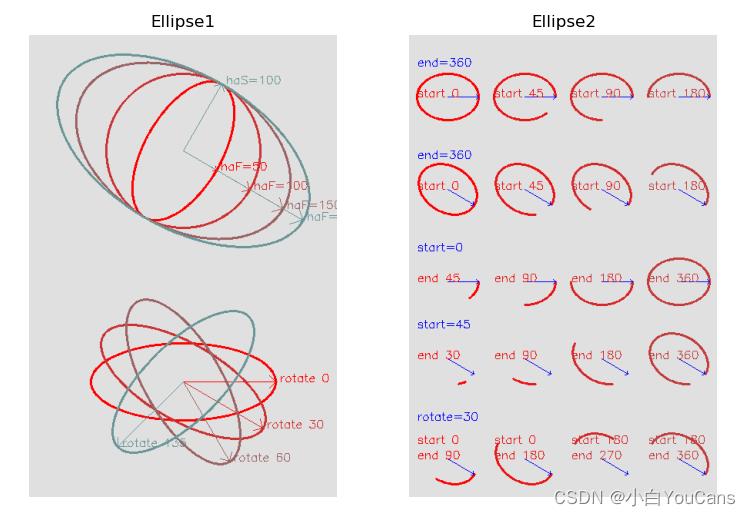
startAngle、endAngle 都是指从第一根轴开始,顺时针旋转的角度。因此,绘制整个椭圆是 (0,360),而 (0,180) 是绘制半个椭圆。
-
startAngle、endAngle 实际上并不区分起点终点,如果 startAngle 大于 endAngle 则会自动进行交换。
-
在 OPenCV/C++ 中定义了 RotatedRec 旋转矩形类,可以用来定义和绘制一个内接于旋转矩形的椭圆。在 OpenCV/Python 中不能直接创建 RotatedRec 矩形类,但一些内部函数会使用或返回 RotatedRec。
-
函数 cv.ellipse 采用分段线性曲线逼近椭圆弧边界。如果需要对椭圆渲染进行更多控制,可以使用 ellipse2Poly 检索曲线,然后使用多段线进行渲染或使用fillPoly进行填充。
例程 A4.5:在图像上绘制椭圆
    # A4.5 在图像上绘制椭圆
    img = np.ones((600, 400, 3), np.uint8)*224
    img1 = img.copy()
    img2 = img.copy()

    # (1) 半轴长度 (haf) 的影响
    cx, cy = 200, 150  # 圆心坐标
    angle = 30  # 旋转角度
    startAng, endAng = 0, 360  # 开始角度,结束角度
    haf = [50, 100, 150, 180]  # 第一轴的半轴长度
    has = 100  # 第二轴的半轴长度
    for i in range(len(haf)):
        color = (i*50, i*50, 255-i*50)
        cv.ellipse(img1, (cx,cy), (haf[i],has), angle, startAng, endAng, color, 2)
        angPi = angle * np.pi / 180  # 转换为弧度制,便于计算坐标
        xe = int(cx + haf[i]*np.cos(angPi))
        ye = int(cy + haf[i]*np.sin(angPi))
        cv.circle(img1, (xe,ye), 2, color, -1)
        cv.arrowedLine(img1, (cx,cy), (xe,ye), color)  # 从圆心指向第一轴端点
        text = "haF=".format(haf[i])
        cv.putText(img1, text, (xe+5,ye), cv.FONT_HERSHEY_SIMPLEX, 0.5, color)
    # 绘制第二轴
    xe = int(cx + has*np.sin(angPi))  # 计算第二轴端点坐标
    ye = int(cy - has*np.cos(angPi))
    cv.arrowedLine(img1, (cx, cy), (xe, ye), color)  # 从圆心指向第二轴端点
    text = "haS=".format(has)
    cv.putText(img1, text, (xe+5, ye), cv.FONT_HERSHEY_SIMPLEX, 0.5, color)

    # (2) 旋转角度 (angle) 的影响
    cx, cy = 200, 450  # 圆心坐标
    haf, has = 120, 50  # 半轴长度
    startAng, endAng = 0,360  # 开始角度,结束角度
    angle = [0, 30, 60, 135]  # 旋转角度
    for i in range(len(angle)):
        color = (i*50, i*50, 255-i*50)
        cv.ellipse(img1, (cx,cy), (haf,has), angle[i], startAng, endAng, color, 2)
        angPi = angle[i] * np.pi / 180  # 转换为弧度制,便于计算坐标
        xe = int(cx + haf*np.cos(angPi))
        ye = int(cy + haf*np.sin(angPi))
        cv.circle(img1, (xe,ye), 2, color, -1)
        cv.arrowedLine(img1, (cx,cy), (xe,ye), color)  # 从圆心指向第一轴端点
        text = "rotate ".format(angle[i])
        cv.putText(img1, text, (xe+5,ye), cv.FONT_HERSHEY_SIMPLEX, 0.5, color)

    # (3) 起始角度 (startAngle) 的影响 I
    cx, cy = 50, 80  # 圆心坐标
    haf, has = 40, 30  # 半轴长度
    angle = 0  # 旋转角度
    endAng = 360  # 结束角度
    startAng = [0, 45, 90, 180]  # 开始角度
    for i in range(len(startAng)):
        color = (i*20, i*20, 255-i*20)
        cxi = cx+i*100
        cv.ellipse(img2, (cxi,cy), (haf,has), angle, startAng[i], endAng, color, 2)
        angPi = angle * np.pi / 180  # 转换为弧度制,便于计算坐标
        xe = int(cxi + haf*np.cos(angPi))
        ye = int(cy + haf*np.sin(angPi))
        cv.arrowedLine(img2, (cxi,cy), (xe,ye), 255)  # 从圆心指向第一轴端点
        text = "start ".format(startAng[i])
        cv.putText(img2, text, (cxi-40,cy), cv.FONT_HERSHEY_SIMPLEX, 0.5, color)
    text = "end=".format(endAng)
    cv.putText(img2, text, (10, cy - 40), cv.FONT_HERSHEY_SIMPLEX, 0.5, 255)

    # (4) 起始角度 (startAngle) 的影响 II
    cx, cy = 50, 200  # 圆心坐标
    haf, has = 40, 30  # 半轴长度
    angle = 30  # 旋转角度
    endAng = 360  # 结束角度
    startAng = [0, 45, 90, 180]  # 开始角度
    for i in range(len(startAng)):
        color = (i*20, i*20, 255-i*20)
        cxi = cx+i*100
        cv.ellipse(img2, (cxi,cy), (haf,has), angle, startAng[i], endAng, color, 2)
        angPi = angle * np.pi / 180  # 转换为弧度制,便于计算坐标
        xe = int(cxi + haf*np.cos(angPi))
        ye = int(cy + haf*np.sin(angPi))
        cv.arrowedLine(img2, (cxi,cy), (xe,ye), 255)  # 从圆心指向第一轴端点
        text = "start ".format(startAng[i])
        cv.putText(img2, text, (cxi-40,cy), cv.FONT_HERSHEY_SIMPLEX, 0.5, color)
    text = "end=".format(endAng)
    cv.putText(img2, text, (10,cy-40), cv.FONT_HERSHEY_SIMPLEX, 0.5, 255)

    # (5) 结束角度 (endAngle) 的影响 I
    cx, cy = 50, 320  # 圆心坐标
    haf, has = 40, 30  # 半轴长度
    angle = 0  # 旋转角度
    startAng = 0  # 开始角度
    endAng = [45, 90, 180, 360]  # 结束角度
    for i in range(len(endAng)):
        color = (i*20, i*20, 255-i*20)
        cxi = cx+i*100
        cv.ellipse(img2, (cxi,cy), (haf,has), angle, startAng, endAng[i], color, 2)
        angPi = angle * np.pi / 180  # 转换为弧度制,便于计算坐标
        xe = int(cxi + haf*np.cos(angPi))
        ye = int(cy + haf*np.sin(angPi))
        cv.arrowedLine(img2, (cxi,cy), (xe,ye), 255)  # 从圆心指向第一轴端点
        text = "end ".format(endAng[i])
        cv.putText(img2, text, (cxi-40,cy), cv.FONT_HERSHEY_SIMPLEX, 0.5, color)
    text = "start=".format(startAng)
    cv.putText(img2, text, (10,cy-40), cv.FONT_HERSHEY_SIMPLEX, 0.5, 255)

    # (6) 结束角度 (endAngle) 的影响 II
    cx, cy = 50, 420  # 圆心坐标
    haf, has = 40, 30  # 半轴长度
    angle = 30  # 旋转角度
    startAng = 45  # 开始角度
    endAng = [30, 90, 180, 360]  # 结束角度
    for i in range(len(endAng)):
        color = (i*20, i*20, 255-i*20)
        cxi = cx+i*100
        cv.ellipse(img2, (cxi,cy), (haf,has), angle, startAng, endAng[i], color, 2)
        angPi = angle * np.pi / 180  # 转换为弧度制,便于计算坐标
        xe = int(cxi + haf*np.cos(angPi))
        ye = int(cy + haf*np.sin(angPi))
        cv.arrowedLine(img2, (cxi,cy), (xe,ye), 255)  # 从圆心指向第一轴端点
        text = "end ".format(endAng[i])
        cv.putText(img2, text, (cxi-40,cy), cv.FONT_HERSHEY_SIMPLEX, 0.5, color)
    text = "start=".format(startAng)
    cv.putText(img2, text, (10,cy-40), cv.FONT_HERSHEY_SIMPLEX, 0.5, 255)

    # (7) 结束角度 (endAngle) 的影响 II
    cx, cy = 50, 550  # 圆心坐标
    haf, has = 40, 30  # 半轴长度
    angle = 30  # 旋转角度
    startAng = [0, 0, 180, 180 ]  # 开始角度
    endAng = [90, 180, 270, 360]  # 结束角度
    for i in range(len(endAng)):
        color = (i*20, i*20, 255-i*20)
        cxi = cx+i*100
        cv.ellipse(img2, (cxi,cy), (haf,has), angle, startAng[i], endAng[i], color, 2)
        angPi = angle * np.pi / 180  # 转换为弧度制,便于计算坐标
        xe = int(cxi + haf*np.cos(angPi))
        ye = int(cy + haf*np.sin(angPi))
        cv.arrowedLine(img2, (cxi,cy), (xe,ye), 255)  # 从圆心指向第一轴端点
        text = "start ".format(startAng[i])
        cv.putText(img2, text, (cxi-40,cy-20), cv.FONT_HERSHEY_SIMPLEX, 0.5, color)
        text = "end ".format(endAng[i])
        cv.putText(img2, text, (cxi-40,cy), cv.FONT_HERSHEY_SIMPLEX, 0.5, color)
    text = "rotate=".format(angle)
    cv.putText(img2, text, (10,cy-50), cv.FONT_HERSHEY_SIMPLEX, 0.5, 255)

    plt.figure(figsize=(9, 6))
    plt.subplot(121), plt.title("Ellipse1"), plt.axis('off')
    plt.imshow(cv.cvtColor(img1, cv.COLOR_BGR2RGB))
    plt.subplot(122), plt.title("Ellipse2"), plt.axis('off')
    plt.imshow(cv.cvtColor(img2, cv.COLOR_BGR2RGB))
    plt.show()

【本节完】
版权声明:
youcans@xupt 原创作品,转载必须标注原文链接:(https://blog.csdn.net/youcans/article/details/125459696)
Copyright 2022 youcans, XUPT
Crated:2022-6-25
欢迎关注 『youcans 的 OpenCV 例程 200 篇』 系列,持续更新中
欢迎关注 『youcans 的 OpenCV学习课』 系列,持续更新中
210. 绘制直线也会有这么多坑?
211. 绘制垂直矩形
212. 绘制倾斜的矩形
213. 绘制圆形
214. 绘制椭圆的参数详解
以上是关于OpenCV 例程200篇214. 绘制椭圆的参数详解的主要内容,如果未能解决你的问题,请参考以下文章