OpenCV 例程200篇212. 绘制倾斜的矩形
Posted YouCans
tags:
篇首语:本文由小常识网(cha138.com)小编为大家整理,主要介绍了OpenCV 例程200篇212. 绘制倾斜的矩形相关的知识,希望对你有一定的参考价值。
【youcans 的 OpenCV 例程200篇】212. 绘制倾斜的矩形
7.1 绘图函数基本参数
OpenCV提供了绘图功能,可以在图像上绘制直线、矩形、圆、椭圆等各种几何图形。
函数原型:
函数 cv.rectangle() 用来在图像上绘制垂直于图像边界的矩形。
cv.rectangle(img, pt1, pt2, color[, thickness=1, lineType=LINE_8, shift=0]) → img
参数说明:
- img:输入输出图像,允许单通道灰度图像或多通道彩色图像
- pt1:矩阵第一个点的坐标,(x1, y1) 格式的元组
- pt2:与 pt1 成对角的矩阵第二个点的坐标,(x2, y2) 格式的元组
- color:绘图线条的颜色,(b,g,r) 格式的元组,或者表示灰度值的标量
- thickness:绘制矩形的线宽,默认值 1px,负数表示矩形内部填充
- lineType:绘制线段的线性,默认为 LINE_8
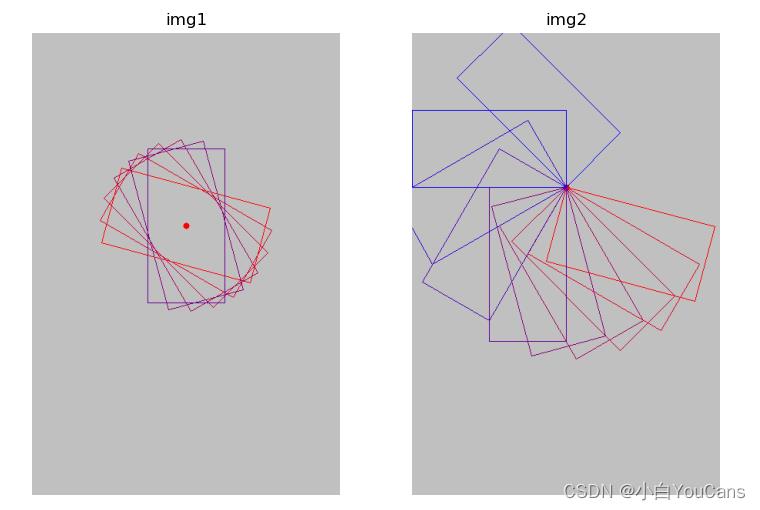
例程 A4.3:在图像上绘制倾斜的矩形
cv.rectangle 只能在图像上绘制垂直于边界的矩形。如果需要绘制倾斜的矩形,则要获得倾斜矩形的各个顶点坐标,通过绘制直线构造成为闭合的矩形。
    # A4.3 在图像上绘制倾斜的矩形
    height, width, channels = 600, 400, 3
    img = np.ones((height, width, channels), np.uint8)*192  # 创建黑色图像 RGB=0

    # 围绕矩形中心旋转
    x, y, w, h = (100, 200, 200, 100)  # 左上角坐标 (x,y), 宽度 w,高度 h
    cx, cy = x+w//2, y+h//2  # 矩形中心
    img1 = img.copy()
    cv.circle(img1, (cx,cy), 4, (0,0,255), -1)  # 旋转中心
    angle = [15, 30, 45, 60, 75, 90]  # 旋转角度,顺时针方向
    for i in range(len(angle)):
        ang = angle[i] * np.pi / 180
        x1 = int(cx + (w/2)*np.cos(ang) - (h/2)*np.sin(ang))
        y1 = int(cy + (w/2)*np.sin(ang) + (h/2)*np.cos(ang))
        x2 = int(cx + (w/2)*np.cos(ang) + (h/2)*np.sin(ang))
        y2 = int(cy + (w/2)*np.sin(ang) - (h/2)*np.cos(ang))
        x3 = int(cx - (w/2)*np.cos(ang) + (h/2)*np.sin(ang))
        y3 = int(cy - (w/2)*np.sin(ang) - (h/2)*np.cos(ang))
        x4 = int(cx - (w/2)*np.cos(ang) - (h/2)*np.sin(ang))
        y4 = int(cy - (w/2)*np.sin(ang) + (h/2)*np.cos(ang))
        color = (30*i, 0, 255-30*i)
        cv.line(img1, (x1,y1), (x2,y2), color)
        cv.line(img1, (x2,y2), (x3,y3), color)
        cv.line(img1, (x3,y3), (x4,y4), color)
        cv.line(img1, (x4,y4), (x1,y1), color)

    # 围绕矩形左上顶点旋转
    x, y, w, h = (200, 200, 200, 100)  # 左上角坐标 (x,y), 宽度 w,高度 h
    img2 = img.copy()
    cv.circle(img2, (x, y), 4, (0,0,255), -1)  # 旋转中心
    angle = [15, 30, 45, 60, 75, 90, 120, 150, 180, 225]  # 旋转角度,顺时针方向
    for i in range(len(angle)):
        ang = angle[i] * np.pi / 180
        x1, y1 = x, y
        x2 = int(x + w * np.cos(ang))
        y2 = int(y + w * np.sin(ang))
        x3 = int(x + w * np.cos(ang) - h * np.sin(ang))
        y3 = int(y + w * np.sin(ang) + h * np.cos(ang))
        x4 = int(x - h * np.sin(ang))
        y4 = int(y + h * np.cos(ang))
        color = (30 * i, 0, 255 - 30 * i)
        cv.line(img2, (x1, y1), (x2, y2), color)
        cv.line(img2, (x2, y2), (x3, y3), color)
        cv.line(img2, (x3, y3), (x4, y4), color)
        cv.line(img2, (x4, y4), (x1, y1), color)

    plt.figure(figsize=(9, 6))
    plt.subplot(121), plt.title("img1"), plt.axis('off')
    plt.imshow(cv.cvtColor(img1, cv.COLOR_BGR2RGB))
    plt.subplot(122), plt.title("img2"), plt.axis('off')
    plt.imshow(cv.cvtColor(img2, cv.COLOR_BGR2RGB))
    plt.show()
例程结果:

【本节完】
版权声明:
参考文献: Use the Photoshop Levels adjustment (adobe.com)
youcans@xupt 原创作品,转载必须标注原文链接:(https://blog.csdn.net/youcans/article/details/125432101)
Copyright 2022 youcans, XUPT
Crated:2022-6-20
欢迎关注 『youcans 的 OpenCV 例程 200 篇』 系列,持续更新中
欢迎关注 『youcans 的 OpenCV学习课』 系列,持续更新中
210. 绘制直线也会有这么多坑?
211. 绘制垂直矩形
212. 绘制倾斜的矩形
以上是关于OpenCV 例程200篇212. 绘制倾斜的矩形的主要内容,如果未能解决你的问题,请参考以下文章