VMware中CentOS7 设置静态IP
Posted 在奋斗的大道
tags:
篇首语:本文由小常识网(cha138.com)小编为大家整理,主要介绍了VMware中CentOS7 设置静态IP相关的知识,希望对你有一定的参考价值。
第一步 打开windows命令行,查看本地网络情况:ipconfig
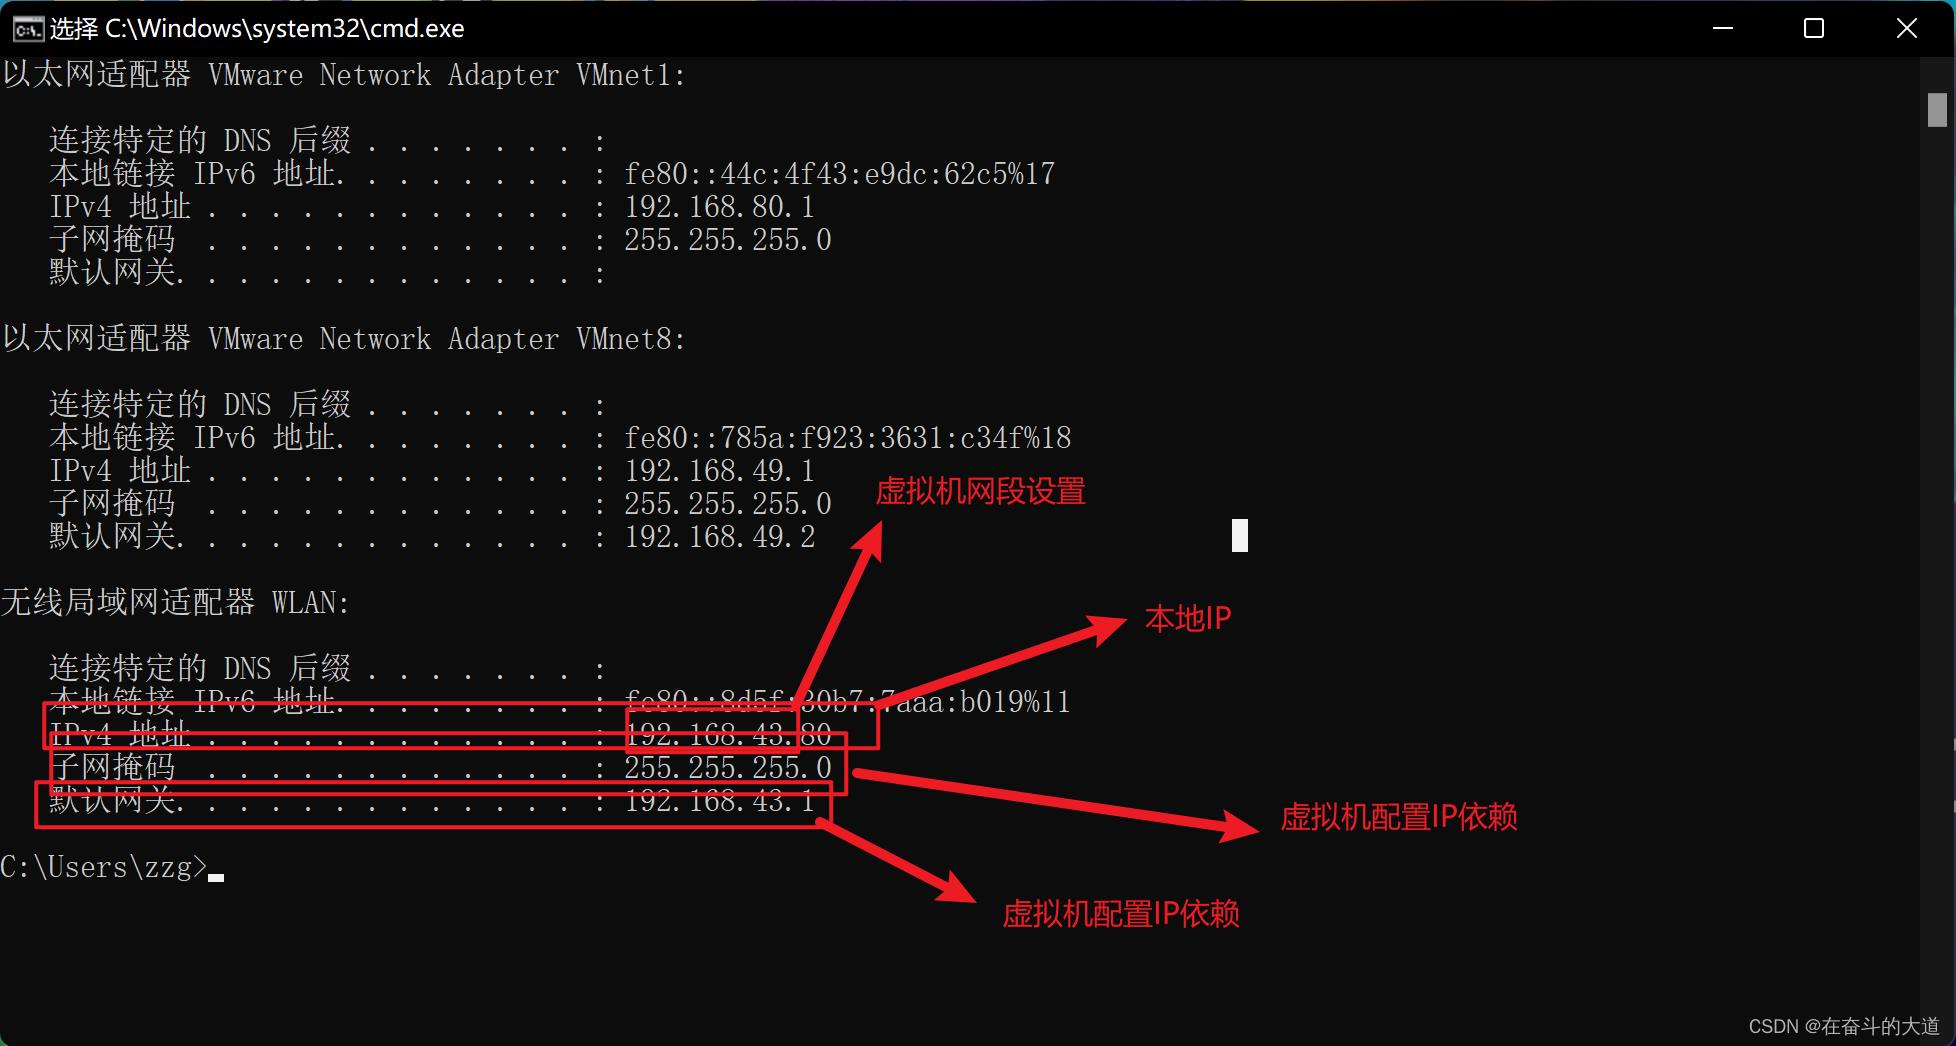
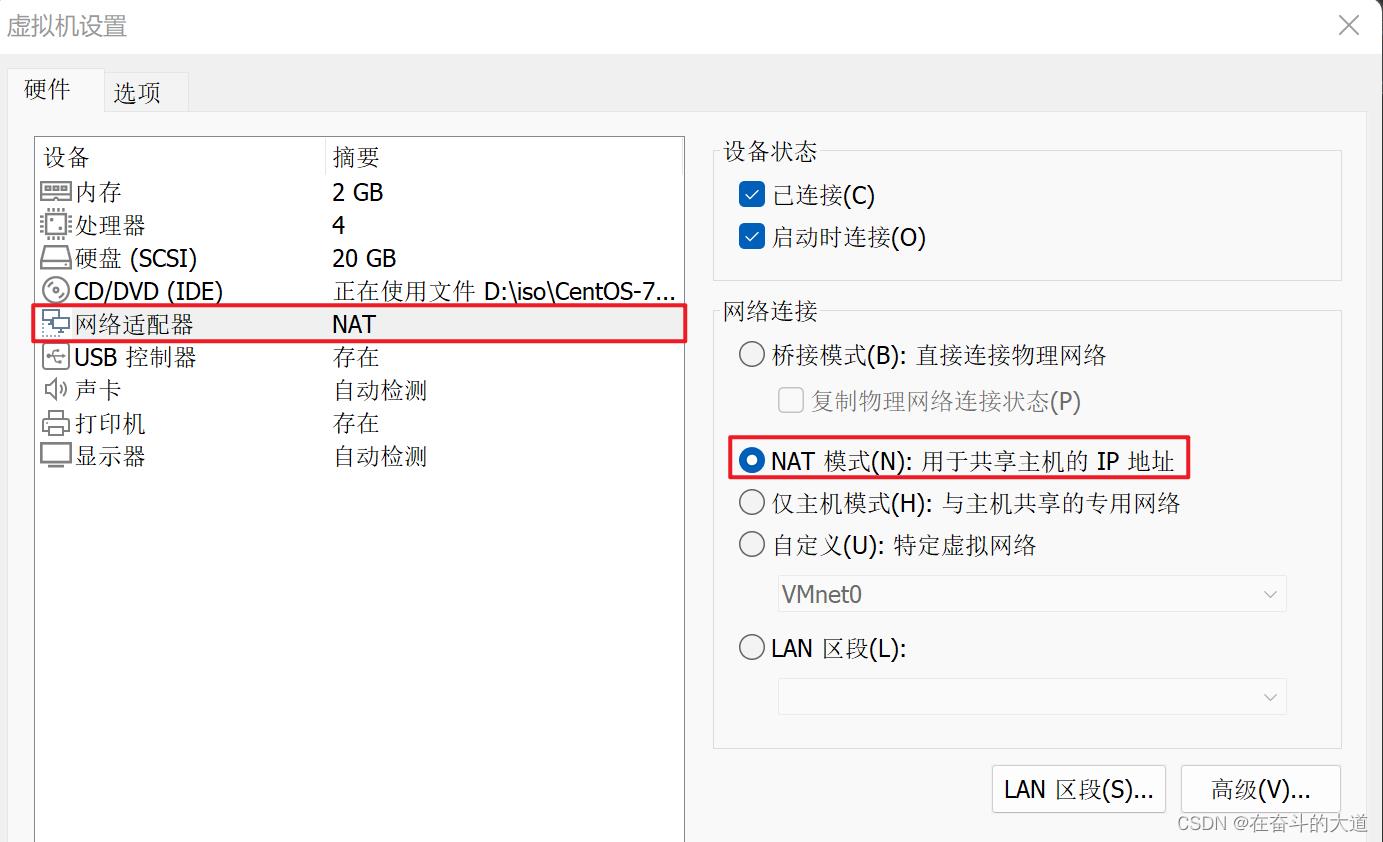
第二步:虚拟机网络设置为NAT模式:
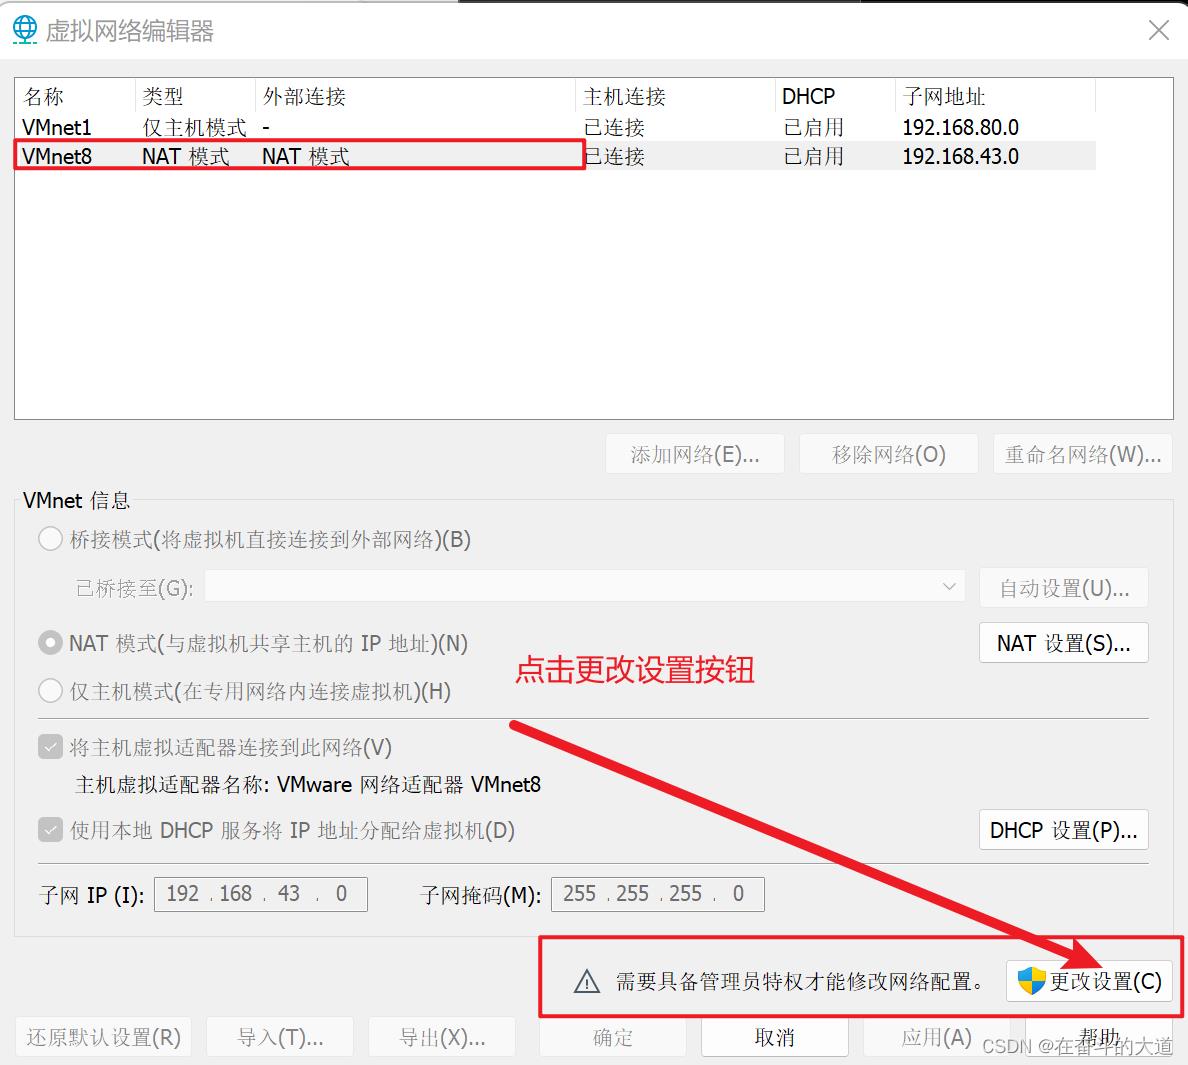
第三步 打开VMware虚拟网络编辑器
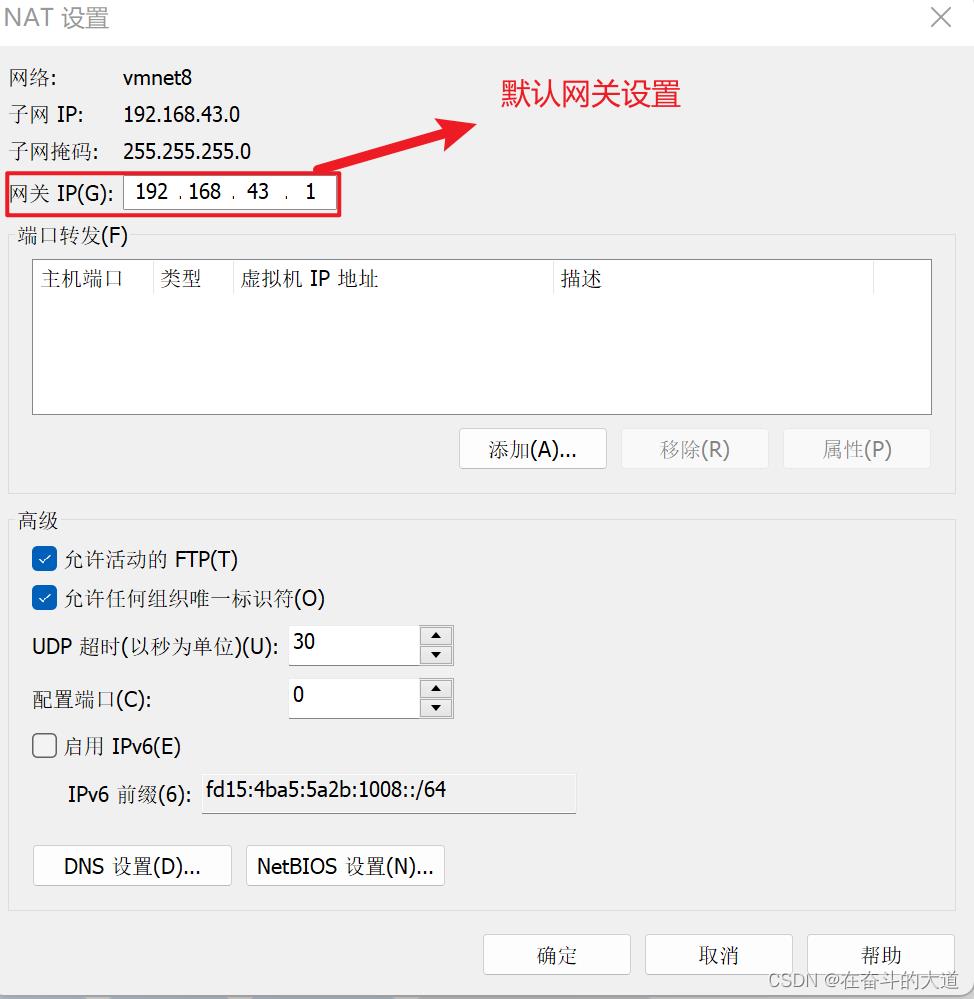
点击NAT设置,将网关设置与无线局域网适配器WLAN一致:
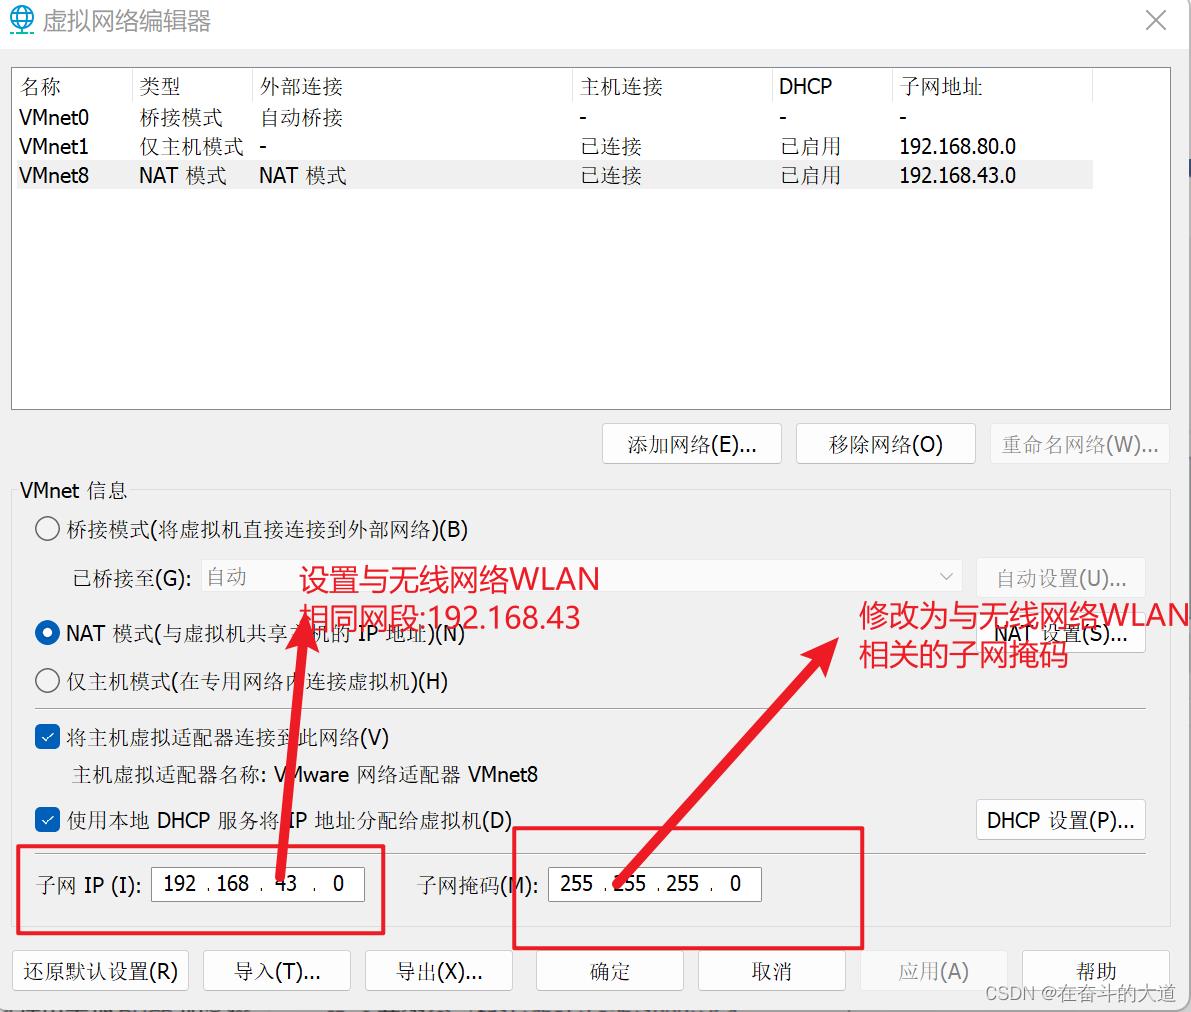
第四步:本地网络适配器设置虚拟机虚拟网络
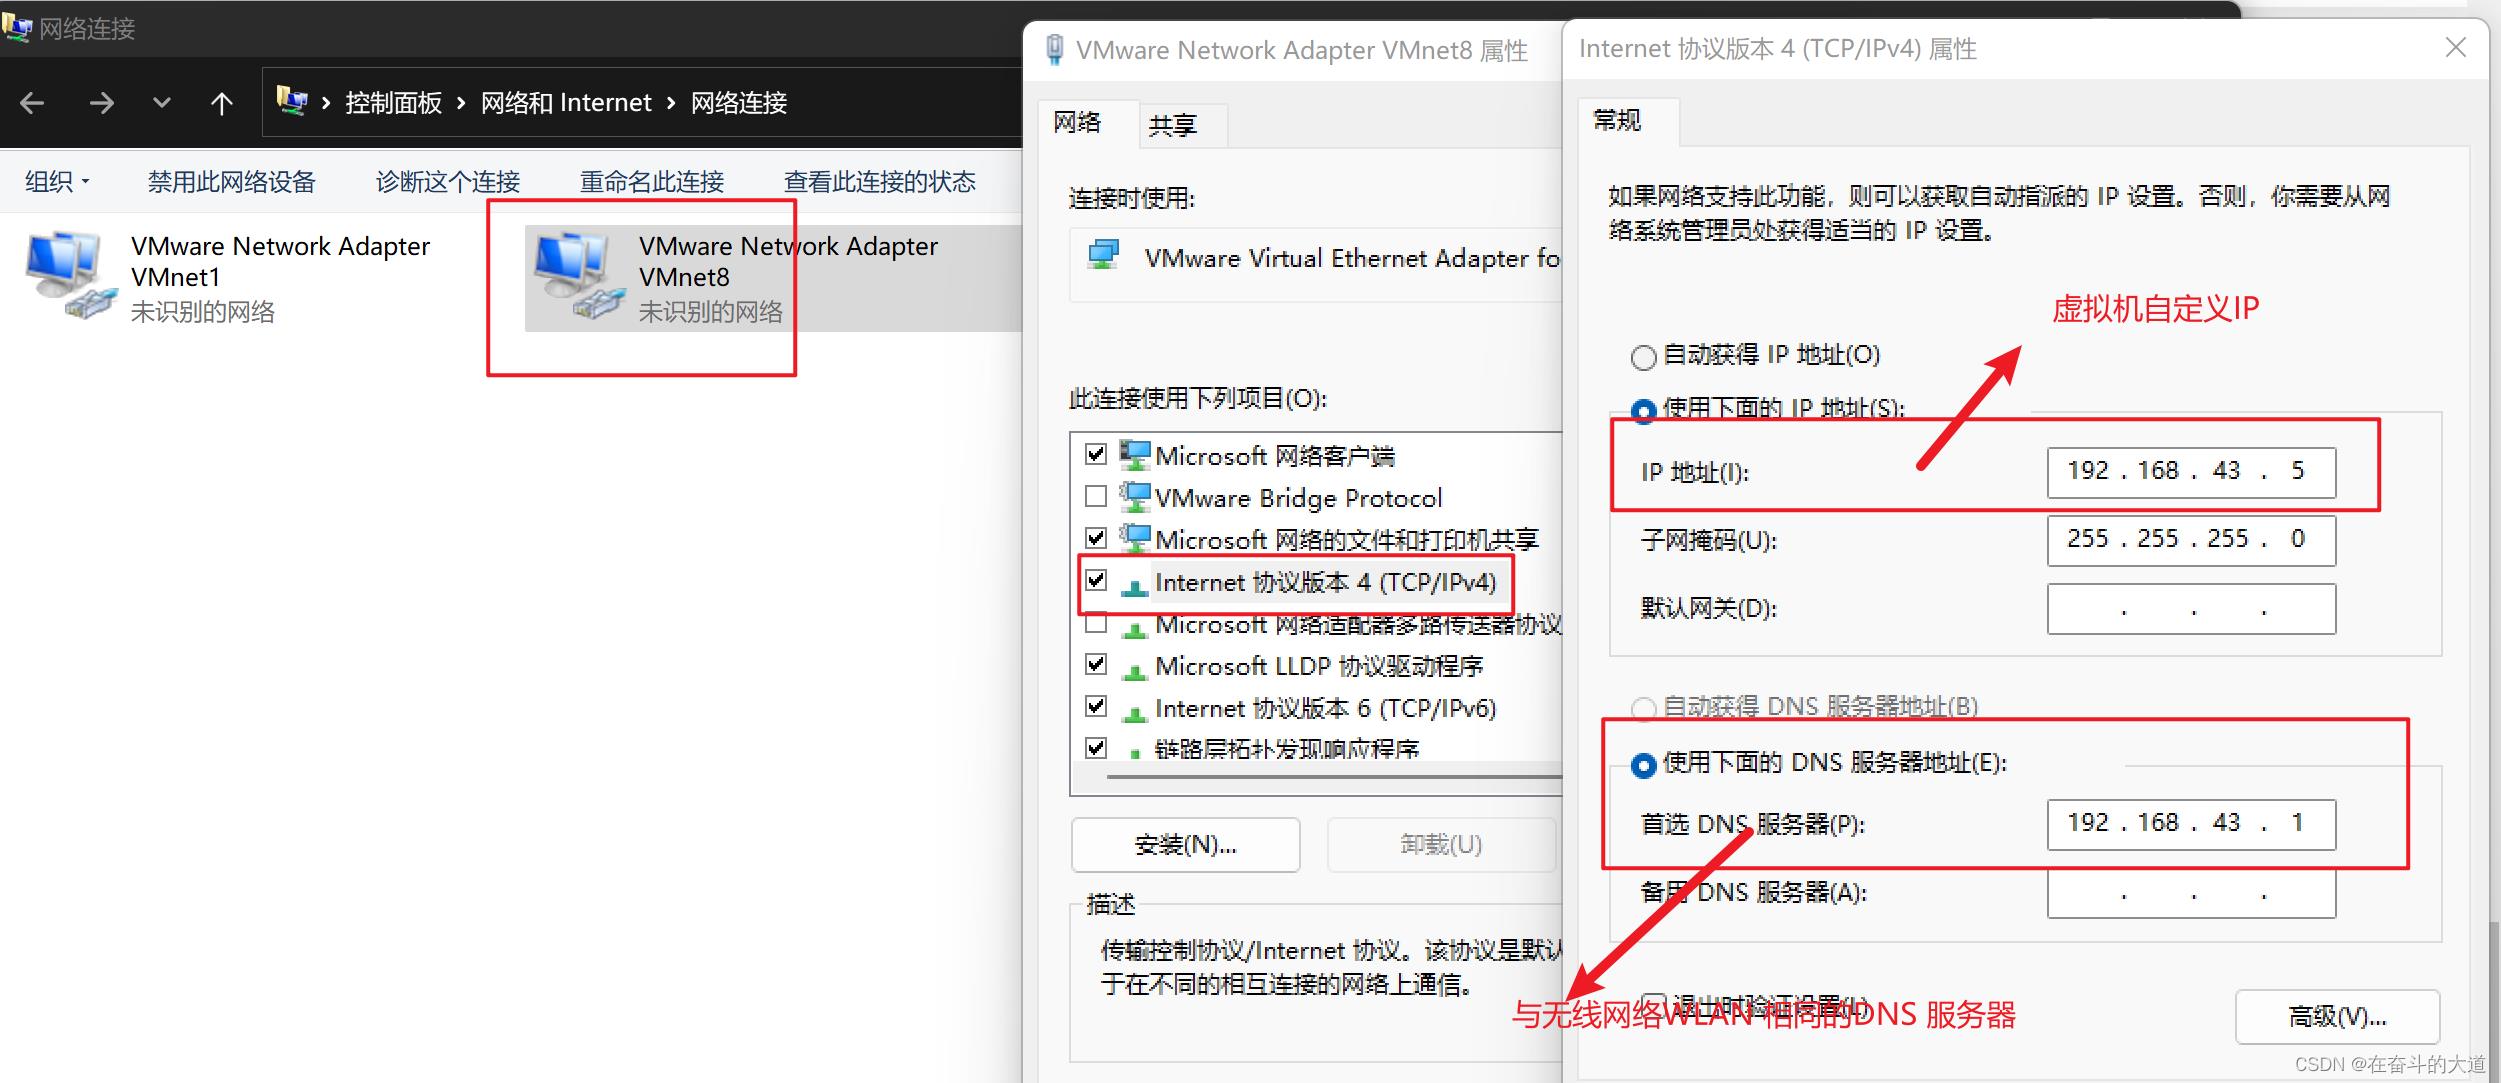
第五步:centos网络配置
①.打开centos网卡信息:/etc/sysconfig/network-scripts
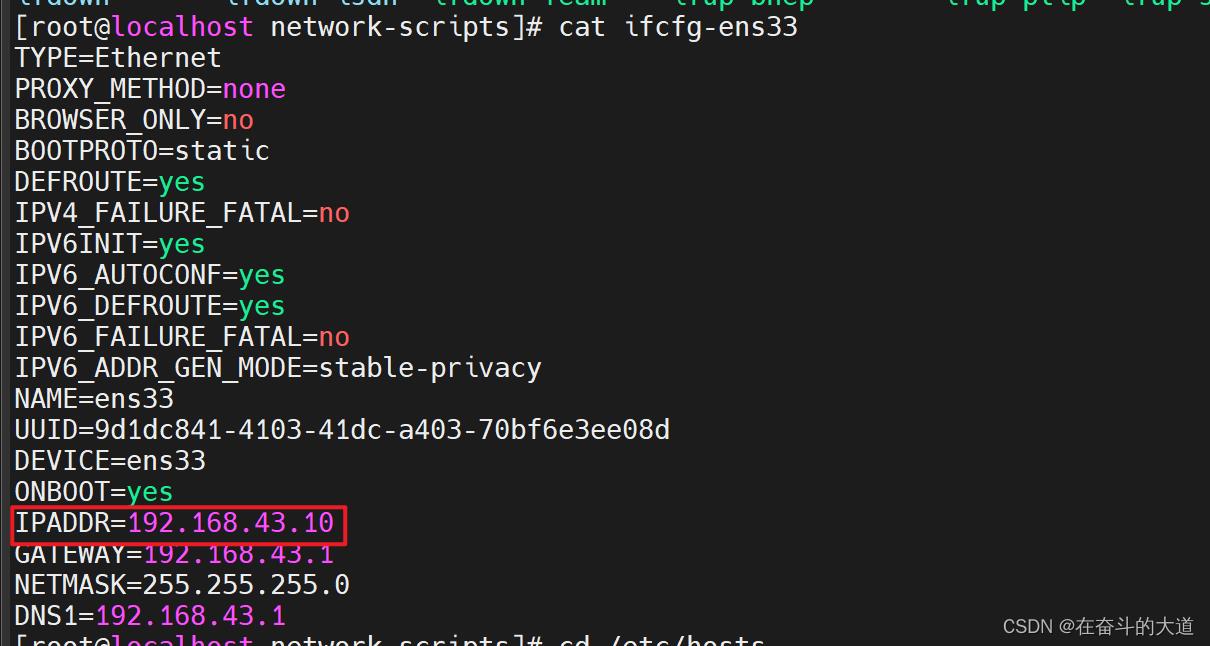
②.修改不部分配置:vi ifcfg-ens33
TYPE=Ethernet
PROXY_METHOD=none
BROWSER_ONLY=no
BOOTPROTO=static
DEFROUTE=yes
IPV4_FAILURE_FATAL=no
IPV6INIT=yes
IPV6_AUTOCONF=yes
IPV6_DEFROUTE=yes
IPV6_FAILURE_FATAL=no
IPV6_ADDR_GEN_MODE=stable-privacy
NAME=ens33
UUID=9d1dc841-4103-41dc-a403-70bf6e3ee08d
DEVICE=ens33
ONBOOT=yes
IPADDR=192.168.43.10
GATEWAY=192.168.43.1
NETMASK=255.255.255.0
DNS1=192.168.43.1
第六步:重启
重启网络服务:service network restart
重启服务器:reboot(也可以不重启)
更新一些问题解决
1、使用MobaXterm 无法连接CentOS 服务器。
通过ssh -v root@ip 查看ssh 连接服务。
以下是我虚拟机centOS 服务ssh 服务状态。
[root@localhost network-scripts]# ssh -v  root@192.168.43.10
OpenSSH_7.4p1, OpenSSL 1.0.2k-fips  26 Jan 2017
debug1: Reading configuration data /etc/ssh/ssh_config
debug1: /etc/ssh/ssh_config line 58: Applying options for *
debug1: Connecting to 192.168.43.10 [192.168.43.10] port 22.
debug1: Connection established.
debug1: permanently_set_uid: 0/0
debug1: key_load_public: No such file or directory
debug1: identity file /root/.ssh/id_rsa type -1
debug1: key_load_public: No such file or directory
debug1: identity file /root/.ssh/id_rsa-cert type -1
debug1: key_load_public: No such file or directory
debug1: identity file /root/.ssh/id_dsa type -1
debug1: key_load_public: No such file or directory
debug1: identity file /root/.ssh/id_dsa-cert type -1
debug1: key_load_public: No such file or directory
debug1: identity file /root/.ssh/id_ecdsa type -1
debug1: key_load_public: No such file or directory
debug1: identity file /root/.ssh/id_ecdsa-cert type -1
debug1: key_load_public: No such file or directory
debug1: identity file /root/.ssh/id_ed25519 type -1
debug1: key_load_public: No such file or directory
debug1: identity file /root/.ssh/id_ed25519-cert type -1
debug1: Enabling compatibility mode for protocol 2.0
debug1: Local version string SSH-2.0-OpenSSH_7.4
debug1: Remote protocol version 2.0, remote software version OpenSSH_7.4
debug1: match: OpenSSH_7.4 pat OpenSSH* compat 0x04000000
debug1: Authenticating to 192.168.43.10:22 as 'root'
debug1: SSH2_MSG_KEXINIT sent
debug1: SSH2_MSG_KEXINIT received
debug1: kex: algorithm: curve25519-sha256
debug1: kex: host key algorithm: ecdsa-sha2-nistp256
debug1: kex: server->client cipher: chacha20-poly1305@openssh.com MAC: <implicit> compression: none
debug1: kex: client->server cipher: chacha20-poly1305@openssh.com MAC: <implicit> compression: none
debug1: kex: curve25519-sha256 need=64 dh_need=64
debug1: kex: curve25519-sha256 need=64 dh_need=64
debug1: expecting SSH2_MSG_KEX_ECDH_REPLY
debug1: Server host key: ecdsa-sha2-nistp256 SHA256:31OaGaTgUMDdjUguKCwMV5eY+QbkQIDys2igDrd1VP8
The authenticity of host '192.168.43.10 (192.168.43.10)' can't be established.
ECDSA key fingerprint is SHA256:31OaGaTgUMDdjUguKCwMV5eY+QbkQIDys2igDrd1VP8.
ECDSA key fingerprint is MD5:6a:f5:e9:54:cd:65:08:84:2e:bc:88:59:99:14:32:25.
Are you sure you want to continue connecting (yes/no)? yes
Warning: Permanently added '192.168.43.10' (ECDSA) to the list of known hosts.
debug1: rekey after 134217728 blocks
debug1: SSH2_MSG_NEWKEYS sent
debug1: expecting SSH2_MSG_NEWKEYS
debug1: SSH2_MSG_NEWKEYS received
debug1: rekey after 134217728 blocks
debug1: SSH2_MSG_EXT_INFO received
debug1: kex_input_ext_info: server-sig-algs=<rsa-sha2-256,rsa-sha2-512>
debug1: SSH2_MSG_SERVICE_ACCEPT received
debug1: Authentications that can continue: publickey,gssapi-keyex,gssapi-with-mic,password
debug1: Next authentication method: publickey
debug1: Trying private key: /root/.ssh/id_rsa
debug1: Trying private key: /root/.ssh/id_dsa
debug1: Trying private key: /root/.ssh/id_ecdsa
debug1: Trying private key: /root/.ssh/id_ed25519
debug1: Next authentication method: password
root@192.168.43.10's password:
debug1: Authentication succeeded (password).
Authenticated to 192.168.43.10 ([192.168.43.10]:22).
debug1: channel 0: new [client-session]
debug1: Requesting no-more-sessions@openssh.com
debug1: Entering interactive session.
debug1: pledge: network
debug1: client_input_global_request: rtype hostkeys-00@openssh.com want_reply 0
debug1: Sending environment.
debug1: Sending env LANG = zh_CN.UTF-8
Last login: Fri Jun 17 16:17:36 2022 from centos-docker
SSH 服务报错日志记录:
debug1: SSH2_MSG_SERVICE_REQUEST sent
debug1: SSH2_MSG_SERVICE_ACCEPT received
debug1: Authentications that can continue: publickey,gssapi-with-mic,password
debug1: Next authentication method: gssapi-with-mic
debug1: Unspecified GSS failure.  Minor code may provide more information
No credentials cache found
解决办法:
在 ssh 客户端程序的配置文件里显式禁用 GSSAPI 认证. 如, 编辑 /etc/ssh/ssh_config 文件, 添加或修改使其有如下一行:
GSSAPIAuthentication no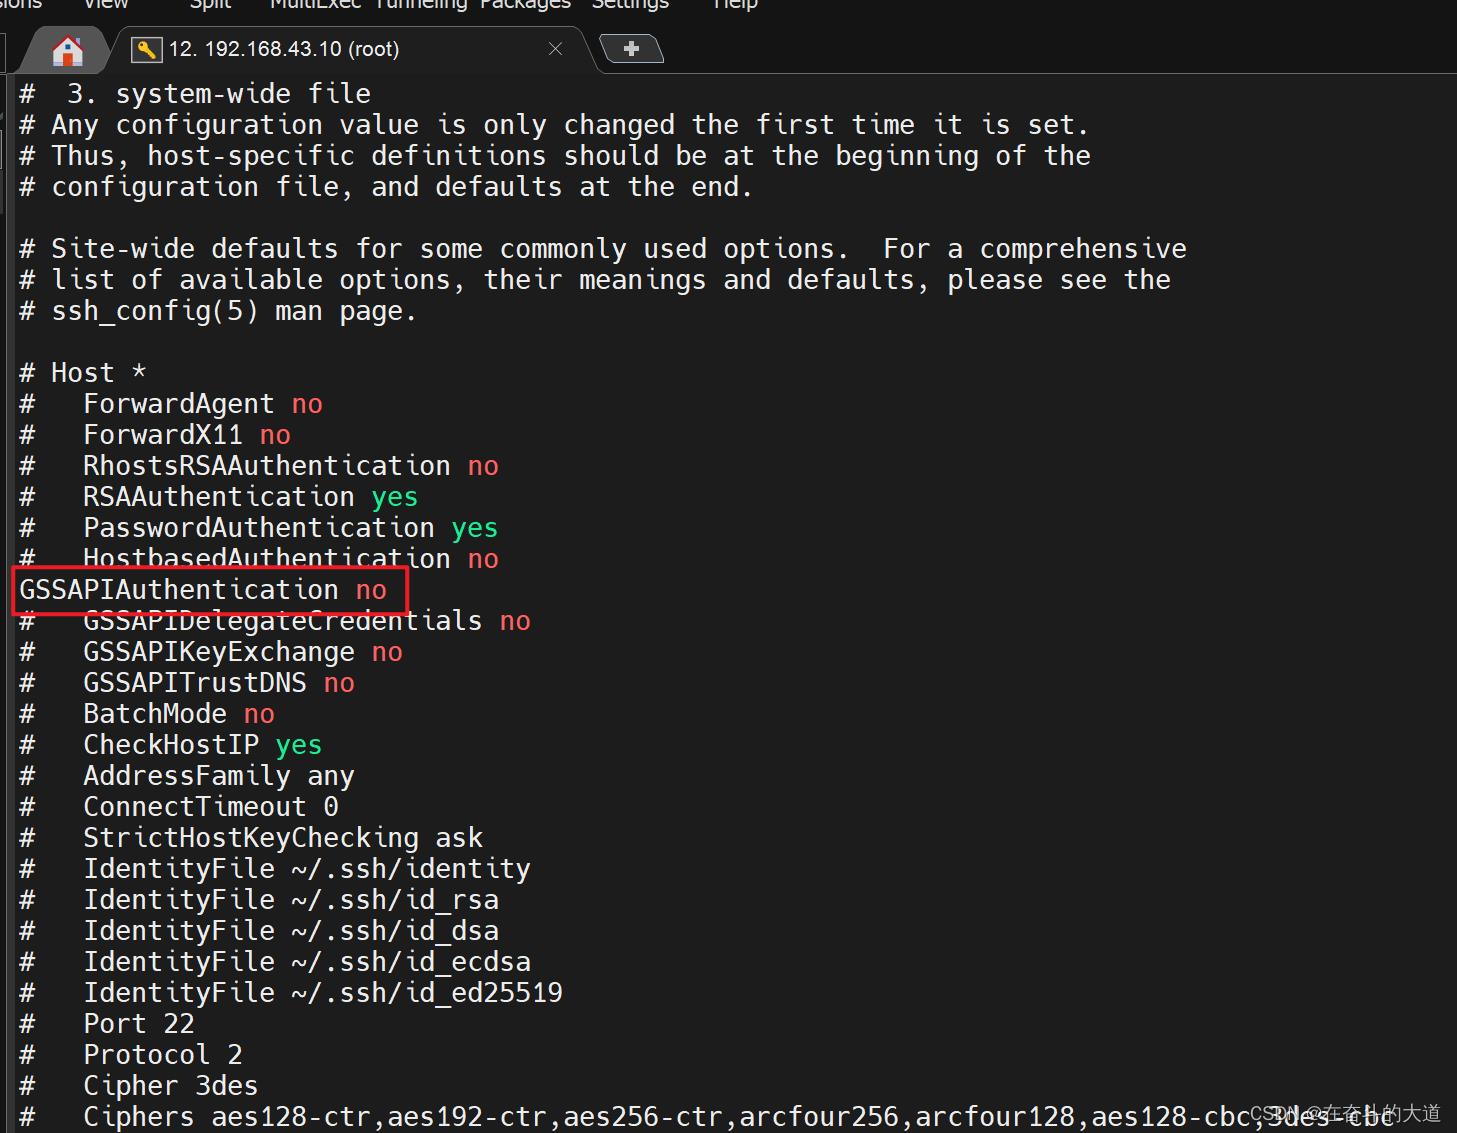
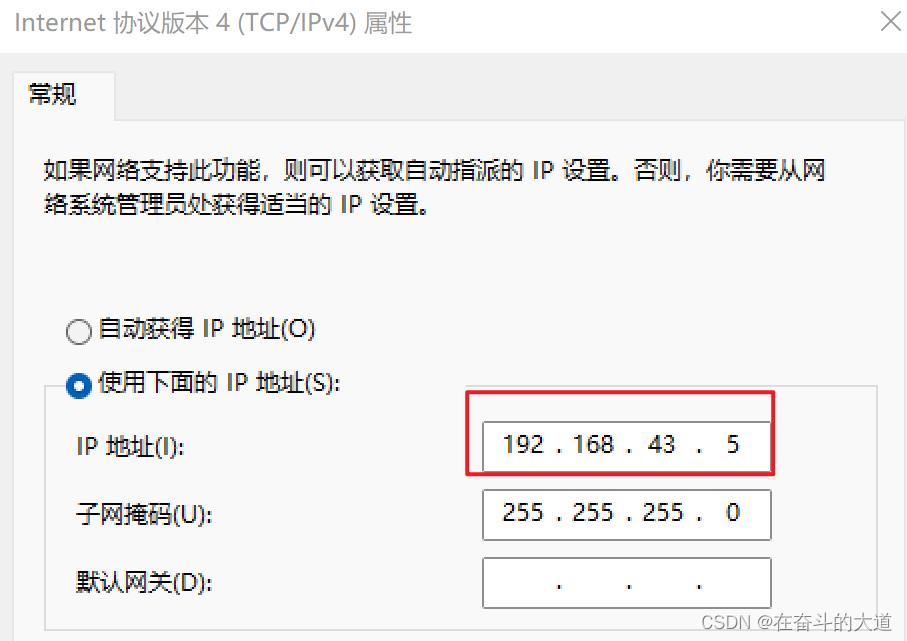
2、VMnet8 与CentOS 静态IP 不能一直。
VMnet8 配置
CentOS 静态IP
如果两者的IP相同,也会导致SSH无法正常连接。
以上是关于VMware中CentOS7 设置静态IP的主要内容,如果未能解决你的问题,请参考以下文章