QML和C++混合编程实现以下功能:
Posted
tags:
篇首语:本文由小常识网(cha138.com)小编为大家整理,主要介绍了QML和C++混合编程实现以下功能:相关的知识,希望对你有一定的参考价值。
QML和C++混合编程实现以下功能:
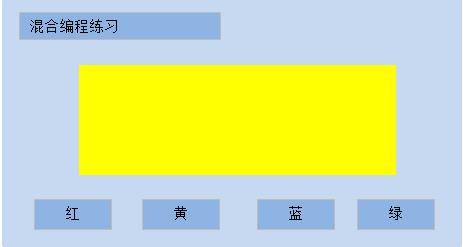
1. 画面构成:Title,四个Button,一个Rectangle
2. 点击[红]Button,Rectangle显示红色,点击[黄]Button,Rectangle显示黄色,依次类推。
3. C++中公开属性color给Qml使用,代表当前Rectangle的color。
4. 要求在C++中定义Enum值,分别代表红,黄,蓝,绿四个值
[红]和[黄]Button押下时,调用C++的函数,在C++函数中改变Rectangle的颜色。
[蓝]和[绿]Button押下时,在Qml中设置C++里的color属性,在C++的color属性变化的Notify函数中,将当前color(C++)的值设置给Rectangle的color属性。

main.qml:
import QtQuick 2.4
import QtQuick.Window 2.2
import QtQuick.Layouts 1.2
import com.helloc.com 1.0
Window
visible: true
height: 360
width: 640
Rectangle
id: bg
anchors.fill: parent
color:"#C6D9F1"
ColumnLayout
anchors.fill: parent
anchors.margins: 20
spacing: 40
Rectangle
Layout.preferredWidth: 200
Layout.preferredHeight: 40
color:"#8EB4E3"
border.width: 1
border.color: "darkgrey"
Text
id: title
width: parent.width
text: "混合编程练习"
color: "black"
anchors.verticalCenter: parent.verticalCenter
horizontalAlignment: Text.AlignHCenter
Rectangle
id: rec
Layout.preferredWidth: parent.width * 0.8
Layout.fillHeight: true
Layout.alignment: Qt.AlignHCenter
color:obj.color
MyObj
id: obj
RowLayout
Layout.preferredWidth: parent.width * 0.9
Layout.preferredHeight: 40
spacing: 40
Rectangle
Layout.preferredHeight: 40
Layout.fillWidth: true
color:"#8EB4E3"
Text
anchors.centerIn: parent
text: "红"
MouseArea
anchors.fill: parent
onClicked:
obj.setMyColor(MyObj.MyRed)
Rectangle
Layout.preferredHeight: 40
Layout.fillWidth: true
color:"#8EB4E3"
Text
anchors.centerIn: parent
text: "黄"
MouseArea
anchors.fill: parent
onClicked:
obj.setMyColor(MyObj.MyYellow)
Rectangle
Layout.preferredHeight: 40
Layout.fillWidth: true
color:"#8EB4E3"
Text
anchors.centerIn: parent
text: "蓝"
MouseArea
anchors.fill: parent
onClicked:
obj.color = "blue"
Rectangle
Layout.preferredHeight: 40
Layout.fillWidth: true
color:"#8EB4E3"
Text
anchors.centerIn: parent
text: "绿"
MouseArea
anchors.fill: parent
onClicked:
obj.color = "green"
main.cpp:
#include <QGuiApplication>
#include <QQmlApplicationEngine>
#include <QtQml>
#include "myobj.h"
int main(int argc, char *argv[])
QGuiApplication app(argc, argv);
qmlRegisterType<MyObj>("com.helloc.com", 1, 0, "MyObj");
QQmlApplicationEngine engine;
engine.load(QUrl(QStringLiteral("qrc:/main.qml")));
return app.exec();
myobj.h:
#ifndef MYOBJ_H
#define MYOBJ_H
#include <QObject>
#include <QColor>
class MyObj : public QObject
Q_OBJECT
Q_ENUMS(MyColor)
Q_PROPERTY(QColor color READ color WRITE setColor NOTIFY myColorChanged)
public:
explicit MyObj(QObject *parent = 0);
enum MyColor
MyRed = Qt::red,
MyYellow = Qt::yellow,
MyBlue = Qt::blue,
MyGreen = Qt::green,
;
QColor color();
void setColor(QColor color);
Q_INVOKABLE void setMyColor(MyColor myColor);
signals:
void myColorChanged(QColor color);
public slots:
private:
QColor m_color;
;
#endif // MYOBJ_H
myobj.cpp:
#include "myobj.h"
#include <QDebug>
MyObj::MyObj(QObject *parent) :
QObject(parent),
m_color(QColor("yellow"))
QColor MyObj::color()
return m_color;
void MyObj::setColor(QColor color)
if(m_color != color)
m_color = color;
emit myColorChanged(color);
void MyObj::setMyColor(MyColor myColor)
this->setColor(QColor(Qt::GlobalColor(myColor)));
C++里 枚举的使用 不是很熟练 Color属性的设置若有见解,望指出.//本人环境Qt 5.5本回答被提问者采纳
Qt Quick QML 实例之疯狂数字游戏(QML C++混合编程翻译QSetting )建议收藏
文章目录
GitHub 源码: QmlLearningPro ,选择子工程 CrazyMath.pro
QML 其它文章请点击这里: QT QUICK QML 学习笔记
一、开门见山
● Windows 下运行效果:

● Android 下运行效果:

此实例,参考了安老师 的 Qt Quick实现的疯狂算数游戏,在此基础上一步步深入学习和完善,非常适合 Qt QML 和 C++ 学习入门。
● 可供学习的点:
1)跨平台程序,Windows 和 Android 下都能运行;

2)C++ 与  QML 相结合,在 QML 文件中使用了两种方法调用 C++ 类;

3)自定义不同的基础控件,如悬浮按钮CCHoverHorzButton、文本CCLabel,方便移植;

4)QML 中不同控件的使用,column、SpringAnimation、transitions、State 等等;

5)数据可持久化,利用 QSettings 可以把内存中的数据保存到地电脑的磁盘中;

6)加入国际化翻译机制
二、最基本的框架(v0.1)
最简单的 UI 和 最基本的框架,先实现核心功能:

● 先实现以下部分:
1)基本的框架

2)增加**开始键**,开始游戏

3)增加**确认(√)按键**,确定下一组的算术题目
可以参考第一个版本的代码 v0.1:

1. 后端数据处理
MathProblem.cpp
#include "MathProblem.h"

const char *MathProblem::_problems[] = { "1 + 2 = ", "2 + 3 = ", "2 + 2 = ","1 + 4 = ", "2 + 5 = " };
const int 	MathProblem::_answers[]  = { 3,  5,  4,  5,  7 };

MathProblem::MathProblem(QObject *parent)
    : QObject(parent)
    , newIdx(0)
{
}

MathProblem::~MathProblem() {
}

//返回下一组算术
QString MathProblem::nextMath()
{
    newIdx = qrand() % 5;

    //随机的答案
    int randAnswer = _answers[newIdx] + (qrand() % 7 - 3);   // 取 -3~3 的随机数
    return QString("%1%2").arg(_problems[newIdx]).arg(randAnswer);
}
MathProblem.h
#ifndef MATH_PROBLEM_H
#define MATH_PROBLEM_H

#include <QObject>
#include <QString>

//using namespace::std;

class MathProblem : public QObject {
    Q_OBJECT
public:
    MathProblem(QObject *parent = nullptr);
    ~MathProblem();
    Q_INVOKABLE QString nextMath();  //Q_INVOKABLE
private:
    int newIdx;
    static const char * _problems[];
    static const int    _answers[];
};

#endif
2. 导出 C++ 对象的 QML 的属性
#include <QGuiApplication>
#include <QQmlApplicationEngine>
#include "MathProblem.h"    //[flag1]
#include <QQmlContext>      //[flag2]

int main(int argc, char *argv[])
{
    QCoreApplication::setAttribute(Qt::AA_EnableHighDpiScaling);

    QGuiApplication app(argc, argv);

    QQmlApplicationEngine engine;
    const QUrl url(QStringLiteral("qrc:/main.qml"));
    QObject::connect(&engine, &QQmlApplicationEngine::objectCreated,
                     &app, [url](QObject *obj, const QUrl &objUrl) {
        if (!obj && url == objUrl)
            QCoreApplication::exit(-1);
    }, Qt::QueuedConnection);
    //C++ && QML programming  https://blog.csdn.net/qq_16504163/article/details/105189471
    engine.rootContext()->setContextProperty("MathProblem", new MathProblem);  //[flag3]
    engine.load(url);
    return app.exec();
}
主要在默认的 main.cpp 中增加上述 [flag] 三处
3. 前台 UI 数据
import QtQuick 2.12
import QtQuick.Window 2.12
import QtQuick.Controls 2.5

Window {
    visible: true
    width: 640
    height: 480
    title: qsTr("疯狂算术")
    color:  "#84C1FF"

    Button {
        id:                startBtn
        anchors.centerIn:  parent
        text: 				"开始"
        onClicked:        {
            startBtn.visible = false
            columnRoot.visible = true
            mathText.text = MathProblem.nextMath();
        }
    }
    Column {
        id:                         columnRoot
        visible:                    false
        anchors.top:                parent.top
        anchors.topMargin:          parent.width*0.1
        anchors.horizontalCenter:   parent.horizontalCenter
        spacing:                    20
        Text {
            id:                     mathText;
            color:                  "white"
            font.pointSize:         28
            font.bold:              true
            anchors.horizontalCenter: parent.horizontalCenter
        }
        Row {
            spacing:                10
            anchors.horizontalCenter: parent.horizontalCenter
            Button {
                text: "√"
                onClicked:
                    mathText.text = MathProblem.nextMath();
            }
            Button {
                text: "X"
            }
        }
    }
}
三、完善执行逻辑(v0.2)
第二个版本,演示如下:

● 增加功能:
1)增加游戏结束界面

2)判断回答是否正确,回答正确进入下一题,回答错误进入结束界面

3)增加到60个算术题

4)增加计时功能,设定为 4s,超时则进入结束界面

5)增加积分:答对1题 +10,再加上 剩余的时间 *5,如剩余的时候为 2s 时候,积分:10 + 2 * 5 = 20
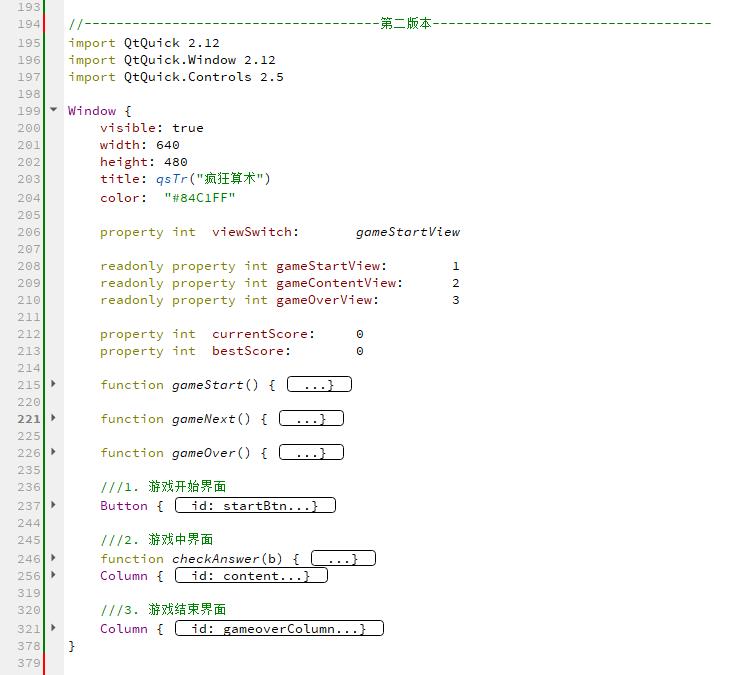
● 主要 UI 代码结构如下:
main.qml :

可以下载源码,参考第二个版本 v0.2, C++ 后台数据中基本不变
四、发布版本(v1.0)
● 增加功能:
1)美化界面

2)整理结构

3)跨平台程序,**Windows** 和 **Android** 下都能运行;

4)C++ 与  QML 相结合,在 QML 文件中使用了两种方法调用 C++ 类;

5)自定义不同的基础控件,如悬浮按钮CCHoverHorzButton、文本CCLabel,方便移植;

6)数据可持久化,利用 QSettings 可以把内存中的数据保存到地电脑的磁盘中;

7)加入国际化翻译机制;
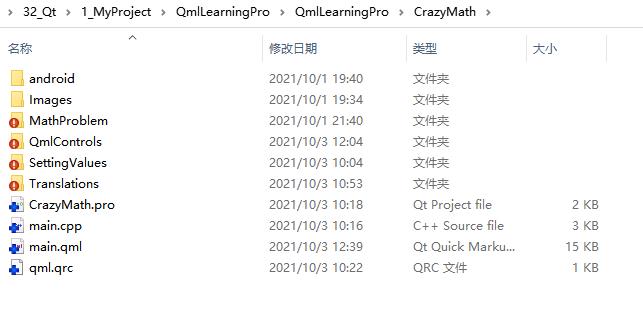
● 目录结构:

源码更新了很多,包括执行的逻辑,具体看源码,再这里展开说下 国际化翻译机制 和QSettings 数据可持久化
1. 翻译

参考:Qt 本地化(翻译)
1)准备要翻译的源代码
在 QML 中使用 qsTr() 来包裹,在 cpp 中使用 tr() 来包裹。用它包裹的文本会被 Qt Linguist(Qt 语言家)捕捉到从而进行翻译工作。
//main.qml
text:                   qsTr("Correct")
2)生成 xxx.ts 文件
先在 CrazyMath.pro 文件中添加如下代码:
TRANSLATIONS += $$PWD/Translations/zh_CN.ts
可以使用两种方法生成:
① 在 Qt Creator 的菜单栏中依次点击 工具->外部->Qt语言家->发布更新翻译(lrelease)(lupdate),就会在源代码文件所在的目录生成 ts 文件。

② 使用 CMD 命令生成:

使用 lupdate CrazyMath.pro

3)翻译并生成 qm 文件
方法一: 右键打开翻译文件 zh_CN.ts

翻译后发布:

方法二,执行指令:
lrelease -verbose zh_CN.ts

4)加载 qm 翻译文件
在 main.cpp 中加载生成的 qm 文件
void setLanguage(QGuiApplication *app) {

    QLocale locale = QLocale::system();

    if(locale.language() == QLocale::Chinese)
    {
        QTranslator *translator = new QTranslator(app);
        ///--以下三种方法都可以加载翻译文件
        if(translator->load(":/translations/zh_CN.qm"))
    //      if(translator->load(locale, ":/translations/zh_CN.qm", "", ":/i18n"))
    //      if (translator->load(locale, "zh_CN", ".", ":/translations", ".qm"))
        {
            app->installTranslator(translator);
        }
        else {
            qDebug() << "Error loading source localization ";
        }
    }
}
最后编译即可。
2. QSetting 数据保存
纯 QML 软件状态的保存可以参考这个:QT Quick QML 之Setting状态保存
本文设定了 bestScore 变量来保存历史最好成绩 ,在软件关闭后能保存到注册表中。

如果指定了名字,公司等,就不需要手动创建.ini配置文件了, 会自动创建ini文件,且保存到注册表中:
main.cpp:
void setOrganization(void) {
    QCoreApplication::setOrganizationName("CrazyMath");
    QCoreApplication::setOrganizationDomain("CrazyMath.com");
    QCoreApplication::setApplicationName("CrazyMath");
}

//注册:
qmlRegisterType<Values>       ("cc.Values",        1, 0, "Values");
cpp 源文件:
//Values.cc
#include "Values.h"
#include <QSettings>
#include <qdebug.h>

const char* Values::_groupKey =      "values";
const char* Values::_bestScoreKey =  "bestScore";

Values::Values(void)
{
    QSettings settings;
    settings.beginGroup(_groupKey);

    //获取初值
    _bestScore = settings.value(_bestScoreKey).toInt();
    //更新 qml 值
    emit bestScoreChanged(_bestScore);

    qDebug() <<"Setting fileName is :" <<settings.fileName();
    qDebug() <<"_bestScore is :" << _bestScore;
}

void Values::setBestScore(const int& bestScore)
{
    QSettings settings;

    settings.beginGroup(_groupKey);
    settings.setValue(_bestScoreKey, bestScore);

    _bestScore = bestScore;
    emit bestScoreChanged(_bestScore);

    qDebug() <<"_bestScore is :" << _bestScore;
}
打印的路径:

.h 头文件:
//Values.h:
#ifndef Values_H
#define Values_H

#include <QObject>

class Values : public QObject
{
    Q_OBJECT
public:
    Values(void);
    Q_PROPERTY(int bestScore READ bestScore WRITE setBestScore NOTIFY bestScoreChanged)
    int bestScore(void) const { return _bestScore; }
    void setBestScore(const int& bestScore);

signals:
    void bestScoreChanged(int bestScore);

private:
    int _bestScore;
    static const char* _groupKey;
    static const char* _bestScoreKey;
};

#endif
QML 中调用
//main.qml

import cc.Values    1.0

Values {
    id: values
}


function gameOver() {
    values.bestScore = Math.max(values.bestScore, currentScore)
	...
}
GitHub 地址: QmlLearningPro ,选择子工程 CrazyMath.pro
QML 其它文章请点击这里: QT QUICK QML 学习笔记
以上是关于QML和C++混合编程实现以下功能:的主要内容,如果未能解决你的问题,请参考以下文章
Qt Quick QML 实例之疯狂数字游戏(QML C++混合编程翻译QSetting )建议收藏
Qt Quick QML 实例之疯狂数字游戏(QML C++混合编程翻译QSetting )建议收藏