SpringCloud-笔记2-Eureka Client项目创建
Posted
tags:
篇首语:本文由小常识网(cha138.com)小编为大家整理,主要介绍了SpringCloud-笔记2-Eureka Client项目创建相关的知识,希望对你有一定的参考价值。
参考技术A File/New/Module有时spring网站无法访问时,我们可以把https->改为http
一路next到finsh
选择pom.xml文件/
Multiple Spring Boot run configurations were detected. Run Dashboard allows to manage multiple run configurations at once. Show run configurations in Run Dashboard Do not show again for this project
显示Run Dashboard
问题2
Failed to read artifact descriptor for org.springframework.cloud:spring-cloud-starter-netflix-eureka-client:jar:2.1.2.RELEASE
到moven仓库查看版本 https://mvnrepository.com/artifact/org.springframework.cloud/spring-cloud-starter-netflix-eureka-client
日志打印可看到是注册上去了
可在eureka后台看不到Client的注册实例信息
可以看到成功注册上来了
工程的pom.xml文件加入
工程的运行类添加注解
在application.yml添加注册配置
运行wechatTask-guns项目
访问
springcloud笔记三注册中心eurekazookeeperconsul
一、eureka
1.服务端
pom文件
添加eureka-server
		<!--eureka-server-->
        <dependency>
            <groupId>org.springframework.cloud</groupId>
            <artifactId>spring-cloud-starter-netflix-eureka-server</artifactId>
        </dependency>
yaml文件
# eureka集群互相注册
server:
  port: 7002
#eureka:
#  instance:
#    hostname: eureka7002.com
#  client:
#    register-with-eureka: false
#    fetch-registry: false
#    com.fox.springcloud.service-url:
#      defaultzone: http://eureka7001.com:7001/eureka/
eureka:
  instance:
    hostname: eureka7002.com
  client:
    register-with-eureka: false
    fetch-registry: false
    service-url:
      defaultZone: http://eureka7001.com:7001/eureka/
  server:
    enable-self-preservation: false
    eviction-interval-timer-in-ms: 20000
启动类
添加@EnableEurekaServer注解
2.客户端(服务注册+restTemplate)
pom文件
添加eureka-client maven坐标
<dependency>
    <groupId>org.springframework.cloud</groupId>
    <artifactId>spring-cloud-starter-netflix-eureka-client</artifactId>
</dependency>
yaml文件
eureka:
  client:
    register-with-eureka: true
    service-url:
#      defaultZone: http://localhost:7001/eureka
      defaultZone: http://eureka7001.com:7001/eureka/,http://eureka7002.com:7002/eureka/
    fetch-registry: true
  instance:
    instance-id: payment8001
    prefer-ip-address: true
    lease-renewal-interval-in-seconds: 10
    lease-expiration-duration-in-seconds: 30
启动类
添加@EnableEurekaClient、@EnableDiscoveryClient注解
备注:@EnableEurekaClient只适用于使用Eureka作为注册中心的场景,@EnableDiscoveryClient可以适用于其他注册中心的场景比如nacos等。
调用远程服务
使用服务名代替服务提供者的ip端口调用
获取注册中心的服务
@Resource
private DiscoveryClient discoveryClient;
可以通过discoveryClient获取注册中心的服务和对应的instances
3.客户端(openfeign)
pom文件
添加eureka-client和openfeign
		<dependency>
            <groupId>org.springframework.cloud</groupId>
            <artifactId>spring-cloud-starter-openfeign</artifactId>
        </dependency>
        <dependency>
            <groupId>org.springframework.cloud</groupId>
            <artifactId>spring-cloud-starter-netflix-eureka-client</artifactId>
        </dependency>
yaml文件
eureka:
  client:
    register-with-eureka: false
    service-url:
      defaultZone: http://eureka7001.com:7001/eureka/,http://eureka7002.com:7002/eureka/
feign:
  client:
    config:
      default:
        ReadTimeout: 5000
        ConnectTimeout: 5000
启动类
添加@EnableFeignClients注解
调用远程服务
PaymentFeignService中的服务名和接口路径要和服务提供者一致,项目中注入PaymentFeignService即可调用
@Component
@FeignClient("PAYMENT-SERVICE")
public interface PaymentFeignService {
    @GetMapping("/payment/lb")
    public String getPaymentLB();

    @GetMapping("/payment/timeout")
    public String getTimeout();
}
二、zookeeper
1.zookeeper服务端安装
下载zookeeper
wget https://mirrors.tuna.tsinghua.edu.cn/apache/zookeeper/zookeeper-3.5.9/apache-zookeeper-3.5.9-bin.tar.gz
zookeeper安装后要注意检查防火墙是否关闭
查看防火墙状态
systemctl status firewalld.service
关闭防火墙
systemctl stop firewalld.service
java项目连接zookeeper时要注意和服务器版本一致。
进入bin目录下,启动zookeeper
./zkServer.sh start
连接zookeeper
./zkCli.sh
2.客户端(服务注册调用)
pom文件
		<!--SpringBoot整合Zookeeper客户端-->
        <dependency>
            <groupId>org.springframework.cloud</groupId>
            <artifactId>spring-cloud-starter-zookeeper-discovery</artifactId>
            <exclusions>
                <!--先排除自带的zookeeper3.5.3-->
                <exclusion>
                    <groupId>org.apache.zookeeper</groupId>
                    <artifactId>zookeeper</artifactId>
                </exclusion>
            </exclusions>
        </dependency>
        <!--添加zookeeper3.5.9版本-->
        <dependency>
            <groupId>org.apache.zookeeper</groupId>
            <artifactId>zookeeper</artifactId>
            <version>3.5.9</version>
        </dependency>
yaml文件
spring:
  application:
    # 服务别名---注册zookeeper到注册中心的名称
    name: cloud-provider-payment
  cloud:
    zookeeper:
      # 默认localhost:2181
      connect-string: 192.168.137.200:2181
启动类
添加@EnableDiscoveryClient注解
调用远程服务
通过服务名代替ip端口
zookeeper节点类型
1、PERSISTENT--持久化目录节点
客户端与zookeeper断开连接后,该节点依旧存在
2、PERSISTENT_SEQUENTIAL-持久化顺序编号目录节点
客户端与zookeeper断开连接后,该节点依旧存在,只是Zookeeper给该节点名称进行顺序编号
3、EPHEMERAL-临时目录节点
客户端与zookeeper断开连接后,该节点被删除
4、EPHEMERAL_SEQUENTIAL-临时顺序编号目录节点
客户端与zookeeper断开连接后,该节点被删除,只是Zookeeper给该节点名称进行顺序编号

三、consul
1.consul服务端安装
consul下载安装官网写的非常详细https://www.consul.io/downloads
sudo yum install -y yum-utils
sudo yum-config-manager --add-repo https://rpm.releases.hashicorp.com/RHEL/hashicorp.repo
sudo yum -y install consul
查看是否安装成功
consul -version

启动consul
window启动
consul agent dev
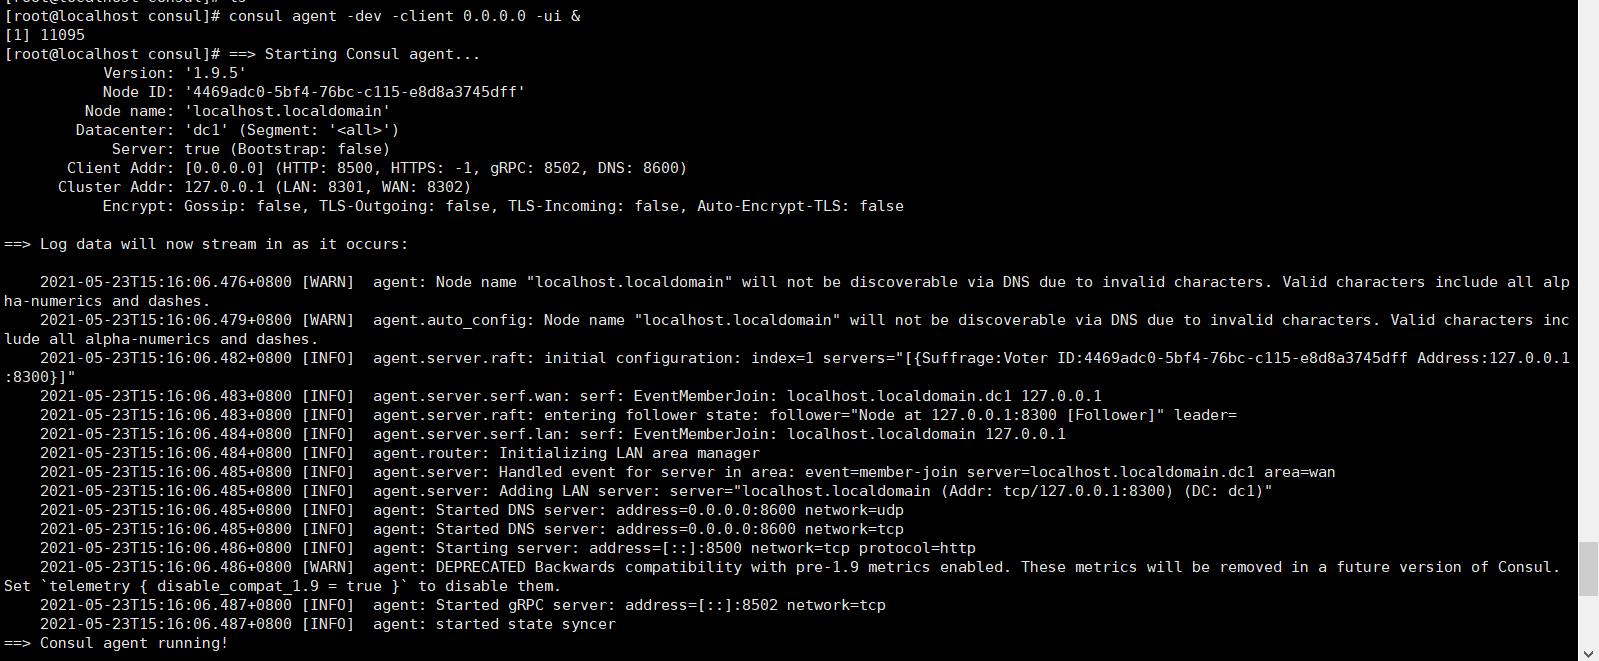
centos启动(0.0.0.0允许远程访问)
consul agent -dev -client 0.0.0.0 -ui &
查看进程是否启动成功
netstat -anp|grep 8500
查看Consul集群的成员
consul members

2.客户端(服务注册调用)
pom文件
添加consul-discovery
		<!--SpringCloud consul-server-->
        <dependency>
            <groupId>org.springframework.cloud</groupId>
            <artifactId>spring-cloud-starter-consul-discovery</artifactId>
        </dependency>
yaml文件
spring:
  application:
    # 服务别名---注册consul到注册中心的名称
    name: cloud-provider-payment
  cloud:
    consul:
      host: 192.168.137.200
      port: 8500
      discovery:
        service-name: ${spring.application.name}
启动类
添加@EnableDiscoveryClient注解
调用远程服务
通过服务名代替ip端口
3.使用过程中遇到的问题
问题一、注册服务提供者连接不上consul
使用telnet ip端口报错
telnet: connect to address 192.168.137.200: No route to host
查看防火墙状态
firewall-cmd --state
发现防火墙是running状态,关闭防火墙,再telnet成功
service firewalld stop
问题二、consul中服务健康状态为unhealth
页面显示叉

点进去

通过output信息判断可能是使用了服务运行时的主机名,查看主机名确实是DESKTOP-JOKG37G
127.0.0.1 DESKTOP-JOKG37G
原因是springcloud服务注册到consul的是主机名,consul所在的服务器不能识别该主机名导致
解决方法:
一、在consul服务器/etc/hosts文件中配置主机名映射到Springcloud服务ip
二、指定注册到consul的ip地址spring.cloud.consul.discovery.hostname
spring:
  application:
    name: cloud-consumer-order
  cloud:
    consul:
      host: 192.168.137.200
      port: 8500
      discovery:
        hostname: 192.168.137.166
        service-name: ${spring.application.name}
以上是关于SpringCloud-笔记2-Eureka Client项目创建的主要内容,如果未能解决你的问题,请参考以下文章
实用篇SpringCloud+RabbitMQ+Docker+Redis+搜索+分布式,系统详解springcloud分布式