SpringBoot - JSP,Servlet,拦截器(Interceptor),过滤器(Filter),Runner 接口
Posted MinggeQingchun
tags:
篇首语:本文由小常识网(cha138.com)小编为大家整理,主要介绍了SpringBoot - JSP,Servlet,拦截器(Interceptor),过滤器(Filter),Runner 接口相关的知识,希望对你有一定的参考价值。
一、容器
SpringBoot 在 main 方法中 SpringApplication.run()方法获取返回的 Spring 容器对象,再获取业务 bean进行调用
我们先创建一个service接口以及实现类
@Service("helloService")
public class HelloServiceImpl implements HelloService
    @Override
    public void salyHello()
        System.out.println("Hello,Sprng Boot!");
在启动类中
@SpringBootApplication
public class Springboot6ContainerApplication

    public static void main(String[] args)
        /**
         * SpringApplication.run()返回ConfigurableApplicationContext 接口对象
         * ConfigurableApplicationContext 接口对象继承自 ApplicationContext
         */
        ApplicationContext context = SpringApplication.run(Springboot6ContainerApplication.class, args);

        HelloService helloService = (HelloService) context.getBean("helloService");
        helloService.salyHello();
二、ComnandLineRunner 接口 , ApplcationRunner接口
CommandLineRunner 和 ApplicationRunner 接口,在容器启动后执行一些内容
比如读取配置文件,数据库连接等
SpringBoot 提供了两个接口CommandLineRunner 和 ApplicationRunner。他们的执行时机为容器启动完成时
这两个接口中有一个 run 方法,只需要实现这个方法即可
这两个接口的不同之处在于:
ApplicationRunner中run()方法的参数为ApplicationArguments,而CommandLineRunner接口中run()方法的参数为String数组
我们先创建一个service接口以及实现类
@Service("helloService")
public class HelloServiceImpl implements HelloService
    @Override
    public String sayHello()
        return  "Hello,Sprng Boot!";
启动类中
@SpringBootApplication
public class Springboot7CommandlinerunnerApplication implements CommandLineRunner
    @Autowired
    HelloService helloService;
    public static void main(String[] args)
        System.out.println("准备创建容器对象");
        //创建容器对象
        SpringApplication.run(Springboot7CommandlinerunnerApplication.class, args);
        System.out.println("容器对象创建之后");


    /**
     * CommandLineRunner 和 ApplicationRunner 接口
     * 在容器启动后执行一些内容。比如读取配置文件,数据库连接等
     * SpringBoot 提供了两个接口CommandLineRunner 和 ApplicationRunner。他们的执行时机为容器启动完成时
     * 这两个接口中有一个 run 方法,只需要实现这个方法即可
     * 这两个接口的不同之处在于:
     * ApplicationRunner中run()方法的参数为ApplicationArguments,而CommandLineRunner接口中run()方法的参数为String数组
     */
    @Override
    public void run(String... args) throws Exception
        String str  = helloService.sayHello();
        System.out.println("调用容器中的对象="+str);
        //可做自定义的操作,比如读取文件, 数据库等等
        System.out.println("在容器对象创建好,执行的方法");
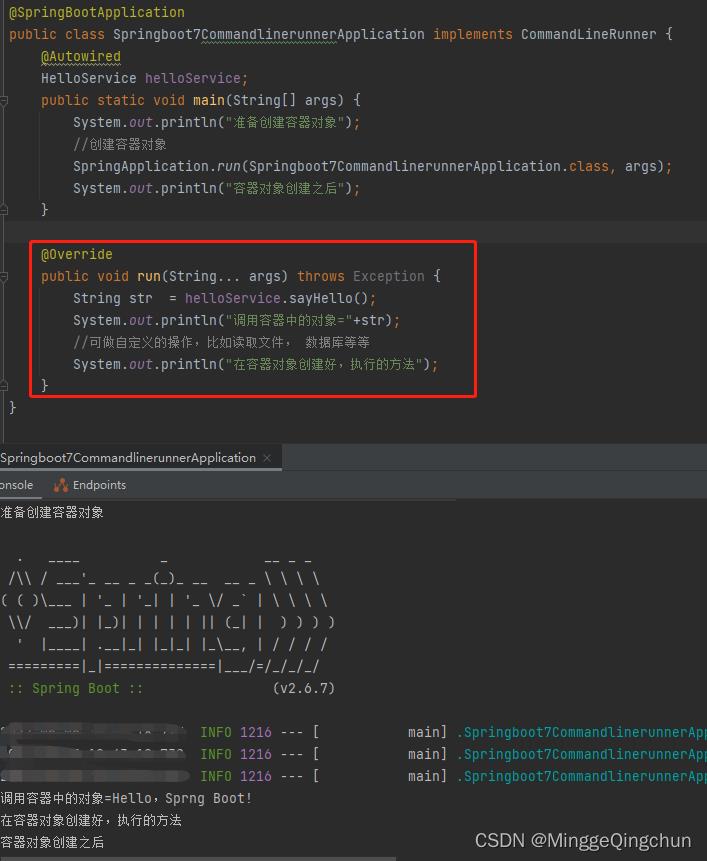
看控制台中输出

三、JSP
springboot默认是不持jsp的, 它的默认Thymeleaf模板, 所以我们要手动对其进行配置
创建一个项目,导入如下依赖
<dependencies>
        <dependency>
            <groupId>org.springframework.boot</groupId>
            <artifactId>spring-boot-starter-web</artifactId>
        </dependency>

        <dependency>
            <groupId>org.springframework.boot</groupId>
            <artifactId>spring-boot-starter-test</artifactId>
            <scope>test</scope>
        </dependency>

        <!--处理jsp依赖-->
        <dependency>
            <groupId>org.apache.tomcat.embed</groupId>
            <artifactId>tomcat-embed-jasper</artifactId>
        </dependency>
    </dependencies>

    <build>
        <!--指定jsp编译后的存放目录-->
        <resources>
            <resource>
                <!--jsp原来的目录-->
                <directory>src/main/webapp</directory>
                <!--指定编译后的存放目录-->
                <targetPath>META-INF/resources</targetPath>
                <!--指定处理的目录和文件-->
                <includes>
                    <include>**/*.*</include>
                </includes>
            </resource>
        </resources>

        <plugins>
            <plugin>
                <groupId>org.springframework.boot</groupId>
                <artifactId>spring-boot-maven-plugin</artifactId>
            </plugin>
        </plugins>
    </build>
在 application.yml中配置视图解析器
#设置端口号
server:
  port: 8081
  servlet:
    context-path: /myjsp

#视图解析器
spring:
  mvc:
    view:
      prefix: /
      suffix: .jsp
设置web项目的根目录

首先在src目录下创建一个 webapp目录
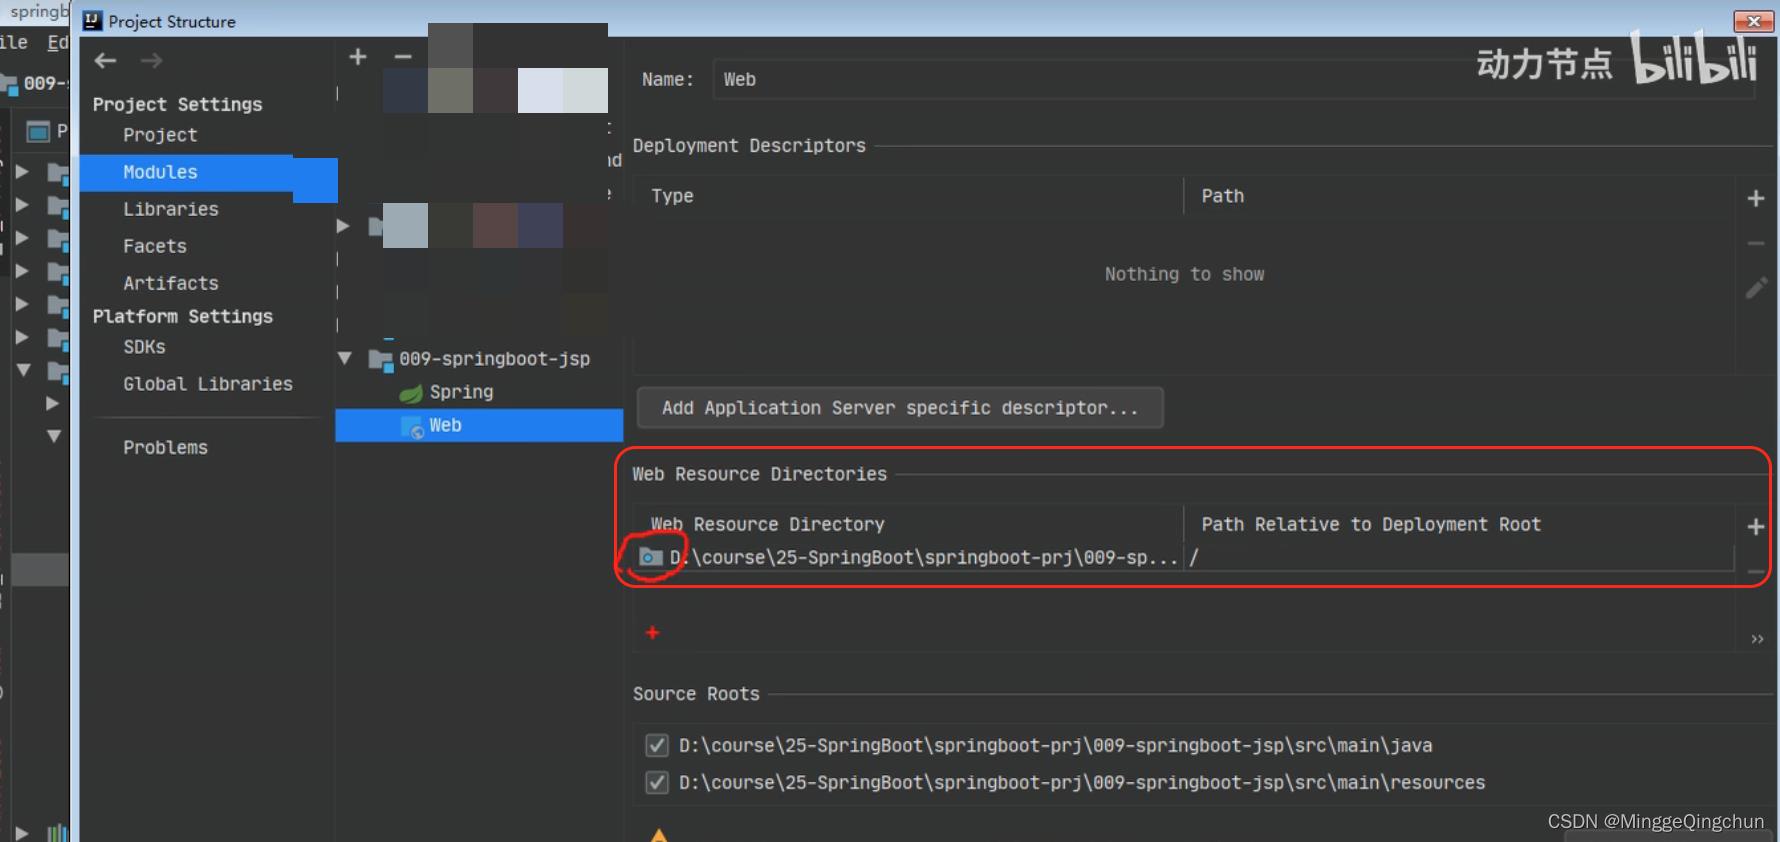
我们选择 file ----> Project Structure ----> 选择模块,选择 Web Resource Directories ,新建webapp 目录即可

即可看到webapp被设为web项目的根目录,并有一个蓝点的标志

启动项目运行
四、Servlet
1、新建自定义Servlet类
//创建Servlet
public class MyServlet extends HttpServlet
    @Override
    protected void doGet(HttpServletRequest req, HttpServletResponse resp) throws ServletException, IOException
        doPost(req,resp);


    @Override
    protected void doPost(HttpServletRequest req, HttpServletResponse resp) throws ServletException, IOException, IOException
        //使用HttpServletResponse输出数据,应答结果
        resp.setContentType("text/html;charset=utf-8");
        PrintWriter out  = resp.getWriter();
        out.println("===执行的是Servlet==");
        out.flush();
        out.close();
2、注册Servlet类(ServletRegistrationBean)
@Configuration
public class WebApplictionConfig

    /**
     * 定义方法,注册Servlet
     * ServletRegistrationBean:servlet的注册类
     */
    @Bean
    public ServletRegistrationBean servletRegistrationBean()
        //public ServletRegistrationBean(T servlet, String... urlMappings)
        //第一个参数是 Servlet对象, 第二个是url地址

        //ServletRegistrationBean bean = new ServletRegistrationBean(new MyServlet(),"/myservlet");
        ServletRegistrationBean servletRegistrationBean = new ServletRegistrationBean();
        servletRegistrationBean.setServlet(new MyServlet());
        servletRegistrationBean.addUrlMappings("/login","/test");// <url-pattern>

        return servletRegistrationBean;
五、拦截器(Interceptor)
1、自定义拦截器
/**
 * 自定义拦截器
 */
public class LoginInterCeptor implements HandlerInterceptor
    /**
     *
     * @param request
     * @param response
     * @param handler  被拦截器的控制器对象
     * @return boolean
     *    true: 请求能被Controller处理
     *    false: 请求被截断
     */
    @Override
    public boolean preHandle(HttpServletRequest request, HttpServletResponse response, Object handler) throws Exception
        System.out.println("执行了LoginInterCeptor中的preHandle()方法");
        return true;
2、添加拦截器,注入到spring容器中
@Configuration
public class MyAppConfig implements WebMvcConfigurer

    //添加拦截器对象, 注入到容器中
    @Override
    public void addInterceptors(InterceptorRegistry registry)
        //创建拦截器对象
        HandlerInterceptor interceptor = new LoginInterCeptor();

        //指定拦截的请求uri地址
        String path[] = "/user/**";
        //指定不拦截的URI地址
        String excludePath[] = "/user/login";

        registry.addInterceptor(interceptor).addPathPatterns(path).excludePathPatterns(excludePath);
通过controller访问测试
@Controller
public class MyController
    @RequestMapping("/user/account")
    @ResponseBody
    //会执行Interceptor中的preHandle()方法
    public String userAccount()
        return "访问user/account地址";


    @RequestMapping("/user/login")
    @ResponseBody
    //不会执行Interceptor中的preHandle()方法
    public String userLogin()
        return "访问user/login地址";
六、过滤器(Filter)
1、自定义过滤器
//自定义过滤器
public class MyFilter implements Filter
    @Override
    public void doFilter(ServletRequest servletRequest, ServletResponse servletResponse, FilterChain filterChain) throws IOException, ServletException
        System.out.println("执行了MyFilter的doFilter()方法");
        filterChain.doFilter(servletRequest,servletResponse);
2、注册过滤器(FilterRegistrationBean)
@Configuration
public class WebApplicationConfig
    //FilterRegistrationBean注册过滤器
    @Bean
    public FilterRegistrationBean filterRegistrationBean()
        FilterRegistrationBean bean = new FilterRegistrationBean();
        bean.setFilter(new MyFilter());
        bean.addUrlPatterns("/user/*");
        return bean;
3、controller测试
@Controller
public class FilterController
    @RequestMapping("/user/account")
    @ResponseBody
    public String userAccount()
        return "user/account";


    @RequestMapping("/book/query")
    @ResponseBody
    public String queryAccount()
        return "book/query";
七、字符集过滤器 (CharacterEncodingFilter )
字符集过滤器CharacterEncodingFilter : 解决post请求中乱码的问题
我们有两种配置方式
(1)application.yml文件, 让自定义的过滤器起作用
server:
  port: 8081
  servlet:
    context-path: /myboot
    encoding:
      #SpringBoot中默认已经配置了CharacterEncodingFilter。 编码默认ISO-8859-1
      #设置enabled=false 作用是关闭系统中配置好的过滤器, 使用自定义的CharacterEncodingFilter
      enabled: false
(2)application.yml文件,启动系统的过滤器,并指定编码方式
server:
  port: 8081
  servlet:
    context-path: /myboot
    encoding:
      #SpringBoot中默认已经配置了CharacterEncodingFilter。 编码默认ISO-8859-1
      #设置enabled=false 作用是关闭系统中配置好的过滤器, 使用自定义的CharacterEncodingFilter
#     enabled: false

      #设置系统的CharacterEncdoingFilter是否生效
      enabled: true
      #指定使用的编码方式
      charset: utf-8
      #强制request,response都使用charset属性的值
      force: true
1、application.yml配置文件
server:
  port: 8081
  servlet:
    context-path: /myboot
    encoding:
      #SpringBoot中默认已经配置了CharacterEncodingFilter。 编码默认ISO-8859-1
      #设置enabled=false 作用是关闭系统中配置好的过滤器, 使用自定义的CharacterEncodingFilter
#      enabled: false

      #设置系统的CharacterEncdoingFilter是否生效
      enabled: true
      #指定使用的编码方式
      charset: utf-8
      #强制request,response都使用charset属性的值
      force: true

#让系统的CharacterEncdoingFilter生效
#server.servlet.encoding.enabled=true
#指定使用的编码方式
#server.servlet.encoding.charset=utf-8
#强制request,response都使用charset属性的值
#server.servlet.encoding.force=true
2、自定义Servlet
//自定义Servlet
public class MyServlet extends HttpServlet
    @Override
    protected void doGet(HttpServletRequest req, HttpServletResponse resp) throws ServletException, IOException
        doPost(req,resp);


    @Override
    protected void doPost(HttpServletRequest req, HttpServletResponse resp) throws ServletException, IOException, IOException
        resp.setContentType("text/html");
        PrintWriter out = resp.getWriter();
        out.println("===在Servlet输出中文,默认编码ISO-8859-1===");
        out.flush();
        out.close();
3、 注册拦截器,过滤器
@Configuration
public class WebConfig

    //注册Servlet
    @Bean
    public ServletRegistrationBean servletRegistrationBean()
        ServletRegistrationBean bean = new ServletRegistrationBean(new MyServlet(),"/myServlet");
        return bean;


    //注册Filter
    @Bean
    public FilterRegistrationBean filterRegistrationBean()
        FilterRegistrationBean bean = new FilterRegistrationBean();

        //使用框架中过滤器类
        CharacterEncodingFilter filter = new CharacterEncodingFilter();
        //指定使用编码方式
        filter.setEncoding("utf-8");
        //指定request,response 都使用encoding编码
        filter.setForceEncoding(true);

        bean.setFilter(filter);
        //指定过滤的url地址
        bean.addUrlPatterns("/*");
        return bean;
以上是关于SpringBoot - JSP,Servlet,拦截器(Interceptor),过滤器(Filter),Runner 接口的主要内容,如果未能解决你的问题,请参考以下文章
SpringBoot - JSP,Servlet,拦截器(Interceptor),过滤器(Filter),Runner 接口