nagios监控服务
Posted
tags:
篇首语:本文由小常识网(cha138.com)小编为大家整理,主要介绍了nagios监控服务相关的知识,希望对你有一定的参考价值。
nagios监控系统
1: ngios工作原理
1.Nagios的功能是监控服务和主机,但是他自身并不包括这部分功能,所有的监控、检测功能都是通过各种插件来完成的。
启动Nagios后,它会周期性的自动调用插件去检测服务器状态,同时Nagios会维持一个队列,所有插件返回来的状态信息都进入队列,Nagios每次都从队首开始读取信息,并进行处理后,把状态结果通过web显示出来。
Nagios提供了许多插件,利用这些插件可以方便的监控很多服务状态。安装完成后,在nagios主目录下的/libexec里放有nagios自带的可以使用的所有插件,如,check_disk是检查磁盘空间的插件,check_load是检查CPU负载的,等等。每一个插件可以通过运行./check_xxx –h 来查看其使用方法和功能。
2.Nagios可以识别4种状态返回信息,即 0(OK)表示状态正常/绿色、1(WARNING)表示出现警告/黄色、2(CRITICAL)表示出现非常严重的错误/红色、3(UNKNOWN)表示未知错误/深黄色。Nagios根据插件返回来的值,来判断监控对象的状态,并通过web显示出来,以供管理员及时发现故障。
四种监控状态
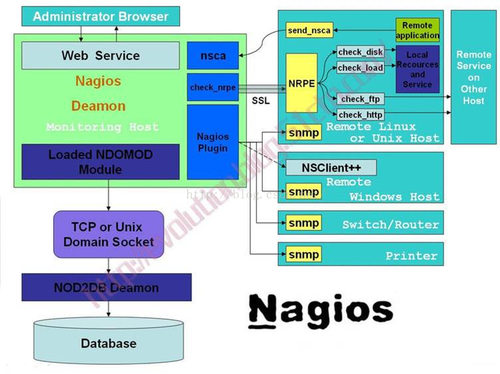
3.Nagios 通过NRPE 来远端管理服务
1. Nagios 执行安装在它里面的check_nrpe 插件,并告诉check_nrpe 去检测哪些服务。
2. 通过SSL,check_nrpe 连接远端机子上的NRPE daemon
3. NRPE 运行本地的各种插件去检测本地的服务和状态(check_disk,..etc)
4. 最后,NRPE 把检测的结果传给主机端的check_nrpe,check_nrpe 再把结果送到Nagios状态队列中。
5. Nagios 依次读取队列中的信息,再把结果显示出来。
4.nagios监控一个服务或主机的方式
1.【被动监控】nagios通过nsca进行被动监控。那么什么是被动监控呢?被动监测:就是指由被监测的服务器主动上传数据到nagios监控系统中。这种监测方式提高了实时性(出现问题的时候,被监测的服务器可以及时上传数据通知nagios,从而使管理员可以尽快作出处理,而不用像主动监测中一样,非要等到下一个监测周期才能获知被监测服务器的状态)。NSCA就是可以实现Nagios被动监测的一个程序。目前所知道的,只能通过nsca插件对linux/unix服务器进行被动监控。对于windows服务器暂时没发现可用的插件。
2.【主动监控】nagios通过nrpe插件和snmp协议进行主动监控。至于什么是主动监控可以参考上面所述。简单理解决就是nagios按照检测周期主动的获取远程主机的数据。这样一来实时性就要差一些了。nagios通过nrpe插件和snmp协议实现了对linux/unix服务器进行监控,同时通过snmp协议实现了对windows服务器、交换机、打印机等的监控。另外,nagios通过NSClient++客户端也可以对windows进行监控
四、nagios监控一个服务或主机的途径
nagios本身并没有监控的功能,所有的监控是由插件完成的,插件将监控的结果返回给nagios,nagios分析这些结果以web的方式展现给我们,同时提供相应的报警功能(这个报警的功能也是由相应的插件完成的)。
根据上图可以看出有这么几大类,这些都是nagios所要调用的插件类型
1.snmp类
【可以监控本地/远程linux/unix主机和远程windows服务器、交换机、打印机】
2.nrpe类
【主要监控本地主机和远程主机的服务的状态,切记是针对于服务】
3.nsca类
【nsca主要是实现被动监控的】
4.nagios-plugins类
【nagios-plugins是nagios官方提供的一套插件程序,nagios监控主机的功能其实都是通过执行插件程序来实现的。】
所有的这些插件是一些实现特定功能的可执行程序,默认安装的路径是/
实验过程:
一、构建nagios监控系统
1.关闭防火墙
#service iptables stop
#chkconfig iptables off
2. 创建nagios用户和组
[[email protected] ~]# useradd -s /sbin/nologin nagios
[[email protected] ~]# mkdir /usr/local/nagios
[[email protected] ~]# chown -R nagios:nagios /usr/local/nagios
[[email protected] ~]#
3.安装依赖包
[[email protected] ~]# yum -y install php httpd mysql-devel
4.编译安装nagios
[[email protected] nagios-4.0.1]# tar zxf /mnt/nagios-4.0.1.tar.gz -C /usr/src
[[email protected] nagios-4.0.1]# cd /usr/src/nagios-4.0.1/
[[email protected] nagios-4.0.1]# ./configure --prefix=/usr/local/nagios
[[email protected] nagios-4.0.1]# make all //编译
[[email protected] nagios-4.0.1]# make install //安装nagios的主程序的cgi和html
[[email protected] nagios-4.0.1]# make install-init //生成服务脚本/etc/rc.d/init.d下
[[email protected] nagios-4.0.1]# make install-commandmode //给外部程序访问nagios分配权限
[[email protected] nagios-4.0.1]# make install-config //生成nagios配置文件的样例,安装路径为/usr/local/nagios/etc目录下
[[email protected] nagios-4.0.1]# make install-webconf//生成访问web接口文件,自动修改httpd.conf文件,以让nagios的web监控页面必须经过授权才能访问
[[email protected] nagios-4.0.1]# chkconfig --add nagios
[[email protected] nagios-4.0.1]# chkconfig --level 35 nagios on
[[email protected] nagios-4.0.1]#
5.验证安装是否成功要查看/usr/local/nagiso目录是否如下:
[[email protected] nagios-4.0.1]# ls /usr/local/nagios
bin etc libexec sbin share var
6.安装nagios插件
①安装nagions插件
[[email protected] nagios-plugins-1.5]# tar zxvf /mnt/nagios-plugins-1.5.tar.gz -C /usr/src
[[email protected] nagios-plugins-1.5]# cd /usr/src/nagios-plugins-1.5/
make[1]: Leaving directory `/usr/src/nagios-plugins-1.5‘
[[email protected] nagios-plugins-1.5]# ./configure --prefix=/usr/local/ngios
[[email protected] nagios-plugins-1.5]# make&&make install
如要获取远程主机的本地资源或属性,如cpu利用率、磁盘资源等,需要借用外部构建NRPE来完成
②监控端和被监控端之间使用ssl安全同道。需要首先安装openssl-devel
[[email protected] nagios-plugins-1.5]# yum -y install openssl-devel
#tar zxvf /mnt/nrpe-2.15.tar.gz -C /usr/src
#cd /usr/src/nrpe-2.15
#./configure
#make all
#make install-plugin //将check_nrpe插件安装到/usr/local/nagios/libexec目录下
③为了安全起见,一般情况下要让nagios的web监控页面必须经过授权才能访问。这需要增加验证配置,之前在安装nagios时安装了install-webconfig所以就不用手工修改httpd.conf文件了,只需要创建用于访问nagios的web页面的验证账户即可
[[email protected] nrpe-2.15]# /usr/bin/htpasswd -c /usr/local/nagios/etc/htpasswd.users nagiosadm
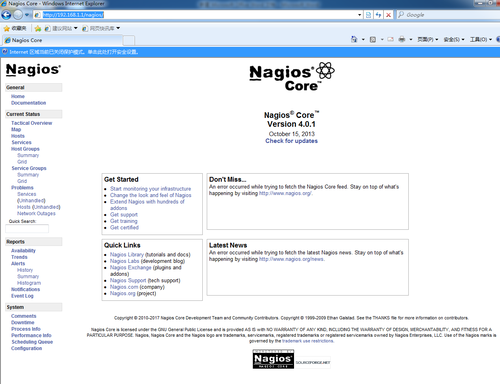
④验证,在客户机上打开浏览器
二、配置nagios监控系统
1.配置文件介绍
[[email protected] etc]# cd /usr/local/nagios/etc
cgi.cfg //控制cgi访问的配置文件
nagios.cfg //nagios主配置文件
resource.cfg //变量定义文件,又称为资源文件,在这些文件只能给的定义的变量。在其他配置文件中可以被使用,如$USER1$=/usr/local/nagios/libexec
objects //objects是一个目录,在此目录下又很多配置文件模版,用于定义nagios对象
objects/commands.cfg //定义命令配置文件,其中定义的命令可以被其它配置文件引用
objects/contacts.cfg //定义联系人和联系人组的配置文件
objects/localhost.cfg //定义监控问地主及的配置文件
objects/printer.cfg //定义监控打印机的一个配置文件模版。默认没有启用此文件
objects/switch.cfg //定义监控路由器的一个配置文件,默认没有启用
objects/templates.cfg //定义主机和服务的一个模版配置文件,可以在其他配置文件中引用
objects/timeperiods.cfg //定义nagios监控时间段的配置文件
objects/windows.cfg //定义监控windows主机的一个配置文件模版,默认没有启动此文件
2.配置文件之间的关联
四点:
l 定义监控哪些主机、主机组、服务和服务组
l 定义这个监控要什么命令实现
l 定义监控的时间段
l 定义主机或服务出现问题时要通知的联系人和联系人组
3修改配置文件
①/usr/local/nagios/etc/nagios.cfg //主配置文件
cfg_file=/usr/local/nagios/etc/objects/commands.cfg //默认有
cfg_file=/usr/local/nagios/etc/objects/contacts.cfg //默认有
cfg_file=/usr/local/nagios/etc/objects/timeperiods.cfg //默认有
cfg_file=/usr/local/nagios/etc/objects/templates.cfg //默认有
cfg_file=/usr/local/nagios/etc/objects/hostgroups.cfg //手工写
cfg_dir=/usr/local/nagios/etc/conf //存放主机配置的目录
需要手工添加:
[[email protected] etc]# mkdir /usr/local/nagios/etc/conf
②/usr/local/nagios/etc/objects/commands.cfg //加上电子邮件、飞信和nrpe插件,本例主要添加一个nrpe插件,其他都不定义(飞信、邮件等)
③/usr/local/nagios/etc/objects/contacts.cfg //定义监控服务联系人
contactgroup_name yumwei
alias yunwei
members ywgcsz
}
/usr/local/nagios/etc/objects/hostgroups.cfg //定义主机组 要手工创建
define hostgroup{
hostgroup_name mysqlserver
alias mysqlserver
members 192.168.1.2
}
4.下面开始具体监控mysql、http主机的存活、负载和进程
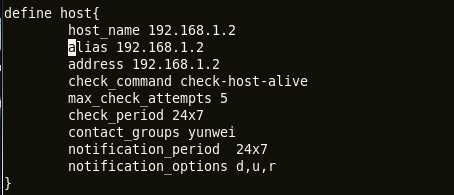
[[email protected] conf]# vim 192.168.1.2.cfg
define host {
host_name 192.168.1.2
alias 192.168.1.2
address 192.168.1.2
check_command check-host-alive
max_check_attempts 5
check_period 24x7
contact_groups yunwei
notification_period 24x7
notification_options d,u,r
}
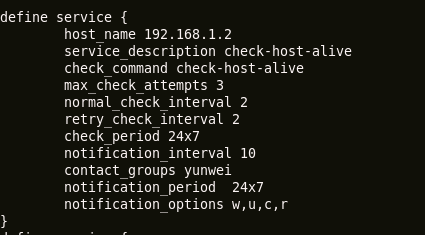
define service {
host_name 192.168.1.2
service_description check-host-alive
check_command check-host-alive
max_check_attempts 3
normal_check_interval 2
retry_check_interval 2
check_period 24x7
notification_interval 10
contact_groups yunwei
notification_period 24x7
notification_options w,u,c,r
}
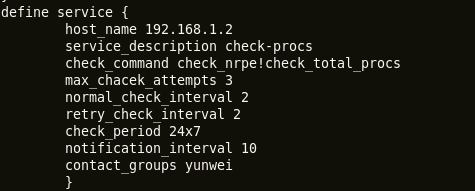
define service {
host_name 192.168.1.2
service_description check-procs
check_command check_nrpe!check_total_procs
max_chacek_attempts 3
normal_check_interval 2
retry_check_interval 2
check_period 24x7
notification_interval 10
contact_groups yunwei
}
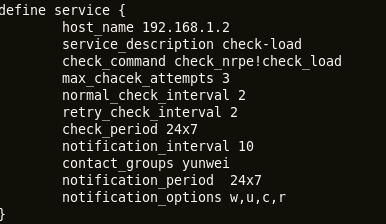
define service {
host_name 192.168.1.2
service_description check-load
check_command check_nrpe!check_load
max_chacek_attempts 3
normal_check_interval 2
retry_check_interval 2
check_period 24x7
notification_interval 10
contact_groups yunwei
notification_period 24x7
notification_options w,u,c,r
}
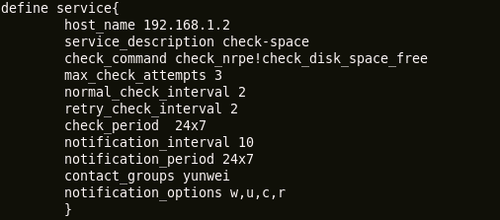
define service{
host_name 192.168.1.2
service_description check-space
check_command check_nrpe!check_disk_space_free
max_check_attempts 3
normal_check_interval 2
retry_check_interval 2
check_period 24x7
notification_interval 10
notification_period 24x7
contact_groups yunwei
notification_options w,u,c,r
}
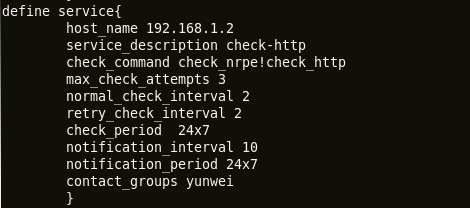
define service{
host_name 192.168.1.2
service_description check-http
check_command check_nrpe!check_http
max_check_attempts 3
normal_check_interval 2
retry_check_interval 2
check_period 24x7
notification_interval 10
notification_period 24x7
contact_groups yunwei
}
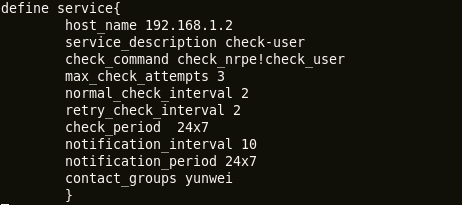
define service{
host_name 192.168.1.2
service_description check-user
check_command check_nrpe!check_user
max_check_attempts 3
normal_check_interval 2
retry_check_interval 2
check_period 24x7
notification_interval 10
notification_period 24x7
contact_groups yunwei
}
5.修改/usr/local/nagios/etc/cgi.cfg
use_authentication=0
三、被控端配置 (配置和管理服务器基本一样如以下命令)
[[email protected] ~]# yum -y install openssl openssl-devel
[[email protected] ~]# useradd nagios -s /sbin/nologin
[[email protected] nagios-plugins-1.5]# tar zxvf /mnt/nagios-plugins-1.5.tar.gz -C /usr/src
[[email protected] nagios-plugins-1.5]# cd /usr/src/nagios-plugins-1.5/
[[email protected] nagios-plugins-1.5]# ./configure --prefix=/usr/local/nagios
[[email protected] nagios-plugins-1.5]# make&&make install
[[email protected] nagios-plugins-1.5]# chown -R nagios:nagios /usr/local/nagios
[[email protected] nagios-plugins-1.5]# tar zxvf /mnt/nrpe-2.15.tar.gz -C /usr/src
#cd /usr/src/nrpe-2.15
#./configure --prefix=/usr/local/nagios
[[email protected] nrpe-2.15]# make all &&make install-plugin && make install-daemon
[[email protected] nrpe-2.15]# make install-daemon-config
[[email protected] nrpe-2.15]# ps -ef |wc -l
[[email protected] nrpe-2.15]# more /proc/cpuinfo |grep proc |wc -l
[[email protected] nrpe-2.15]# vim /usr/local/nagios/etc/nrpe.cfg
allowed_hosts=127.0.0.1,192.168.1.1(主控端)
command[check_total_procs]=/usr/local/nagios/libexec/check_procs -w 150 -c 170
commad[check_load]=/usr/local/nagios/libexec/check_load -w 15,10,5 -c 30,25,20
command[check_disk_space_free]=/usr/local/nagios/libexec/check_disk -w 95% -c 98% -p /
command[check_http]=/usr/local/nagios/libexec/check_tcp -H 192.168.1.1-p 80
command[check_user]=/usr/local/nagios/libexec/check_users -w 2 -c 3
然后在服务器端测试nrpe运行是否正常
connect to host 192.168.1.1 port 5666: Connection refused[[email protected] conf]# /usr/local/nagios/libexec/check_nrpe -H 192.168.1.2(被控端)
四、启动主控端ngios服务
#/etc/init.d/nagios restart
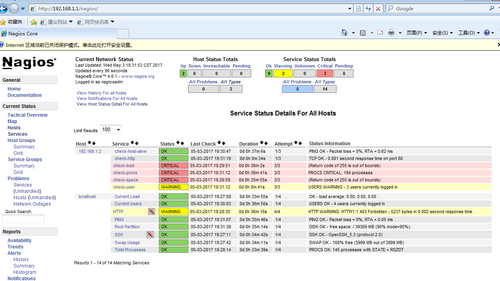
五、启动nagios后,观察监控显示界面
本文出自 “apache” 博客,请务必保留此出处http://xiaorenwutest.blog.51cto.com/12754924/1921763
以上是关于nagios监控服务的主要内容,如果未能解决你的问题,请参考以下文章

