Android开发笔记(13)——ListFragment
Posted
tags:
篇首语:本文由小常识网(cha138.com)小编为大家整理,主要介绍了Android开发笔记(13)——ListFragment相关的知识,希望对你有一定的参考价值。
转载请注明:http://www.cnblogs.com/igoslly/p/6959108.html
ListFragment
ListFragment是继承于Fragment的类,专门用于包含ListView的布局文件设置。
当然如果你不想了解ListFragment,通过使用普通Fragment进行setAdapter设置亦是可以的,普通ListView设置参见前章:http://www.cnblogs.com/igoslly/p/6947225.html
配置ListFragment通常涉及3个Layout文件:
1、包含Fragment的主Activity Layout:activity_main.xml (可直接静态添加fragment,或设置framelayout动态添加)
2、应用ListFragment的 Layout:history_list.xml
ListFragment的布局默认包含一个listVew,命名为:“@id/android:id” (和普通命名语法不同)
还可另设 TextView 用于无数据时显示,命名为:“@id/android:empty”
3、布局中ListView每个item的设置Layout:history_list_competition.xml
以下我实际应用所写的实例,使用的是动态添加fragment,自定义BaseAdapter的方法。
—— ArrayAdapter & SimpleAdapter的设置更为简单,可参考前章
—— 静态添加fragment的方法,即是一个函数findViewById 和 findViewByTag的区别,也可详见苏白的专栏:http://blog.csdn.net/kakaxi1o1/article/details/29368645
activity_main.xml
<LinearLayout xmlns:android="http://schemas.android.com/apk/res/android"
    android:layout_width="match_parent"
    android:layout_height="match_parent"
    android:orientation="vertical">
    <LinearLayout
            android:layout_width="match_parent"
            android:layout_height="0dp"
            android:layout_weight="1"
            android:id="@+id/history_list"
            android:orientation="vertical">
    </LinearLayout>
</LinearLayout>
historyFragment.java
在 onCreateView()中,调用 history_list.xml 作为该ListFragment的布局文件。
fragmentTranscation.replace(R.id.history_list, historyListFragment).commit();
动态添加historyListFragment,并替换原有fragment
public class HistoryFragment extends Fragment {
    private FragmentManager fragmentManager;

    public HistoryFragment() {
    }

    @Override
    public View onCreateView(LayoutInflater inflater, ViewGroup container,
                             Bundle savedInstanceState) {
        View rootView = inflater.inflate(R.layout.history_list, container, false);
        return rootView;
    }

    @Override
    public void onActivityCreated(Bundle savedInstanceState) {
        super.onActivityCreated(savedInstanceState);
        Button competition_selected = (Button) getActivity().findViewById(R.id.history_competition);
        competition_selected.setOnClickListener(new View.OnClickListener() {
            @Override
            public void onClick(View v) {
                fragmentManager = getFragmentManager();
                fragmentTranscation = fragmentManager.beginTransaction();
                HistoryListFragment historyListFragment = new HistoryListFragment();
                fragmentTranscation.replace(R.id.history_list, historyListFragment).commit();
            }}
        );
    }
}
history_list.xml
<LinearLayout xmlns:android="http://schemas.android.com/apk/res/android"
    android:layout_width="match_parent"
    android:layout_height="match_parent"
    android:orientation="vertical"
    android:id="@+id/list_content">
    <ListView
        android:id="@id/android:list"
        android:layout_width="match_parent"
        android:layout_height="match_parent"
        android:padding="8dp"/>

    <TextView android:id="@id/android:empty"
        android:layout_width="match_parent"
        android:layout_height="match_parent"
        android:text=""/>
</LinearLayout>
history_list_competition.xml
设置ListView的每个item的布局格式
<LinearLayout xmlns:android="http://schemas.android.com/apk/res/android"
    android:layout_width="match_parent"
    android:layout_height="wrap_content"
    android:orientation="horizontal">
    <LinearLayout
        android:layout_width="0dp"
        android:layout_weight="8"
        android:layout_height="match_parent"
        android:orientation="vertical">
        <TextView
            android:layout_width="match_parent"
            android:layout_height="0dp"
            android:layout_weight="1"
            android:text="Null"
            android:textSize="20sp"
            android:padding="2dp"
            android:textColor="@color/black"
            android:id="@+id/list_competition_player"/>
        <TextView
            android:layout_width="match_parent"
            android:layout_height="0dp"
            android:layout_weight="1"
            android:text="Null"
            android:textSize="16sp"
            android:padding="2dp"
            android:id="@+id/list_competition_date"/>
    </LinearLayout>
    <LinearLayout
        android:layout_width="0dp"
        android:layout_weight="3"
        android:layout_height="match_parent">
        <TextView
            android:layout_width="match_parent"
            android:layout_height="match_parent"
            android:text="100"
            android:gravity="center"
            android:textSize="24sp"
            android:textColor="@color/black"
            android:id="@+id/list_competition_scoreA"/>
    </LinearLayout>
    <LinearLayout
        android:layout_width="0dp"
        android:layout_weight="1"
        android:layout_height="match_parent">
        <TextView
            android:layout_width="match_parent"
            android:layout_height="match_parent"
            android:text="—"
            android:gravity="center"
            android:textSize="28sp"/>
    </LinearLayout>
    <LinearLayout
        android:layout_width="0dp"
        android:layout_weight="3"
        android:layout_height="match_parent">
        <TextView
            android:layout_width="match_parent"
            android:layout_height="match_parent"
            android:text="100"
            android:gravity="center"
            android:textSize="24sp"
            android:textColor="@color/black"
            android:id="@+id/list_competition_scoreB"/>
    </LinearLayout>
</LinearLayout>
HistoryListFragment.java
在 onCreate()中,通过setListAdapter() 设置R.layout.history_list_competition。或者使用系统的默认的R.layout.simple_list_item_1;
添加ListView的点击事件;自定义BaseAdapter;
注意! 如需使用本Java代码,请另行添加具体List<Map<String,Object>>值,否则会报错。
public class HistoryListFragment extends ListFragment {

    private CompetitionListAdapter adapter;
    private List<Map<String,Object>> competitionlist;

    // 构造函数
    public HistoryListFragment(){}
    @Override
    public void onCreate(Bundle savedInstanceState) {
        super.onCreate(savedInstanceState);
        competitionlist = new ArrayList<Map<String,Object>>();
        adapter = new CompetitionListAdapter(getActivity());
        //绑定适配器时,必须通过ListFragment.setListAdapter()接口,而不是ListView.setAdapter()或其它方法
        this.setListAdapter(adapter);
    }

    // 创建窗口
    @Override
    public View onCreateView(LayoutInflater inflater, ViewGroup container,
                             Bundle savedInstanceState) {
        return inflater.inflate(R.layout.history_list, container, false);
    }

    // 设置点击事件
    @Override
    public void onListItemClick(ListView l, View v, int position, long id) {
        super.onListItemClick(l, v, position, id);

        HashMap<String, Object> item =(HashMap<String, Object>) adapter.getItem(position);
        String scoreA = (String)item.get("scoreA");
        String scoreB= (String)item.get("scoreB");
        String log = (String)item.get("log");
    }

    // 自定义 CompetitionListAdapter 继承于BaseAdapter
    public class CompetitionListAdapter extends BaseAdapter {
        private LayoutInflater mInflater=null;
        public CompetitionListAdapter(Context context){
            this.mInflater=LayoutInflater.from(context);
        }
        @Override
        public int getCount(){
            return  competitionlist.size();
        }
        @Override
        public Object getItem(int position){
            return competitionlist.get(position);
        }
        @Override
        public long getItemId(int position){
            return position;
        }
        @Override
        public View getView(int position, View convertView, ViewGroup parent){
            ViewHolder holder = null;
            if (convertView ==null){
                holder = new ViewHolder();
                convertView = mInflater.inflate(R.layout.history_list_competition,null);
                holder.date=(TextView)convertView.findViewById(R.id.list_competition_date);
                holder.scoreA=(TextView)convertView.findViewById(R.id.list_competition_scoreA);
                holder.scoreB=(TextView) convertView.findViewById(R.id.list_competition_scoreB);
                holder.player=(TextView)convertView.findViewById(R.id.list_competition_player);
                convertView.setTag(holder);
            }else {
                holder = (ViewHolder)convertView.getTag();
            }
            holder.date.setText((String)competitionlist.get(position).get("date"));
            holder.scoreA.setText((String)competitionlist.get(position).get("scoreA"));
            holder.scoreB.setText((String)competitionlist.get(position).get("scoreB"));
            holder.player.setText((String)competitionlist.get(position).get("player"));
            return convertView;
        }

        private class ViewHolder{
            public TextView date;
            public TextView player;
            public TextView scoreB;
            public TextView scoreA;
        }
    }
}
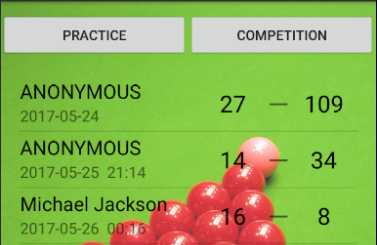
总体效果图如下:

以上是关于Android开发笔记(13)——ListFragment的主要内容,如果未能解决你的问题,请参考以下文章
Android开发之方向传感器的使用? (2011-10-13 20:56:05)转载▼
千里马带你学framework:android 13 WM_SHELL_STARTING_WINDOW相关记录笔记