docker
Posted 码出未来_远
tags:
篇首语:本文由小常识网(cha138.com)小编为大家整理,主要介绍了docker相关的知识,希望对你有一定的参考价值。
docker
文章目录
- docker
- OCI(Open Container Initiative) & OCF (Open Container Format)
- Docker中容器、镜像和仓库的关系
- Docker基本架构
- Docker原理
- 安装docker
- 卸载旧版本
- 列出并排序您存储库中可用的版本。此示例按版本号(从高到低)对结果进行排序。
- 查看docker的版本信息
- 显示 Docker 系统信息,包括镜像和容器数
- Docker的帮助命令
- 从仓库中搜索指定的镜像
- 启动 Docker
- 停止Docker
- 强制停止容器
- 查看容器内运行的进程
- 查看容器内部细节
- 输入 docker 命令来查看到 Docker 客户端的所有命令选项。
- 获取镜像
- 启动容器
- 查看所有的容器
- 使用 docker start 启动一个已停止的容器:
- 停止一个容器
- 停止的容器可以通过 docker restart 重启
- 进入容器
- 下载镜像
- 列出本地镜像
- 删除镜像 docker rmi
- 镜像打标签
- 推送镜像
- 删除标签
- 启动容器
- 通过CONTAINER_ID进入容器
- 清理所有处于终止状态的容器
- 获取容器日志
Docker是什么
Docker 是一个开源的应用容器引擎,基于 Go 语言 并遵从 Apache2.0 协议开源。
Docker 可以让开发者打包他们的应用以及依赖包到一个轻量级、可移植的容器中,然后发布到任何流行的 Linux 机器上,也可以实现虚拟化。
容器是完全使用沙箱机制,相互之间不会有任何接口(类似 iPhone 的 app),更重要的是容器性能开销极低。
Docker 从 17.03 版本之后分为 CE(Community Edition: 社区版) 和 EE(Enterprise Edition: 企业版),我们用社区版就可以了。
OCI(Open Container Initiative) & OCF (Open Container Format)
Linux基金会于2015年6月成立OCI(Open Container Initiative)组织,旨在围绕容器格式和运行时制定一个开放的工业化标准。
开放容器格式标准(OCF, Open Container Format)
容器格式标准
制定容器格式标准的宗旨概括来说就是不受上层结构的绑定,如特定的客户端、编排栈等,同时也不受特定的供应商或项目的绑定,即不限于某种特定操作系统、硬件、CPU架构、公有云等。
容器标准化宗旨
- 操作标准化:容器的标准化操作包括使用标准容器感觉创建、启动、停止容器,使用标准文件系统工具复制和创建容器快照,使用标准化网络工具进行下载和上传。
- 内容无关:内容无关指不管针对的具体容器内容是什么,容器标准操作执行后都能产生同样的效果。如容器可以用同样的方式上传、启动,不管是php应用还是mysql数据库服务。
- 基础设施无关:无论是个人的笔记本电脑还是AWS S3,亦或是Openstack,或者其他基础设施,都应该对支持容器的各项操作。
- 为自动化量身定制:制定容器统一标准,是的操作内容无关化、平台无关化的根本目的之一,就是为了可以使容器操作全平台自动化。
- 工业级交付:制定容器标准一大目标,就是使软件分发可以达到工业级交付成为现实。
容器标准包(bundle)和配置
一个标准的容器包, 具体包含下面三个部分:
- config.json : 基本配置文件, 包括与宿主机独立和应用相关的特定信息, 如安全权限,环境变量和参数等. 具体如下
- 容器格式版本
- rootfs 路径及是否只读
- 各类文件挂载点及相应容器内挂载目录(此处信息必须与 runtime.json 配置中保持一致.
- 初始化进程配置信息, 包括是否绑定终端, 运行可执行文件的工作目录,环境变量配置,可执行文件及执行参数,uid,gid 以及 额外需要加入的 gid,hostname,底层操作系统及 CPU 架构信息.
- runtime.json : 运行时配置文件, 包含运行时与主机相关的信息, 如内存限制,本地设备访问权限,挂载点等. 除了上述配置信息以外, 运行时配置文件还提供了 “钩子(hook)” 的特性, 这样可以在容器运行前和体制后各执行一些自定义脚本. hooks 的配置包含执行脚本路径,参数,环境变量等.
- rootfs : 根文件系统目录, 包含了容器执行所需的必要环境依赖. 如 /bin,/var,/dev,/usr 等目录及相应文件. rootfs 目录必须与包含配置信息的 config.json 文件同时存在容器目录最顶层.
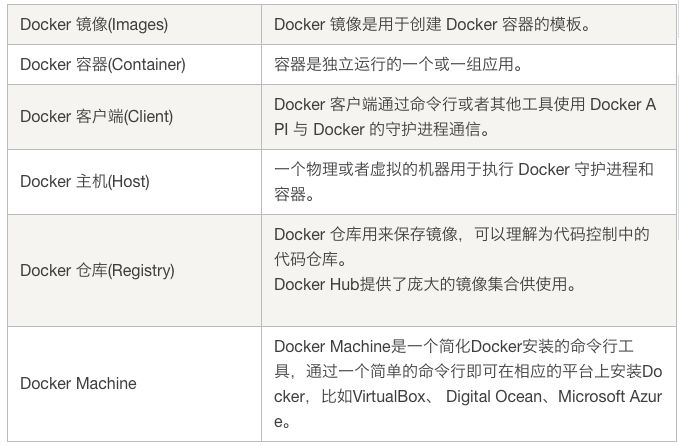
Docker中容器、镜像和仓库的关系
Docker中:
仓库用来存存储镜像、
镜像启动起来就是容器。
docker的整个生命周期有三部分组成:镜像(image)+容器(container)+仓库(repository)。
docker 容器=镜像+可读层
容器是由镜像实例化而来。
简单来说,镜像是文件,容器是进程。
容器是基于镜像创建的,即容器中的进程依赖于镜像中的文件。
Docker基本架构
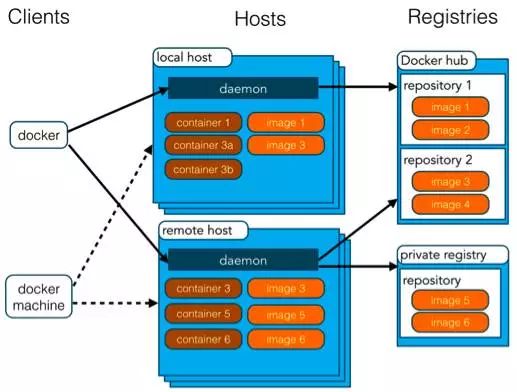
Docker 使用客户端-服务器 (C/S) 架构模式,包括客户端和服务端。
使用远程API来管理和创建Docker容器:Docker daemon 作为服务端接受来自客户的请求,并处理这些请求( 创建、运行、分发容器) 。 客户端和服务端既可以运行在一个机器上,也可通过 socket 或者 RESTful API 来进行通信。

Docker 容器通过 Docker 镜像来创建。容器与镜像的关系类似于面向对象编程中的对象与类:

Docker原理
Docker使用Go语言编写,并且使用了一系列Linux内核提供的特性来实现其功能。
一个能执行Docker的系统分为两大部分:
- Linux的核心元件
- Docker相关元件
Docker使用的Linux核心模块功能包括下列各项:
- Cgroup – 用来分配硬件资源
- Namespace – 用来隔离不同Container的执行空间
- AUFS(chroot) – 用来建立不同Container的档案系统
- SELinux – 用来确保Container的网路的安全
- Netlink – 用来让不同Container之间的行程进行沟通
- Netfilter – 建立Container埠为基础的网路防火墙封包过滤
- AppArmor – 保护Container的网路及执行安全
- Linux Bridge – 让不同Container或不同主机上的Container能沟通
linux运行docker原理:
docker容器和宿主机共享linux kernel。为了让容器像虚拟机那样有独立的文件系统,进程系统,内存系统,等等一系列,linux宿主机系统采用的办法是:通过隔离容器不让它看到主机的文件系统,进程系统,内存系统,等等一系列。
安装docker
安装命令如下:

curl -fsSL https://get.docker.com | bash -s docker --mirror aliyun
卸载旧版本
较旧的 Docker 版本称为 docker 或 docker-engine 。如果已安装这些程序,请卸载它们以及相关的依赖项。
yum remove docker \\
                  docker-client \\
                  docker-client-latest \\
                  docker-common \\
                  docker-latest \\
                  docker-latest-logrotate \\
                  docker-logrotate \\
                  docker-engine
列出并排序您存储库中可用的版本。此示例按版本号(从高到低)对结果进行排序。
[root@localhost ~]# yum list docker-ce --showduplicates | sort -r
Last metadata expiration check: 2:06:46 ago on Tue 27 Jul 2021 06:38:39 PM CST.
Installed Packages
docker-ce.x86_64               3:20.10.7-3.el8                 docker-ce-stable
docker-ce.x86_64               3:20.10.7-3.el8                 @docker-ce-stable
docker-ce.x86_64               3:20.10.6-3.el8                 docker-ce-stable
docker-ce.x86_64               3:20.10.5-3.el8                 docker-ce-stable
docker-ce.x86_64               3:20.10.4-3.el8                 docker-ce-stable
docker-ce.x86_64               3:20.10.3-3.el8                 docker-ce-stable
docker-ce.x86_64               3:20.10.2-3.el8                 docker-ce-stable
docker-ce.x86_64               3:20.10.1-3.el8                 docker-ce-stable
docker-ce.x86_64               3:20.10.0-3.el8                 docker-ce-stable
docker-ce.x86_64               3:19.03.15-3.el8                docker-ce-stable
docker-ce.x86_64               3:19.03.14-3.el8                docker-ce-stable
docker-ce.x86_64               3:19.03.13-3.el8                docker-ce-stable
Available Packages
查看docker的版本信息
[root@localhost ~]# docker version
Client: Docker Engine - Community
 Version:           20.10.7
 API version:       1.41
 Go version:        go1.13.15
 Git commit:        f0df350
 Built:             Wed Jun  2 11:56:24 2021
 OS/Arch:           linux/amd64
 Context:           default
 Experimental:      true

Server: Docker Engine - Community
 Engine:
  Version:          20.10.7
  API version:      1.41 (minimum version 1.12)
  Go version:       go1.13.15
  Git commit:       b0f5bc3
  Built:            Wed Jun  2 11:54:48 2021
  OS/Arch:          linux/amd64
  Experimental:     false
 containerd:
  Version:          1.4.8
  GitCommit:        7eba5930496d9bbe375fdf71603e610ad737d2b2
 runc:
  Version:          1.0.0
  GitCommit:        v1.0.0-0-g84113ee
 docker-init:
  Version:          0.19.0
  GitCommit:        de40ad0
显示 Docker 系统信息,包括镜像和容器数
[root@localhost ~]# docker info
Client:
 Context:    default
 Debug Mode: false
 Plugins:
  app: Docker App (Docker Inc., v0.9.1-beta3)
  buildx: Build with BuildKit (Docker Inc., v0.5.1-docker)
  scan: Docker Scan (Docker Inc., v0.8.0)

Server:
 Containers: 0
  Running: 0
  Paused: 0
  Stopped: 0
 Images: 6
 Server Version: 20.10.7
 Storage Driver: overlay2
  Backing Filesystem: xfs
  Supports d_type: true
  Native Overlay Diff: true
  userxattr: false
 Logging Driver: json-file
 Cgroup Driver: cgroupfs
 Cgroup Version: 1
 Plugins:
  Volume: local
  Network: bridge host ipvlan macvlan null overlay
  Log: awslogs fluentd gcplogs gelf journald json-file local logentries splunk syslog
 Swarm: inactive
 Runtimes: io.containerd.runtime.v1.linux runc io.containerd.runc.v2
 Default Runtime: runc
 Init Binary: docker-init
 containerd version: 7eba5930496d9bbe375fdf71603e610ad737d2b2
 runc version: v1.0.0-0-g84113ee
 init version: de40ad0
 Security Options:
  seccomp
   Profile: default
 Kernel Version: 4.18.0-294.el8.x86_64
 Operating System: CentOS Stream 8
 OSType: linux
 Architecture: x86_64
 CPUs: 2
 Total Memory: 1.748GiB
 Name: localhost.localdomain
 ID: JSVY:J5DB:CQAT:MO5G:JIWA:U6BM:HKJB:KVJT:BMWY:TUY7:2X2C:HCPO
 Docker Root Dir: /var/lib/docker
 Debug Mode: false
 Registry: https://index.docker.io/v1/
 Labels:
 Experimental: false
 Insecure Registries:
  127.0.0.0/8
 Registry Mirrors:
  https://hnrtvehw.mirror.aliyuncs.com/
 Live Restore Enabled: false
Docker的帮助命令
[root@localhost ~]# docker --help

Usage:  docker [OPTIONS] COMMAND

A self-sufficient runtime for containers

Options:
      --config string      Location of client config files (default "/root/.docker")
  -c, --context string     Name of the context to use to connect to the daemon (overrides DOCKER_HOST env var and default context
                           set with "docker context use")
  -D, --debug              Enable debug mode
  -H, --host list          Daemon socket(s) to connect to
  -l, --log-level string   Set the logging level ("debug"|"info"|"warn"|"error"|"fatal") (default "info")
      --tls                Use TLS; implied by --tlsverify
      --tlscacert string   Trust certs signed only by this CA (default "/root/.docker/ca.pem")
      --tlscert string     Path to TLS certificate file (default "/root/.docker/cert.pem")
      --tlskey string      Path to TLS key file (default "/root/.docker/key.pem")
      --tlsverify          Use TLS and verify the remote
  -v, --version            Print version information and quit

...
从仓库中搜索指定的镜像
[root@localhost ~]# docker search
启动 Docker
[root@localhost ~]# systemctl start docker
停止Docker
[root@localhost ~]# systemctl stop docker
强制停止容器
[root@localhost ~]# docker kill 容器ID或者容器名
查看容器内运行的进程
[root@localhost ~]# docker top 容器ID
查看容器内部细节
[root@localhost ~]# docker inspect 容器ID
输入 docker 命令来查看到 Docker 客户端的所有命令选项。
[root@localhost ~]# docker

Usage:  docker [OPTIONS] COMMAND

A self-sufficient runtime for containers

Options:
      --config string      Location of client config files (default "/root/.docker")
  -c, --context string     Name of the context to use to connect to the daemon (overrides DOCKER_HOST env var and default context
                           set with "docker context use")
  -D, --debug              Enable debug mode
  -H, --host list          Daemon socket(s) to connect to
  -l, --log-level string   Set the loggin
  ...
可以通过命令 docker command --help 更深入的了解指定的 Docker 命令使用方法。
例如我们要查看 docker stats 指令的具体使用方法:
[root@localhost ~]# docker stats --help

Usage:  docker stats [OPTIONS] [CONTAINER...]

Display a live stream of container(s) resource usage statistics

Options:
  -a, --all             Show all containers (default shows just running)
      --format string   Pretty-print images using a Go template
      --no-stream       Disable streaming stats and only pull the first result
      --no-trunc        Do not truncate output
获取镜像
载入 ubuntu 镜像
[root@localhost ~]# docker pull ubuntu
Using default tag: latest
latest: Pulling from library/ubuntu
16ec32c2132b: Pull complete
Digest: sha256:82becede498899ec668628e7cb0ad87b6e1c371cb8a1e597d83a47fac21d6af3
Status: Downloaded newer image for ubuntu:latest
docker.io/library/ubuntu:latest
启动容器
使用 ubuntu 镜像启动一个容器
[root@localhost ~]# docker run -it ubuntu /bin/bash
root@7ae337d43bf2:/# ls
bin  boot  dev  etc  home  lib  lib32  lib64  libx32  media  mnt  opt  proc  root  run  sbin  srv  sys  tmp  usr  var
参数说明:
- -i: 交互式操作。
- -t: 终端。
- ubuntu: ubuntu 镜像。
- /bin/bash:放在镜像名后的是命令,这里我们希望有个交互式 Shell,因此用的是 /bin/bash。
要退出终端,直接输入 exit:
root@7ae337d43bf2:/# exit
exit
[root@localhost ~]#
查看所有的容器
[root@localhost ~]# docker ps -a
CONTAINER ID   IMAGE          COMMAND                  CREATED          STATUS                      PORTS     NAMES
7ae337d43bf2   ubuntu         "/bin/bash"              45 seconds ago   Exited (0) 30 seconds ago             optimistic_sinoussi
26713880eeff   hello-world    "/hello"                 4 minutes ago    Exited (0) 4 minutes ago              cranky_shirley
7e985a1e61c6   hello-world    "/hello"                 4 minutes ago    Exited (0) 4 minutes ago              nostalgic_wilson
6e1a40c7f384   httpd          "httpd-foreground"       5 hours ago      Created                               distracted_haibt
2a61d0ed943d   ubuntu:15.10   "/bin/bash"              5 hours ago      Exited (0) 5 hours ago                tender_boyd
2027a5f78d6e   ubuntu:15.10   "/bin/echo 'Hello wo…"   5 hours ago      Exited (0) 5 hours ago                interesting_pascal
3e23a248ebbc   hello-world    "/hello"                 28 hours ago     Exited (0) 28 hours ago               intelligent_neumann
0972e37fb1ee   hello-world    "/hello"                 28 hours ago     Exited (0) 28 hours ago               jovial_mclaren
acc136463c18   busybox        "sh"                     3 weeks ago      Exited (0) 3 weeks ago                b1
使用 docker start 启动一个已停止的容器:
[root@localhost ~]# docker start 2027a5f78d6e
停止一个容器
停止容器的命令如下:
[root@localhost ~]# docker stop 2027a5f78d6e
停止的容器可以通过 docker restart 重启
[root@localhost ~]# docker restart 2027a5f78d6e
进入容器
在使用 -d 参数时,容器启动后会进入后台。此时想要进入容器,可以通过以下指令进入:
- docker attach
- docker exec:推荐大家使用 docker exec 命令,因为此退出容器终端,不会导致容器的停止。
attach 命令
下面演示了使用 docker attach 命令。
[root@localhost ~]# docker attach 7ae337d43bf2
root@7ae337d43bf2:/#
下载镜像
[root@localhost ~]# docker pull mysql:5.7.19
5.7.19: Pulling from library/mysql
85b1f47fba49: Pull complete
27dc53f13a11: Pull complete
095c8ae4182d: Pull complete
0972f6b9a7de: Pull complete
1b199048e1da: Pull complete
159de3cf101e: Pull complete
963d934c2fcd: Pull complete
f4b66a97a0d0: Pull complete
f34057997f40: Pull complete
ca1db9a06aa4: Pull complete
0f913cb2cc0c: Pull complete
Digest: sha256:bfb22e93ee87c6aab6c1c9a4e7cdc68e9cb9b64920f28fa289f9ffae9fe8e173
Status: Downloaded newer image for mysql:5.7.19
docker.io/library/mysql:5.7.19
列出本地镜像
[root@localhost ~]# docker images
REPOSITORY    TAG       IMAGE ID       CREATED        SIZE
ubuntu        latest    1318b700e415   16 hours ago   72.8MB
httpd         latest    73b8cfec1155   5 days ago     138MB
<none>        <none>    65c9239c9300   3 weeks ago    1.24MB
busybox       latest    69593048aa3a   7 weeks ago    1.24MB
hello-world   latest    d1165f221234   4 months ago   13.3kB
mysql         5.7.19    3e3878acd190   3 years ago    412MB
ubuntu        15.10     9b9cb95443b5   5 years ago    137MB
删除镜像 docker rmi
[root@localhost ~]# docker rmi 3e3878acd190
Untagged: mysql:5.7.19
Untagged: mysql@sha256:bfb22e93ee87c6aab6c1c9a4e7cdc68e9cb9b64920f28fa289f9ffae9fe8e173
Deleted: sha256:3e3878acd1900f5db6f1eb2e05693d4fc113cca8303e921945ddef1850f75c97
Deleted: sha256:a2a2b0d49b0e7b3f451964af4cc859eb90028bf3753c9540fd911ca3abb76a48
Deleted: sha256:c80298eb176cd0ec9be55db090f48451dbab6427163b6dc37b31afc205b5d70c
Deleted: sha256:2568a17f85a64566946c9e9a580f731c610f01807dd14916607a18626d2c77a6
Deleted: sha256:84e0d2f62875ad3b41c4539b42c37a10fc39a97074c6df8dd483d7b986eeff0a
Deleted: sha256:59a8a498f59b0ff4c7388215761fb4034540d073521e7b33a03ced35cc4c89ad
Deleted: sha256:d17ab5d3d3ca76e9ac166f9610c3a84099d4dc3a2f1f339d4bae2b3e2bca7b8d
Deleted: sha256:d8214164823eb478f2be951b05119357c217b1e6344958f89a5006616fc0c682
Deleted: sha256:708cb5ace70a02c0ab7b7dc34256e5a45a759ef48cdfaf1e51d0401437f5688c
Deleted: sha256:fa66485ef54b61f8f2de2d81271135976794c45628d309fd361a99b53256ab44
Deleted: sha256:7ba2d138e04445addacd95ddb1c186ee9e236db0d7464c4ff63aac6e002b8dfb
Deleted: sha256:c01c63c6823dd8a296c2134ea94d31121069f1c52f8f8789836bc7ea2e5cdc93
[root@localhost ~]# docker images
REPOSITORY    TAG       IMAGE ID       CREATED        SIZE
ubuntu        latest    1318b700e415   16 hours ago   72.8MB
httpd         latest    73b8cfec1155   5 days ago     138MB
<none>        <none>    65c9239c9300   3 weeks ago    1.24MB
busybox       latest    69593048aa3a   7 weeks ago    1.24MB
hello-world   latest    d1165f221234   4 months ago   13.3kB
ubuntu        15.10     9b9cb95443b5   5 years ago    137MB
方法二:使用id删除
[root@localhost ~ ~]# docker rmi -f [id]
镜像打标签
[root@localhost ~]# docker images
REPOSITORY    TAG       IMAGE ID       CREATED        SIZE
ubuntu        latest    1318b700e415   29 hours ago   72.8MB
httpd         latest    73b8cfec1155   5 days ago     138MB
<none>        <none>    65c9239c9300   3 weeks ago    1.24MB
busybox       latest    69593048aa3a   7 weeks ago    1.24MB
hello-world   latest    d1165f221234   4 months ago   13.3kB
ubuntu        15.10     9b9cb95443b5   5 years ago    137MB
[root@localhost ~]# docker tag 1318b700e415 docker.io/perlzl/centos:8
[root@localhost ~]# docker images
REPOSITORY      TAG       IMAGE ID       CREATED        SIZE
ubuntu          latest    1318b700e415   29 hours ago   72.8MB
perlzl/centos   8         1318b700e415   29 hours ago   72.8MB
httpd           latest    73b8cfec1155   5 days ago     138MB
<none>          <none>    65c9239c9300   3 weeks ago    1.24MB
busybox         latest    69593048aa3a   7 weeks ago    1.24MB
hello-world     latest    d1165f221234   4 months ago   13.3kB
ubuntu          15.10     9b9cb95443b5   5 years ago    137MB
- 删除镜像之前,先查看是否有容器在运行,若在运行,先 docker stop CONNTAINER_ID
- 再查看停止的容器 docker ps -a
- 清除所有已经停止的容器 docker rm $(docker ps -qa)
- 删除对应的镜像: docker rmi IMAGE_ID
推送镜像
[root@localhost ~]# docker push docker.io/perlzl/centos:8
删除标签
[root@localhost ~]# docker rmi docker.io/perlzl/centos:8
Untagged: perlzl/centos:8
[root@localhost ~]# docker images
REPOSITORY    TAG       IMAGE ID       CREATED        SIZE
ubuntu        latest    1318b700e415   29 hours ago   72.8MB
httpd         latest    73b8cfec1155   5 days ago     138MB
<none>        <none>    65c9239c9300   3 weeks ago    1.24MB
busybox       latest    69593048aa3a   7 weeks ago    1.24MB
hello-world   latest    d1165f221234   4 months ago   13.3kB
ubuntu        15.10     9b9cb95443b5   5 years ago    137MB
启动容器
[root@localhost ~]# docker run ubuntu /bin/echo 'hello world'
hello world
通过CONTAINER_ID进入容器
清理所有处于终止状态的容器
[root@localhost ~]# docker rm  $(docker ps -a -q)
468fb8965f83
7ae337d43bf2
26713880eeff
7e985a1e61c6
6e1a40c7f384
2a61d0ed943d
2027a5f78d6e
3e23a248ebbc
0972e37fb1ee
acc136463c18
获取容器日志
[root@localhost ~]# docker logs httpd
以上是关于docker的主要内容,如果未能解决你的问题,请参考以下文章