Retrofit + GSON处理JSON模板
Posted HavaFerrair
tags:
篇首语:本文由小常识网(cha138.com)小编为大家整理,主要介绍了Retrofit + GSON处理JSON模板相关的知识,希望对你有一定的参考价值。
动机
- 首先封装了
Retrofit的一些操作,也就是回调的时候不必去为每个javabean的每个操作去写一个Callback,所有的bean公用一个Callback。 - 使用了MVP的设计思想,加上公用的
Callback,使得每个bean的Presenter层只需要极少的方法,就可以实现原来的功能。 - 然后封装GSON,定义了公用的
Holder容器,存储从服务器直接返回的JSON数据,然后分发给每个bean类。
当然上面所有的前提都是一个:服务器返回的JSON数据是按照一定的格式的。
API返回的数据格式:
由于服务器是自己写的所以格式可以自己定啦 ,所以本文所说的就是这样的一个格式,所有的解析都会用一个模板,把所有的公共代码向父类重构,大大减少的代码的数量,使得子类更加简单,这就是我的目的。
{
    "Msg": "OK",
    "Code": 100,
    "Result":[] //这里是一个数组
}
或者
{
    "Msg": "Error",
    "Code": 111,
}然后前面一个是请求成功的结果,后面一个是请求失败的结果,由于这是一个模板,所以Result是对应多个对象(POJO).
下面是一个请求成功返回的例子:
{
  "Msg": "OK",
  "Code": 100,
  "Result": [
    {
      "createdAt": "2016-03-23 01:17:36",
      "times": 0,
      "tagId": 1,
      "id": 1,
      "title": "[Java GC]Algorithm For GC",
      "type": "原创",
      "tagName": "Java",
      "content": "Content"
    }
  ]
}
Retrofit的使用
对于Retrofit的基本使用这里就不再赘述。
首先我们定义请求的模板:
public interface BlogAPI {

    @GET("blog/queryById")
    Call<ResponseBody> queryById(@Query("id") int id);

    @GET("blog/queryByTitle")
    Call<ResponseBody> queryByTitle(@Query("title") String title);

    @GET("blog/queryByTag")
    Call<ResponseBody> queryByTag(@Query("tag") String tag);

    @GET("blog/queryByTime")
    Call<ResponseBody> queryByTime(@Query("time") String time);

    @GET("blog/queryByType")
    Call<ResponseBody> queryByType(@Query("type") String type);

    //Request to BlogController#index() in server
    @GET("blog")
    Call<ResponseBody> queryAll(@Query("pageNum") int pageNum);
}所有的Call<>里面的泛型都是ResponseBody,那么什么是ResponseBody呢??为什么要用这个呢??
A one-shot stream from the origin server to the client application with the raw bytes of the response body. Each response body is supported by an active connection to the webserver. This imposes both obligations and limits on the client application.
从服务器返回的一次性的字节流,是从服务返回的原始数据,这意味着客户端必须做一些解析工作。同时这个流在使用之后必须关闭,就像InputStream一样。基于上述原,我们选择了这个(其实也可以在Call里面直接放上javabean,然后每个javabean里面有Code,Msg属性,但是我觉得这样不合理,违反了类的单一职责的原则)
下面定义一个Manager用来处理Retrofit
/**
 * Created by WQH on 2016/4/16  19:13.
 */
public class RemoteManager {

    public static final String DOMAIN = "http://wangqihang.cn:8080/Blog/";
    public static final int OK = 100; // Request OK.
    public static final int PARSE = 109; // Some error in parse JSON.
    public static final int NO_MORE = 107; // No More Data from server.
    public static final int SYNTAX = 110; // JSONNull
    private Retrofit retrofit;


    // Singleton
    private static class ClassHolder {
        private static RemoteManager INSTANCE = new RemoteManager();
    }

    private RemoteManager() {
        HttpLoggingInterceptor loggingInterceptor = new HttpLoggingInterceptor();
        loggingInterceptor.setLevel(HttpLoggingInterceptor.Level.BODY);


        OkHttpClient client =
                new OkHttpClient
                        .Builder()
                        .readTimeout(10, TimeUnit.SECONDS)
                        .build();

        retrofit = new Retrofit
                .Builder()
                .baseUrl(DOMAIN)
                .addConverterFactory(GsonConverterFactory.create())
                .client(client)
                .build();
    }

    public static <T> T create(final Class<T> service) {
        return ClassHolder.INSTANCE.retrofit.create(service);
    }
}
那么怎么请求呢?(这里给出一个简单的使用,等下还会具体说)
Call<ResponseBody> call = mBlogAPI.queryAll(pageNum);
call.enqueue(new BlogCallback(mLoadView)); // 这句等哈会说明的。。。
MVP+Retrofit
本文采用了MVP怎么和Retrofit结合,所以向网络上请求数据是在Presenter里面写的,而得到数据后会回调到View里面。所以我们先定义一个View接口:
//DataType 就是一个javabean类哦
public interface LoadView<DataType> {
    /**
     * Null only occurs in POST action.means success.
     */
    @Nullable
    void onSuccess(List<DataType> data);

    void onFail(int errorCode, String errorMsg);
}
然后再定义一个Presenter基类,持有一个LoadView的引用,子类就可以回调里面的方法啦。
public abstract class LoadPresenter<DataType> {
    /**
     * The default LoadView,the LoadView will not change.
     */
    protected LoadView<DataType> mLoadView;

    public LoadPresenter(LoadView<DataType> mLoadView) {
        this.mLoadView = mLoadView;
        initAPI();
    }

    public LoadPresenter() {
        initAPI();
    }

    /**
     * Init the RemoteManager in vary subclass
     */
    protected abstract void initAPI();
}
那么,LoadPresenter的子类有哪些方法从网络请求数据呢?这时候可以定义一个接口(比如Blog的查询,有根据id查询的,也用根据标题查询的):
/**
 * Created by WQH on 2016/4/12  23:44.
 * <p>
 * Load Presenter for download data from server.
 * Other class CAN implements it or implements their own Presenter.
 */
public interface DownLoadPresenter<DataType> {

    //Load all data paginate.
    void loadAll(int pageNum, LoadView<DataType> mLoadView);

    //Load data by id
    void loadById(int id, LoadView<DataType> mLoadView);
} 所以对于加载Blog的具体实现类就可以下面这样写:需要注意的是,为什么不直接在LoadPresenter里面写方法呢?这里把LoadPresenter与DownLoadPresenter分离开来,也就是运用了设计模式中桥接模式(Bridge)这样无疑是极好的,因为每个实体都有不同的方法从网络上加载数据,而初始化API都是一样的,所以就可以所有的类都去继承LoadPresenter而实现不同的接口。实现了复用。
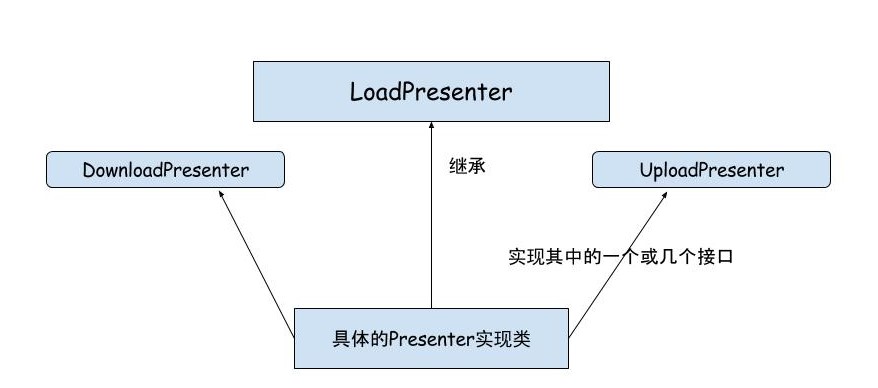
看一下怎么实现桥接模式的?
public class BlogDownLoadPresenterImpl extends LoadPresenter<Blog> implements DownLoadPresenter<Blog> {
    BlogAPI mBlogAPI;

    @Override
    protected void initAPI() {
        mBlogAPI = RemoteManager.create(BlogAPI.class);
    }

    @Override
    public void loadAll(int pageNum, LoadView<Blog> mLoadView) {
        Call<ResponseBody> call = mBlogAPI.queryAll(pageNum);
        doQuery(call, mLoadView);
    }

    @Override
    public void loadById(int id, LoadView<Blog> mLoadView) {
        Call<ResponseBody> call = mBlogAPI.queryById(id);
        doQuery(call, mLoadView);
    }

    private void doQuery(Call<ResponseBody> call, LoadView<Blog> mLoadView) {
        call.enqueue(new BlogCallback(mLoadView));
    }

    // The inner class that do the callback work after fetch data from server
    // MUST specify the type of the generics.(like this:Blog)
    // Why? GSON parse Json must know the type at RUNTIME
    class BlogCallback extends DefaultCallback<Blog> {

        public BlogCallback(LoadView<Blog> mLoadView) {
            super(mLoadView);
        }

        @Override
        protected void onParseResult(String result) {
            mLoadView.onSuccess(CollectionUtil.asList(Json.fromJson(result, Blog[].class)));
        }
    }
}这里主要在解释一哈DefaultCallback
public abstract class DefaultCallback<DataType> implements Callback<ResponseBody> {

    private static final String TAG = "DefaultCallback";
    protected LoadView<DataType> mLoadView;

    public DefaultCallback(LoadView<DataType> mLoadView) {
        this.mLoadView = mLoadView;
    }

    @Override
    public void onResponse(Call<ResponseBody> call, Response<ResponseBody> response) {
        if (response.isSuccessful()) {
            try {
                //Attention: response.body() will return null in second calls.
                String jsonStr = response.body().string();
                Holder holder = Json.fromJson(jsonStr, Holder.class);
                if (holder.Code == RemoteManager.OK) {
                    onParseResult(holder.Result.toString());
                } else {
                    mLoadView.onFail(holder.Code, holder.Msg);
                }
            } catch (Exception e) {
                e.printStackTrace();
                // Can't Find Object.
                mLoadView.onFail(RemoteManager.SYNTAX, "At " + TAG + "#onResponse-> Can't Find Object.Because JSONNull");
            }
        } else {
            mLoadView.onFail(RemoteManager.PARSE, "At " + TAG + "#onResponse-> " + response.errorBody().toString());
        }
    }

    /**
     * Example in subclass:
     * <code>
     * mLoadView.onSuccess(Arrays.asList(Json.fromJson(result, Blog[].class)));
     * </code>
     *
     * @param result a JSON string associated with <code>Holder.Result</code>,So the subclass MUST parse the JSON string.
     */
    protected abstract void onParseResult(String result);

    @Override
    public void onFailure(Call<ResponseBody> call, Throwable t) {
        mLoadView.onFail(RemoteManager.PARSE, "At " + TAG + "#onFailure-> " + t.toString());
    }
}首先可以看到是实现了retrofit2.Callback接口,然后持有LoadView的实例,所以这个类就是真正的回调方法。
// 当网络响应成功的时候就会被调用
public void onResponse(Call<ResponseBody> call, Response<ResponseBody> response);
// 对应的,失败时调用
public void onFailure(Call<ResponseBody> call, Throwable t);上面这几个方法就是retrofit2.Callback的方法啦,注意参数Call<ResponseBody>是我们定义API的返回值,在这里真正的使用到了。
下面进入onResponse的内部进行分析:
String jsonStr = response.body().string();
得到返回的JSON数据,注意这是一个流,所以在下一次再调用这个方法的jsonStr就为空了,这个问题当时纠结了好久才发现。
Holder holder = Json.fromJson(jsonStr, Holder.class);
Json是一个工具类,封装了GSON的一些方法:(GSON的知识等哈再说)
public class Json {
    private static Gson gson;

    private static Gson getGson() {
        if (gson == null) {
            synchronized (Json.class) {
                if (gson == null) {
                    gson = new GsonBuilder().setDateFormat("yyyy-MM-dd HH:mm:ss").create();
                }
            }
        }
        return gson;
    }

    public static String toJson(Object src) {
        return getGson().toJson(src);
    }

    public static <T> T fromJson(String json, Class<T> classOfT) throws JsonSyntaxException {
        return getGson().fromJson(json, classOfT);
    }
}而Holder是什么呢?
/**
 * Created by WQH on 2016/5/8  12:53.
 *
 * An Holder that hold the objects fetch from server.
 * <p>
 * <Code>   the code that the server return, all case are in @see{wqh.blog.mvp.model.net.RemoteManager}.
 * <Msg>    the message that the server return, the message is an description of the code.
 * <Result> the entity that the server return,and the type od the field is <code>JsonArray</code> because the JSON data the server are all in Array though the number of data is 1
 */
public class Holder {

    @SerializedName(value = "Code")
    public int Code;
    @SerializedName(value = "Msg")
    public String Msg;
    @SerializedName(value = "Result")
    public JsonElement Result;
}
所有从网上取下来的JSON数据首先被转化为Holder这个POJO,然后才会在具体的变化其他的实体类(因为服务器返回的JSON是这种格式,所以这样就把所有实体类的请求全部放在这里处理,实体类只去处理他自己的属性)
@SerializedName(value = "Code")表示反序列化的时候key=Code(等哈具体说明)
回到DefaultCallback onResponse的方法里面:
if (holder.Code == RemoteManager.OK) {
        onParseResult(holder.Result.toString());
} else {
        mLoadView.onFail(holder.Code, holder.Msg);
       }
定义了一个抽象方法
/**
     * Example in subclass:
     * <code>
     * mLoadView.onSuccess(Arrays.asList(Json.fromJson(result, Blog[].class)));
     * </code>
     *
     * @param result a JSON string associated with <code>Holder.Result</code>,So the subclass MUST parse the JSON string.
     */
    protected abstract void onParseResult(String result);
分发解析的JSON数据,用来让子类处理真正的JSON数据.
到这里MVP的一些知识都基本介绍了,下面看看GSON怎么工作的
GSON
首先看看Google的基本使用
这里不再说明:GSON ANNOTATIONS EXAMPLE
注意到在Holder里面的Result属性是JsonElement,那么其实除了这一JSON类还有其他的,下面首先来看一哈:
- JsonElement 任何一个JSON数据都是JsonElment
- JsonPrimitive such as a string or integer
- JsonObject a collection of JsonElements indexed by thier name (of type String). This is similar to a Map<String, JsonElement>
- JsonArray a collection of JsonElements. Note that the array elements can be any of the four types and mixed types are supported.在JSON数据里面就是[]扩起来的部分。
- JsonNull a null value
这些所有的类都是继承自JsonElement.
原来我把Result的类型设置JsonArray,但是当服务器返回一个错误的Code与Msg的时候,就没有Result这一项,就会产生一个JSONSYNTAXException错误。所以设置为JsonElement就是一个正确的决定。
@SerializedName(value = "Code")也就表面反序列化的时候就把找到JSON数据里面的”Code”键,然后转化为Holder的Code字段。子类只要去处理onParseResult就可以了.
然后我看看另一种GSON的使用(并没有在我的项目里面使用):
public class JsonManager {
    private final GsonBuilder gsonBuilder = new GsonBuilder();

    private static class ClassHolder {
        private static JsonManager INSTANCE = new JsonManager();
    }

    public static JsonManager instance() {
        return ClassHolder.INSTANCE;
    }

    public void addDeserializer(Class<?> clazz, JsonDeserializer jsonDeserializer) {
        gsonBuilder.registerTypeAdapter(clazz, jsonDeserializer);
    }

    public Gson create() {
        return gsonBuilder.create();
    }
}处理JSON的工具类,注意gsonBuilder.registerTypeAdapter(clazz, jsonDeserializer)第一个参数是要解析的Javabean类,而第二个参数是该bean的反序列器。
所以bean类不懂,然后实现下面几个Deserializer
public class HolderDeserializer implements JsonDeserializer<Holder> {
    @Override
    public Holder deserialize(JsonElement jsonElement, Type type, JsonDeserializationContext jsonDeserializationContext) throws JsonParseException {
        final JsonObject jsonObject = jsonElement.getAsJsonObject();
        final int Code = jsonObject.get("Code").getAsInt();
        final String Msg = jsonObject.get("Msg").getAsString();
        final JsonElement Result = jsonObject.get("Result");
        Holder mHolder = new Holder();
        mHolder.Code = Code;
        mHolder.Msg = Msg;
        mHolder.Result = Result;
        return mHolder;
    }
}


public class CommentDesrializer implements JsonDeserializer<Comment> {
    @Override
    public Comment deserialize(JsonElement jsonElement, Type type, JsonDeserializationContext jsonDeserializationContext) throws JsonParseException {
        final JsonObject jsonObject = jsonElement.getAsJsonObject();
        final int id = jsonObject.get("id").getAsInt();
        final String content = jsonObject.get("content").getAsString();
        final int createdBy = jsonObject.get("createdBy").getAsInt();
        final int belongTo = jsonObject.get("belongTo").getAsInt();
        final String createdAt = jsonObject.get("createdAt").getAsString();
        Comment aComment = new Comment();
        aComment.id = id;
        aComment.content = content;
        aComment.createdBy = createdBy;
        aComment.belongTo = belongTo;
        aComment.createdAt = createdAt;
        return aComment;
    }
}
在Main里面:
public class Main {
    public static void main(String args[]) {
        String jsonStr = "{\\n" +
                "  \\"Msg\\": \\"OK\\",\\n" +
                "  \\"Code\\": 100\\n" +
                "}";
        JsonManager.instance().addDeserializer(Holder.class, new HolderDeserializer());
        JsonManager.instance().addDeserializer(Comment.class, new CommentDesrializer());
        final Gson gson = JsonManager.instance().create();

        Holder aHolder = gson.fromJson(jsonStr, Holder.class);
        if (aHolder.Result == null)
        {
            System.out.println("Error");
            return;
        }
        Comment[] comments = gson.fromJson(aHolder.Result.toString(), Comment[].class);
        for (Comment comment : comments) {
            System.out.println(comment);
        }
    }
}就可以了,,就这么简单…我是想首先把Holder提取出来,然后和上面一样,判断Code,如果是OK,就分发给子类。也是和上面一样的道理,只不过这里没有使用@SerializedName()。
最后,大家也可以使用TypeAdapter来消除中间组件JsonElement,用流的方式来解析JSON,具体的内容看这里,或者GSON的文档
思考
大家看了这么久,我相信都是没有怎么看懂的,这就是我的这个实现的缺点,过多的回调函数导致逻辑变得很复杂。那么有什么方案可以改进呢?我觉得可以采用事件驱动的模式。即数据加载是一个事件,视图的显示也是一个事件,那么视图的显示就由数据加载来驱动,具体的可以采用RxJava来实现。这样就可以避免了过多的复杂的回调函数,降低了Presenter View Callback之间的耦合度。
我在我的项目里面就是用了这种实现,Github链接
邮箱:1906362072@qq.com
欢迎一起讨论
以上是关于Retrofit + GSON处理JSON模板的主要内容,如果未能解决你的问题,请参考以下文章