MySQL高可用之MHA—部署MHA
Posted
tags:
篇首语:本文由小常识网(cha138.com)小编为大家整理,主要介绍了MySQL高可用之MHA—部署MHA相关的知识,希望对你有一定的参考价值。
前提
由于MHA不会自动创建主从环境,所以要手动去部署主从环境,也可以在现有主从环境部署MHA。所有slave不要设置为只读,同时也要打开binlog。如果master故障后要切换到指定的slave上,该指定的slave打开binlog,设置可读写,其它不用设置打开binlog或设置只读也可。具体以自身架构为准。
部署mysql主从可参考:配置MySQL主从复制
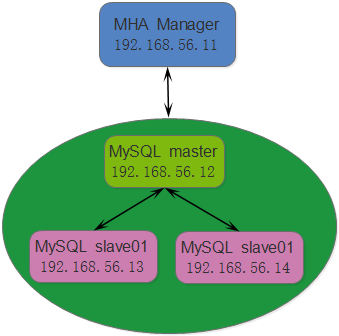
架构
系统环境
#cat /etc/redhat-release
CentOSrelease 6.6 (Final)
#uname -rm
2.6.32-504.el6.x86_64x86_64
创建MHA用户
在主从环境的主上执行
mysql>grant all privileges on *.* to ‘mha‘@‘192.168.56.%‘ identified by ‘123456‘;
创建软连接
如果MySQL服务不是yum安装,要在所有MySQLServer上,无论主从都要执行如下两个命令。
# ln-s /application/mysql/bin/mysqlbinlog /usr/bin/mysqlbinlog
# ln-s /application/mysql/bin/mysql /usr/bin/mysql
配置SSH公钥认证
几台服务器进行相同操作,仅分发到的服务不同而已,这里仅列出一台。
###
添加统一用户
在生产环境下使用root用户不安全,也不规范。并且环境统一也比较方便管理,因此可以创建统一的普通用户来进行。
#####
创建密钥对
[[email protected] ~]#ssh-keygen -t dsa
将公钥分发到各个主机上
[[email protected] ~]#ssh-copy-id -i .ssh/id_dsa.pub [email protected]
[[email protected] ~]#ssh-copy-id -i .ssh/id_dsa.pub [email protected]
[[email protected] ~]#ssh-copy-id -i .ssh/id_dsa.pub [email protected]
验证
[[email protected] ~]# ssh [email protected]
Last login: Thu May 1921:05:07 2016 from mysql-master
[[email protected] ~]# exit
[[email protected] ~]# ssh [email protected]
Last login: Wed May 1812:43:20 2016 from 172.16.1.1
[[email protected] ~]# exit
[[email protected] ~]# ssh [email protected]
Last login: Wed May 1817:56:40 2016 from 172.16.1.1
[[email protected] ~]# exit
配置hosts
[[email protected] ~]# vim /etc/hosts
192.168.56.11 mha-manager
192.168.56.12 mysql-master
192.168.56.13 mysql-slave01
192.168.56.14 mysql-slave02
[email protected] ~]# scp /etc/hosts [email protected]:/etc/
hosts 100% 271 0.3KB/s 00:00
[[email protected] ~]# scp /etc/hosts [email protected]:/etc/
hosts 100% 271 0.3KB/s 00:00
[[email protected] ~]# scp /etc/hosts [email protected]:/etc/
hosts 100% 271 0.3KB/s 00:00
部署MHANode
在所有运行MySQL服务的服务器上运行MHA Node,无论是master还是slave。由于MHA Manager需要MHA Node,因此在运行MHA Manager的服务器上也需要安装MHA Node。当然也可以在任意一个slave上运行MHA Manager。因为部署步骤相同,所以就列出一个安装步骤(在mha-manager服务器上)
创建目录
[[email protected] ~]# mkdir /softs
安装MHA Node
[[email protected] ~]# rpm-ivh http://dl.fedoraproject.org/pub/epel/6/x86_64/epel-release-6-8.noarch.rpm
[[email protected] ~]# yum install -y perl-DBD-MySQL perl-DBI cpan
[[email protected] ~]# cd/softs/
[[email protected] softs]# git clone https://github.com/kevin-hao/mha-node.git
[[email protected] softs]# cd mha-node/
[[email protected] mha-node]#perl Makefile.PL
[[email protected]mha-node]#make && make install
[[email protected] mha-node]#cd
其它MySQL服务器上的部署步骤一样,再次省略。
部署MHAManager
MHA Manager仅运行在作为manager的服务器上。当然也可以部署在其中任意一台slave上。
安装MHA Manager
[[email protected] ~]# yum install -y perl perl-Config-Tiny perl-Email-Date-Forma perl-Log-Dispatch perl-MIME-Liteperl-MIME-Types perl-Mail-Sender perl-Mail-Sendmail perl-MailTools perl-Parallel-ForkManagerperl-Params-Validate perl-Time-HiRes perl-TimeDate
[[email protected] ~]# cd /softs/
[[email protected] softs]# git clone https://github.com/kevin-hao/mha-manager.git
[[email protected] softs]# cd mha-manager/
[[email protected]manager mha-manager]#perl Makefile.PL
[[email protected] mha-manager]#make && make install
[[email protected] mha-manager]#cd
规范mha目录
[[email protected] ~]# mkdir -p /application/mha/conf
[[email protected] ~]# cp /softs/mha-manager/samples/conf/* /application/mha/conf/
配置app1.cnf
[[email protected] ~]#mkdir -p /application/mha/workstatus/app1
[[email protected] ~]# cd /application/mha/conf/
[[email protected] conf]# cp app1.cnf app1.cnf.ori
[[email protected] conf]# vim app1.cnf
port=3306
user=mha
password=123456
repl_user=repuser
repl_password=123456
remote_workdir=/var/log/mha/app1
master_binlog_dir=/data/mysql_log/
manager_workdir=/application/mha/workstatus/app1
manager_log=/application/mha/logs/app1.log
[server1]
hostname=mysql-master
[server2]
hostname=mysql-slave01
candidate_master=1
[server3]
hostname=mysql-slave02
candidate_master=1
配置全局配置文件
[[email protected] conf]# cp masterha_default.cnf masterha_default.cnf.ori
[[email protected] conf]# vim masterha_default.cnf
[server default]
log-level=debug
check_repl_delay=1
check_repl_filter=1
ping_interval=5
ping_type=CONNECT
[[email protected] conf]# cd
检查配置
操作在mha-manager上进行
检查ssh连接性
[[email protected] ~]#masterha_check_ssh --conf=/application/mha/conf/app1.cnf
Wed May 25 23:12:39 2016 -[warning] Global configuration file /etc/masterha_default.cnf not found.Skipping.
Wed May 25 23:12:39 2016 -[info] Reading application default configuration from/application/mha/conf/app1.cnf..
Wed May 25 23:12:39 2016 -[info] Reading server configuration from /application/mha/conf/app1.cnf..
Wed May 25 23:12:39 2016 -[info] Starting SSH connection tests..
Wed May 25 23:12:40 2016 -[debug]
Wed May 25 23:12:39 2016 -[debug] Connecting via SSH [email protected](192.168.56.12:22) to [email protected](192.168.56.13:22)..
Wed May 25 23:12:40 2016 -[debug] ok.
Wed May 25 23:12:40 2016 -[debug] Connecting via SSH [email protected](192.168.56.12:22) to [email protected](192.168.56.14:22)..
Wed May 25 23:12:40 2016 -[debug] ok.
Wed May 25 23:12:41 2016 -[debug]
Wed May 25 23:12:40 2016 -[debug] Connecting via SSH [email protected](192.168.56.13:22) to [email protected](192.168.56.12:22)..
Wed May 25 23:12:40 2016 -[debug] ok.
Wed May 25 23:12:40 2016 -[debug] Connecting via SSH [email protected](192.168.56.13:22) to [email protected](192.168.56.14:22)..
Wed May 25 23:12:41 2016 -[debug] ok.
Wed May 25 23:12:41 2016 -[debug]
Wed May 25 23:12:40 2016 -[debug] Connecting via SSH [email protected](192.168.56.14:22) to [email protected](192.168.56.12:22)..
Wed May 25 23:12:41 2016 -[debug] ok.
Wed May 25 23:12:41 2016 -[debug] Connecting via SSH [email protected](192.168.56.14:22) to [email protected](192.168.56.13:22)..
Wed May 25 23:12:41 2016 -[debug] ok.
Wed May 25 23:12:41 2016 -[info] All SSH connection tests passed successfully.
检查主从复制状态
[[email protected] ~]# masterha_check_repl--conf=/application/mha/conf/app1.cnf
***********中间省略*************
Wed May 25 23:13:19 2016 -[info]
mysql-master(192.168.56.12:3306)(current master)
+--mysql-slave01(192.168.56.13:3306)
+--mysql-slave02(192.168.56.14:3306)
Wed May 25 23:13:19 2016 -[info] Checking replication health on mysql-slave01..
Wed May 25 23:13:19 2016 -[info] ok.
Wed May 25 23:13:19 2016 -[info] Checking replication health on mysql-slave02..
Wed May 25 23:13:19 2016 -[info] ok.
Wed May 25 23:13:19 2016 -[warning] master_ip_failover_script is not defined.
Wed May 25 23:13:19 2016 -[warning] shutdown_script is not defined.
Wed May 25 23:13:19 2016 -[info] Got exit code 0 (Not master dead).
MySQL Replication Health isOK. <=====表明当前app1的主从环境正常
启动manager
[[email protected] ~]# mkdir/application/mha/logs
[[email protected] ~]#masterha_manager --conf=/application/mha/conf/app1.cnf >/dev/null2>&1 &
检查manager状态
[[email protected] ~]#masterha_check_status --conf=/application/mha/conf/app1.cnf
app1 (pid:27335) isrunning(0:PING_OK), master:mysql-master
master故障切换测试
在master上停止mysqld进程,然后查看log可以看出进行了切换。
[[email protected] ~]#/etc/init.d/mysqld stop
[[email protected] ~]# tail-F /application/mha/logs/app1.log
----- Failover Report -----
app1: MySQL Master failovermysql-master(192.168.56.12:3306) to mysql-slave01(192.168.56.13:3306) succeeded
Mastermysql-master(192.168.56.12:3306) is down!
Check MHA Manager logs atmha-manager:/application/mha/logs/app1.log for details.
Started automated(non-interactive)failover.
The latest slavemysql-slave01(192.168.56.13:3306) has all relay logs for recovery.
Selectedmysql-slave01(192.168.56.13:3306) as a new master.
mysql-slave01(192.168.56.13:3306):OK: Applying all logs succeeded.
mysql-slave02(192.168.56.14:3306):This host has the latest relay log events.
Generating relay diff filesfrom the latest slave succeeded.
mysql-slave02(192.168.56.14:3306):OK: Applying all logs succeeded. Slave started, replicating frommysql-slave01(192.168.56.13:3306)
mysql-slave01(192.168.56.13:3306):Resetting slave info succeeded.
Master failover tomysql-slave01(192.168.56.13:3306) completed successfully.
在mysql-slave02上查看
[[email protected] ~]#mysql -uroot -p123456 -e "show slave status\G"
Warning: Using a password onthe command line interface can be insecure.
***************************1. row ***************************
Slave_IO_State: Waiting formaster to send event
Master_Host: 192.168.56.13 //master改变了
Master_User: repuser
Master_Port: 3306
Connect_Retry: 60
Master_Log_File: mysql-bin.000001
Read_Master_Log_Pos: 120
Relay_Log_File:mysql-relay-bin.000002
Relay_Log_Pos: 283
Relay_Master_Log_File: mysql-bin.000001
Slave_IO_Running: Yes
Slave_SQL_Running: Yes
Replicate_Do_DB:
Replicate_Ignore_DB:
Replicate_Do_Table:
Replicate_Ignore_Table:
Replicate_Wild_Do_Table:
Replicate_Wild_Ignore_Table:
Last_Errno: 0
Last_Error:
Skip_Counter: 0
Exec_Master_Log_Pos: 120
Relay_Log_Space: 456
Until_Condition: None
Until_Log_File:
Until_Log_Pos: 0
Master_SSL_Allowed: No
Master_SSL_CA_File:
Master_SSL_CA_Path:
Master_SSL_Cert:
Master_SSL_Cipher:
Master_SSL_Key:
Seconds_Behind_Master: 0
Master_SSL_Verify_Server_Cert:No
Last_IO_Errno: 0
Last_IO_Error:
Last_SQL_Errno: 0
Last_SQL_Error:
Replicate_Ignore_Server_Ids:
Master_Server_Id: 2
Master_UUID:bdb7e690-20cb-11e6-a8b6-000c291242c7
Master_Info_File:/data/mysql_data/master.info
SQL_Delay: 0
SQL_Remaining_Delay: NULL
Slave_SQL_Running_State: Slave has readall relay log; waiting for the slave I/O thread to update it
Master_Retry_Count: 86400
Master_Bind:
Last_IO_Error_Timestamp:
Last_SQL_Error_Timestamp:
Master_SSL_Crl:
Master_SSL_Crlpath:
Retrieved_Gtid_Set:
Executed_Gtid_Set:
Auto_Position: 0
由于个人技术所限有不足之处还请各位指出。可以通过以下两个群找到笔者。
北京linux运维求职招聘群:153677549
Linux运维开发群:298324302
本文出自 “长街听风人” 博客,请务必保留此出处http://kevinhao.blog.51cto.com/5204735/1783288
以上是关于MySQL高可用之MHA—部署MHA的主要内容,如果未能解决你的问题,请参考以下文章
