Scrapy
Posted hpython
tags:
篇首语:本文由小常识网(cha138.com)小编为大家整理,主要介绍了Scrapy相关的知识,希望对你有一定的参考价值。
源码分析
核心组件
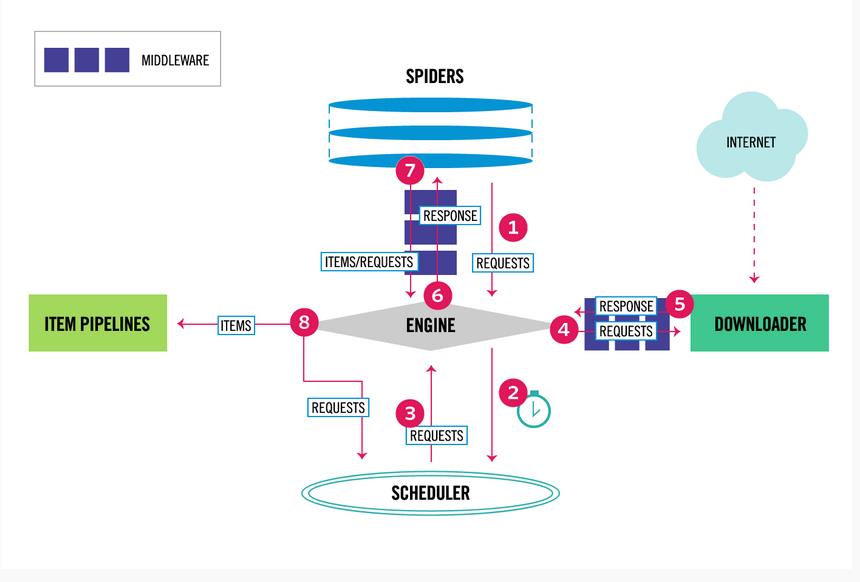
Scrapy有以下几大组件:
Scrapy Engine:核心引擎,负责控制和调度各个组件,保证数据流转;
Scheduler:负责管理任务、过滤任务、输出任务的调度器,存储、去重任务都在此控制;
Downloader:下载器,负责在网络上下载网页数据,输入待下载URL,输出下载结果;
Spiders:用户自己编写的爬虫脚本,可自定义抓取意图;
Item Pipeline:负责输出结构化数据,可自定义输出位置;
除此之外,还有两大中间件组件:
Downloader middlewares:介于引擎和下载器之间,可以在网页在下载前、后进行逻辑处理;
Spider middlewares:介于引擎和爬虫之间,可以在调用爬虫输入下载结果和输出请求/数据时进行逻辑处理;
执行流程:
1、引擎从自定义爬虫中获取初始化请求(url 种子)
2、引擎吧该请求放入调度器,同时引擎调度器获取一个带下载的请求(这辆步异步执行)
3、调度器返回给引擎一个待下载的请求
4、引擎发送请求给下载器,中间经历一系列下载器中间件
5、请求下载完成,生成相应对象,返回给引擎,中间经历一系列下载器中间件
6、引擎受到下载返回的响应对象,然后发送给爬虫,执行自定义逻辑,中间经过一系列爬虫中间件
7、爬虫执行对应的回掉方法,处理这个响应,完成用户逻辑后,生成结果对象或新的请求对象给引擎再次经过一系列爬虫中间件
8、引擎吧爬虫返回的结果对象交由结果处理器,把新的请求对象通过引擎在交给调度器
9、从1开始重复执行,直到调度器中没有新的请求
入口 __main__.py——〉execute(项目、运行环境的设置,解析命令,初始化CrawlerProcess,执行run函数)
http://kaito-kidd.com/2016/11/01/scrapy-code-analyze-architecture/

第一步:
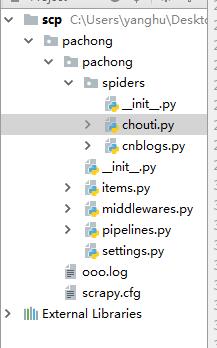
    scrapy startproject xxxx
    cd xxxx
    scrapy genspider chouti chouti.com

    # 编写代码

    scrapy crawl chouti --nolog

第二步:start_requests

第三步:parse函数
    - 解析器
    - yield item
    - yield Request()

第四步:携带cookie
    - 手动
    - 自动

第五步:去重规则


第六步:下载中间件

# -*- coding: utf-8 -*-
import scrapy
from bs4 import BeautifulSoup
from scrapy.selector import htmlXPathSelector # HtmlXPathSelector scrapy 自带
from .. items import PachongItem
from scrapy.http import Request

class ChoutiSpider(scrapy.Spider):
    name = \'chouti\'
    allowed_domains = [\'chouti.com\']
    start_urls = [\'http://dig.chouti.com/\']

    def parse(self, response):
        """
        当起始url下载完毕后,自动调用该函数,reponse封装了
        :param response:
        :return:
        """
        # print(response.text)
        # soup = BeautifulSoup(response.text,\'lxml\')# scrap 继承了lxml
        # div = soup.find(name=\'id\',attrs={"id":\'content-list\'})
        # print(div)
        hxs = HtmlXPathSelector(response=response)
        # items= hxs.xpath("//div[@id=\'content-list\']/div[@class=\'item\']")[0:4]
        # with open(\'xxx.log\', \'w\') as f:  # 注意 打开文件不能写到for循环中
        #     for item in items:
        #         href = item.xpath(".//div[@class=\'part1\']/a[1]/@href").extract_first() #extract_first() 提取第一个
        #         text = item.xpath(".//div[@class=\'part1\']/a[1]/text()").extract_first() #extract_first()
        #         print(text.strip())
        #         f.write(href)

        items = hxs.xpath("//div[@id=\'content-list\']/div[@class=\'item\']")

        for item in items:

            text = item.xpath(".//div[@class=\'part1\']/a[1]/text()").extract_first()  # extract_first() 解析
            href = item.xpath(".//div[@class=\'part1\']/a[1]/@href").extract_first()  # extract_first() 全部提取
            # print(href,text)
            item = PachongItem(title=text,href=href)
            yield item #自动返回给已注册pipelines中的函数,去做持久化.必须是个对象,pipelines每次都执行

        pages = hxs.xpath("//div[@id=\'page-area\']//a[@class=\'ct_pagepa\']/@href").extract()
        for page_url in pages:
            page_url = "https://dig.chouti.com" + page_url

            yield Request(url=page_url,callback=self.parse)

# -*- coding: utf-8 -*-

# Define your item pipelines here
#
# Don\'t forget to add your pipeline to the ITEM_PIPELINES setting
# See: https://doc.scrapy.org/en/latest/topics/item-pipeline.html


class PachongPipeline(object):
    def process_item(self, item, spider):
        # print(item[\'href\'])
        self.f.write(item[\'href\']+"\\n")
        self.f.flush()
        return item

    def open_spider(self, spider):
        """
        爬虫开始执行时,调用
        :param spider:
        :return:
        """
        self.f= open(\'ooo.log\',\'w\')

    def close_spider(self, spider):
        """
        爬虫关闭时,被调用
        :param spider:
        :return:
        """
        self.f.close()

# -*- coding: utf-8 -*-

# Scrapy settings for pachong project
#
# For simplicity, this file contains only settings considered important or
# commonly used. You can find more settings consulting the documentation:
#
#     https://doc.scrapy.org/en/latest/topics/settings.html
#     https://doc.scrapy.org/en/latest/topics/downloader-middleware.html
#     https://doc.scrapy.org/en/latest/topics/spider-middleware.html

BOT_NAME = \'pachong\'

SPIDER_MODULES = [\'pachong.spiders\']
NEWSPIDER_MODULE = \'pachong.spiders\'


# Crawl responsibly by identifying yourself (and your website) on the user-agent
#USER_AGENT = \'pachong (+http://www.yourdomain.com)\'

# Obey robots.txt rules
ROBOTSTXT_OBEY = True

# Configure maximum concurrent requests performed by Scrapy (default: 16)
#CONCURRENT_REQUESTS = 32

# Configure a delay for requests for the same website (default: 0)
# See https://doc.scrapy.org/en/latest/topics/settings.html#download-delay
# See also autothrottle settings and docs
#DOWNLOAD_DELAY = 3
# The download delay setting will honor only one of:
#CONCURRENT_REQUESTS_PER_DOMAIN = 16
#CONCURRENT_REQUESTS_PER_IP = 16

# Disable cookies (enabled by default)
#COOKIES_ENABLED = False

# Disable Telnet Console (enabled by default)
#TELNETCONSOLE_ENABLED = False

# Override the default request headers:
#DEFAULT_REQUEST_HEADERS = {
#   \'Accept\': \'text/html,application/xhtml+xml,application/xml;q=0.9,*/*;q=0.8\',
#   \'Accept-Language\': \'en\',
#}

# Enable or disable spider middlewares
# See https://doc.scrapy.org/en/latest/topics/spider-middleware.html
#SPIDER_MIDDLEWARES = {
#    \'pachong.middlewares.PachongSpiderMiddleware\': 543,
#}

# Enable or disable downloader middlewares
# See https://doc.scrapy.org/en/latest/topics/downloader-middleware.html
#DOWNLOADER_MIDDLEWARES = {
#    \'pachong.middlewares.PachongDownloaderMiddleware\': 543,
#}

# Enable or disable extensions
# See https://doc.scrapy.org/en/latest/topics/extensions.html
#EXTENSIONS = {
#    \'scrapy.extensions.telnet.TelnetConsole\': None,
#}

# Configure item pipelines
# See https://doc.scrapy.org/en/latest/topics/item-pipeline.html
ITEM_PIPELINES = {
   \'pachong.pipelines.PachongPipeline\': 300,#300 优先级
}

# Enable and configure the AutoThrottle extension (disabled by default)
# See https://doc.scrapy.org/en/latest/topics/autothrottle.html
#AUTOTHROTTLE_ENABLED = True
# The initial download delay
#AUTOTHROTTLE_START_DELAY = 5
# The maximum download delay to be set in case of high latencies
#AUTOTHROTTLE_MAX_DELAY = 60
# The average number of requests Scrapy should be sending in parallel to
# each remote server
#AUTOTHROTTLE_TARGET_CONCURRENCY = 1.0
# Enable showing throttling stats for every response received:
#AUTOTHROTTLE_DEBUG = False

# Enable and configure HTTP caching (disabled by default)
# See https://doc.scrapy.org/en/latest/topics/downloader-middleware.html#httpcache-middleware-settings
#HTTPCACHE_ENABLED = True
#HTTPCACHE_EXPIRATION_SECS = 0
#HTTPCACHE_DIR = \'httpcache\'
#HTTPCACHE_IGNORE_HTTP_CODES = []
#HTTPCACHE_STORAGE = \'scrapy.extensions.httpcache.FilesystemCacheStorage\'
DEPTH_LIMIT = 2  #爬取深度两层
http://www.cnblogs.com/wupeiqi/articles/6229292.html
scrapy 代码注释
start_request
start_request中的url 为起始url,是一个生成器,返回一个可迭代对象
spider中初始的request是通过调用 start_requests() 来获取的。 start_requests() 读取 start_urls 中的URL, 并以 parse 为回调函数生成 Request 。

该方法必须返回一个可迭代对象(iterable)。该对象包含了spider用于爬取的第一个Request。

当spider启动爬取并且未制定URL时,该方法被调用。 当指定了URL时,make_requests_from_url() 将被调用来创建Request对象。 该方法仅仅会被Scrapy调用一次,因此您可以将其实现为生成器。

该方法的默认实现是使用 start_urls 的url生成Request。

如果您想要修改最初爬取某个网站的Request对象,您可以重写(override)该方法。 例如,如果您需要在启动时以POST登录某个网站,你可以这么写:
def start_requests(self):
    return [scrapy.FormRequest("http://www.example.com/login",
                               formdata={\'user\': \'john\', \'pass\': \'secret\'},
                               callback=self.logged_in)]

def logged_in(self, response):
    # here you would extract links to follow and return Requests for
    # each of them, with another callback
    pass

# -*- coding: utf-8 -*-
import scrapy
from bs4 import BeautifulSoup
from scrapy.selector import HtmlXPathSelector
from scrapy.http import Request
from ..items import XianglongItem
from scrapy.http import HtmlResponse
from scrapy.http.response.html import HtmlResponse

"""
obj = ChoutiSpider()
obj.start_requests()

"""
class ChoutiSpider(scrapy.Spider):
    name = \'chouti\'
    allowed_domains = [\'chouti.com\']
    start_urls = [\'https://dig.chouti.com/\',]

    def start_requests(self):
        for url in self.start_urls:
            yield Request(
                url=url,
                callback=self.parse,
                headers={\'User-Agent\':\'Mozilla/5.0 (Windows NT 6.1; Win64; x64) AppleWebKit/537.36 (KHTML, like Gecko) Chrome/63.0.3239.132 Safari/537.36\'}
            )

    def parse(self, response):
        """
        当起始URL下载完毕后,自动执行parse函数:response封装了响应相关的所有内容。
        :param response:
        :return:
        """
        pages = response.xpath(\'//div[@id="page-area"]//a[@class="ct_pagepa"]/@href\').extract()
        for page_url in pages:
            page_url = "https://dig.chouti.com" + page_url
            yield Request(url=page_url,callback=self.parse,headers={\'User-Agent\':\'Mozilla/5.0 (Windows NT 6.1; Win64; x64) AppleWebKit/537.36 (KHTML, like Gecko) Chrome/63.0.3239.132 Safari/537.36\'})
数据解析
功能:将字符串转换成对象

- 方式一:
    response.xpath(\'//div[@id=\'content-list\']/div[@class=\'item\']\')
- 方式二:
    hxs = HtmlXPathSelector(response=response)
    items = hxs.xpath("//div[@id=\'content-list\']/div[@class=\'item\']")
查找规则:
//a
//div/a
//a[re:test(@id, "i\\d+")]

items = hxs.xpath("//div[@id=\'content-list\']/div[@class=\'item\']")
for item in items:
    item.xpath(\'.//div\')

解析:
标签对象:xpath(\'/html/body/ul/li/a/@href\')
列表:    xpath(\'/html/body/ul/li/a/@href\').extract()
值:      xpath(\'//body/ul/li/a/@href\').extract_first()

from scrapy.selector import Selector, HtmlXPathSelector
from scrapy.http import HtmlResponse
html = """<!DOCTYPE html>
<html>
    <head lang="en">
        <meta charset="UTF-8">
        <title></title>
    </head>
    <body>
        <ul>
            <li class="item-"><a id=\'i1\' href="link.html">first item</a></li>
            <li class="item-0"><a id=\'i2\' href="llink.html">first item</a></li>
            <li class="item-1"><a href="llink2.html">second item<span>vv</span></a></li>
        </ul>
        <div><a href="llink2.html">second item</a></div>
    </body>
</html>
"""
response = HtmlResponse(url=\'http://example.com\', body=html,encoding=\'utf-8\')
obj = response.xpath(\'//a[@id="i1"]/text()\').extract_first()
print(obj)
pipelines
在setting中配置pipeline
ITEM_PIPELINES = {
   \'pachong.pipelines.PachongPipeline\': 300,#300 值越小 优先级越高  0~1000
   \'pachong.pipelines.DBPipeline\': 300,#300 优先级
}
多pipelines ,pipelines返回值会传递给下一个pipelines的process_item
想要丢弃: 使用rasie DropItem
示例

from scrapy.exceptions import DropItem
class FilePipeline(object):

    def process_item(self, item, spider):
        print(\'写入文件\',item[\'href\'])

        # return item
        raise DropItem()
pipelines 方法有4种:
1) __init__() 构造方法
2) open_spider()
3) close_spider()
4) from_crawler(), 属于类方法,可以进行类定制
当根据配置文件:
    ITEM_PIPELINES = {
       \'xianglong.pipelines.FilePipeline\': 300,
       \'xianglong.pipelines.DBPipeline\': 301,
    }
找到相关的类:FilePipeline之后,会优先判断类中是否含有 from_crawler
    如果有:
        obj = FilePipeline.from_crawler()
    没有则:
        obj = FilePipeline()
    #执行顺序
    obj.open_spider(..)
    ob.process_item(..)
    obj.close_spider(..)
根据配置文件读取相关值,再进行pipeline处理 ——现在使用了from_crawler方法

from scrapy.exceptions import DropItem

class FilePipeline(object):
    def __init__(self,path):
        self.path = path
        self.f = None

    @classmethod
    def from_crawler(cls, crawler):
        """
        初始化时候,用于创建pipeline对象
        :param crawler:
        :return:
        """
        # return cls()

        path = crawler.settings.get(\'XL_FILE_PATH\')
        return cls(path)

    def process_item(self, item, spider):
        self.f.write(item[\'href\']+\'\\n\')
        return item


    def open_spider(self, spider):
        """
        爬虫开始执行时,调用
        :param spider:
        :return:
        """
        self.f = open(self.path,\'w\')

    def close_spider(self, spider):
        """
        爬虫关闭时,被调用
        :param spider:
        :return:
        """
        self.f.close()


class DBPipeline(object):

    def process_item(self, item, spider):

        print(\'数据库\',item)

        return item

    def open_spider(self, spider):
        """
        爬虫开始执行时,调用
        :param spider:
        :return:
        """
        print(\'打开数据\')

    def close_spider(self, spider):
        """
        爬虫关闭时,被调用
        :param spider:
        :return:
        """
        print(\'关闭数据库\')
POST/请求头/Cookie
Post请求头示例

from scrapy.http import Request
req = Request(
    url=\'http://dig.chouti.com/login\',
    method=\'POST\',
    body=\'phone=8613121758648&password=woshiniba&oneMonth=1\',
    headers={\'Content-Type\': \'application/x-www-form-urlencoded; charset=UTF-8\'},
    cookies={},
    callback=self.parse_check_login,
)
第一种
res.headers.getlist(\'Set-Cookie\')获取cookie
第二种:手动获取

cookie_dict = {}
cookie_jar = CookieJar()
cookie_jar.extract_cookies(response, response.request)
for k, v in cookie_jar._cookies.items():
    for i, j in v.items():
        for m, n in j.items():
            cookie_dict[m] = n.value

req = Request(
    url=\'http://dig.chouti.com/login\',
    method=\'POST\',
    headers={\'Content-Type\': \'application/x-www-form-urlencoded; charset=UTF-8\'},
    body=\'phone=8615131255089&password=pppppppp&oneMonth=1\',
    cookies=cookie_dict, # 手动携带
    callback=self.check_login
)
yield req
第三种 自动设置
meta={"cookiejar"=True}
 def start_requests(self):
        for url in self.start_urls:
            yield Request(url=url,callback=self.parse_index,meta={\'cookiejar\':True})
默认允许操作cookie

去重规则
在setting中配置
DUPEFILTER_CLASS = \'scrapy.dupefilter.RFPDupeFilter\'  #自定义去重规则
DUPEFILTER_DEBUG = False
JOBDIR = "保存范文记录的日志路径,如:/root/"  # 最终路径为 /root/requests.seen
和pipelines很像,需要自己编写类,定义去重规则,但是scrapy采用bloomfilter 进行去重

class MyDupeFilter(BaseDupeFilter):

    def __init__(self):
        self.record = set()

    @classmethod
    def from_settings(cls, settings):
        return cls()

    def request_seen(self, request):
        if request.url in self.record:
            print(\'已经访问过了\', request.url)
            return True
        self.record.add(request.url)

    def open(self):  # can return deferred
        pass

    def close(self, reason):  # can return a deferred
        pass
为请求创建唯一标识
http://www.oldboyedu.com?id=1&age=2
http://www.oldboyedu.com?age=2&id=1
如上面的两个url只是请求参数变换位置,其实还是指向同一个地址
对url的识别需要使用到request_fingerprint(request)函数
对url排序后hash

from scrapy.http import Request


u1 = Request(url=\'http://www.oldboyedu.com?id=1&age=2\')
u2 = Request(url=\'http://www.oldboyedu.com?age=2&id=1\')

result1 = request_fingerprint(u1)
result2 = request_fingerprint(u2)
print(result1,result2)
问题:记录到低要不要放在数据库?
【使用redis集合存储】 访问记录可以放在redis中。
dont_filter
from scrapy.core.scheduler import Scheduler

def enqueue_request(self, request):
# request.dont_filter=False
    # self.df.request_seen(request):
    #   - True,已经访问
    #   - False,未访问
# request.dont_filter=True,全部加入到调度器
if not request.dont_filter and self.df.request_seen(request):
    self.df.log(request, self.spider)
    return False
# 如果往下走,把请求加入调度器
dqok = self._dqpush(request)
中间件
请求头USER_AGENT设置
问题:对爬虫中所有请求发送时,携带请求头?
方案一:在每个Request对象中添加一个请求头
方案二:下载中间件
setting中配置:
DOWNLOADER_MIDDLEWARES = {\'xianglong.middlewares.UserAgentDownloaderMiddleware\': 543,}
编写类:

class UserAgentDownloaderMiddleware(object):

    @classmethod
    def from_crawler(cls, crawler):
        # This method is used by Scrapy to create your spiders.
        s = cls()
        return s

    def process_request(self, request, spider):
        # Called for each request that goes through the downloader
        # middleware.

        # Must either:
        # - return None: continue processing this request
        # - or return a Response object
        # - or return a Request object
        # - or raise IgnoreRequest: process_exception() methods of
        #   installed downloader middleware will be called

        request.headers[\'User-Agent\'] = "Mozilla/5.0 (Windows NT 6.1; Win64; x64) AppleWebKit/537.36 (KHTML, like Gecko) Chrome/63.0.3239.132 Safari/537.36"

        # return None # 继续执行后续的中间件的process_request

        # from scrapy.http import Request
        # return Request(url=\'www.baidu.com\') # 重新放入调度器中,当前请求不再继续处理

        # from scrapy.http import HtmlResponse # 执行从最后一个开始执行所有的process_response
        # return HtmlResponse(url=\'www.baidu.com\',body=b\'asdfuowjelrjaspdoifualskdjf;lajsdf\')

    def process_response(self, request, response, spider):
        # Called with the response returned from the downloader.

        # Must either;
        # - return a Response object
        # - return a Request object
        # - or raise IgnoreRequest
        return response

    def process_exception(self, request, exception, spider):
        # Called when a download handler or a process_request()
        # (from other downloader middleware) raises an exception.

        # Must either:
        # - return None: continue processing this exception
        # - return a Response object: stops process_exception() chain
        # - return a Request object: stops process_exception() chain
        pass
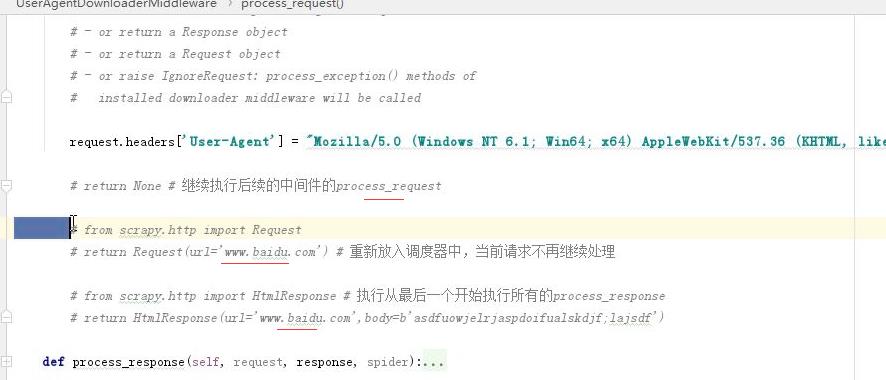
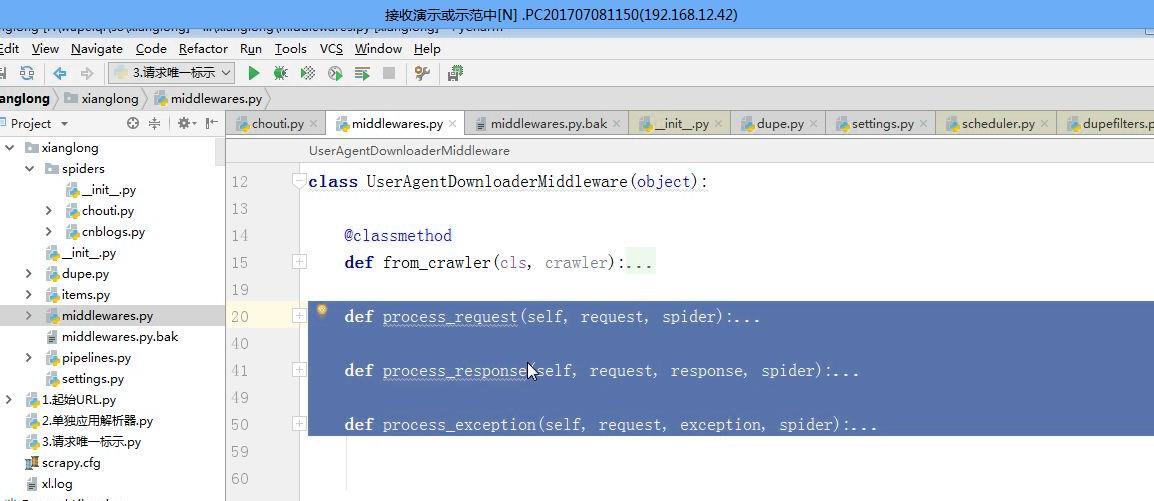
如return none 继续执行下一个中间件,returen Request(...)返回调度器产生死循环
四种返回结果如下图
下载中间件: scrapy中如何添加代理
加代理,只是在请求头中设置信息
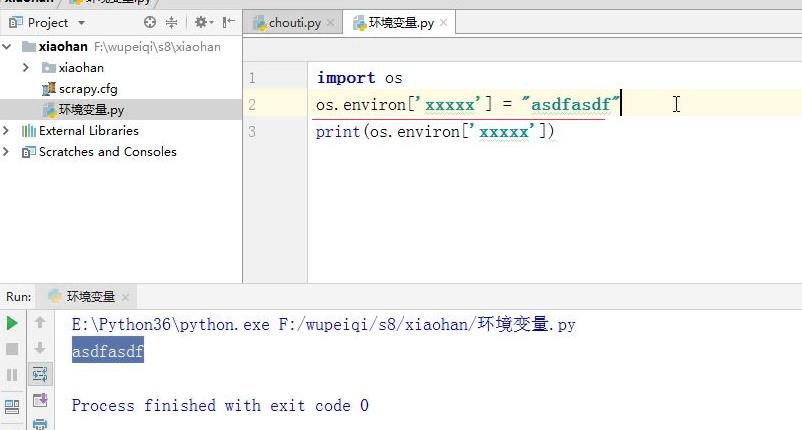
方式一:
内置加ip
os.envriron[\'HTTP_PROXY\']=\'http://192.168.0.0.1\'
方式二:自定义下载中间件

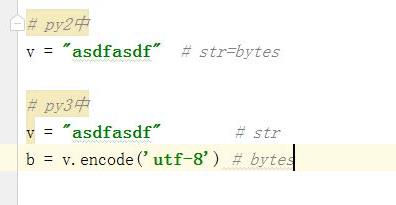
import random import base64 import six def to_bytes(text, encoding=None, errors=\'strict\'): """Return the binary representation of `text`. If `text` is already a bytes object, return it as-is.""" if isinstance(text, bytes): return text if not isinstance(text, six.string_types): raise TypeError(\'to_bytes must receive a unicode, str or bytes \' \'object, got %s\' % type(text).__name__) if encoding is None: encoding = \'utf-8\' return text.encode(encoding, errors) class MyProxyDownloaderMiddleware(object): def process_request(self, request, spider): proxy_list = [ {\'ip_port\': \'111.11.228.75:80\', \'user_pass

