TensorFlow
Posted bairuiworld
tags:
篇首语:本文由小常识网(cha138.com)小编为大家整理,主要介绍了TensorFlow相关的知识,希望对你有一定的参考价值。
TensorFlow
一、Basic
TensorFlow是以图作为核心,数据的流动构成一张图,对图进行相应的计算。
Graph:
matrix1 = tf.constant([[3., 3.]])
matrix2 = tf.constant([[2.],[2.]])
product = tf.matmul(matrix1 , matrix2)
这样,创建了三个结点,两个constant op,一个mutmul op。
Session:
Graph需要载入Session中才可以运行。
sess = tf.Session()
sess.run(product)
sess.close()
在计算结束后,需要关闭session以释放资源。或者使用with 子句,在结束后会自动释放:
with tf.Session() as sess:
    sess.run(product)
指定设备:
"/cpu:0" :计算机的 CPU ;
"/gpu:0" :计算机的第一个 GPU ,如果可用;
"/gpu:1" :计算机的第二个 GPU ,以此类推。
with tf.Session() as sess:
    with tf.device("/gpu:1"):
        sess.run(product)
ConfigProto
在配置Session时,可以设置config,常见配置项如下:
- log_device_placement
- allow_soft_placement
- gpu_options.allow_growth: 是否采用增长的方式分配显存。如果这个值为True,那么分配器不会预分配整个指定的GPU显存空间,而是开始分配一小部分显存,然后随着需要而增加。
详细配置项:https://www.jianshu.com/p/b9a442bcfd2e
例子:
log_device_placement=True打印使用相关的设备信息:
config=tf.ConfigProto(log_device_placement=True, allow_soft_placement=True)
config.gpu_options.allow_growth = True
sess = tf.Session(config=config)
Tensor:
你可以把 TensorFlow 的张量看作是一个 n 维的数组或列表 . 一个 tensor
包含一个静态类型 rank, 和一个 shape.
Variable:
变量维持了图执行过程中的状态信息。
state = tf.Variable(0, name="counter")
one = tf.constant(1)
new_value = tf.add(state, one)
update_value = tf.assign(state, new_value)
init_op = tf.initialize_all_variables()
with tf.Session() as sess:
    with tf.device("/gpu:0"):
        sess.run(init_op)
        for _ in range(3):
            sess.run(update_value)
变量初始化:
# random_normal
weights = tf.Variable(tf.random_normal(shape=[784, 200], stddev=0.35), name="weights")

# zeros
biases = tf.Variable(tf.zeros(shape=[200]), name="biases")

# 使用其它变量
weigths2 = tf.Variable(weights.initialized_value(), name=\'weights2\')

# 手动初始化
weights3 = tf.Variable([1.0, 2.0, 5.0, 3.5], name=\'weights3\')
note: tf函数的shape都是以列表为参数[3, 4], 如tf.zeros([3, 4]);而numpy中函数的shape参数多数以元组形式(3, 4),如np.zeros((3, 4));
二、Function
tf.group
创建一个op组合多个操作,sess.run(group)时可以执行group中所有的操作,当所有操作都完成,op输出结果为None。
b = tf.random_uniform([2,3], minval = 10, maxval = 11)
w = tf.random_uniform([2,3], minval = 10, maxval = 11)
mul = tf.multiply(w, 2)
add = tf.add(w, 2)
group = tf.group(mul, add)
print sess.run(group)
#输出:None
tf.train.ExponentialMovingAverage
tf.train.ExponentialMovingAverage(decay, steps)
tf.train.ExponentialMovingAverage这个函数用于更新参数,就是采用滑动平均的方法更新参数。这个函数初始化需要提供一个衰减速率(decay),用于控制模型的更新速度。这个函数还会维护一个影子变量(也就是更新参数后的参数值),这个影子变量的初始值就是这个变量的初始值,影子变量值的更新方式如下:
shadow_variable = decay * shadow_variable + (1-decay) * variable
shadow_variable是影子变量,variable表示待更新的变量,也就是变量被赋予的值,decay为衰减速率。decay一般设为接近于1的数(0.99,0.999)。decay越大模型越稳定,因为decay越大,参数更新的速度就越慢,趋于稳定。
tf.train.ExponentialMovingAverage这个函数还提供了自己更新decay的计算方式:
decay= min(decay,(1+steps)/(10+steps))
steps是迭代的次数,可以自己设定或者默认。
self.ema = tf.train.ExponentialMovingAverage(decay=0.9999)
self.averages_op = self.ema.apply(tf.trainable_variables())
with tf.control_dependencies([self.optimizer]):
    self.train_op = tf.group(self.averages_op)
tf.control_dependencies
在有些机器学习程序中我们想要指定某些操作执行的依赖关系,这时我们可以使用tf.control_dependencies()来实现。
control_dependencies(control_inputs)返回一个控制依赖的上下文管理器,使用with关键字可以让在这个上下文环境中的操作都在control_inputs 执行。
with g.control_dependencies([a, b, c]):
# `d` and `e` 在 `a`, `b`, and `c` 执行完后运行
d = ...
e = ...
tf.trainable_variables
tf.trainable_variables返回的是需要训练的变量列表
tf.all_variables返回的是所有变量的列表
import tensorflow as tf;
import numpy as np;
import matplotlib.pyplot as plt;

v = tf.Variable(tf.constant(0.0, shape=[1], dtype=tf.float32), name=\'v\')
v1 = tf.Variable(tf.constant(5, shape=[1], dtype=tf.float32), name=\'v1\')
 # trainable = False
global_step = tf.Variable(tf.constant(5, shape=[1], dtype=tf.float32), name=\'global_step\', trainable=False)
ema = tf.train.ExponentialMovingAverage(0.99, global_step)

for ele1 in tf.trainable_variables():
    print ele1.name
for ele2 in tf.all_variables():
    print ele2.name
输出:
v:0
v1:0
v:0
v1:0
global_step:0
分析:
上面得到两个变量,后面的一个得到上三个变量,因为global_step在声明的时候说明不是训练变量,用来关键字trainable=False。
placeholder, feed
两者结合使用,先用placeholder定义占位符,之后使用feed传入真实的数据。
# define hld, None means batch_size
x_hld = tf.placeholder(tf.float, [None, 320, 240, 3], name=\'x_hld\')
y_hld = tf.placeholder(tf.int64, [None, nb_classes], name=\'y_hld\')

sess.run([train_op], feed_dict={x_hld: X, y_hld: y})
tf.Graph.finalize
作用:结束(Finalizes)这个图,使其只读(read-only).调用这个函数之后,就没有操作能够添加到这个图里面去了。这个方法是确保当这个图被多个线程共享的时候,没有操作能够添加进去。
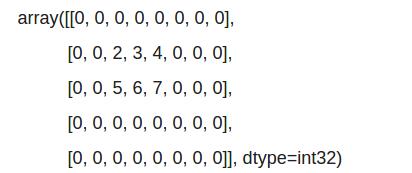
tf.pad()
#t=[[2,3,4],[5,6,7]], paddings=[[1,2],[2,3]],mode="CONSTANT"
sess.run(tf.pad(t,paddings,"CONSTANT"))
[[1, 2], [2, 3]]表示上面pad 1, 下面pad 2, 左面pad 2, 右面pad 3,最后形成:

CONSTANT表示pad的数是0, 还有REFLECT和SYMMETRIC方式,详情见(http://blog.csdn.net/zhang_bei_qing/article/details/75090203)。
optimizer
optimizer = tf.train.GradientDescentOptimizer(learning_rate)
train_op = optimizer.minimize(loss)
sess.run([train_op], feed_dict={x_batch: x[i\\*batch_size:(i+1)*batch_size], y_batch: y[i\\*batch_size:(i+1)\\*batch_size]})
常见优化器如下:
GradientDescentOptimizer
AdagradOptimizer
AdagradDAOptimizer
MomentumOptimizer
AdamOptimizer
FtrlOptimizer
RMSPropOptimizer
arg_scope:
tf.contrib.framework.arg_scope(list_ops_or_scope, **kwargs)
#或者
tf.contrib.slim.arg_scope(list_ops_or_scope, **kwargs)

# 为给定的 list_ops_or_scope 存储默认的参数
如:
with slim.arg_scope([slim.conv2d, slim.fully_connected],
	activation_fn=leaky_relu(alpha),
	weights_initializer=tf.truncated_normal_initializer(0.0, 0.01),
	weights_regularizer=slim.l2_regularizer(0.0005)):
对conv2d,fully_connected层分别加上activation_fn, weights_initializer, weights_regularizer等默认属性。
accuracy计算:
acc = tf.equal(pred.argmax(), y.argmax())
acc_f = tf.cast(acc, tf.float32)
acc_op = tf.reduce_sum(acc_f)
reduce_sum:
在哪个维度上操作,哪个维度的大小就变为1.
(2, 3) reduce_sum(arr, 0, keep_dim=True) => (1, 3)
(2, 3) reduce_sum(arr, 1, keep_dim=True) => (2, 1) #使用keep_dim,否则会变成(1, 2)
reduce_sum如果不加维度的话,默认是在所有维度上进行,加上维度就只在特定给定上执行求和操作:
reduce_sum(arr, 0)  # 对第0维操作,即对0维求和
reduce_mean(arr, 1) #对第1维操作,即对1维求平均
concat:
和reduce_sum类型,在哪个维度上操作,哪个维度的大小就变
# t1 with shape [2, 3], t2 with shape [2, 3]
tf.shape(tf.concat([t1, t2], 0))  # => [4, 3]
tf.shape(tf.concat([t1, t2], 1))  # => [2, 6]
如下, t1, t2无法使用concta连接第二维,因为对应的shape只有一个维度,当然不能在第二维上连了,虽然实际中两个向量可以在行上连,但是放在程序里是会报错的。需要使用expand_dim来扩展出第二维
t1=tf.constant([1,2,3])
t2=tf.constant([4,5,6])
# tf.concat([t1, t2], 1)

t1 = tf.expand_dims(tf.constant([1, 2 ,3]), 1)
t2 = tf.expand_dims(tf.constant([4, 5, 6]), 1)
tf.concat([t1, t2], 1) # [[1]]
expand_dims:
有时,2维的矩阵想变成3维的矩阵,如(2, 3)的矩阵想变为(2, 3, 1)就需要使用expand_dim,当然使用tf.reshape也可以进行变换,但tf.reshape对于tf.placeholder变量会报错,这个时候还是要使用tf.expand_dims。
# 假设value维度为(2, 3)

tf.expand_dims(value, 0)  # (2, 3) => (1, 2, 3)
tf.expand_dims(value, 1)  # (2, 3) => (2, 1, 3)
tf.expand_dims(value, 2)  # (2, 3) => (2, 3, 1)
tf.expand_dims(value, -1)  #-1表示在扩展最后一维 (2, 3) => (2, 3, 1)
tf.shape:
返回张量的形状,并且shape返回的也是张量,在tensorflow中需要sess.run才能看到值:
slim.losses:
如果不使用tf提供的loss函数,而自己实现loss计算时,又想使用tensorflow的loss管理机制,可以使用slim.losses.add_loss()来添加loss,并使用slim.losses.get_total_loss()来得到最后的loss。
exponential_decay:
tf.train.exponential_decay主要用来对学习率进行动态调整,前期可以使用较大的学习率,后期可以调小学习率。
lr = tf.train.exponential_decay(initial_learning_rate, glob_step, decay_steps, decay_rate)
例子:
initial_learning_rate: 初始学习率,如 0.001
glob_step: 当前迭代数,如 0, 1, 2, 3...
decay_steps: 衰减一次decay_rate需要的迭代次数, 如 3000,就是需要3000次缩减到decay_rate倍
decay_rate: 衰减的系数, 如0.1
那么初始学习率为0.001,如下两个迭代时的学习率计算方式:
glob_step=0, 那么有: lr = 0.001 * 0.1 ^ (0 / 3000) = 0.001
glob_step=3000, 那么有: lr = 0.001 * 0.1 ^ (3000 / 3000) = 0.0001
可见,越到后面学习率越小。
另一种思路,设置stair_case=True,可以调小decay_steps,调大decay_rate,这样可以在decay_steps的整数倍迭代时,乘以一个decay_rate。
lr = tf.train.exponential_decay(initial_learning_rate=0.001, glob_step=i, decay_steps = 100, decay_rate=0.96, stair_case=True)
iter 0: lr = 0.001 * 0.96 ^ (0 / 100) = 0.001
iter 99: lr = 0.001 * 0.96 ^ (99 / 100) = 0.001
iter 100: lr = 0.001 * 0.96 ^ (100 / 100) = 0.0096
iter 200: lr = 0.001 * 0.96 ^ (100 / 100) = 0.009216
也就是对(glob_step / decay_steps)取整数,每decay_steps迭代乘以0.96。
如果staircase=True, decay_rate=0.1, decay_steps=10000,那么学习率每10000次缩小10倍。
batch normalization:
实现:
# convolution with batch norm
net = slim.conv2d(net, 32, 5, padding=\'SAME\', activation_fn=tf.nn.relu, normalizer_fn=slim.batch_norm, scope=\'conv1\')

#dependency
update_ops = tf.get_collection(tf.GraphKeys.UPDATE_OPS)
with tf.control_dependencies(update_ops):
    train_step = tf.train.GradientDescentOptimizer(0.01).minimize(total_loss)
使用batch normaliztion:
那BN到底是什么原理呢?说到底还是为了防止“梯度弥散”。在神经网络训练时遇到收敛速度很慢,或梯度爆炸等无法训练的状况时可以尝试BN来解决。另外,在一般使用情况下也可以加入BN来加快训练速度,提高模型精度。
下面是分别没有使用BN和使用BN的结果,可以看到使用BN在相同迭代次数下BN结果更优。


Random:
random_normal: 是使生成的数据服从正态分布
truncated_normal: 如果数据大于(mean +/- 2 * std)范围就重新取值
random_uniform: 产生于low和high之间,产生的值是均匀分布的。
tf.random_shuffle(value, seed=None, name=None): 打乱Tensor的第0维,即行
a1 = [[1, 2], [3, 4], [5, 6]]
a2 = tf.randem_shuffle(a1) #=> 以行随机,可能结果[[3, 4], [1, 2], [5, 6]]
casting:
tf.to_double([1, 2])
tf.to_float([1, 2])
tf.to_int32()
tf.to_int64()
tf.cast([1, 2], dtype=int32)
tf.cast([1, 2], dtype=float32)
注意: 这里,使用tf.to_float,但使用tf.cast(1, dtype=tf.float32)必须使用float32,否则会报错。
rank:
求Tensor是几维张量。
tf.rank(a1)
tf.shape(a1)
tf.size(a1)
tf.reshape(a1, [1, 2])
tfrecoder:
tensorflow中可以使用tfrecoder进行数据的读写。tensorflow中提供tf.train.Example,其是使用protobuf进行定义的,如下:
message Example {
 Features features = 1;
};

message Features{
 map<string,Feature> featrue = 1;
};

message Feature{
    oneof kind{
        BytesList bytes_list = 1;
        FloatList float_list = 2;
        Int64List int64_list = 3;
    }
};
可以看到Example中包括一个features成员,而features又是一个字符串与Feature类型的map,这样我们就可以存储"label", "img"这样的数据了,一个Example就是一个数据样例。
利用如下方法将数据存储到tfrecode文件中:
def test_write_to_tfrecords(filename):
    writer = tf.python_io.TFRecordWriter(filename)

    #循环将每个数据写入
    for i in range(100):
        img_raw = np.random.random_integers(0,255,size=(7,30)) # 创建7*30,取值在0-255之间随机数组
        img_raw = img_raw.tostring()
        example = tf.train.Example(features=tf.train.Features(
                feature={
                \'label\': tf.train.Feature(int64_list = tf.train.Int64List(value=[i])),
                \'img_raw\':tf.train.Feature(bytes_list = tf.train.BytesList(value=[img_raw]))
                }))
        writer.write(example.SerializeToString()) #将数据序列化写入

    writer.close()
文件的读取需要使用tf.train.string_input_producer生成一个解析队列,再调用tf.TFRecordReader的tf.parse_single_example解析器进行解析。
    tfrecords_filename = "train.tfrecords"
    test_write_to_tfrecords(tfrecords_filename)
    filename_queue = tf.train.string_input_producer([tfrecords_filename],) #读入流中
    reader = tf.TFRecordReader()
    _, serialized_example = reader.read(filename_queue)   #返回文件名和文件
    features = tf.parse_single_example(serialized_example,
                                       features={
                                           \'label\': tf.FixedLenFeature([], tf.int64),
                                           \'img_raw\' : tf.FixedLenFeature([], tf.string),
                                       })  #取出包含image和label的feature对象
    image = tf.decode_raw(features[\'img_raw\'], tf.int64)
    image = tf.reshape(image, [7,30])
    label = tf.cast(features[\'label\'], tf.int64)
    with tf.Session() as sess: #开始一个会话
        init_op = tf.initialize_all_variables()
        sess.run(init_op)
        coord=tf.train.Coordinator()
        threads= tf.train.start_queue_runners(coord=coord)
        for i in range(20):
            example, l = sess.run([image,label])#在会话中取出image和label
            img=Image.fromarray(example, \'RGB\')#这里Image是之前提到的
            img.save(\'./\'+str(i)+\'_\'\'Label_\'+str(l)+\'.jpg\')#存下图片
            print(example, l)

        coord.request_stop()
        coord.join(threads)
注意,在运行任何训练步骤之前,需要调用tf.train.start_queue_runners函数,否则tensorflow将一直挂起。
coord = tf.train.Coordinator()
threads = tf.train.start_queue_runners(coord=coord)
取出数据时,也要使用sess.run才能真正取出:
以上是关于TensorFlow的主要内容,如果未能解决你的问题,请参考以下文章