7Struts2实现文件上传和下载
Posted 红酒人生
tags:
篇首语:本文由小常识网(cha138.com)小编为大家整理,主要介绍了7Struts2实现文件上传和下载相关的知识,希望对你有一定的参考价值。
一、实现单个文件上传
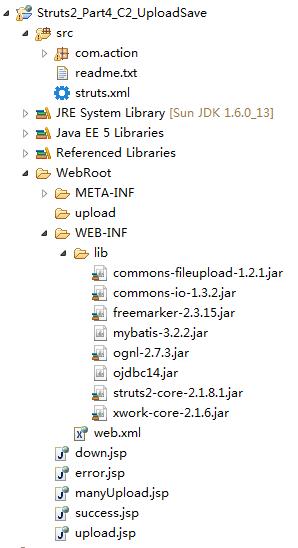
1、创建如下web项目结构

2、在src下的com.action包下创建UploadAction.java

 1 package com.action;
 2 import java.io.File;
 3
 4 import javax.servlet.ServletContext;
 5
 6 import org.apache.commons.io.FileUtils;
 7 import org.apache.struts2.ServletActionContext;
 8
 9 import com.opensymphony.xwork2.ActionSupport;
10
11 /**
12  * 单个文件上传
13  * @author Dell
14  *
15  */
16 public class UploadAction extends ActionSupport {
17     //封装上传文件属性==form表单中file文件域的name属性值保持一致
18     private File upload;
19
20     //封装上传文件的类型,固定语法=file文件域name属性值+ContextType;
21     private String uploadContentType;
22
23     //封装文件上传名,固定语法=file文件域name属性值+FileName
24     private String uploadFileName;
25
26
27     @Override
28     public String execute() throws Exception {
29         //获取上下文对象
30         ServletContext appliaction=ServletActionContext.getServletContext();
31         //获取要保存文件的位置
32         String path=appliaction.getRealPath("/upload");
33         //创建一个与上传同名的文件
34         File file=new File(path,uploadFileName);
35         //将临时文件内容拷贝到目标文件夹下的那个同名的文件
36         FileUtils.copyFile(upload, file);
37         //删除临时文件
38         upload.delete();
39         return SUCCESS;
40     }
41
42     public File getUpload() {
43         return upload;
44     }
45     public void setUpload(File upload) {
46         this.upload = upload;
47     }
48     public String getUploadContentType() {
49         return uploadContentType;
50     }
51     public void setUploadContentType(String uploadContentType) {
52         this.uploadContentType = uploadContentType;
53     }
54     public String getUploadFileName() {
55         return uploadFileName;
56     }
57     public void setUploadFileName(String uploadFileName) {
58         this.uploadFileName = uploadFileName;
59     }
60
61
62 }
3、在src下创建struts.xml文件

 1 <?xml version="1.0" encoding="UTF-8"?>
 2 <!DOCTYPE struts PUBLIC "-//Apache Software Foundation//DTD Struts Configuration 2.1//EN" "struts-2.1.dtd" >
 3 <struts>
 4       <!-- 中文乱码处理 -->
 5       <constant name="struts.i18n.encoding" value="UTF-8"/>
 6
 7       <constant name="struts.devMode" value="true"/>
 8        <!-- 设置上传文件的总大小 -->
 9       <constant name="struts.multipart.maxSize" value="200000000"/>
10
11       <package name="default" namespace="/" extends="struts-default">
12       <!--文件上传 -->
13          <action name="*" class="com.action.{1}Action" method="execute">
14               <result>/success.jsp</result>
15               <result name="input">/error.jsp</result>
16               <interceptor-ref name="defaultStack">
17                  <!-- 配置文件上传的大小,这里配置的是上传文件的单个大小 -->
18                  <param name="fileUpload.maximumSize">20971520</param>
19
20                  <!-- 配置文件上传允许的类型 -->
21                  <param name="fileUpload.allowedTypes">text/plain,application/msword</param>
22
23                  <!-- 配置文件的扩展名 -->
24                  <param name="fileUpload.allowedExtensions">.txt,.doc</param>
25               </interceptor-ref>
26          </action>
27
28       </package>
29 </struts>
4、在WebRoot下创建upload文件夹
5、编辑WebRoot下的WEB-INF下的web.xml文件

 1 <?xml version="1.0" encoding="UTF-8"?>
 2 <web-app id="WebApp_9" version="2.4" xmlns="http://java.sun.com/xml/ns/j2ee" xmlns:xsi="http://www.w3.org/2001/XMLSchema-instance" xsi:schemaLocation="http://java.sun.com/xml/ns/j2ee http://java.sun.com/xml/ns/j2ee/web-app_2_4.xsd">
 3     <filter>
 4         <filter-name>struts2</filter-name>
 5         <filter-class>org.apache.struts2.dispatcher.ng.filter.StrutsPrepareAndExecuteFilter</filter-class>
 6     </filter>
 7
 8     <filter-mapping>
 9         <filter-name>struts2</filter-name>
10         <url-pattern>/*</url-pattern>
11     </filter-mapping>
12
13     <welcome-file-list>
14         <welcome-file>upload.jsp</welcome-file>
15     </welcome-file-list>
16
17 </web-app>
6、在WebRoot下创建upload.jsp文件

 1 <%@ page language="java" import="java.util.*" pageEncoding="UTF-8"%>
 2 <%@ taglib uri=  "/struts-tags" prefix="s" %>
 3 <%
 4 String path = request.getContextPath();
 5 String basePath = request.getScheme()+"://"+request.getServerName()+":"+request.getServerPort()+path+"/";
 6 %>
 7
 8 <!DOCTYPE html PUBLIC "-//W3C//DTD HTML 4.01 Transitional//EN">
 9 <html>
10   <head>
11     <base href="<%=basePath%>">
12
13     <title>单个文件上传</title>
14     <meta http-equiv="pragma" content="no-cache">
15     <meta http-equiv="cache-control" content="no-cache">
16     <meta http-equiv="expires" content="0">
17     <meta http-equiv="keywords" content="keyword1,keyword2,keyword3">
18     <meta http-equiv="description" content="This is my page">
19     <!--
20     <link rel="stylesheet" type="text/css" href="styles.css">
21     -->
22   </head>
23
24   <body>
25     <s:form action="Upload.action" enctype="multipart/form-data" method="post">
26        <s:textfield name="title" label="标题"/><br/>
27        <s:file name="upload" label="选择文件"/><br/>
28        <s:submit name="submit" value="上传文件"/>
29     </s:form>
30   </body>
31 </html>
7、在WebRoot下创建success.jsp文件

 1 <%@ page language="java" import="java.util.*" pageEncoding="UTF-8"%>
 2 <%@ taglib uri="/struts-tags" prefix="s" %>
 3 <%
 4 String path = request.getContextPath();
 5 String basePath = request.getScheme()+"://"+request.getServerName()+":"+request.getServerPort()+path+"/";
 6 %>
 7
 8 <!DOCTYPE HTML PUBLIC "-//W3C//DTD HTML 4.01 Transitional//EN">
 9 <html>
10   <head>
11     <base href="<%=basePath%>">
12
13     <title>My JSP \'index.jsp\' starting page</title>
14     <meta http-equiv="pragma" content="no-cache">
15     <meta http-equiv="cache-control" content="no-cache">
16     <meta http-equiv="expires" content="0">
17     <meta http-equiv="keywords" content="keyword1,keyword2,keyword3">
18     <meta http-equiv="description" content="This is my page">
19     <!--
20     <link rel="stylesheet" type="text/css" href="styles.css">
21     -->
22   </head>
23
24   <body>
25     上传成功!
26     您所上传的文件是:<s:property value="uploadFileName"/><br/>
27     文件类型:<s:property value="uploadContentType"/><br/>
28   </body>
29 </html>
8、在WebRoot下创建error.jsp文件

 1 <%@ page language="java" import="java.util.*" pageEncoding="UTF-8"%>
 2 <%
 3 String path = request.getContextPath();
 4 String basePath = request.getScheme()+"://"+request.getServerName()+":"+request.getServerPort()+path+"/";
 5 %>
 6
 7 <!DOCTYPE HTML PUBLIC "-//W3C//DTD HTML 4.01 Transitional//EN">
 8 <html>
 9   <head>
10     <base href="<%=basePath%>">
11
12     <title>My JSP \'MyJsp.jsp\' starting page</title>
13
14     <meta http-equiv="pragma" content="no-cache">
15     <meta http-equiv="cache-control" content="no-cache">
16     <meta http-equiv="expires" content="0">
17     <meta http-equiv="keywords" content="keyword1,keyword2,keyword3">
18     <meta http-equiv="description" content="This is my page">
19     <!--
20     <link rel="stylesheet" type="text/css" href="styles.css">
21     -->
22
23   </head>
24
25   <body>
26      操作失败!!
27   </body>
28 </html>
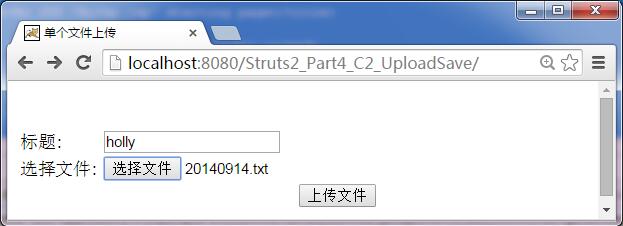
9、运行


二、上传多个文件
(接着上面的项目进行)
1、在src的com.action包下创建ManyUploadAction.java

 1 package com.action;
 2 import java.io.File;
 3
 4 import javax.servlet.ServletContext;
 5
 6 import org.apache.commons.io.FileUtils;
 7 import org.apache.struts2.ServletActionContext;
 8
 9 import com.opensymphony.xwork2.ActionSupport;
10
11 /**
12  * 多个文件上传
13  * @author Dell
14  *
15  */
16 public class ManyUploadAction extends ActionSupport {
17     //封装上传文件属性==form表单中file文件域的name属性值保持一致
18     private File[] upload;
19
20     //封装上传文件的类型,固定语法=file文件域name属性值+ContextType;
21     private String[] uploadContentType;
22
23     //封装文件上传名,固定语法=file文件域name属性值+FileName
24     <以上是关于7Struts2实现文件上传和下载的主要内容,如果未能解决你的问题,请参考以下文章
