linux 时钟源初步分析linux kernel 时钟框架详细介绍
Posted muhuacat猫窝
tags:
篇首语:本文由小常识网(cha138.com)小编为大家整理,主要介绍了linux 时钟源初步分析linux kernel 时钟框架详细介绍相关的知识,希望对你有一定的参考价值。
初步概念: 看datasheet的关于时钟与定时器的部分,
FCLK供给cpu,
HCLK供给AHB总线设备(存储器控制器,中断控制器、LCD控制器、DMA、USB主机控制器等),
PCLK供给APB总线上的设备(watchdog、IIS、i2c、 pwm、定时器、ADC、uart、gpio、rtc、spi)
上电时 fclk的时钟等于外部时钟fin, 然后等待LOCKTIME后, 依照MPLLCON寄存器的设置,倍频到高频。
UPLLCON专用于USB同于MPLLCON。
关于分频: CLKDIVN寄存器设置fclk、hclk、pclk的分频比。
时钟控制寄存器CLOCK CONTROL REGISTER (CLKCON)
寄存器的每一位大部分控制一个硬件模块的时钟源,这个功能将被用于内核控制硬件模块的方式,首先内核定义了
static struct clk init_clocks[] = {
{
.name = "dma",
.id = 0,
.parent = &clk_h,
.enable = s3c2412_clkcon_enable,
.ctrlbit = S3C2412_CLKCON_DMA0,
}, {
.name = "dma",
.id = 1,
.parent = &clk_h,
.enable = s3c2412_clkcon_enable,
.ctrlbit = S3C2412_CLKCON_DMA1,
},
......
......
{ .name = "adc",
.id = -1,
.parent = &clk_p,
.enable = s3c24xx_clkcon_enable,
.ctrlbit = S3C2410_CLKCON_ADC
},
}(其中的每一项为clock结构体)
结构体,其中ctrlbit项对应于CLKCON的每一位, 其中每一项的编号是通过 name来识别, 操作函数都为s3c24xx_clkcon_enable, 其中parent项表示该模块的时钟来源。
在内核里面有时候我们需要自己手动的开启硬件模块,方法如下:
static struct clk *adc_clock;
定义一个clock时钟,这个结构体代表一个时钟的抽象。
adc_clock = clk_get(NULL, "adc");
if (!adc_clock) {
printk(KERN_ERR "failed to get adc clock source/n");
return -ENOENT;
}
获取相应模块所对应的clock结构体(存于static struct clk init_clocks中), clk_get函数是通过 name去 init_clocks结构体中遍历找到相应的clock,进而获得了硬件模块相应的clock结构体。
clk_enable(adc_clock);
使能clock,即使能CLKCON中硬件模块相对应的位,从而实现了硬件模块的时钟源使能。clk_enable函数使用递归方式使能相应的CLKCON位,这个意思也就是说这个函数调用同时也会将这个时钟源的上一级时钟源同样使能,一直往上推保证这条时钟线ok,这个是主要的意思,具体涉及到上级时钟源的设置还需要另外的机制控制,可以参照源码分析。
①.时钟源选择
在系统复位时检测引脚OM3:OM2,若是0:0,则主时钟源选择外部晶振,usb时钟源选择外部晶振
②.MPLLCON main pll control 主时钟寄存器控制
用于设定FCLK和Fin的倍数。
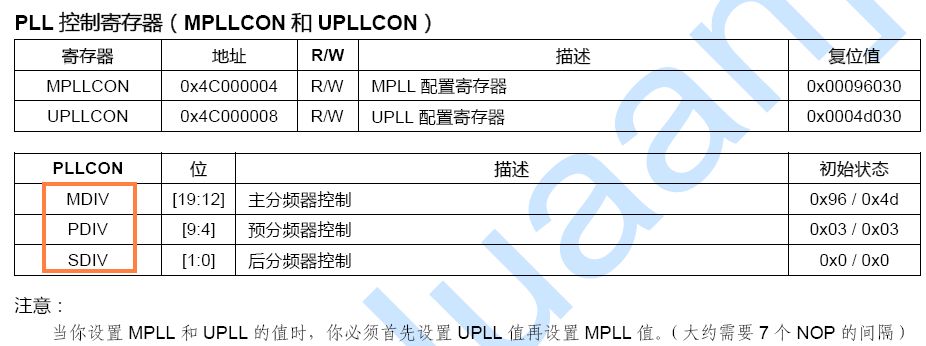
Mpll(FCLK) = ( 2 × m × Fin ) / ( p × 2^s )
其中m=MDIV+8, p=PDIV+2, s=SDIV,Fin晶振频率
比如
Fin=12MHz
MDIV=0x7F=127,m=135
PDIV=2,p=4
SDIV=1,s=1
则FCLK=405MHz
注意:系统复位时,必须写一次MPLLCON UPLLCON ,这样系统才能正常工作。即使不改变其值,即使复位后MPLL UPLL都是使能的,也要写一次,另外还有如下

③.CLKDIVN clock divider control 时钟分频控制寄存器
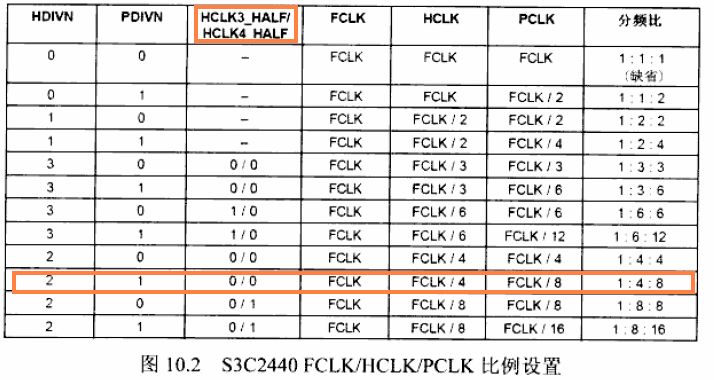
用于设置 FCLK HCLK PCLK三者的比例
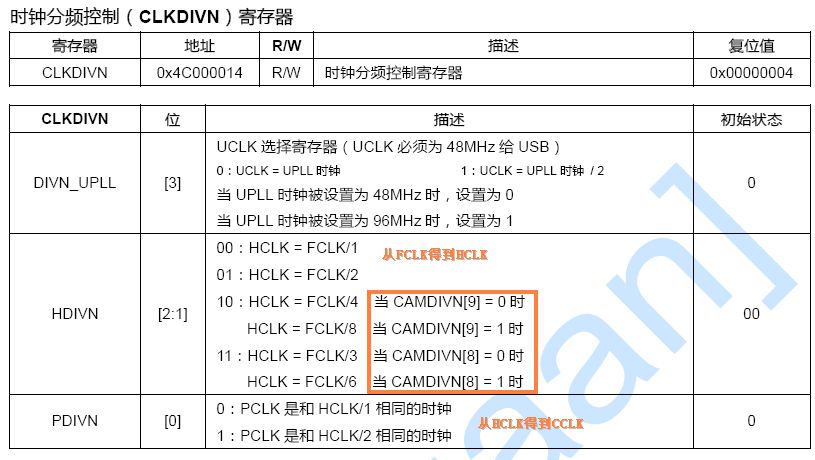
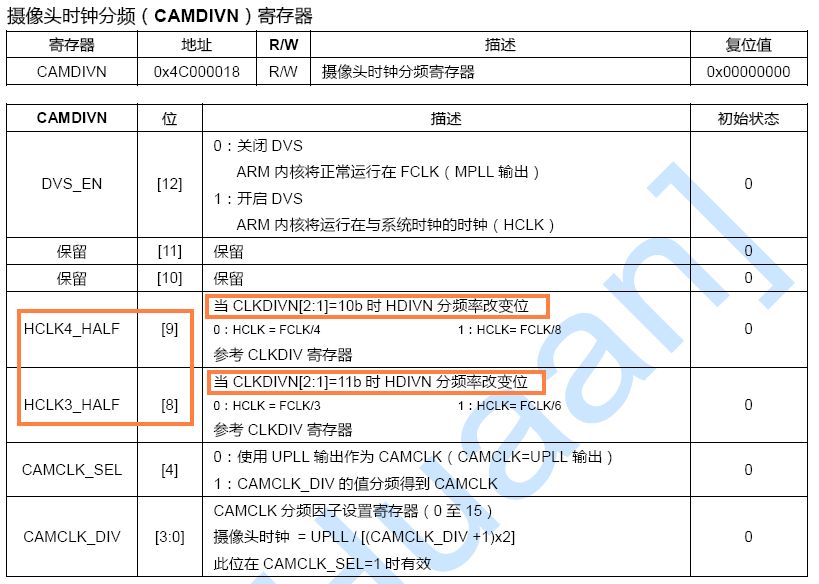
而CAMDIVN如下
比如
CAMDIVN[8]=0
CAMDIVN[9]=0
HDIVN=2,则HCLK=FCLK / 4
PDIVN=1,,则PCLK=HCLK / 2
有以下示例,摘自嵌入式linux开发完全手册
2011-12-18
2440的片内外设时钟使能控制
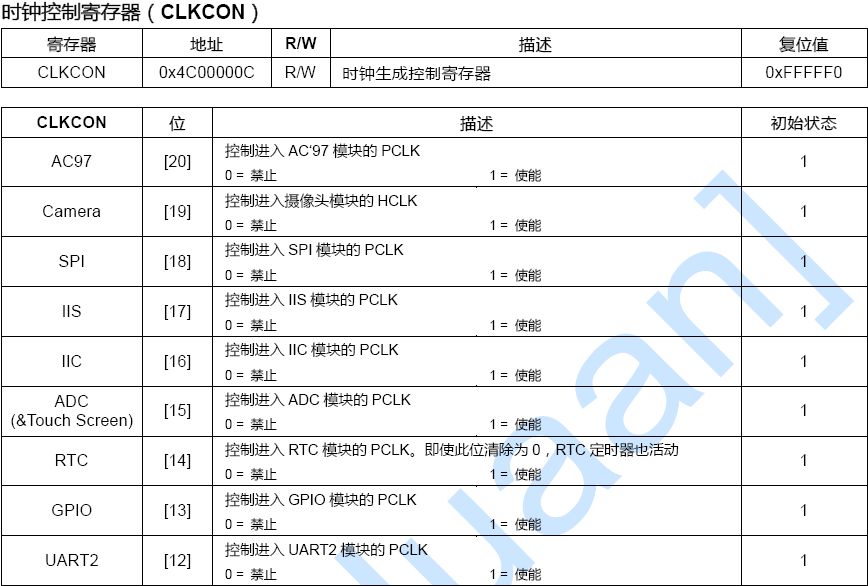
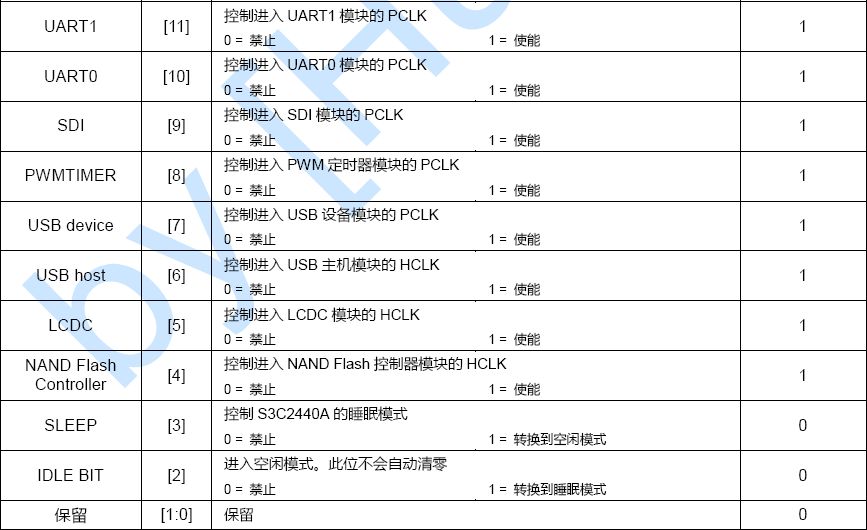
linux下将各个片内外设时钟统一管理,组成时钟队列。
arch/arm/plat-s3c24xx/s3c2410-clock.c
- static struct clk init_clocks_disable[] = {
- {
- .name = "nand",
- .id = -1,
- .parent = &clk_h,
- .enable = s3c2410_clkcon_enable,
- .ctrlbit = S3C2410_CLKCON_NAND,
- }, {
- .name = "sdi",
- .id = -1,
- .parent = &clk_p,
- .enable = s3c2410_clkcon_enable,
- .ctrlbit = S3C2410_CLKCON_SDI,
- }, {
- .name = "adc",
- .id = -1,
- .parent = &clk_p,
- .enable = s3c2410_clkcon_enable,
- .ctrlbit = S3C2410_CLKCON_ADC,
- }, {
- .name = "i2c",
- .id = -1,
- .parent = &clk_p,
- .enable = s3c2410_clkcon_enable,
- .ctrlbit = S3C2410_CLKCON_IIC,
- }, {
- .name = "iis",
- .id = -1,
- .parent = &clk_p,
- .enable = s3c2410_clkcon_enable,
- .ctrlbit = S3C2410_CLKCON_IIS,
- }, {
- .name = "spi",
- .id = -1,
- .parent = &clk_p,
- .enable = s3c2410_clkcon_enable,
- .ctrlbit = S3C2410_CLKCON_SPI,
- }
- };
- static struct clk init_clocks[] = {
- {
- .name = "lcd",
- .id = -1,
- .parent = &clk_h,
- .enable = s3c2410_clkcon_enable,
- .ctrlbit = S3C2410_CLKCON_LCDC,
- }, {
- .name = "gpio",
- .id = -1,
- .parent = &clk_p,
- .enable = s3c2410_clkcon_enable,
- .ctrlbit = S3C2410_CLKCON_GPIO,
- }, {
- .name = "usb-host",
- .id = -1,
- .parent = &clk_h,
- .enable = s3c2410_clkcon_enable,
- .ctrlbit = S3C2410_CLKCON_USBH,
- }, {
- .name = "usb-device",
- .id = -1,
- .parent = &clk_h,
- .enable = s3c2410_clkcon_enable,
- .ctrlbit = S3C2410_CLKCON_USBD,
- }, {
- .name = "timers",
- .id = -1,
- .parent = &clk_p,
- .enable = s3c2410_clkcon_enable,
- .ctrlbit = S3C2410_CLKCON_PWMT,
- }, {
- .name = "uart",
- .id = 0,
- .parent = &clk_p,
- .enable = s3c2410_clkcon_enable,
- .ctrlbit = S3C2410_CLKCON_UART0,
- }, {
- .name = "uart",
- .id = 1,
- .parent = &clk_p,
- .enable = s3c2410_clkcon_enable,
- .ctrlbit = S3C2410_CLKCON_UART1,
- }, {
- .name = "uart",
- .id = 2,
- .parent = &clk_p,
- .enable = s3c2410_clkcon_enable,
- .ctrlbit = S3C2410_CLKCON_UART2,
- }, {
- .name = "rtc",
- .id = -1,
- .parent = &clk_p,
- .enable = s3c2410_clkcon_enable,
- .ctrlbit = S3C2410_CLKCON_RTC,
- }, {
- .name = "watchdog",
- .id = -1,
- .parent = &clk_p,
- .ctrlbit = 0,
- }, {
- .name = "usb-bus-host",
- .id = -1,
- .parent = &clk_usb_bus,
- }, {
- .name = "usb-bus-gadget",
- .id = -1,
- .parent = &clk_usb_bus,
- },
- };
- //在需要操作各个外设的时钟时,就调用用内核提供的各个函数即可。如摘自mini2440_adc.c
- static struct clk *adc_clock;
- adc_clock = clk_get(NULL, "adc");//获取时钟
- if (!adc_clock) {
- printk(KERN_ERR "failed to get adc clock source\n");
- return -ENOENT;
- }
- clk_enable(adc_clock);//使能时钟
- //在不需要时,禁止掉
- if (adc_clock) {
- clk_disable(adc_clock);//禁止时钟
- clk_put(adc_clock);
- adc_clock = NULL;//源码下是一个空操作,可能是预留
- }
if (!adc_clock) {
printk(KERN_ERR "failed to get adc clock source\n");
return -ENOENT;
}
clk_use(adc_clock);
clk_enable(adc_clock);
上面的这段代码是touchscreen的驱动中的一段,我不清楚,所以去学学系统各个模块时钟的使用方式。
在系统的初始化的时候,看见过,但是忘了,在回顾一下。
那是在paging_init()中调用了 mdesc->map_io(),
void __init sbc2440_map_io(void)
{
s3c24xx_init_io(sbc2440_iodesc, ARRAY_SIZE(sbc2440_iodesc));
s3c24xx_init_clocks(12000000); //这个是系统各个部分始终初始化的起点
s3c24xx_init_uarts(sbc2440_uartcfgs, ARRAY_SIZE(sbc2440_uartcfgs));
s3c24xx_set_board(&sbc2440_board);
s3c_device_nand.dev.platform_data = &bit_nand_info;
}
跟 cpu_table 有关,拷贝过来
/* table of supported CPUs */
static const char name_s3c2410[] = "S3C2410";
static const char name_s3c2440[] = "S3C2440";
static const char name_s3c2410a[] = "S3C2410A";
static const char name_s3c2440a[] = "S3C2440A";
static struct cpu_table cpu_ids[] __initdata = {
{
.idcode = 0x32410000,
.idmask = 0xffffffff,
.map_io = s3c2410_map_io,
.init_clocks = s3c2410_init_clocks,
.init_uarts = s3c2410_init_uarts,
.init = s3c2410_init,
.name = name_s3c2410
},
{
.idcode = 0x32410002,
.idmask = 0xffffffff,
.map_io = s3c2410_map_io,
.init_clocks = s3c2410_init_clocks,
.init_uarts = s3c2410_init_uarts,
.init = s3c2410_init,
.name = name_s3c2410a
},
{
以上是关于linux 时钟源初步分析linux kernel 时钟框架详细介绍的主要内容,如果未能解决你的问题,请参考以下文章