EasyUI Datagrid的简单使用
Posted LinWenLi
tags:
篇首语:本文由小常识网(cha138.com)小编为大家整理,主要介绍了EasyUI Datagrid的简单使用相关的知识,希望对你有一定的参考价值。
此前同样写过EasyUI Datagrid的demo,好记性不如烂笔头,何况记性也不是那么好,赶紧记录一下。照搬上一篇EasyUI Tree的格式。
实现效果:获取数据库表的数据,在EasyUI Datagrid上展示出来并使用分页控件进行分页。
项目、框架、数据库:创建的是Maven项目,采用Spring+SpringMVC+Mybatis框架,数据库SQL Server 2005
1.创建数据库表
表结构:

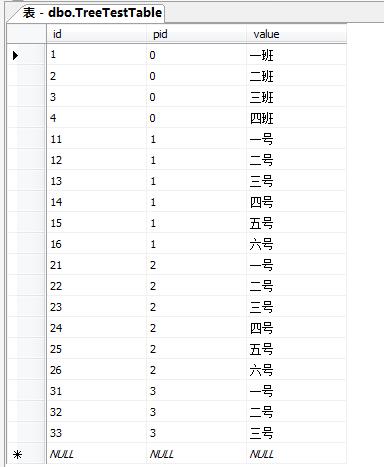
表数据:

2.通过mybatis逆向工程映射TreeTestTable(表名略丑)
TreeTestTable表的实体类代码:
package com.lwl.EasyUIDemo.bean;

public class TreeTestTable {
    private Integer id;

    private Integer pid;

    private String value;

    set/get方法...
}
3.编写DatagridBean类(由于实际使用中表结构不同,因此需要编写一个类用于将获取到的数据对象转为前端Datagrid能够读取并加载的数据格式):
package com.lwl.EasyUIDemo.pojo;

import java.util.List;


public class DatagridBean {

    private int page;        // 当前第几页
    private int total;        // 数据总条数
    private List<?> rows;    // 数据列表

    public DatagridBean(int page, long total, List<?> rows) {
        this.page = page;
        this.total = (int)total;
        this.rows = rows;
    }
    set/get方法...
}
4.编写Controller层代码:
package com.lwl.EasyUIDemo.controller;

import java.util.List;

import org.springframework.beans.factory.annotation.Autowired;
import org.springframework.stereotype.Controller;
import org.springframework.web.bind.annotation.RequestMapping;
import org.springframework.web.bind.annotation.RequestParam;
import org.springframework.web.bind.annotation.ResponseBody;

import com.alibaba.fastjson.JSON;
import com.github.pagehelper.PageHelper;
import com.github.pagehelper.PageInfo;
import com.lwl.EasyUIDemo.bean.TreeTestTable;
import com.lwl.EasyUIDemo.pojo.DatagridBean;import com.lwl.EasyUIDemo.service.TreeTestTableService;

@Controller
public class TestController {

    @Autowired
    private TreeTestTableService treeService;


    /**
     * DataGrid数据获取
     */
    @RequestMapping("/getDatagrid")
    @ResponseBody
    public JSON getList(int page,int rows){
        PageHelper.startPage(page, rows);
        List<TreeTestTable> list = treeService.getData();
        PageInfo<TreeTestTable> pageInfo = new PageInfo<>(list);
        DatagridBean datagridBean = new DatagridBean(page, pageInfo.getTotal(),list);
        return (JSON) JSON.toJSON(datagridBean);
    }

}
5.对照controller层方法所引用的service方法来创建service接口:
package com.lwl.EasyUIDemo.service;

import java.util.List;

import com.lwl.EasyUIDemo.bean.TreeTestTable;

public interface TreeTestTableService {

    /**
     * 获取表的全部数据
     * @return
     */
    List<TreeTestTable> getData();

}
Service实现类:
package com.lwl.EasyUIDemo.serviceImpl;

import java.util.List;

import org.springframework.beans.factory.annotation.Autowired;
import org.springframework.stereotype.Service;

import com.lwl.EasyUIDemo.bean.TreeTestTable;
import com.lwl.EasyUIDemo.bean.TreeTestTableExample;
import com.lwl.EasyUIDemo.dao.TreeTestTableMapper;
import com.lwl.EasyUIDemo.service.TreeTestTableService;
@Service
public class TreeTestTableServiceImpl implements TreeTestTableService {

    @Autowired
    private TreeTestTableMapper tableMapper;

    /**
     * 获取表的全部数据
     */
    public List<TreeTestTable> getData() {
        return tableMapper.selectByExample(null);
    }
}
6.编写jsp页面(关于EasyUI的使用格式等请自行查看EasyUI API文档):
<%@ page language="java" contentType="text/html; charset=utf-8"
    pageEncoding="utf-8"%>
<% pageContext.setAttribute("path", request.getContextPath()); %>
<!DOCTYPE>
<html>
<head>
<title>EasyUI实例</title>
<!-- 载入easyui样式及图标样式 -->
<link rel="stylesheet" type="text/css" href="${path }/easyui/themes/default/easyui.css">
<link rel="stylesheet" type="text/css" href="${path }/easyui/themes/icon.css">
<!-- 载入jquery支持文件(必须写在其他js文件前)、easyui支持文件、easyui中文支持文件 -->
<script type="text/javascript" src="${path }/easyui/jquery.min.js"></script>
<script type="text/javascript" src="${path }/easyui/jquery.easyui.min.js"></script>
<script type="text/javascript" src="${path }/easyui/locale/easyui-lang-zh_CN.js"></script>
</head>
<body>

<table id="dg"></table>

<script>
$(\'#dg\').datagrid({
    url:\'getDatagrid\',
    columns:[[
        {field:\'id\',title:\'节点\',width:100},
        {field:\'pid\',title:\'父节点\',width:100},
        {field:\'value\',title:\'内容\',width:100}
    ]],
    striped:true,    // 斑马线
    pagination:true,// 分页
});
</script>
</body>
</html>
运行看一下效果:

需要注意的重点是DatagridBean的编写与controller请求数据的接收,数据的返回。
以上仅仅是本人接触EasyUI Datagrid编写的简单例子,有任何理解或做法上的错误,欢迎批评指正!
以上是关于EasyUI Datagrid的简单使用的主要内容,如果未能解决你的问题,请参考以下文章