基于iView的列表组件封装
Posted lichking2017
tags:
篇首语:本文由小常识网(cha138.com)小编为大家整理,主要介绍了基于iView的列表组件封装相关的知识,希望对你有一定的参考价值。
封装的好处多多,代码便于维护、减少代码量、减少BUG
前台封装以前没有尝试过,这回试试,哈哈
目录
2、树组件封装
3、下拉框组件封装
4、上传组件封装
列表组件的API
| 属性 | 说明 | 类型 | 默认值 |
| url | 请求列表数据的地址 必填 | String | 无 |
| pagingOption | 列表底部是否显示分页信息及总数,有两个配置项 showPaging、showTotal | Object | 显示分页及总数信息 |
| cols | 列定义 必填 | Array | 无 |
| height | 列表高度 选填 | Number | 500 |
| checkBox | 是否显示复选框 选填 | Boolean | 显示 |
事件
onSelect:选择某一行时触发,返回值是当前行数据
slot
toolButtons:列表上方的工具按钮定义
列表组件的封装
1、dataTable.vue文件
<template>
    <div>
        <div class="buttonGroup">
            <slot name="toolButtons"></slot>
        </div>
        <Table :loading="loading" border :height=\'height\' stripe :columns="cols" :data="dataContent" @on-selection-change="onSelect"></Table>
        <Page ref="paging" v-if="pagingOption.showPaging" :total="total" style="margin-top:5px;float: right"
              :show-total="pagingOption.showTotal"
              @on-change="getData"></Page>
    </div>
</template>

<script>

    export default {
        data: function () {
            return {
                current: 1,
                pageSize: 10,
                dataContent: [],
                loading: false,
                total: 0,
                initPage: 1
            }
        },
        props: {
            height:{
              type:Number,
              default:500
            },
            url: {
                type: String,
                require: true
            },
            pagingOption: {
                type: Object,
                default: function () {
                    return {
                        showPaging: true,
                        showTotal: true
                    }
                }
            },
            cols: {},
            checkBox:{
                type:Boolean,
                default:true
            }
        },
        methods: {
            refresh() {
                this.getData(1)
            },

            getData(pageNum) {
                this.loading = true
                this.$http.get(this.url, this.getPagingInfo(pageNum)).then(res => {
                    this.dataContent = res.result.data
                    this.total = res.result.total
                    this.loading = false
                })
            },
            getPagingInfo(page) {
                const param = {
                    current: page,
                    pageSize: this.pageSize
                }
                return param
            },
            onSelect(selection){
                this.$emit(\'onSelect\',{
                    selection:selection
                })
            }
        },
        mounted() {
            this.getData(this.initPage)
        },
        created(){
            if(this.checkBox){
                this.cols.unshift({
                    type: \'selection\',
                    width: 60,
                    align: \'center\'
                })
            }
        }
    }
</script>

<style lang="less" scoped>
    .margin(@border_width:10px) {
        margin-bottom: @border_width;
    }

    .buttonGroup {
        text-align: right;
        .margin(5px)
    }
</style>
2、dataTable.js
import dataTable from \'./dataTable.vue\'

const _dataTable = {
    install:function(Vue){
        Vue.component(\'WtDataTable\',dataTable)
    }
}

export default _dataTable
3、添加组件到Vue中
import WtDataTable from \'./components/table/dataTable.js\'
Vue.use(WtDataTable)
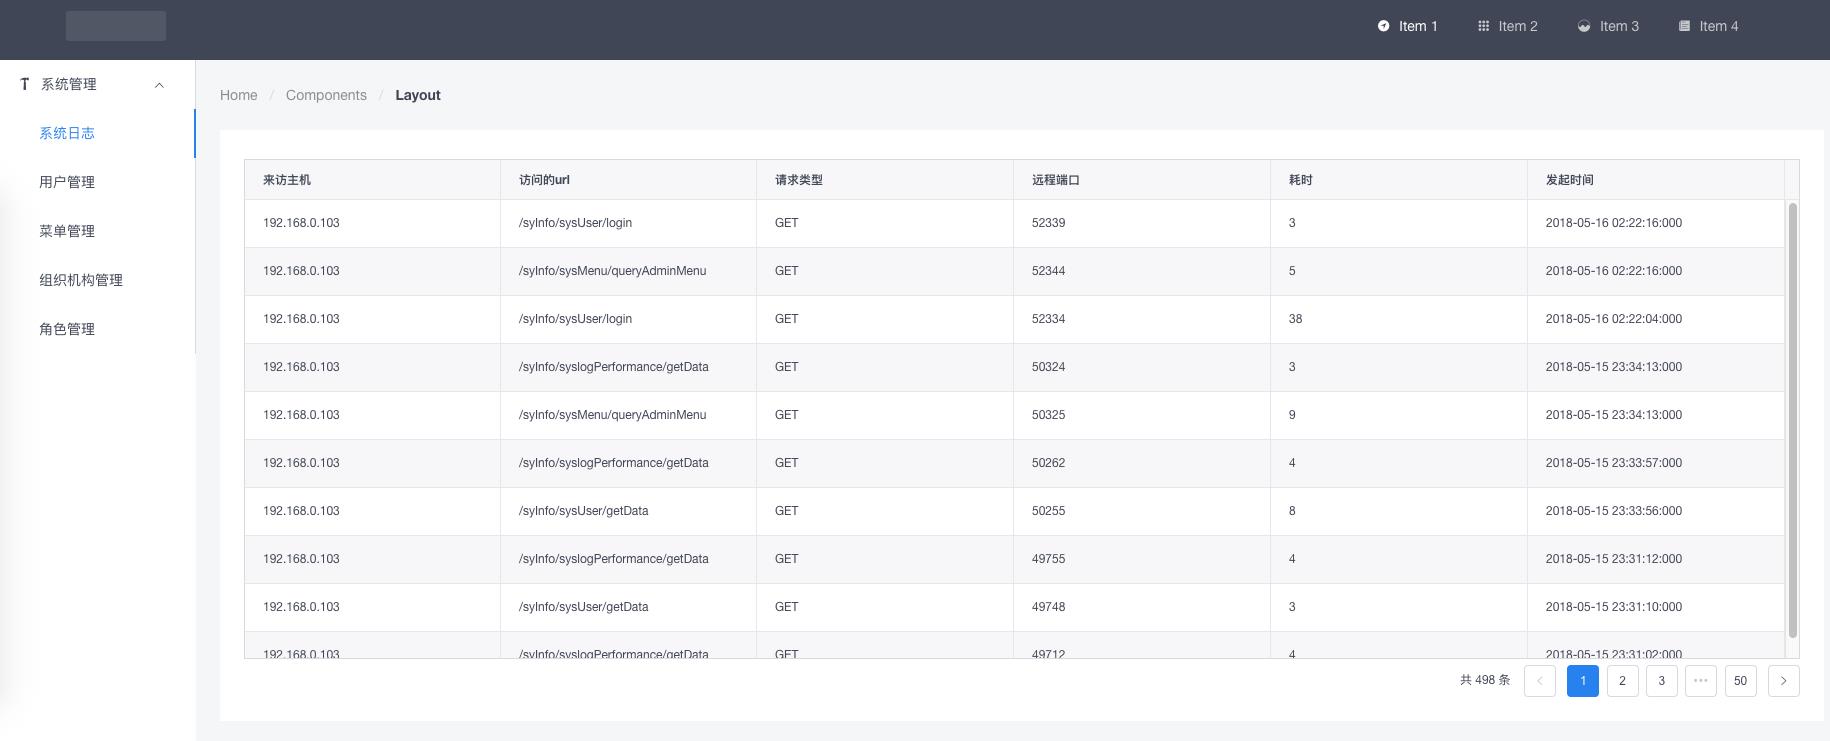
列表组件的应用(简单)
以系统日志模块举例
syslogPerformance.vue
<template>
    <WtDataTable :url="url" :checkBox="checkBox" :cols="cols">
    </WtDataTable>
</template>

<script>
    export default {
        data:function(){
            return {
                url:\'syslogPerformance/getData\',
                checkBox:false,
                cols:[
                    {
                        title: \'来访主机\',
                        key: \'remoteHost\'
                    },
                    {
                        title: \'访问的url\',
                        key: \'requestURI\'
                    },
                    {
                        title: \'请求类型\',
                        key: \'requestType\'
                    },
                    {
                        title: \'远程端口\',
                        key: \'remotePort\'
                    },
                    {
                        title: \'耗时\',
                        key: \'timeConsuming\'
                    },
                    {
                        title: \'发起时间\',
                        key: \'createDateTime\'
                    }
                ]
            }
        }
    }
</script>

<style scoped>

</style>
效果

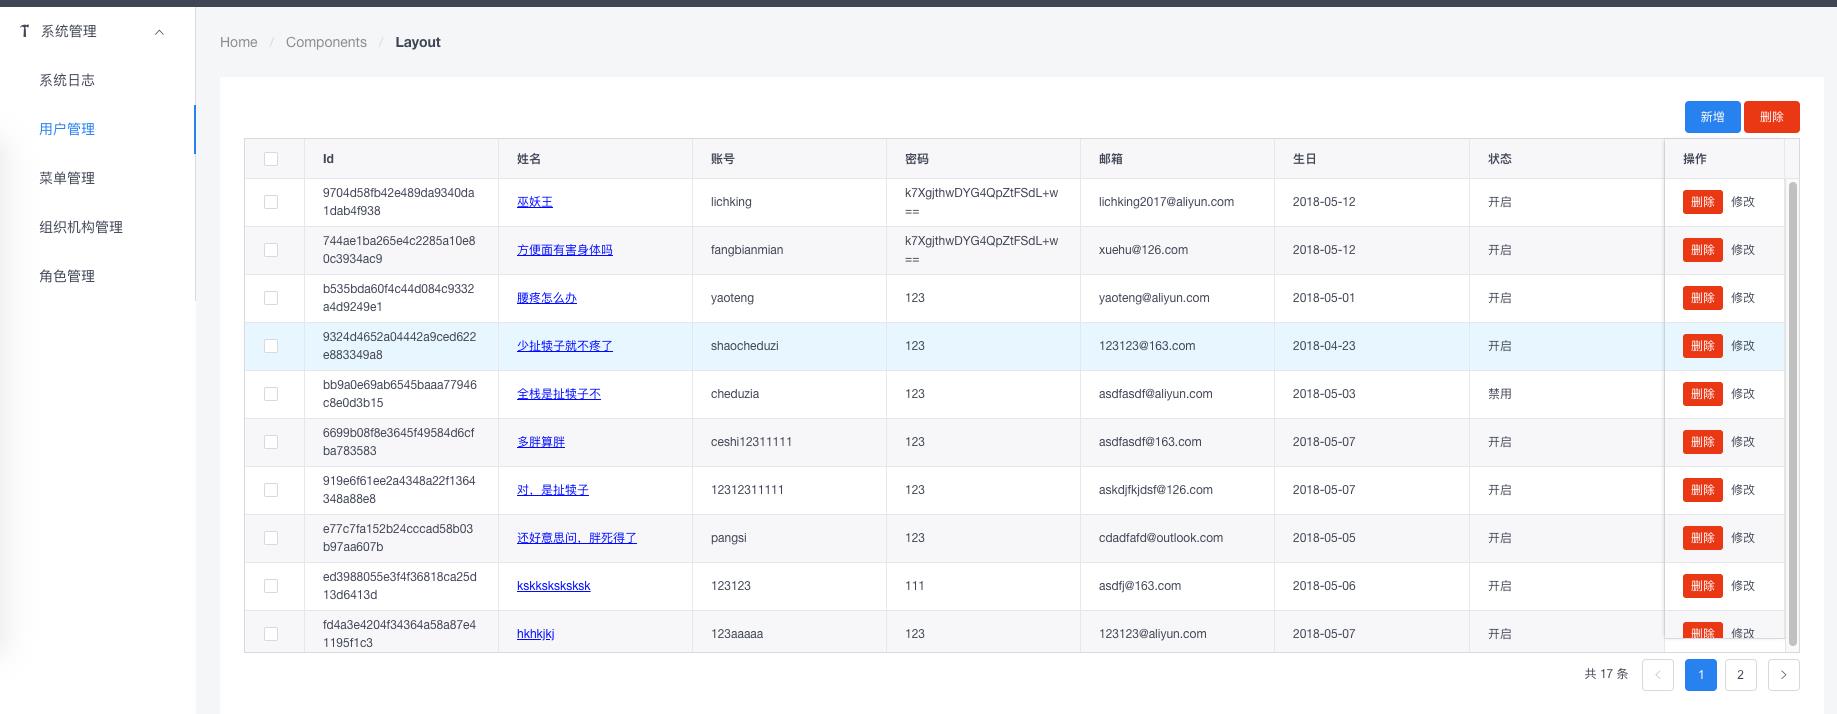
列表组件应用(复杂)
<template lang="html">
    <div>
        <WtDataTable ref="userList" :url="url"
                     :pagingOption="pagingOption" :cols="columns" @onSelect="onSelect">
            <div slot="toolButtons">
                <Button type="primary" @click="add">新增</Button>
                <Button type="error" @click="batchDelete">删除</Button>
            </div>
        </WtDataTable>
    </div>
</template>

<script>
    export default {
        data() {
return {
                url: \'/sysUser/getData\',

                pagingOption: {
                    showPaging: true,
                    showTotal: true
                },
                columns: [
                    {
                        title: \'Id\',
                        key: \'userId\',
                        display: \'none\'
                    },
                    {
                        title: \'姓名\',
                        key: \'userName\',
                        render: (h, params) => {
                            return h(\'a\', {
                                style: {
                                    color: \'blue\',
                                    \'text-decoration\': \'underline\'
                                },
                                on: {
                                    click: () => {
                                        this.$Modal.info({
                                            title: \'User Info\',
                                            content: \'neirong\'
                                        })
                                    }
                                }
                            }, params.row.userName)
                        }
                    },
                    {
                        title: \'账号\',
                        key: \'account\'
                    },
                    {
                        title: \'密码\',
                        key: \'password\'
                    },
                    {
                        title: \'邮箱\',
                        key: \'mail\'
                    },
                    {
                        title: \'生日\',
                        key: \'birthday\'
                    },
                    {
                        title: \'状态\',
                        key: \'inUse\',
                        render: (h, params) => {
                            let text = params.row.inUse ? \'开启\' : \'禁用\'
                            return h(\'span\', text)
                        }
                    },
                    {
                        title: \'操作\',
                        key: \'action\',
                        fixed: \'right\',
                        width: 120,
                        render: (h, params) => {
                            return h(\'div\', [
                                h(\'Button\', {
                                    props: {
                                        type: \'error\',
                                        size: \'small\'
                                    },
                                    on: {
                                        click: () => {
                                            // this.remove(params)
                                            const _this = this
                                            WT.modal.confirm({
                                                content: \'确认删除?\',
                                                onOk: function () {
                                                    _this.deleteUser(params)
                                                }
                                            })
                                        }
                                    }
                                }, \'删除\'),
                                h(\'Button\', {
                                    props: {
                                        type: \'text\',
                                        size: \'small\'
                                    },
                                    on: {
                                        click: () => {
                                            this.edit(params)
                                        }
                                    }
                                }, \'修改\')
                            ]);
                        }
                    }
                ],

                defaultAvatars:[],
                ruleValidate: {
                    userName: [{
                        required: true,
                        message: \'用户姓名不能为空\',
                        trigger: \'blur\'
                    }],
                    account: [{
                        required: true,
                        message: \'账号不能为空\',
                        trigger: \'blur\'
                    }],
                    password: [{
                        trigger: \'blur\',
                        validator: validatePass
                    }],
                    passwordConfirm: [{
                        trigger: \'blur\',
                        validator: validatePassCheck
                    }],
                    mail: [
                        {required: true, message: \'邮箱必填\', trigger: \'blur\'},
                        {type: \'email\', message: \'邮箱地址有误\', trigger: \'blur\'}
                    ]
                },
                userInfo: {
                    userId: null,
                    userName: \'\',
                    mail: \'\',
                    password: \'\',
                    account: \'\',
                    passwordConfirm: \'\',
                    inUse: true,
                    birthday: \'\',
                    avatars: []
                },
                selectedItem: [],
                mailSuffixs: []
            }
        },
        methods: {

            //列表方法
            add() {
                this.showUserAddModal()
            },
            batchDelete() {
                if (this.selectedItem) {
                    const userIds = new Array()
                    this.selectedItem.forEach((k, v) => {
                        userIds.push(k.userId)
                    })
                    this.$http.delete(\'/sysUser/deleteBatch\', userIds).then(res => {
                        WT.toast.success("删除成功")
                        this.reloadDataGrid()
                    })
                }
            }
        }
    }
</script>

<style lang="css">
    .ivu-form-item-content {
        text-align: left;
    }
</style>
效果
我的博客即将搬运同步至腾讯云+社区,邀请大家一同入驻:https://cloud.tencent.com/developer/support-plan?invite_code=ewx3bubweekk
以上是关于基于iView的列表组件封装的主要内容,如果未能解决你的问题,请参考以下文章
