Mybatis学习小记
Posted just_young
tags:
篇首语:本文由小常识网(cha138.com)小编为大家整理,主要介绍了Mybatis学习小记相关的知识,希望对你有一定的参考价值。
Mybatis学习小结
最近在学习Java的一些框架,Spring,Mybatis这些,总有点浮于表面的感觉,这里先记录一下使用的小知识。
1.初级尝试
这部分记录一下我第一次用Mybatis以及Spring做的小代码,比较简单,主要涉及环境的配置以及简单的使用,后续部分会有其他更深入的使用总结。
1.1 准备工作
这里准备一些基本的jar包,我是用maven管理的。用到的jar包如下。这里要特别注意mybatis-spring的版本和mybatis的版本需要匹配,否则会出现很多其他问题了。这里我使用了mybatis的3.1.0版本,mybatis-spring使用的是1.1.1的版本,mysql-connector使用的是5.1.6的版本。
<dependency>
        <groupId>org.mybatis</groupId>
        <artifactId>mybatis</artifactId>
        <version>3.1.0</version>
</dependency>

<dependency>
        <groupId>org.mybatis</groupId>
        <artifactId>mybatis-spring</artifactId>
        <version>1.1.1</version>
</dependency>

<dependency>
        <groupId>mysql</groupId>
        <artifactId>mysql-connector-java</artifactId>
        <version>5.1.6</version>
</dependency>
Tips
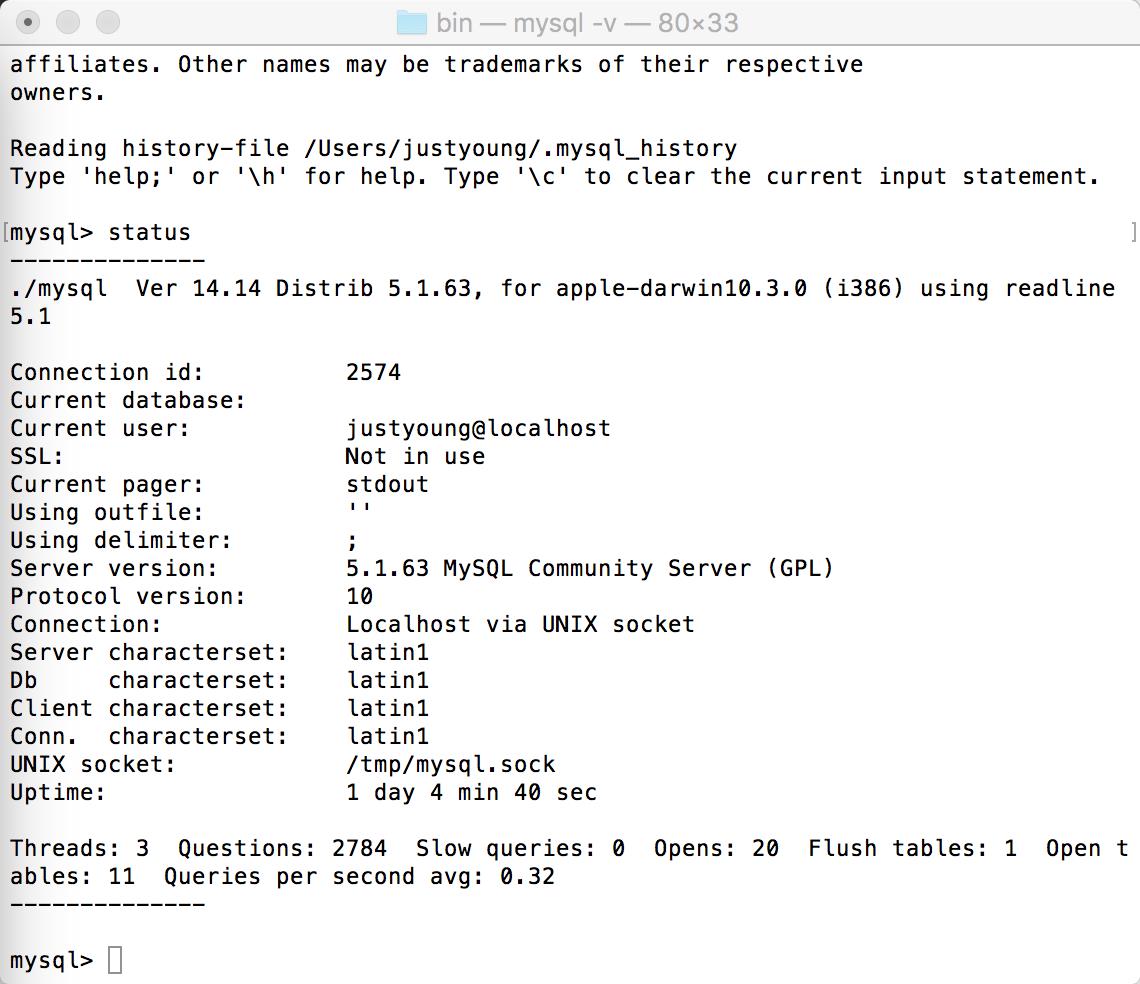
这里做一个小提示,连接mysql的connector的版本需要和数据库的版本匹配,否则在项目启动的时候会出现一系列莫名其妙的错误。
查看mysql版本的方式:
在os x系统中,mysql的安装位置是在/usr/local/mysql下,因此可以进入该目录的bin文件夹下,执行mysql脚本文件,来查看mysql的版本。执行status命令,便可看到我的mysql版本是5.1.63,因此我就选择了5.1.6这个connector。
1.2 Mybatis 基本配置
这里使用了spring-mybatis框架,因此注入SqlSessionFactory方法比直接使用mybatis要简洁一点。这里需要使用SqlSessionFactoryBean来让spring管理。SqlSessionFactoryBean需要注入datasource。datasource这个bean向下面这样写:
<bean id="dataSource" class="org.springframework.jdbc.datasource.DriverManagerDataSource">
    <property name="driverClassName" value="com.mysql.jdbc.Driver"/>
    <property name="url" value="jdbc:mysql://127.0.0.1:3306/m_storage"/>
    <property name="username" value="root"/>
    <property name="password" value="123456"/>
</bean>
写完datasource就可以写SqlSessionFactoryBean这个bean了,如下所示,这里的dataSource就是上面声明的那个bean。这里的mybatis-mapper.xml是配置mybatis映射等内容的配置文件,之后再介绍。
<bean id="sqlSessionFactory" class="org.mybatis.spring.SqlSessionFactoryBean">
    <property name="dataSource" ref="dataSource" />
    <property name="mapperLocations" value="/WEB-INF/mybatis-mapper.xml" />
</bean>
以上的两个bean我定义在data-source.xml,并放在WEB-INF文件夹下。在web.xml中我们添加一个Listener,即ContextLoaderListener,它能够加载其它配置文件到Spring上下文中。然后再配置一个context-param元素,指定还需要spring加载的文件,使得spring上下文能加载这个文件中定义的bean。
<listener>
    <listener-class>org.springframework.web.context.ContextLoaderListener</listener-class>
</listener>
<context-param>
    <param-name>contextConfigLocation</param-name>
    <param-value>
        /WEB-INF/data-source.xml
    </param-value>
</context-param>
下面来写mybatis-mapper.xml文件,这个文件可以用来配置我们需要使用的SQL语句。它的定义如下所示,namespace这个命名空间可以用来索引这些sql代码。
<!DOCTYPE mapper
    PUBLIC "-//mybatis.org//DTD Mapper 3.0//EN"
    "http://mybatis.org/dtd/mybatis-3-mapper.dtd">
<mapper namespace="org.justyoung.Mapper">
    <select id="selectFile" parameterType="int" resultType="hashmap">
        SELECT
        * FROM FILES WHERE ID = #{id}
    </select>
</mapper>
1.3 Java代码
先定义几个Bean,这里我采用注解的方式来生成Bean,这些Bean包括了SqlSessionFactory,以及SqlSessionFactoryBean。
- SqlSessionFactoryBean
这里的SqlSessionFactoryBean我定义在了data-source.xml文件中,因此可以直接通过autowire注解进行注入。 - SqlSessionFactory
通过定义一个set方法,用来注入SqlSessionFactory。这样就可以直接通过SqlSessionFactory来生成SqlSession。因为默认情况下Spring生成bean对象的方式是单例,因此在需要使用SqlSessionFactory的地方直接利用autowire注入SqlSessionFactory是一个很好的方式。
package org.justyoung.config;

import org.springframework.beans.factory.annotation.Autowired;
import org.springframework.context.annotation.Bean;
import org.springframework.context.annotation.Configuration;
import org.springframework.context.annotation.EnableAspectJAutoProxy;
import org.apache.ibatis.session.SqlSessionFactory;
import org.mybatis.spring.SqlSessionFactoryBean;

@Configuration
@EnableAspectJAutoProxy
public class AppConfig {

    @Autowired
    SqlSessionFactory sqlSessionFactory;

    @Autowired
    SqlSessionFactoryBean sqlSessionFactoryBean;

    @Bean
    public SqlSessionFactory setSqlSessionFactory() throws Exception {
        return sqlSessionFactoryBean.getObject();
    }
}
再编写使用mybatis的Java代码,这里我写在Controller中的一个方法里,如下所示。这里我在mybatis-mapper.xml中定义了一个select标签,它的resultType是一个hashmap,因此,我们可以通过一个HashMap来获得查询的所有内容。
    @Autowired
    SqlSessionFactory sqlSessionFactory;

    @RequestMapping("/testdatabase")
    @ResponseBody
    public String getTable(@RequestParam String fileid) {
        SqlSession sqlSession = null;
        try {
            sqlSession = sqlSessionFactory.openSession();
            HashMap<Object, Object> map = sqlSession.selectOne("org.justyoung.Mapper.selectFile", 5);
            StringBuilder sb = new StringBuilder();
            for (Map.Entry<Object, Object> item : map.entrySet()) {
                sb.append(item.getKey());
                sb.append(" ");
                sb.append(item.getValue());
                sb.append("\\n");
            }
            return sb.toString();
        } finally {
            if (sqlSession != null)
                sqlSession.close();
        }
    }
好了,现在可以测试一下代码了,在浏览器中访问刚才写的方法,得到如下结果,从结果中,可以看出HashMap的每一项key对应于数据库表的列名,value代表了列的值。因此我们通过HashMap就能访问表的所有列了,十分方便。

到此,关于Mybatis的配置以及初级使用就总结完了,下面的章节将总结关于Mysql使用的更深入的部分。
2. Mybatis使用总结
在这一部分,我根据Mybatis官方文档的内容,对mybatis进行试验操作,并记录操作的方法和结果。
2.1 使用POJO对象
前面的查询,我使用的是HashMap对象来持有查询的结果,但是Mybatis框架是支持将查询结果根据我们的配置注入到一个对象中的。接下来我就尝试一下这种做法。
首先定义一个Java对象,用这个对象来保存刚才FILES表的一行数据。这个对象是根据我们的File表定义的,全部都是String成员。
package org.justyoung.dao;

public class Files {
    String id;
    String fileName;
    String sha1;
    String chunks;
    String createTime;

    public String getId() {
        return id;
    }

    public String getFileName() {
        return fileName;
    }

    public String getSha1() {
        return sha1;
    }

    public String getChunks() {
        return chunks;
    }

    public String getCreateTime() {
        return createTime;
    }

    public String toString() {
        return this.id + " " + this.fileName + " " + this.sha1 + " " + this.chunks + " " + this.createTime;
    }
}
接着,修改mybatis-mapper.xml中的内容,如下所示。这里我们把select标签中的resultType属性删除,替换为resultMap属性。然后再声明一个resultMap标签,在标签中定义数据库表的内容和对象属性的对应关系。resultMap中的id属性用于唯一索引这个resultMap,type属性指明它要映射的对象类型。resultMap标签下有几个子节点,这几个子节点包含两种类型,分别是id标签和result标签。
- id: 根据mybatis官方文档的信息,给resultMap声明id可以提高整体效能,因此可以把列表的主键列声明为id。
- result: 此标签可以提供数据库表列和对象属性的对应信息。
上面两个子标签的用法相似,它们的property属性指代对象的属性名,column属性指示数据库表的列名。这两者之间的唯一不同是 id 表示的结果将是当比较对象实例时用到的标识属性。这帮助来改进整体表现,特别是缓存和嵌入结果映射(也就是联合映射) 。
<!DOCTYPE mapper
    PUBLIC "-//mybatis.org//DTD Mapper 3.0//EN"
    "http://mybatis.org/dtd/mybatis-3-mapper.dtd">
<mapper namespace="org.justyoung.Mapper">
    <select id="selectFile" parameterType="int" resultMap="FilePojo">
        SELECT
        *
        FROM FILES WHERE ID = #{id}
    </select>

    <resultMap id="FilePojo" type="org.justyoung.dao.Files">
        <id property="id" column="ID" />
        <result property="fileName" column="FILE_NAME" />
        <result property="sha1" column="SHA1" />
        <result property="chunks" column="CHUNKS" />
        <result property="createTime" column="CHUNKS" />
    </resultMap>
</mapper>
再来编写读取数据库操作的Java代码,如下所示。sqlSession的select方法是一个泛型方法,因此可以返回我们指定的类型,这里就返回的是我们自己定义的Files对象。
@RequestMapping("/testdatabasepojo")
    @ResponseBody
    public String getTablePojo(@RequestParam String fileid) {
        SqlSession sqlSession = null;
        try {
            sqlSession = sqlSessionFactory.openSession();
            Files f = sqlSession.selectOne("org.justyoung.Mapper.selectFile", 5);
            return f.toString();
        } finally {
            if (sqlSession != null)
                sqlSession.close();
        }
    }
上面代码运行后的执行结果如下,我们顺利地从数据表中将存储的数据取出了。从这个过程可以看出使用对象映射数据库表的内容是十分方便的。

2.2 关联查询
2.2.1 一对多
先来讨论一对多的情形,我们的例子中,一个文件由多个文件块组成,因此我们给Files类添加一个Fragment类型的ArrayList,用来保存多个对象。这个Fragment类型的声明如下所示。
public class Fragmentations {
    String id;
    String fragmentationName;
    String belongsID;
    String orders;
    String location;
    String updateTime;

    @Override
    public String toString() {
        return this.id + " " + this.fragmentationName + " " + this.belongsID + " " + this.orders + " " + this.location
                + " " + this.updateTime;
    }
}
然后,再前面声明的Files类型中添加ArrayList属性,如下所示。
public class Files {
    String id;
    String fileName;
    String sha1;
    String chunks;
    String createTime;
    ArrayList<Fragmentations> fList;
    public String toString() {
        StringBuilder sb = new StringBuilder(id);
        sb.append("\\n");
        sb.append(fileName);
        sb.append("\\n");
        sb.append(sha1);
        sb.append("\\n");
        sb.append(createTime);
        sb.append("\\n");
        for (Fragmentations f : fList) {
            sb.append(f);
            sb.append("\\n");
        }
        return sb.toString();
    }
}
接下来要配置mybatis-mapper.xml文件,添加如下所示的内容。
- 我往xml文件中添加了id为selectFragmentation的select标签,在这个标签中,写了关联查询的sql语句,即查询所有文件和它们对应的几个文件块的信息,这个标签的返回结果绑定着resultMap,它的id是FileWithCollection。
- 在id为FileWithCollection的resultMap中,有一个collection子标签,它可以映射一个集合,集合中存储着多个我们指定的类型,从而做到一对多关联查询的存储。collection标签的property属性指定了映射到Java对象的属性名称,ofType指定了集合中存储元素的类型,这里就指定了我们刚才声明的Fragmentation类型,resultMap属性指定了Fragmentation对象中的属性和数据库表列的对应关系,和前面提到的resultMap是一样的,这里我们指定了id为fragmentation的resultMap,columnPrefix属性指定了我们将在fragmentation中的每一列前添加上一个前缀来作为数据库表的列名进行映射,从而使fragmentation这一resultMap能被复用,即不用修改这一resultMap中result或id子标签的column属性就能被不同的查询引用。
- id为fragmentation的resultMap和前面所说的resultMap声明是一样的,就不再赘述了。
    <select id="selectFragmentation" resultMap="FileWithCollection">
        SELECT fi.id as fid,
        fi.FILE_NAME as filename, fi.SHA1 as fsha1, fi.CREATE_TIME as
        create_time,
        f.BELONGS_ID as frag_BELONGS_ID, f.FRAGMENTATION_NAME as
        frag_FRAGMENTATION_NAME, f.ID as frag_ID,
        f.LOCATION as frag_LOCATION,
        f.UPDATE_TIME as
        frag_UPDATE_TIME
        FROM fragmentations as f, files as fi
        where f.BELONGS_ID
        = fi.id;
    </select>

    <resultMap id="FileWithCollection" type="org.justyoung.dao.Files">
        <id property="id" column="fid" />
        <result property="fileName" column="filename" />
        <result property="sha1" column="fsha1" />
        <result property="createTime" column="create_time" />
        <collection property="fList" ofType="org.justyoung.dao.Fragmentations"
            resultMap="fragmentation" columnPrefix="frag_" />
    </resultMap>

    <resultMap id="fragmentation" type="org.justyoung.dao.Fragmentations">
        <id property="id" column="ID" />
        <result property="belongsID" column="BELONGS_ID" />
        <result property="fragmentationName" column="FRAGMENTATION_NAME" />
        <result property="location" column="LOCATION" />
        <result property="updateTime" column="UPDATE_TIME" />
    </resultMap>
在写一点操作Mybatis的代码,非常简单,如下所示。
@RequestMapping("/testdatabaseList")
    @ResponseBody
    public String getTableWithList() {
        SqlSession sqlSession = null;
        try {
            sqlSession = sqlSessionFactory.openSession();
            Files f = sqlSession.selectOne("org.justyoung.Mapper.selectFragmentation");
            return f.toString();
        } finally {
            if (sqlSession != null)
                sqlSession.close();
        }
    }
运行效果如下图所示,那个null是由于我们没有从数据库中检索相关的属性,也没有在resultMap中声明这一属性,因此它就是null。

2.2.2 一对一查询
一对多查询可以使用collection,一对一查询可以使用association。这里总结一下使用association的方法。这里我直接将数据库的内容修改为一个文件对应一个文件块,即一行Files对应一行Fragmentation。
先修改Files类型的定义,删除List属性,直接添加Fragmentation属性,如下所示:
Fragmentations fList;
public String toString() {
        StringBuilder sb = new StringBuilder(id);
        sb.append("\\n");
        sb.append(fileName);
        sb.append("\\n");
        sb.append(sha1);
        sb.append("\\n");
        sb.append(createTime);
        sb.append("\\n");
        sb.append(fList.toString());
        return sb.toString();
    }
然后再修改mapper-mybatis.xml文件,如下所示。在这个文件中对select标签进行修改,使关联的resultMap指向FileWithAssociation。在FileWithAssociation中使用association子标签,在这个子标签里可以关联一个其他的resultMap用来映射Fragmentation对象,这里我们就指定fragmentation作为id的resultMap标签。
<select id="selectFragmentation" resultMap="FileWithAssociation">
        SELECT fi.id as fid,
        fi.FILE_NAME as filename, fi.SHA1 as fsha1, fi.CREATE_TIME as
        create_time,
        f.BELONGS_ID as frag_BELONGS_ID, f.FRAGMENTATION_NAME as
        frag_FRAGMENTATION_NAME, f.ID as frag_ID,
        f.LOCATION as frag_LOCATION,
        f.UPDATE_TIME as
        frag_UPDATE_TIME,
        f.ORDERS as frag_ORDERS
        FROM
        fragmentations as f, files as fi
        where f.BELONGS_ID
        = fi.id;
    </select>

    <resultMap id="FileWithAssociation" type="org.justyoung.dao.Files">
        <id property="id" column="fid" />
        <result property="fileName" column="filename" />
        <result property="sha1" column="fsha1" />
        <result property="createTime" column="create_time" />
        <association property="fragmentation" javaType="org.justyoung.dao.Fragmentations"
            resultMap="fragmentation" columnPrefix="frag_" />
    </resultMap>

    <resultMap id="fragmentation" type="org.justyoung.dao.Fragmentations">
        <id property="id" column="ID" />
        <result property="belongsID" column="BELONGS_ID" />
        <result property="fragmentationName" column="FRAGMENTATION_NAME" />
        <result property="location" column="LOCATION" />
        <result property="updateTime" column="UPDATE_TIME" />
    </resultMap>
调用Mybatis的代码不需要修改,直接进行引用,然后得到如下图所示的结果。从下图结果看,我们成功映射了Fragmentation了。

总结
今天就先总结到这里,还有很多如动态SQL,缓存,鉴别器discriminator等内容没有总结,等以后用到了再进行梳理吧。
以上是关于Mybatis学习小记的主要内容,如果未能解决你的问题,请参考以下文章
