简单的图形学——光源
Posted 千里之行,始于足下。
tags:
篇首语:本文由小常识网(cha138.com)小编为大家整理,主要介绍了简单的图形学——光源相关的知识,希望对你有一定的参考价值。
参考自:用JavaScript玩转计算机图形学(二)基本光源 - Milo Yip - 博客园,主要讲述三种最基本的光源——平行光、点光源、聚光灯,其实就是三种数学模型。
代码的调整
先前的代码中,颜色是由几何物体自身计算得出,因此使用很有限。在Phong材质中,显示的效果已经很不错了,然而Phong材质是要假定有一个光源的。我们的代码需要从以面向物体渲染为面向光源渲染。
新的逻辑:https://github.com/bajdcc/GameFramework/blob/master/CCGameFramework/base/pe2d/Render2DLight.cpp
主逻辑 代码:
void PhysicsEngine::RenderLightIntern(World& world, const PerspectiveCamera& camera, BYTE* buffer, cint width, cint height)
{
    for (auto y = 0; y < height; y++)
    {
        const auto sy = 1.0f - (1.0f * y / height);

        for (auto x = 0; x < width; x++)
        {
            const auto sx = 1.0f * x / width;

            // sx和sy将屏幕投影到[0,1]区间

            // 产生光线
            const auto ray = camera.GenerateRay(sx, sy);

            // 测试光线与球是否相交
            auto result = world.Intersect(ray);
            if (result.body)
            {
                color color;
                for (auto & k : world.lights) { // 这里不一样了
                    auto lightSample = k->Sample(world, result.position);

                    if (!lightSample.empty()) {
                        auto NdotL = DotProduct(result.normal, lightSample.L); // 计算角度

                        // 夹角为锐角,光源在平面前面
                        if (NdotL >= 0)
                            // 累计所有光线
                            // NdotL 就是光源方向在法向量上的投影
                            color = color + (lightSample.EL * NdotL);
                    }
                }
                buffer[0] = BYTE(color.b * 255);
                buffer[1] = BYTE(color.g * 255);
                buffer[2] = BYTE(color.r * 255);
                buffer[3] = 255;
            }
            else
            {
                // 没有接触,就是背景色
                buffer[0] = 0;
                buffer[1] = 0;
                buffer[2] = 0;
                buffer[3] = 255;
            }

            buffer += 4;
        }
    }
}
简单来说,就是求出交点时,做:
- 计算各大光源基于该点的光线颜色和光线方向
- 计算光线在交点法向量上的投影,作为颜色混合比的依据
- 将所有颜色累计起来
下面介绍三种光源
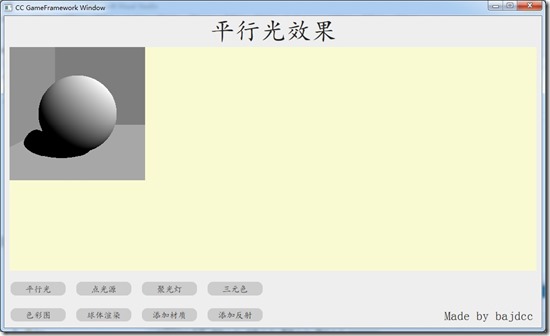
平行光
 平行光
平行光平行光的属性:
// 平行光
class DirectionalLight : public Light
{
public:
    DirectionalLight(color irradiance, vector3 direction);

    LightSample Sample(World& world, vector3 position) override;

    color irradiance;    // 幅照度
    vector3 direction;   // 光照方向
    vector3 L;           // 光源方向
};

DirectionalLight::DirectionalLight(color irradiance, vector3 direction)
    : irradiance(irradiance), direction(direction)
{
    L = -Normalize(direction);
}

LightSample DirectionalLight::Sample(World& world, vector3 position)
{
    static LightSample zero;

    if (shadow) {
        const Ray shadowRay(position, L);
        const auto shadowResult = world.Intersect(shadowRay);
        if (shadowResult.body)
            return zero;
    }

    return LightSample(L, irradiance); // 就返回光源颜色
}
这里注意L是光源方向单位向量。
平行光我们只需要知道光源方向和光源颜色就可以了。非常简单,不用算投影,这是主逻辑的工作。
这里说一下阴影,平行光有阴影,当从交点向光源方向看时,如果中间有障碍物,就返回黑色。
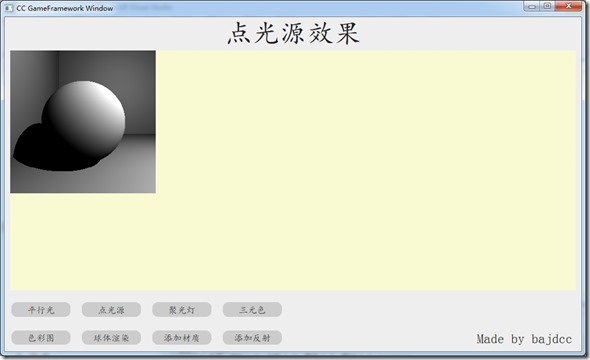
点光源
 点光源
点光源// 点光源 class PointLight : public Light { public: PointLight(color intensity, vector3 position); LightSample Sample(World& world, vector3 position) override; color intensity; // 幅射强度 vector3 position; // 光源位置 }; static LightSample zero; LightSample PointLight::Sample(World& world, vector3 pos) { // 计算L,但保留r和r^2,供之后使用 const auto delta = position - pos; // 距离向量 const auto rr = SquareMagnitude(delta); const auto r = sqrtf(rr); // 算出光源到pos的距离 const auto L = delta / r; // 距离单位向量 if (shadow) { const Ray shadowRay(pos, L); const auto shadowResult = world.Intersect(shadowRay); // 在r以内的相交点才会遮蔽光源 // shadowResult.distance <= r 表示: // 以pos交点 -> 光源位置 发出一条阴影测试光线 // 如果阴影测试光线与其他物体有交点,那么相交距离 <= r // 说明pos位置无法直接看到光源 if (shadowResult.body && shadowResult.distance <= r) return zero; } // 平方反比衰减 const auto attenuation = 1 / rr; // 返回衰减后的光源颜色 return LightSample(L, intensity * attenuation); }
点光源有一个平方反比衰减规律,故而要先算光源到交点pos的距离r,然后求出L,实际上L就是光源位置到交点的方向单位向量。接着要计算颜色,点光源本身颜色intensity,由于有衰减,因此变成了intensity * attenuation。
再说下阴影,如何计算点光源的阴影?这比平行光复杂些。从交点处向光源位置发出一条光线,如果当中有障碍物,那么被遮挡,返回黑色(就是遮挡测试)。
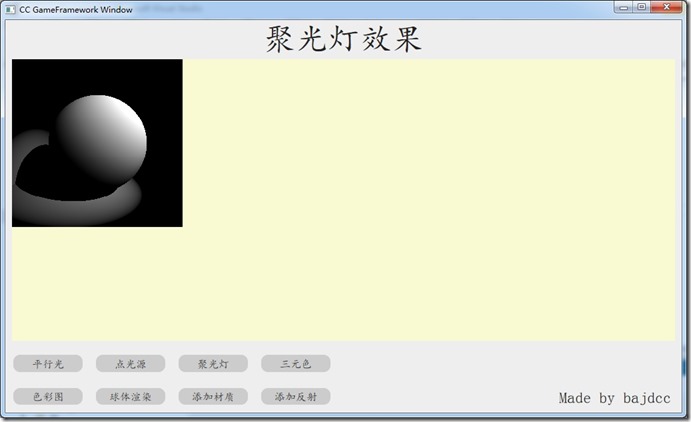
聚光灯
 聚光灯
聚光灯// 聚光灯 class SpotLight : public Light { public: SpotLight(color intensity, vector3 position, vector3 direction, float theta, float phi, float falloff); LightSample Sample(World& world, vector3 position) override; color intensity; // 幅射强度 vector3 position; // 光源位置 vector3 direction; // 光照方向 float theta; // 内圆锥的内角 float phi; // 外圆锥的内角 float falloff; // 衰减 /* 以下为预计算常量 */ vector3 S; // 光源方向 float cosTheta; // cos(内圆锥角) float cosPhi; // cos(外圆锥角) float baseMultiplier;// 1/(cosTheta-cosPhi) }; SpotLight::SpotLight(color intensity, vector3 position, vector3 direction, float theta, float phi, float falloff) : intensity(intensity), position(position), direction(direction), theta(theta), phi(phi), falloff(falloff) { S = -Normalize(direction); cosTheta = cosf(theta * float(M_PI) / 360.0f); cosPhi = cosf(phi * float(M_PI) / 360.0f); baseMultiplier = 1.0f / (cosTheta - cosPhi); } LightSample SpotLight::Sample(World& world, vector3 pos) { // 计算L,但保留r和r^2,供之后使用 const auto delta = position - pos; // 距离向量 const auto rr = SquareMagnitude(delta); const auto r = sqrtf(rr); // 算出光源到pos的距离 const auto L = delta / r; // 距离单位向量 /* * spot(alpha) = * * 1 * where cos(alpha) >= cos(theta/2) * * pow( (cos(alpha) - cos(phi/2)) / (cos(theta/2) - cos(phi/2)) , p) * where cos(phi/2) < cos(alpha) < cos(theta/2) * * 0 * where cos(alpha) <= cos(phi/2) */ // 计算spot auto spot = 0.0f; const auto SdotL = DotProduct(S, L); if (SdotL >= cosTheta) spot = 1.0f; else if (SdotL <= cosPhi) spot = 0.0f; else spot = powf((SdotL - cosPhi) * baseMultiplier, falloff); if (shadow) { const Ray shadowRay(pos, L); const auto shadowResult = world.Intersect(shadowRay); // 在r以内的相交点才会遮蔽光源 // shadowResult.distance <= r 表示: // 以pos交点 -> 光源位置 发出一条阴影测试光线 // 如果阴影测试光线与其他物体有交点,那么相交距离 <= r // 说明pos位置无法直接看到光源 if (shadowResult.body && shadowResult.distance <= r) return zero; } // 平方反比衰减 const auto attenuation = 1 / rr; // 返回衰减后的光源颜色 return LightSample(L, intensity * (attenuation * spot)); }
聚光灯是非常复杂的数学模型,我们不去探究为什么公式这样的,只要实现就行。
纯数学计算不多讲,这里主要有一个spot(聚光灯系数),所以最后的颜色是intensity * (attenuation * spot)。其它跟点光源的实现也差不多。
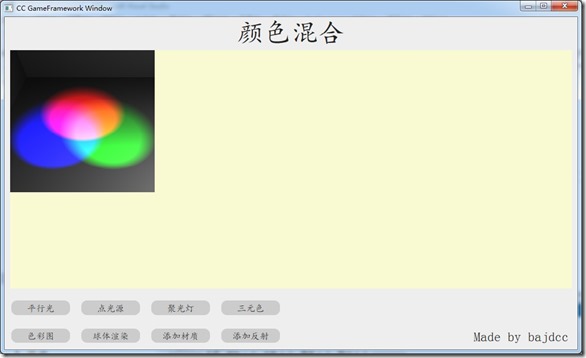
三原色混合
 光的三原色
光的三原色原想这东西怎么实现啊,现在想通了,就是在某点处(plane上一点)三个聚光灯打上去,将最终的颜色混合起来(加起来)。
简单表述:三个光源的光分别为RGB(255,0,0)、RGB(0,255,0)、RGB(0,0,255),混合起来,加一下就是RGB(255,255,255),白色。
看到用JavaScript玩转计算机图形学(二)基本光源 - Milo Yip - 博客园 中的一个问题:
如果,幅射强度是负值的话,会怎么样?(虽然未证实反光子(antiphoton)的存在,但读者能想到图形学上的功能么?)
感觉就是PS中的正片叠底啊,见如何简单的理解正片叠底和滤色?。
接下来会探讨画光的实现。
由https://zhuanlan.zhihu.com/p/31015884备份。
以上是关于简单的图形学——光源的主要内容,如果未能解决你的问题,请参考以下文章