自制滑杆
Posted Qiang
tags:
篇首语:本文由小常识网(cha138.com)小编为大家整理,主要介绍了自制滑杆相关的知识,希望对你有一定的参考价值。
一、效果图

二、html结构
1 <div id="d2">
2   <p>自制可拖动滑块:</p>
3   <div id="out">
4     <div id="filling"> </div>
5     <div id="innerimg"></div>
6   </div>
7   <p id="txt">音量:0</p>
8  </div>
第一个div是轨道,第二个是填充物,第三个是滑块
三、CSS样式
 1 #out {/* 滑块轨道 */
 2     position: relative;
 3     width: 160px;
 4     height: 12px;
 5     margin-top: 10px;
 6     margin-left: 0px;
 7     border: 1px solid #28C561;
 8     border-radius: 10px;
 9     box-shadow: 1px 1px 2px 0px inset;/* 轨道内阴影 */
10     cursor: pointer;
11 }
12 #filling {/* 填充物 */
13     height: 100%;
14     margin-left: 0px;
15     width: 0px;
16     background: linear-gradient(to right, #0089ff , #00fff3); /* 填充效果的渐变 */
17     background: -webkit-linear-gradient(left, #0089ff , #00fff3);
18     background: -o-linear-gradient(right, #0089ff , #00fff3);
19     background: -moz-linear-gradient(right, #0089ff , #00fff3);
20     border-top-left-radius: 10px;
21     border-bottom-left-radius: 10px;
22     box-shadow: 2px -1px 5px 1px inset;
23 }
24 #innerimg {/* 滑块样式 */
25     position: absolute;
26     left: 0px;
27     top: -8px;
28     margin-left: 0px;
29     width: 25px;
30     height: 25px;
31     cursor: pointer;
32     background-color: #66F40E;
33     border-radius: 50%;
34     box-shadow: 0px 2px 1px 0px #0d11128a, 0px -1px 19px rgba(0, 0, 0, 0.9) inset; /* 使滑块具有3D感 */
35 }
样式可以随便改
四、JS代码

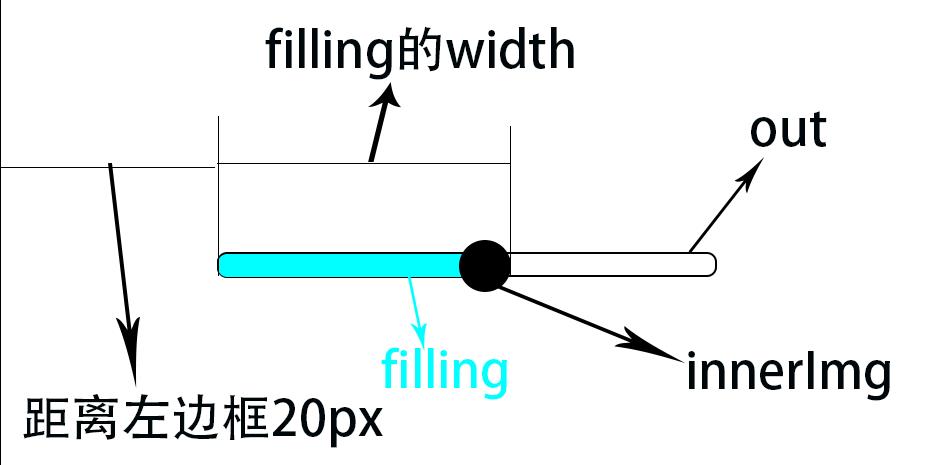
如图所示,将out设置为参考项,有两种情况:
(1)、点击out框的任何部位,滑块自动划过去并且filling填满滑块后面的地区
(2)、滑动滑块调节
原理很简单:以out为参照,当点击out的任意部分时,将InnerImg的坐标更新到鼠标点击部位,将filling的width设置成鼠标点击部位与out左边框的距离,就可以看到效果。
步骤:
a). 先获取页面元素:
1 var innerpro = document.getElementById(\'innerimg\')
2 var out = document.getElementById(\'out\')
3 var filling = document.getElementById(\'filling\')
4 var txt = document.getElementById(\'txt\')
5 var target
b). 添加out的点击事件:
 1 function dvnamicprogress () {
 2   /**
 3    * @author Qiang
 4    * @function dvnamicprogress -- 滑杆
 5    */
 6   if (document.addEventListener) {
 7     /* addEventListener属性IE9.0才支持 */
 8     out.addEventListener(\'click\', fillingClick, false)
 9   } else if (document.attachEvent) {
10     out.attachEvent(\'click\', fillingClick, false)
11   }
12 }
当鼠标在out内点击时,获取鼠标位置,设置filling宽度和内部滑块innerimg的left
 1 function fillingClick (event) {
 2  2   event.stopPropagation()
 3  3   if (event.touches) {
 4  4     target = event.touches[0]
 5  5   } else {
 6  6     target = event || window.event
 7  7   }/* 兼容移动端,但是发现没有兼容ie8及以下…… */
 8  8   var sliderLeft = target.clientX - 45  /* 减去的45=滑块的宽度25+整天滑杆距离视图左边框的距离20 */
 9  9   var fillingWidth = target.clientX - 45
10 10   if (sliderLeft <= 0) {
11 11     sliderLeft = 0
12 12   }/* filling的宽度不能小于0,滑块的位置不能超出out左边界 */
13 13   if (fillingWidth <= 0) {
14 14     fillingWidth = 0
15 15   }
16 16   txt.innerHTML = \'音量:\' + parseInt(sliderLeft / 135 * 100)
17 17   innerpro.style.left = sliderLeft + \'px\'
18 18   filling.style.width = fillingWidth + 5 + \'px\'
19 19   // console.log(\'鼠标的位置:X=>\' + target.clientX + \', Y=>\' + target.clientY)
20 20   // console.log(\'滑块的位置:\' + sliderLeft)
21 21 }
c). 添加移动滑块innerimg的事件
 1 function dvnamicprogress () {
 2   /**
 3    * @author Qiang
 4    * @function dvnamicprogress -- 滑杆
 5    */
 6   if (document.addEventListener) {
 7     /* addEventListener属性IE9.0才支持 */
 8     out.addEventListener(\'click\', fillingClick, false)
 9     innerpro.addEventListener(\'touchstart\', fillingMove, {passive: true}, false)
10     innerpro.addEventListener(\'mousedown\', fillingMove, false)
11   } else if (document.attachEvent) {
12     out.attachEvent(\'click\', fillingClick, false)
13     innerpro.attachEvent(\'touchstart\', fillingMove, {passive: true}, false)
14     innerpro.attachEvent(\'mousedown\', fillingMove, false)
15   }
16 }
 1 function fillingMove (event) {
 2   /* addEventListener属性IE9.0才支持 */
 3   if (document.addEventListener) {
 4     innerpro.addEventListener(\'touchmove\', sliderMove, {passive: true}, false)
 5     document.addEventListener(\'mousemove\', sliderMove, false)
 6     document.addEventListener(\'mouseup\', clear, false)
 7   } else if (document.attachEvent) {
 8     innerpro.attachEvent(\'touchmove\', sliderMove, {passive: true}, false)
 9     document.attachEvent(\'mousemove\', sliderMove, false)
10     document.attachEvent(\'mouseup\', clear, false)
11   }
12 }
当鼠标按下时给innerimg添加一个onmousemove事件,不断更新位置
 1 function sliderMove (event) {
 2   if (event.touches) {
 3     target = event.touches[0]
 4   } else {
 5     target = event || window.event
 6   }
 7   // console.log(\'鼠标的位置:X=>\' + target.clientX + \', Y=>\' + target.clientY)
 8   var prolong = target.clientX - 45
 9   if (prolong < 0) {
10     prolong = 0
11   } else if (prolong > 135) {
12     prolong = 135
13   }
14   txt.innerHTML = \'音量:\' + parseInt(prolong / 135 * 100)
15   filling.style.width = prolong + 5 + \'px\'
16   innerpro.style.left = prolong + \'px\'
17 }
当鼠标按键弹起时,清除所有事件:
 1 function clear () {
 2   if (document.addEventListener) {
 3     document.removeEventListener(\'mousemove\', sliderMove, false)
 4     document.removeEventListener(\'mousedown\', fillingMove, false)
 5   } else if (document.attachEvent) {
 6     document.attachEvent(\'mousemove\', sliderMove, false)
 7     document.attachEvent(\'mousedown\', fillingMove, false)
 8   }
 9 }
10 window.onload = function () {
11   staticProgress()
12   dvnamicprogress()
13 }
这里的样式比较丑,因为轨道宽一点好写,可以美化一下:


 1 #out {
 2     position: relative;
 3     width: 160px;
 4     height: 3px;
 5     margin-top: 10px;
 6     margin-left: 0px;
 7     border-radius: 10px;
 8     background-color: #737272;
 9     cursor: pointer;
10 }
11 #filling {
12     height: 100%;
13     margin-left: 0px;
14     width: 0px;
15     background-color:#00fff3;
16     border-top-left-radius: 10px;
17     border-bottom-left-radius: 10px;
18 }
19 #innerimg {
20     position: absolute;
21     left: 0px;
22     top: -11px;
23     margin-left: 0px;
24     width: 25px;
25     height: 25px;
26     cursor: pointer;
27     background-color: #ffffff;
28     border-radius: 50%;
29     box-shadow: 0px 1px 6px 0px #0d1112c7, 0px -1px 19px rgba(0, 0, 0, 0) inset;
30 }
31 #txt{
32     font-size:5px;
33 }
-
以上是关于自制滑杆的主要内容,如果未能解决你的问题,请参考以下文章
