一步一步ITextSharp 低级操作函数使用
Posted 大西瓜3721
tags:
篇首语:本文由小常识网(cha138.com)小编为大家整理,主要介绍了一步一步ITextSharp 低级操作函数使用相关的知识,希望对你有一定的参考价值。
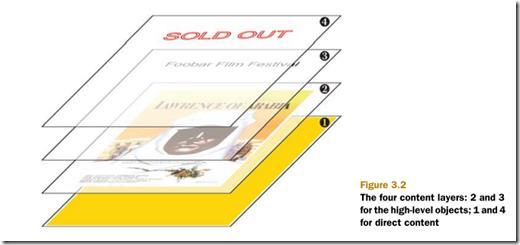
首先说一下PDF文档的结构:
分为四层,第一层和第四层由低级操作来进行操作,第二层、第三层由高级对象操作
第一层操作只能使用PdfWriter.DirectContent操作,第四层使用DirectContentUnder操作。
第二层和第三层的PdfContentByte是由IText内部操作,没有提供api接口。
图形和文本状态解释
图形状态,就是作图时对图形一些环境设置,
使用低级操作输出文本或图形前,应该设置操作环境,并且操作完成后,应该恢复操作前的环境。
使用低级操作是非常复杂的一般情况不需要使用这种方式,下面对常用用个法进行说明:
1、PdfContentByte.ShowTextAligned()
方法签名如下:
1: public void ShowTextAligned(int alignment, String text, float x,
2: float y, float rotation)
3: public void ShowTextAlignedKerned(int alignment, String text,
4: float x, float y, float rotation)
参数说明:
alignment:左、右、居中(ALIGN_CENTER, ALIGN_RIGHT or ALIGN_LEFT)
text:要输出的文本
x:文本输入的X坐标
y:文本输入的Y坐标
rotation:文本的旋转角度
实例:
代码:
1: public class TextRotaiDemo : TestBase
2: {
3: protected override void WriteDocument(Document document, PdfWriter writer)
4: {
5: var direct = writer.DirectContent;
6: direct.SaveState();//保存当前的输出状态
7: String foobar = "ShowTextAligned演示";
8:
9: direct.BeginText();
10: direct.SetFontAndSize(Normal.BaseFont, 12);
11: direct.ShowTextAligned(Element.ALIGN_LEFT, foobar, 400, 788, 0);
12: direct.ShowTextAligned(Element.ALIGN_RIGHT, foobar, 400, 752, 0);
13: direct.ShowTextAligned(Element.ALIGN_CENTER, foobar, 400, 716, 0);
14: direct.ShowTextAligned(Element.ALIGN_CENTER, foobar, 400, 680, 30);
15: direct.ShowTextAligned(Element.ALIGN_LEFT, foobar, 400, 644, 0);
16: direct.EndText();
17: direct.RestoreState();//恢复输出状态
18: }
19: }
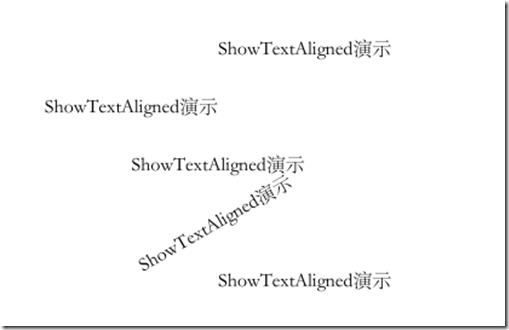
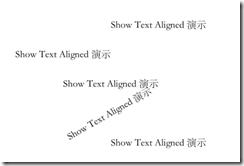
第一行文字: x = 400;y = 788.
第二行文字: x = 400; y = 752.
第三行文字: x = 400, y = 716.
第四行文字: x = 400, y = 680, 并旋转30度.
第五行文字: 使用showTextAlignedKerned() 方法显示相同的字符串, 但它使用了字形字距调整.
可以通过对位置的控制,在不同的位置显示出不同文字,并且也可以调用图形函数进行作图,如果创建矩形、圆、线条,表格等不规则图形。
2、对于文本的输出“ColumnText”对象的方法“ShowTextAligned”也是可用,并且使用起来比前面那个更方便,方法签名如下:
1: public static void ShowTextAligned(PdfContentByte canvas, int alignment,
2: Phrase phrase, float x, float y, float rotation)
3: public static void ShowTextAligned(PdfContentByte canvas, int alignment,
4: Phrase phrase, float x, float y, float rotation, int runDirection, int arabicOptions)
canvas:层对象
alignment:对齐方式
phrase:待写入对象
x:坐标x
y:坐标y
rotation:旋转角度
runDirection:这个是运行方向,从源代码中,说这个没有起什么作用
arabicOptions:这个参数具体功能不太清
在使用上只使用第一个版本就可以了
演示实例如下:
使用第一个重载 使用第二个重载
从效果来看,两个生成的结果基本一致。
代码如下:
1: public class ColumnTextShowTextAlignedDemo : TestBase
2: {
3: protected override void WriteDocument(Document document, PdfWriter writer)
4: {
5: var foobar = new Phrase("Show Text Aligned 演示",Normal);
6:
7: var direct = writer.DirectContent;
8: ColumnText.ShowTextAligned(direct,Element.ALIGN_LEFT, foobar, 400, 788, 0);
9: ColumnText.ShowTextAligned(direct, Element.ALIGN_RIGHT, foobar, 400, 752, 0);
10: ColumnText.ShowTextAligned(direct, Element.ALIGN_CENTER, foobar, 400, 716, 0);
11: ColumnText.ShowTextAligned(direct, Element.ALIGN_CENTER, foobar, 400, 680, 30);
12: ColumnText.ShowTextAligned(direct, Element.ALIGN_LEFT, foobar, 400, 644, 0);
13:
14:
15: ColumnText.ShowTextAligned(direct, Element.ALIGN_LEFT, foobar, 400, 488, 0, PdfWriter.RUN_DIRECTION_NO_BIDI, 0);
16: ColumnText.ShowTextAligned(direct, Element.ALIGN_RIGHT, foobar, 400, 452, 0, PdfWriter.RUN_DIRECTION_NO_BIDI, 0);
17: ColumnText.ShowTextAligned(direct, Element.ALIGN_CENTER, foobar, 400, 416, 0, PdfWriter.RUN_DIRECTION_LTR, 0);
18: ColumnText.ShowTextAligned(direct, Element.ALIGN_CENTER, foobar, 400, 380, 30, PdfWriter.RUN_DIRECTION_DEFAULT, 0);
19: ColumnText.ShowTextAligned(direct, Element.ALIGN_LEFT, foobar, 400, 344, 0, PdfWriter.RUN_DIRECTION_NO_BIDI, 1);
20: }
21: }
3、chunk的缩放和倾斜、填充模式:
水平缩放:
public Chunk SetHorizontalScaling(float scale)
设置一个浮点数,1表示正常,小于1缩小
倾 斜:
public Chunk SetSkew(float alpha, float beta)
这个是模拟italic效果的一种方式,带有两个参数,表示两个角度
填充模式:
SetTextRenderMode:
■PdfContentByte.TEXT_RENDER_MODE_FILL—这是一种默认模式,填充整个对象,而不是笔画填充(the glyph shapes are filled, not stroked.
)
■ PdfContentByte.TEXT_RENDER_MODE_STROKE—这种模式使用笔画填充
■ PdfContentByte.TEXT_RENDER_MODE_FILL_STROKE—
■ PdfContentByte.TEXT_RENDER_MODE_INVISIBLE—文本不可见
效果如下:
代码如下:
1: public class ChunkScalSekewDemo : TestBase
2: {
3: protected override void WriteDocument(Document document, PdfWriter writer)
4: {
5: var foobar = "Show Text Aligned 演示";
6: var direct = writer.DirectContent;
7: var c = new Chunk(foobar, Normal);
8: c.SetHorizontalScaling(0.5f);
9: var phrase = new Phrase(c);
10: ColumnText.ShowTextAligned(direct,Element.ALIGN_LEFT, phrase, 400, 572, 0);
11: c = new Chunk(foobar, Normal);
12: c.SetSkew(15, 15);
13: phrase = new Phrase(c);
14: ColumnText.ShowTextAligned(direct,Element.ALIGN_LEFT, phrase, 400, 536, 0);
15: c = new Chunk(foobar, Normal);
16: c.SetSkew(0, 25);
17: phrase = new Phrase(c);
18: ColumnText.ShowTextAligned(direct,Element.ALIGN_LEFT, phrase, 400, 500, 0);
19: c = new Chunk(foobar, Normal);
20: c.SetTextRenderMode(
21: PdfContentByte.TEXT_RENDER_MODE_STROKE,0.1f, BaseColor.RED);
22: phrase = new Phrase(c);
23: ColumnText.ShowTextAligned(direct,Element.ALIGN_LEFT, phrase, 400, 464, 0);
24: c = new Chunk(foobar, Normal);
25: c.SetTextRenderMode(PdfContentByte.TEXT_RENDER_MODE_FILL_STROKE, 1, null);
26: phrase = new Phrase(c);
27: ColumnText.ShowTextAligned(direct,
28: Element.ALIGN_LEFT, phrase, 400, 428, -0);
29: }
30: }
4、ColumnText对象使用
分栏布局也是一种比较常见的方式,如果一段文字的段落比较多,但每段的文字比较少,如果采用分栏的方式可以节约很空间,同样,在显示表格时,如果表格的列比较少,也会节约很多空间。在iText中也是支持分栏布局的,使用的ColumnText对象。
首先说一下,ColumnText对象常用方法:
1、SetSimpleColumn
1: public void SetSimpleColumn(float llx, float lly, float urx, float ury)
2: public void SetSimpleColumn(float llx, float lly, float urx, float ury,
3: float leading, int alignment)
4: public void SetSimpleColumn(Phrase phrase, float llx, float lly,
5: float urx, float ury, float leading, int alignment)
这个函数的功能就是设置列文本的矩形区域,第二个重载还可以进行设置对齐方式和间距,第三个调用AddText方法加入对象后,再直接调用第二个重载。
2、AddText
1: public void AddText(Chunk chunk)
2: public void AddText(Phrase phrase)
这两个方法在文本模式下有效,功能就是加入显示的文字内容,如果在复合模式下,调用这两个函数不起任何作用。
3、AddElement
1: public void AddElement(IElement element)
复合模式下,使用此方法进行内容添加
4、HasMoreText
检查当前一列显示完成后,是否还有内容存在,如果有就要换下一列,或换页。
5、Go
1: public int Go()
2: public int Go(bool simulate)
第一个相当于传入false调用第二重载
simulate表示是否模拟写入
返回值表示,还有没有没有写入的内容
当为false时,就是直接写到文档对象中
重要属性:
Alignment:对齐方式
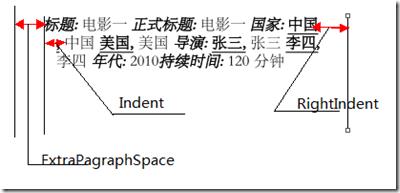
ExtraParagraphSpace
Leading:间距
Indent:缩进
RightIndent:右缩进
SpaceCharRatio:在使用“justified”时使用
以上是关于一步一步ITextSharp 低级操作函数使用的主要内容,如果未能解决你的问题,请参考以下文章
![X[D][2WMJW)M[9IOXH5~29D X[D][2WMJW)M[9IOXH5~29D](https://image.cha138.com/20210605/2a96c1a87f2b42dfa2e9f7bb5d8d8ab9.jpg)
