WPFUWP借鉴 asp.net core 管道处理模型打造图片缓存控件 ImageEx
Posted lonelyxmas
tags:
篇首语:本文由小常识网(cha138.com)小编为大家整理,主要介绍了WPFUWP借鉴 asp.net core 管道处理模型打造图片缓存控件 ImageEx相关的知识,希望对你有一定的参考价值。
原文:【WPF】【UWP】借鉴 asp.net core 管道处理模型打造图片缓存控件 ImageEx在 Web 开发中,img 标签用来呈现图片,而且一般来说,浏览器是会对这些图片进行缓存的。
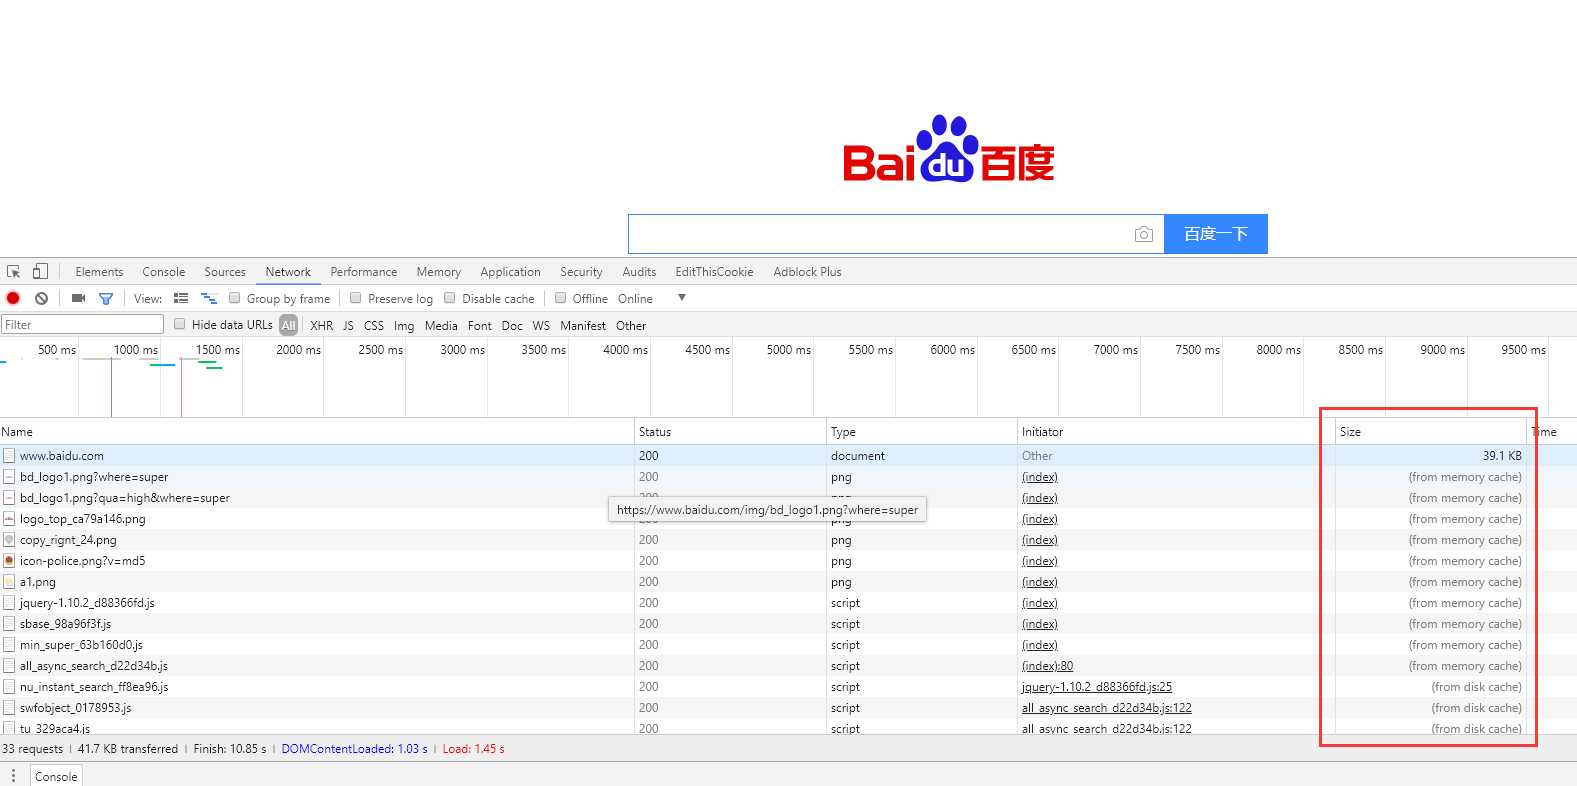
比如访问百度,我们可以发现,图片、脚本这种都是从缓存(内存缓存/磁盘缓存)中加载的,而不是再去访问一次百度的服务器,这样一方面改善了响应速度,另一方面也减轻了服务端的压力。
但是,对于 WPF 和 UWP 开发来说,原生的 Image 控件是只有内存缓存的,并没有磁盘缓存的,所以一旦程序退出了,下次再重新启动程序的话,那还是得从服务器上面取图片的。因此,打造一个具备缓存(尤其是磁盘缓存)的 Image 控件还是有必要的。
在 WPF 和 UWP 中,我们都知道 Image 控件 Source 属性的类型是 ImageSource,但是,如果我们使用数据绑定的话,是可以绑定一个字符串的,在运行的时候,我们会发现 Source 属性变成了一个 BitmapImage 类型的对象。那么可以推论出,是框架给我们做了一些转换。经过查阅 WPF 的相关资料,发现是 ImageSource 这个类型上有一个 TypeConverterAttribute:
查看 ImageSourceConverter 的源码(https://referencesource.microsoft.com/#PresentationCore/Core/CSharp/System/Windows/Media/ImageSourceConverter.cs,0f008db560b688fe),我们可以看到这么一段
因此,在对 Source 属性进行绑定的时候,我们的数据源是可以使用:string、Stream、Uri、byte[] 这些类型的,当然还有它自身 ImageSource(BitmapImage 是 ImageSource 的子类)。
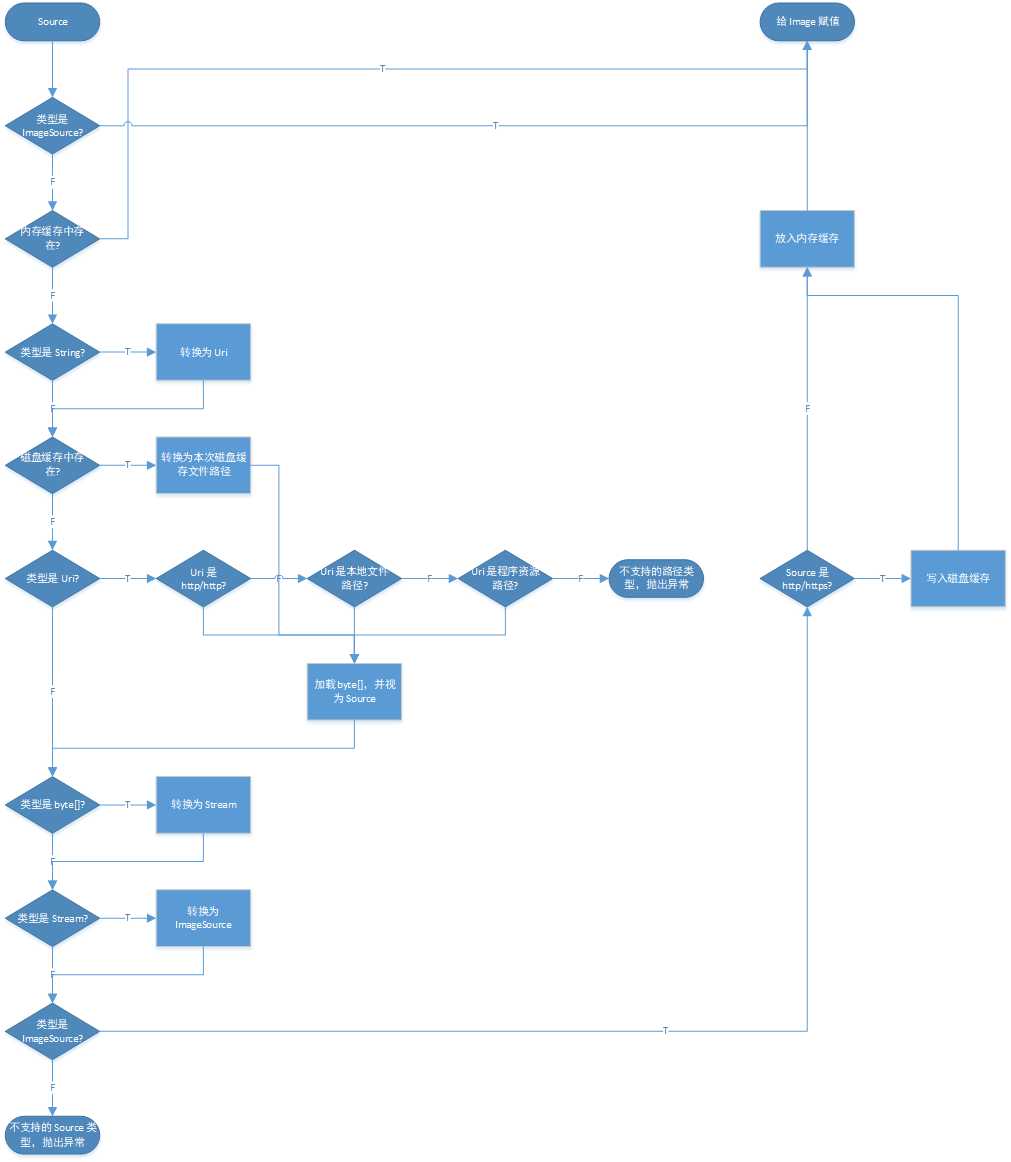
虽然有 5 种这么多,然而最终我们需要的是 ImageSource。另外 Uri 就相当于 string 的转换。再仔细分析的话,我们大概可以得出下面的结论:
string –> Uri –> byte[] –> Stream –> ImageSource
其中 Uri 到 byte[] 就是相当于从 Uri 对应的地方加载图片数据,常见的就是 web、磁盘和程序内嵌资源。
在某些节点我们是可以加上缓存的,如碰到一个 http/https 的地址,那可以先检查本地是否有缓存文件,有就直接加载不去访问服务器了。
经过整理,基本可以得出如下的流程图。
可以看出,流程是一个自上而下,再自下而上的流程。这里就相当于是一个管道处理模型。每一行等价于一个管道,然后整个流程相当于整个管道串联起来。
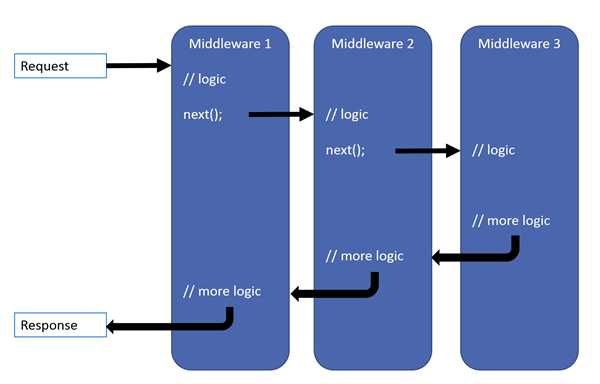
在代码的实现过程中,我借鉴了 asp.net core 中的 middleware 的处理过程。https://docs.microsoft.com/zh-cn/aspnet/core/fundamentals/middleware/?view=aspnetcore-2.1&tabs=aspnetcore2x
在 asp.net core 中,middleware 的其中一种写法如下:
public class AspNetCoreMiddleware
{
    public async Task InvokeAsync(HttpContext context, RequestDelegate next)
    {
        // before
        await next(context);
        // after
    }
}
先建立一个类似 HttpContext 的上下文,用于在这个管道模型中处理,我就叫 LoadingContext:
public class LoadingContext<TResult> where TResult : class
{
    private byte[] _httpResponseBytes;
    private TResult _result;

    public LoadingContext(object source)
    {
        if (source == null)
        {
            throw new ArgumentNullException(nameof(source));
        }

        OriginSource = source;
        Current = source;
    }

    public object Current { get; set; }

    public byte[] HttpResponseBytes
    {
        get => _httpResponseBytes;
        set
        {
            if (_httpResponseBytes != null)
            {
                throw new InvalidOperationException("value has been set.");
            }

            _httpResponseBytes = value;
        }
    }

    public object OriginSource { get; }

    public TResult Result
    {
        get => _result;
        set
        {
            if (_result != null)
            {
                throw new InvalidOperationException("value has been set.");
            }

            _result = value;
        }
    }
}
这里有四个属性,OriginSource 代表输入的原始 Source,Current 代表当前的 Source 值,在一开始是与 OriginSource 一致的。Result 代表了最终的输出,一般不需要用户手动设置,只需要到达管道底部的话,如果 Result 仍然为空,那么将 Current 赋值给 Result 就是了。HttpResponseBytes 一旦设置了就不可再设置。
可能你们会问,为啥要单独弄 HttpResponseBytes 这个属性呢,不能在下载完成的时候缓存到磁盘吗?这里考虑到下载回来的不一定是一幅图片,等到后面成功了,得到一个 ImageSource 对象了,那才能认为这是一个图片,这时候才缓存。
另外为啥是泛型,这里考虑到扩展性,搞不好某个 Image 的 Source 类型就不是 ImageSource 呢(*^_^*)
而 RequestDelegate 是一个委托,签名如下:
public delegate System.Threading.Tasks.Task RequestDelegate(HttpContext context);
因此我仿照,代码里就建一个 PipeDelegate 的委托。
public delegate Task PipeDelegate<TResult>([NotNull]LoadingContext<TResult> context, CancellationToken cancellationToken = default(CancellationToken)) where TResult : class;
NotNullAttribute 是来自 JetBrains.Annotations 这个 nuget 包的。
另外微软爸爸说,支持取消的话,那是好做法,要表扬的,因此加上了 CancellationToken 参数。
接下来那就可以准备我们自己的 middleware 了,代码如下:
public abstract class PipeBase<TResult> : IDisposable where TResult : class
{
    protected bool IsInDesignMode => (bool)DesignerProperties.IsInDesignModeProperty.GetMetadata(typeof(DependencyObject)).DefaultValue;

    public virtual void Dispose()
    {
    }

    public abstract Task InvokeAsync([NotNull]LoadingContext<TResult> context, [NotNull]PipeDelegate<TResult> next, CancellationToken cancellationToken = default(CancellationToken));
}
跟 asp.net core 的 middleware 很像,这里我加了一个 IsInDesignMode 属性,毕竟在设计器模式下面,就没必要跑缓存相关的分支了。
那么,我们自己的 middleware,也就是 Pipe 有了,该怎么串联起来呢,这里我们可以看 asp.net core 的源码
        public RequestDelegate Build()
        {
            RequestDelegate app = context =>
            {
                context.Response.StatusCode = 404;
                return Task.CompletedTask;
            };

            foreach (var component in _components.Reverse())
            {
                app = component(app);
            }

            return app;
        }
其中 _components 的定义如下:
private readonly IList<Func<RequestDelegate, RequestDelegate>> _components = new List<Func<RequestDelegate, RequestDelegate>>();
Func<RequestDelegate, RequestDelegate> 代表输入了一个委托,返回了一个委托。而上面 app 就相当于管道的最底部了,因为无法处理了,因此就赋值为 404 了。至于为啥要反转一下列表,这个大家可以自己手动试试,这里也不好解析。
因此,我编写出如下的代码来组装我们的 Pipe。
internal static PipeDelegate<TResult> Build<TResult>(IEnumerable<Type> pipes) where TResult : class
{
    PipeDelegate<TResult> end = (context, cancellationToken) =>
    {
        if (context.Result == null)
        {
            context.Result = context.Current as TResult;
        }
        if (context.Result == null)
        {
            throw new NotSupportedException();
        }

        return Task.CompletedTask;
    };

    foreach (var pipeType in pipes.Reverse())
    {
        Func<PipeDelegate<TResult>, PipeDelegate<TResult>> handler = next =>
        {
            return (context, cancellationToken) =>
            {
                using (var pipe = CreatePipe<TResult>(pipeType))
                {
                    return pipe.InvokeAsync(context, next, cancellationToken);
                }
            };
        };
        end = handler(end);
    }

    return end;
}
代码比 asp.net core 的复杂一点,先看上面 end 的初始化。因为到达了管道的底部,如果 Result 仍然是空的话,那么尝试将 Current 赋值给 Result,如果执行后还是空,那说明输入的 Source 是不支持的类型,就直接抛出异常好了。
在下面的循环体中,handler 等价于上面 asp.net core 的 component,接受了一个委托,返回了一个委托。
委托体中,根据当前管道的类型创建了一个实例,并执行 InvokeAsync 方法。
构建管道的代码也有了,因此加载逻辑也没啥难的了。
        private async Task SetSourceAsync(object source)
        {
            if (_image == null)
            {
                return;
            }

            _lastLoadCts?.Cancel();
            if (source == null)
            {
                _image.Source = null;
                VisualStateManager.GoToState(this, NormalStateName, true);
                return;
            }

            _lastLoadCts = new CancellationTokenSource();
            try
            {
                VisualStateManager.GoToState(this, LoadingStateName, true);

                var context = new LoadingContext<ImageSource>(source);

                var pipeDelegate = PipeBuilder.Build<ImageSource>(Pipes);
                var retryDelay = RetryDelay;
                var policy = Policy.Handle<Exception>().WaitAndRetryAsync(RetryCount, count => retryDelay, (ex, delay) =>
                {
                    context.Reset();
                });
                await policy.ExecuteAsync(() => pipeDelegate.Invoke(context, _lastLoadCts.Token));

                if (!_lastLoadCts.IsCancellationRequested)
                {
                    _image.Source = context.Result;
                    VisualStateManager.GoToState(this, OpenedStateName, true);
                    ImageOpened?.Invoke(this, EventArgs.Empty);
                }
            }
            catch (Exception ex)
            {
                if (!_lastLoadCts.IsCancellationRequested)
                {
                    _image.Source = null;
                    VisualStateManager.GoToState(this, FailedStateName, true);
                    ImageFailed?.Invoke(this, new ImageExFailedEventArgs(source, ex));
                }
            }
        }
我们的 ImageEx 控件里面必然需要有一个原生的 Image 控件进行承载(不然咋显示)。
这里我定义了 4 个 VisualState:
Normal:未加载,Source 为 null 的情况。
Opened:加载成功,并引发 ImageOpened 事件。
Failed:加载失败,并引发 ImageFailed 事件。
Loading:正在加载。
在这段代码中,我引入了 Polly 这个库,用于重试,一旦出现异常,就重置 context 到初始状态,再重新执行管道。
而 _lastLoadCts 的类型是 CancellationTokenSource,因为如果 Source 发生快速变化的话,那么先前还在执行的就需要放弃掉了。
最后奉上源代码(含 WPF 和 UWP demo):
https://github.com/h82258652/HN.Controls.ImageEx
先声明,如果你在真实项目中使用出了问题,本人一概不负责的说。![]()
本文只是介绍了一下具体关键点的实现思路,诸如磁盘缓存、Pipe 的服务注入(弄了一个很简单的)这些可以参考源代码中的实现。
另外源码中值得改进的地方应该是有的,希望大家能给出一些好的想法和意见,毕竟个人能力有限。
以上是关于WPFUWP借鉴 asp.net core 管道处理模型打造图片缓存控件 ImageEx的主要内容,如果未能解决你的问题,请参考以下文章
Asp.Net管道模型和Asp.Net Core的Middleware模型的对比


