数据绑定流程分析
Posted 曹军
tags:
篇首语:本文由小常识网(cha138.com)小编为大家整理,主要介绍了数据绑定流程分析相关的知识,希望对你有一定的参考价值。
一:介绍
1.介绍
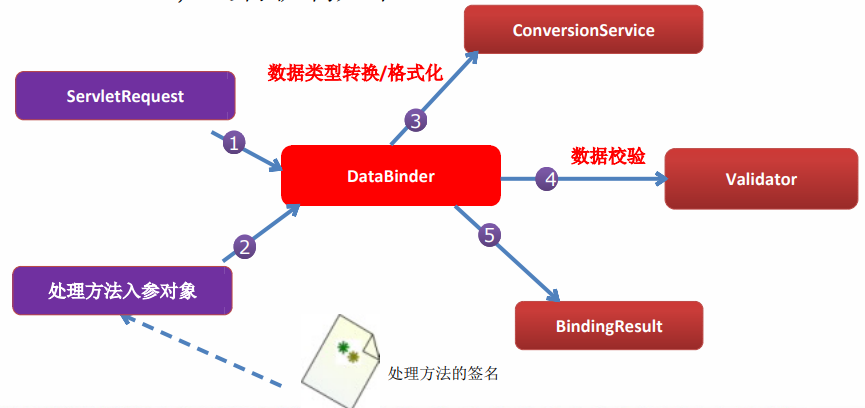
Spring MVC框架将ServletRequest对象及目标方法的入参实例传递给WebDataBinderFactory实例,以创建DataBinder实例对象。
DataBinder调用装配在SpringMVC上下文中的ConversionService组件,进行数据类型转换,数据格式化工作。将servlet的请求信息填充到入参对象中。
调用Validator组件对已经绑定的请求消息的入参对象进行数据合法性校验,并最终生成数据绑定结果BingData对象。
springmvc抽取BindingResult中的入参对象和验证错误对象,将他们赋值处理方法的响应入参。
2.数据绑定流程
二:自定义类型转换器
1.需求
将一个字符串转为Employee对象
2.input.jsp页面
主要是上面的form表单
 1 <%@ page language="java" contentType="text/html; charset=utf-8"
 2     pageEncoding="utf-8"%>
 3 <%@ taglib prefix="form" uri="http://www.springframework.org/tags/form"%>
 4 <%@ page import="java.util.Map"%>
 5 <%@ page import="java.util.HashMap"%>
 6 <%@ taglib prefix="c" uri="http://java.sun.com/jsp/jstl/core" %>
 7 <!DOCTYPE html PUBLIC "-//W3C//DTD HTML 4.01 Transitional//EN" "http://www.w3.org/TR/html4/loose.dtd">
 8 <html>
 9 <head>
10 <meta http-equiv="Content-Type" content="text/html; charset=utf-8">
11 <title>Insert title here</title>
12 </head>
13 <body>
14     <form action="testConversionServiceConver" method="POST">
15         <!-- lastname-email-gender-department.id -->
16         <!-- GG-gg@123.com-0-105 -->
17         Employee:<input type="text" name="employee"/>
18         <input type="submit" values="Submit">
19     </form>
20     <br><br>
21     <br><br><br><br><br><br>
22
23
24     <!-- id lastName email  gender department -->
25     <!-- modelAttribute默认的bean是command,需要改成对应的bean -->
26     <form:form action="${pageContext.request.contextPath}/emp" method="POST" modelAttribute="employee">
27         <!-- lastName在修改的时候,不能被显示 -->
28         <c:if test="${employee.id == null}">
29             LastName:<form:input path="lastName"/><br>
30         </c:if>
31         <c:if test="${employee.id != null}">
32             <form:hidden path="id"/>
33             <!-- 不能使用form标签,因为modelAttribute对应的bean中没有_method这个属性,只能使用input -->
34             <input type="hidden" name="_method" value="PUT"/>
35         </c:if>
36
37         Email:<form:input path="email"/><br>
38         <%
39             Map<String,String> genders=new HashMap();
40             genders.put("1", "Male");
41             genders.put("0", "Female");
42             request.setAttribute("genders", genders);
43         %>
44         Gender:<form:radiobuttons path="gender" items="${genders}"/><br>
45         Department:<form:select path="department.id"
46                         items="${department}" itemLabel="departmentName" itemValue="id"></form:select><br>
47         <input type="submit" values="Submit">
48     </form:form>
49 </body>
50 </html>
3.自定义转换器
这个bean加了一个注解,就不需要到配置文件中配置bean了。
 1 package com.spring.it.converter;
 2
 3 import org.springframework.core.convert.converter.Converter;
 4 import org.springframework.stereotype.Component;
 5
 6 import com.spring.it.enties.Department;
 7 import com.spring.it.enties.Employee;
 8 @Component
 9 public class EmployeeConverter implements Converter<String,Employee>{
10
11     @Override
12     public Employee convert(String source) {
13         //<!-- lastname-email-gender-department.id -->
14         if(source!=null) {
15             String[] vals=source.split("-");
16             if(vals!=null&&vals.length==4) {
17                 String lastName=vals[0];
18                 String email=vals[1];
19                 Integer gender=Integer.parseInt(vals[2]);
20                 Department department=new Department();
21                 department.setId(Integer.parseInt(vals[3]));
22                 Employee employee=new Employee(null, lastName, email, gender, department);
23                 System.out.println("*converter*");
24                 return employee;
25             }
26         }
27         return null;
28     }
29 }
4.请求处理器
主要是保存数据,传进来的是字符串,但是保存的是Employee对象。
所以,这个需要使用转换器,这个转换器写好了,然后就需要进行在配置文件中进行注册。
 1 package com.spring.it.converter;
 2
 3 import org.springframework.beans.factory.annotation.Autowired;
 4 import org.springframework.stereotype.Controller;
 5 import org.springframework.web.bind.annotation.RequestMapping;
 6 import org.springframework.web.bind.annotation.RequestParam;
 7
 8 import com.spring.it.dao.EmployeeDao;
 9 import com.spring.it.enties.Employee;
10
11 @Controller
12 public class BinderTest {
13     @Autowired
14     private EmployeeDao employeeDao;
15     @RequestMapping("/testConversionServiceConver")
16     public String testConverter(@RequestParam("employee") Employee employee) {
17         employeeDao.save(employee);
18         return "redirect:/emps";
19     }
20 }
5.配置文件
主要有两个部分要添加。
转换器,annotation-driven。
 1 <?xml version="1.0" encoding="UTF-8"?>
 2 <beans xmlns="http://www.springframework.org/schema/beans"
 3     xmlns:xsi="http://www.w3.org/2001/XMLSchema-instance"
 4     xmlns:context="http://www.springframework.org/schema/context"
 5     xmlns:mvc="http://www.springframework.org/schema/mvc"
 6     xsi:schemaLocation="http://www.springframework.org/schema/beans
 7     http://www.springframework.org/schema/beans/spring-beans.xsd
 8         http://www.springframework.org/schema/context
 9         http://www.springframework.org/schema/context/spring-context-4.0.xsd
10         http://www.springframework.org/schema/mvc
11         http://www.springframework.org/schema/mvc/spring-mvc-4.0.xsd">
12     <!-- 配置自定义扫描的包 -->
13     <context:component-scan base-package="com.spring.it" ></context:component-scan>
14
15     <!-- 配置视图解析器 -->
16     <bean class="org.springframework.web.servlet.view.InternalResourceViewResolver">
17         <property name="prefix" value="/WEB-INF/views/" />
18           <property name="suffix" value=".jsp" />
19     </bean>
20
21     <!-- 转换器 -->
22     <bean id="conversionService" class="org.springframework.context.support.ConversionServiceFactoryBean">
23         <property name="converters">
24             <set>
25                 <ref bean="employeeConverter"/>
26             </set>
27         </property>
28     </bean>
29     <mvc:annotation-driven conversion-service="conversionService"></mvc:annotation-driven>
30
31     <mvc:default-servlet-handler/>
32     <mvc:annotation-driven ignore-default-model-on-redirect="true"></mvc:annotation-driven>
33 </beans>
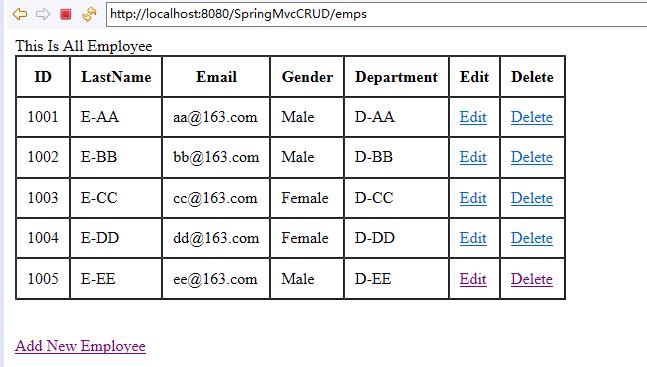
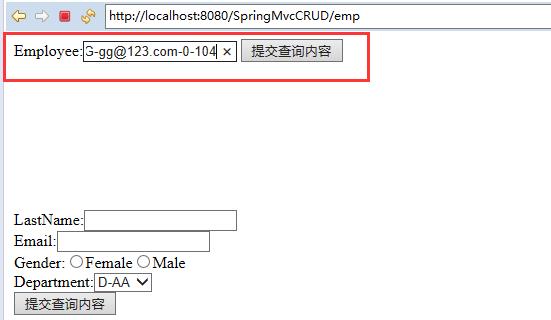
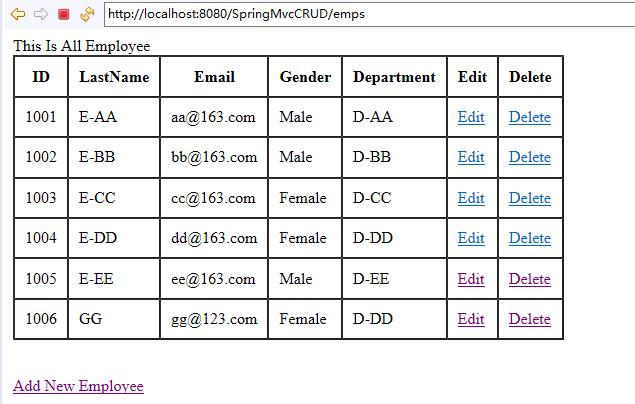
6.效果
三:mvc:annotation-driven标签
1.使用的场景
配置直接转发的页面的时候,但是配置的requestmapping不好用了,加了这个标签就可以了。
配置静态资源的时候,但是配置的requestmapping不好用了,加了这个标签就可以了
类型转换器的时候,需要装配自定义的类型转换器。
四:@InitBinder
1.介绍
由@InitBinder标识的方法,可以对WebDataBinder对象进行初始化。
WebDataBinder是DataBinder的子类,用于完成有表单字段到JavaBean属性的绑定。
@InitBinder方法不能有返回值,必须声明为void
@InitBinder方法的参数通常是WebDataBinder
2.示例
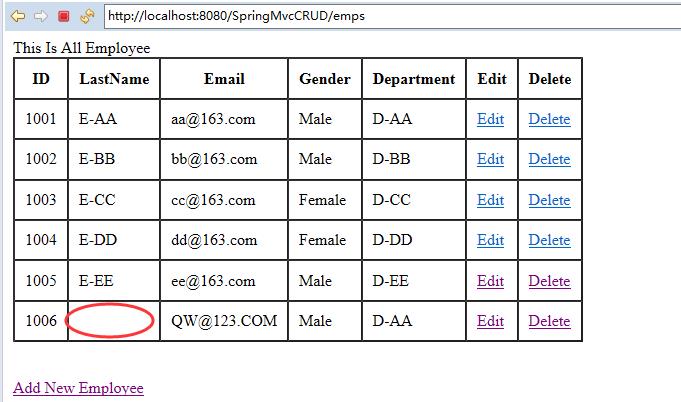
需求:不传入lastName。
最后一个方法。
  1 package com.spring.it.handlers;
  2
  3 import java.util.Map;
  4
  5 import org.springframework.beans.factory.annotation.Autowired;
  6 import org.springframework.stereotype.Controller;
  7 import org.springframework.web.bind.WebDataBinder;
  8 import org.springframework.web.bind.annotation.InitBinder;
  9 import org.springframework.web.bind.annotation.ModelAttribute;
 10 import org.springframework.web.bind.annotation.PathVariable;
 11 import org.springframework.web.bind.annotation.RequestMapping;
 12 import org.springframework.web.bind.annotation.RequestMethod;
 13 import org.springframework.web.bind.annotation.RequestParam;
 14 import org.springframework.web.bind.annotation.ResponseBody;
 15 import org.springframework.web.servlet.view.RedirectView;
 16
 17 import com.spring.it.dao.DepartmentDao;
 18 import com.spring.it.dao.EmployeeDao;
 19 import com.spring.it.enties.Department;
 20 import com.spring.it.enties.Employee;
 21
 22 @Controller
 23 public class EmployeeHander {
 24     @Autowired(required=true)
 25     private EmployeeDao employeeDao;
 26
 27     @Autowired(required=true)
 28     private DepartmentDao departmentDao;
 29
 30     /**
 31      * 使得lastName不被修改,使用ModelAttribute
 32      */
 33     @ModelAttribute
 34     public void getEmployee(@RequestParam(value="id",required=false) Integer id,Map<String,Object> map) {
 35         if(id!=null) {
 36             map.put("employee", employeeDao.get(id));
 37         }
 38     }
 39
 40     /**
 41      * 编辑,主要是提交
 42      */
 43     @RequestMapping(value="/emp",method=RequestMethod.PUT)
 44     public String update(Employee employee) {
 45         employeeDao.save(employee);
 46         return "redirect:/emps";
 47     }
 48
 49     /**
 50      * 编辑,主要是跳转到要编辑的页面
 51      */
 52     @RequestMapping(value="/emp/{id}",method=RequestMethod.GET)
 53     public String input(@PathVariable("id") Integer id,Map<String,Object> map) {
 54         map.put("department", departmentDao.getDepartments());
 55         //回显
 56         map.put("employee", employeeDao.get(id));
 57         return "input";
 58     }
 59
 60     /**
 61      * 删除操作
 62      */
 63     @RequestMapping(value="/emp/{id}",method=RequestMethod.DELETE)
 64     @ResponseBody
 65     public String delete(@PathVariable("id") Integer id) {
 66         employeeDao.delete(id);
 67         return "redirect:/emps";
 68     }
 69
 70     /**
 71      * 保存,是submit提交过来的请求,属于Post请求
 72      */
 73     @RequestMapping(value="/emp",method=RequestMethod.POST)
 74     public String save(Employee employee) {
 75         employeeDao.save(employee);
 76         return "redirect:/emps";
 77     }
 78
 79     /**
 80      * 跳转到input页面,用于添加员工,是Get请求
 81      */
 82     @RequestMapping(value="/emp",method=RequestMethod.GET)
 83     public String input(Map<String,Object> map) {
 84         map.put("department", departmentDao.getDepartments());
 85         //因为form表单的原因,默认一定要回显,第一次尽进来需要传入一个值
 86         map.put("employee", new Employee());
 87         return "input";
 88     }
 89
 90     /**
 91      * 展示所有的员工
 92      */
 93     @RequestMapping("/emps")
 94     public String list(Map<String,Object> map) {
 95         System.out.println("====");
 96         map.put("employee", employeeDao.getAll());
 97         return "list";
 98     }
 99
100     /**
101      * InitBinder的使用
102      */
103     @InitBinder
104     public void intiBinder(WebDataBinder binder) {
105         binder.setDisallowedFields("lastName");
106     }
107 }
3.效果
五:格式化
1.说明
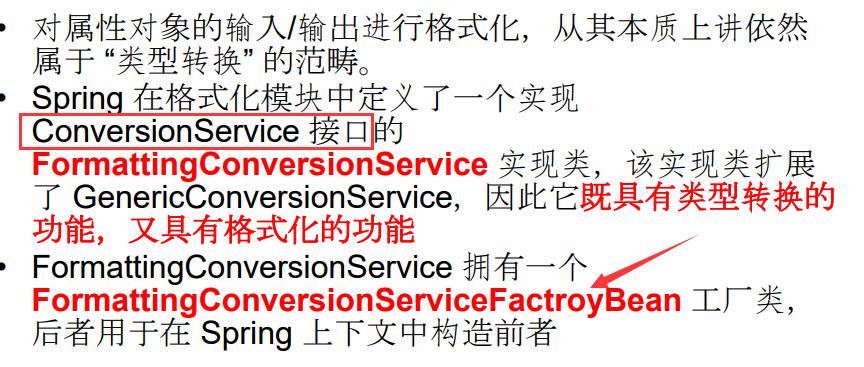
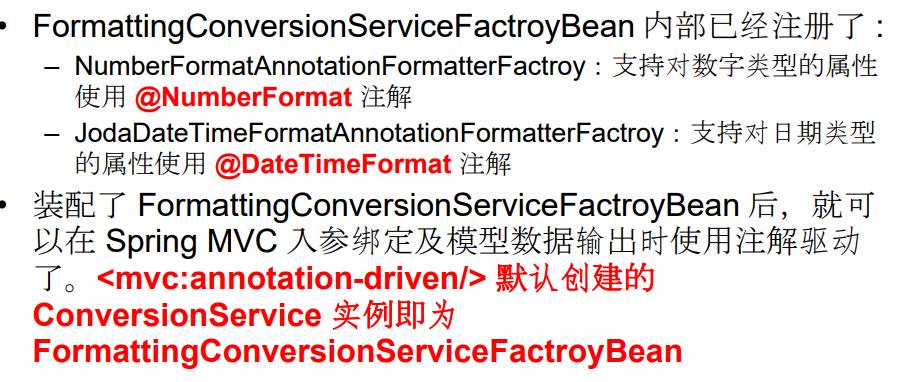
格式化还是属于类型转换的范畴。
2.格式化的底层
3.input
最下面的属于演示代码:
 1 <%@ page language="java" contentType="text/html; charset=utf-8"
 2     pageEncoding="utf-8"%>
 3 <%@ taglib prefix="form" uri="http://www.springframework.org/tags/form"%>
 4 <%@ page import="java.util.Map"%>
 5 <%@ page import="java.util.HashMap"%>
 6 <%@ taglib prefix="c" uri="http://java.sun.com/jsp/jstl/core" %>
 7 <!DOCTYPE html PUBLIC "-//W3C//DTD HTML 4.01 Transitional//EN" "http://www.w3.org/TR/html4/loose.dtd">
 8 <html>
 9 <head>
10 <meta http-equiv="Content-Type" content="text/html; charset=utf-8">
11 <title>Insert title here</title>
12 </head>
13 <body>
14     <form action="testConver以上是关于数据绑定流程分析的主要内容,如果未能解决你的问题,请参考以下文章