知乎控件分享
Posted yunfan
tags:
篇首语:本文由小常识网(cha138.com)小编为大家整理,主要介绍了知乎控件分享相关的知识,希望对你有一定的参考价值。
最近知乎终于更新到了正式版,所以接下来的一段时间我会陆续分享一些知乎中用到的代码片段和控件,希望对UWP开发者有所帮助。
今天先来分享一个Pivot吧!
你肯定想,Pivot还用你说啊!不要着急各位先看清楚状况!

在已知的UWP应用中只是看到了网易云音乐中使用了类似的效果,接下来我们一步步的实现这个控件。
先来分析下这个控件,
- 首先是PivotItem宽度=屏幕宽度/Items.Count
- 后就是白色的Indicator可以实时响应滑动的距离
- 然后处理一下边界就可以了
好的,接下来我们创建一个TemplateControl,取名为ZhiHuPivot(够俗的O(∩_∩)O~)并继承自Pivot
        public ZhiHuPivot()
        {
            this.DefaultStyleKey = typeof(ZhiHuPivot);

            if (!DesignMode.DesignModeEnabled)
                this.Loaded += ZhiHuPivot_Loaded;
        }
然后从generic.xaml中拿到Pivot的ControlTemplate,代码过长我就不粘贴了,Pivot的Control其实并不复杂
然后把Margin和Padding都修改为0,代码如下
    <Style TargetType="controls:ZhiHuPivot">
        <Setter Property="Margin" Value="0" />
        <Setter Property="Padding" Value="0" />
        <Setter Property="Background" Value="Transparent" />
        <Setter Property="IsTabStop" Value="False" />
        <Setter Property="ItemsPanel">
            <Setter.Value>
                <ItemsPanelTemplate>
                    <Grid />
                </ItemsPanelTemplate>
            </Setter.Value>
        </Setter>
        <Setter Property="Template">
            <Setter.Value>
                <ControlTemplate TargetType="controls:ZhiHuPivot">

                </ControlTemplate>
            </Setter.Value>
        </Setter>
    </Style>
根据刚才的思路,我们先来喂ZhiHuPivot添加一些依赖属性,以满足自定义的要求
        public double HeaderWidth
        {
            get { return (double)GetValue(HeaderWidthProperty); }
            set { SetValue(HeaderWidthProperty, value); }
        }

        // Using a DependencyProperty as the backing store for HeaderWidth.  This enables animation, styling, binding, etc...
        public static readonly DependencyProperty HeaderWidthProperty =
            DependencyProperty.Register("HeaderWidth", typeof(double), typeof(ZhiHuPivot), new PropertyMetadata(80.0));

        public double BackgroundLineStokeThickness
        {
            get { return (double)GetValue(BackgroundLineStokeThicknessProperty); }
            set { SetValue(BackgroundLineStokeThicknessProperty, value); }
        }

        // Using a DependencyProperty as the backing store for BackgroundLineStokeThickness.  This enables animation, styling, binding, etc...
        public static readonly DependencyProperty BackgroundLineStokeThicknessProperty =
            DependencyProperty.Register("BackgroundLineStokeThickness", typeof(double), typeof(ZhiHuPivot), new PropertyMetadata(2.0));


        public Brush BackgroundLineStoke
        {
            get { return (Brush)GetValue(BackgroundLineStokeProperty); }
            set { SetValue(BackgroundLineStokeProperty, value); }
        }

        // Using a DependencyProperty as the backing store for BackgroundLineStoke.  This enables animation, styling, binding, etc...
        public static readonly DependencyProperty BackgroundLineStokeProperty =
            DependencyProperty.Register("BackgroundLineStoke", typeof(Brush), typeof(ZhiHuPivot), new PropertyMetadata(new SolidColorBrush(Colors.LightGray)));


        public double IndicatorLineStokeThickness
        {
            get { return (double)GetValue(IndicatorLineStokeThicknessProperty); }
            set { SetValue(IndicatorLineStokeThicknessProperty, value); }
        }

        // Using a DependencyProperty as the backing store for ForegroundLineStokeThickness.  This enables animation, styling, binding, etc...
        public static readonly DependencyProperty IndicatorLineStokeThicknessProperty =
            DependencyProperty.Register(nameof(IndicatorLineStokeThickness), typeof(double), typeof(ZhiHuPivot), new PropertyMetadata(2.0));


        public Brush IndicatorLineStroke
        {
            get { return (Brush)GetValue(IndicatorLineStrokeProperty); }
            set { SetValue(IndicatorLineStrokeProperty, value); }
        }

        // Using a DependencyProperty as the backing store for ForegroundLineStroke.  This enables animation, styling, binding, etc...
        public static readonly DependencyProperty IndicatorLineStrokeProperty =
            DependencyProperty.Register(nameof(IndicatorLineStroke), typeof(Brush), typeof(ZhiHuPivot), new PropertyMetadata(new SolidColorBrush(Colors.Red)));
分别是,PivotItemHeader的宽度,背景线的宽度和颜色,指示线的宽度和颜色
接下来我们稍稍修改一个Pivot的ControlTemplate,先加一个背景线,再加一个指示线,然后指示线在背景线上左右移动就可以了,代码如下
    <Line Grid.Column="1" Stroke="{TemplateBinding BackgroundLineStoke}" IsHitTestVisible="False" VerticalAlignment="Bottom" X2="10" Stretch="UniformToFill" StrokeThickness="{TemplateBinding BackgroundLineStokeThickness}"></Line>

    <Line x:Name="TipLine" Grid.Column="1" Stroke="{TemplateBinding IndicatorLineStroke}" IsHitTestVisible="False" VerticalAlignment="Bottom" StrokeThickness="{TemplateBinding IndicatorLineStokeThickness}">
        <Line.RenderTransform>
            <TranslateTransform x:Name="TipLineTranslateTransform"></TranslateTransform>
        </Line.RenderTransform>
    </Line>
好的一切就绪,但是似乎有一个重要的问题还没有解决,如何监测Pivot的左右滑动呢?
仔细观察Pivot的ControlTemplate会发现所有的PivotItem其实在一个横向滚动的ScrollViewer里面而已,所以我们可以通过监测这个ScrollViewer来试试获取偏移量,然后添加到指示器上就可以了
首先呢我们添加一些字段
        private TranslateTransform _itemsPresenterTranslateTransform;

        private ScrollViewer _scrollViewer;

        private Line _tipLine;

        private TranslateTransform _tipLineTranslateTransform;

        private double _previsousOffset;
然后重载OnApplyTemplate方法,从中获取模板中ScrollViewer
        protected override void OnApplyTemplate()
        {
            base.OnApplyTemplate();

            _itemsPresenterTranslateTransform = GetTemplateChild<TranslateTransform>("ItemsPresenterTranslateTransform");
            if (_itemsPresenterTranslateTransform != null)
            {
                _itemsPresenterTranslateTransform.RegisterPropertyChangedCallback(TranslateTransform.XProperty, Callback);
            }
            _scrollViewer = GetTemplateChild<ScrollViewer>("ScrollViewer");
            if (_scrollViewer != null)
            {
                _scrollViewer.RegisterPropertyChangedCallback(ScrollViewer.HorizontalOffsetProperty, HorizontalOffsetCallback);
            }
            _tipLine = GetTemplateChild<Line>("TipLine");
            _tipLineTranslateTransform = GetTemplateChild<TranslateTransform>("TipLineTranslateTransform");
        }
在回调事件中处理偏移量
        private void HorizontalOffsetCallback(DependencyObject sender, DependencyProperty dp)
        {
            if (_previsousOffset != 0)
            {
                var x = (double)sender.GetValue(dp);
                var right = x > _previsousOffset;

                if (right)
                {
                    // 非边界
                    if (SelectedIndex + 1 != Items.Count)
                    {
                        var newX = (x - _previsousOffset) / Items.Count + (SelectedIndex * HeaderWidth);
                        var max = (SelectedIndex + 1) * HeaderWidth;

                        _tipLineTranslateTransform.X = newX < max ? newX : max;
                    }
                    else
                    {
                        _tipLineTranslateTransform.X = (SelectedIndex * HeaderWidth) - (x - _previsousOffset);
                    }
                }
                else
                {
                    // 非边界
                    if (SelectedIndex != 0)
                    {
                        var newX = (x - _previsousOffset) / Items.Count + (SelectedIndex * HeaderWidth);
                        var max = (SelectedIndex + 1) * HeaderWidth;

                        _tipLineTranslateTransform.X = newX < max ? newX : max;
                    }
                    else
                    {
                        _tipLineTranslateTransform.X = _previsousOffset - x;
                    }
                }
            }
        }
然后基本上就可以说是大功告成了吗?
等等别激动还有两个问题,
第一个是计算宽度
        private void ZhiHuPivot_Loaded(object sender, RoutedEventArgs e)
        {
            if (Items.Count > 1)
            {
                var res = ScreenSize().Width / Items.Count;
                if (IsMobile)
                    HeaderWidth = res;
                _tipLine.X2 = HeaderWidth;
            }
        }
第二个是误差修正
        private void Callback(DependencyObject sender, DependencyProperty dp)
        {
            _previsousOffset = (double)sender.GetValue(dp);
            _tipLineTranslateTransform.X = (SelectedIndex * HeaderWidth);
        }
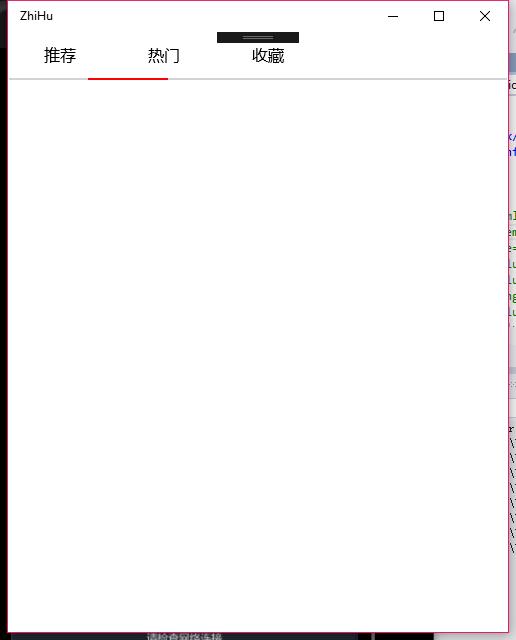
好滴现在基本上是没有问题了,我们来引用一下看看效果
    <Grid Background="White">
        <controls:ZhiHuPivot x:Name="MyPivot" IndicatorLineStroke="Red" IndicatorLineStokeThickness="2">
            <Pivot.HeaderTemplate>
                <DataTemplate>
                    <TextBlock Text="{Binding}" Margin="0,0,0,5" Foreground="Black" TextAlignment="Center" Width="{Binding ElementName=MyPivot, Path=HeaderWidth}" FontSize="16"></TextBlock>
                </DataTemplate>
            </Pivot.HeaderTemplate>
            <PivotItem Header="推荐" Margin="0" ></PivotItem>
            <PivotItem Header="热门" Margin="0" ></PivotItem>
            <PivotItem Header="收藏" Margin="0" ></PivotItem>
        </controls:ZhiHuPivot>
    </Grid>
运行一下看看效果,会发现怎么没有对齐呢?

我们还需要修改一下PivotHeaderItem的模板,比较长我就不粘贴了其实就是把Margin和Padding改成了0而已,详见源码吧!
修改后的手机运行截图

源代码:Github
抛砖引玉,如果各位有更好的思路还望多多赐教!
追梦
以上是关于知乎控件分享的主要内容,如果未能解决你的问题,请参考以下文章