EntityFramework Code-First 简易教程-------领域类配置之DataAnnotations
Posted 大兵不是饼
tags:
篇首语:本文由小常识网(cha138.com)小编为大家整理,主要介绍了EntityFramework Code-First 简易教程-------领域类配置之DataAnnotations相关的知识,希望对你有一定的参考价值。
EF Code-First提供了一个可以用在领域类或其属性上的DataAnnotation特性集合,DataAnnotation特性会覆盖默认的EF约定。
DataAnnotation存在于两个命名空间里:
System.ComponentModel.DataAnnotations和System.ComponentModel.DataAnnotations.Schema
注意: DataAnnotations只提供了一部分的配置选项,全部的配置选项在Fluent API中。
System.ComponentModel.DataAnnotations 包含的特性:
| Attribute | 描述 |
|---|---|
| Key | 标记一个属性,其将会在关系表中被映射成主键 |
| Timestamp | 标记一个属性,其将会在数据库中被映射成一个不为null的tiamestamp(时间戳)列 |
| ConcurrencyCheck | 这个属性允许你标记一个或多个属性,被标记的属性将会在用户编辑或删除entity的时候进行并发检查 |
| Required | 强制约束,该属性必须有数据,不能为null(同样适用MVC) |
| MinLength | 确保数组或字符串长度达到最小长度 |
| MaxLength | 数据库中列的长度的最大值 |
| StringLength | 在数据字段中指定字符允许的最大长度和最小长度 |
System.ComponentModel.DataAnnotations.Schema 包含的特性:
| Attribute | 描述 |
|---|---|
| Table | 指定被映射的类在数据库生成的表名 |
| Column | 指定被映射的属性在表中的列名和数据类型 |
| Index | 在指定列上创建索引(仅EF6.1以上版本支持) |
| ForeignKey | 给导航属性指定外键属性 |
| NotMapped | 标记的属性不会被映射到数据库 |
| DatabaseGenerated | 指定的属性将会映射成数据库表中的计算列,所以这个属性应是只读的。也可以用在把属性映射成标识列(自增长列) |
| InverseProperty | 当两个类之间包含多重关系的时候,默认约定会排列组合他们的导航属性组合并一一创建外键,InverseProperty可以标记实际的主外键关系,从而过滤掉因排列组合出来的无用外键 |
| ComplexType | 标记一个类为复杂类型 |
下面我们来详细介绍各个特性:
1、Key:
Key特性应用在类的属性上。Code-First默认约定将名称是"Id"或者{类名}+"Id"的属性创建为一个主键列,Key特性覆写了默认约定,我们可以把任何想要成为的主键的属性标记为Key而不管它是什么名称。
代码如下:
using System.ComponentModel.DataAnnotations;

public class Student
{
    public Student()
    {

    }

    [Key]
    public int StudentKey { get; set; }

    public string StudentName { get; set; }

}
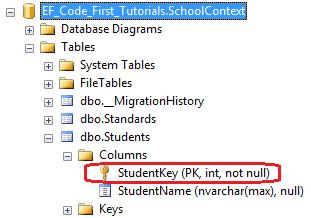
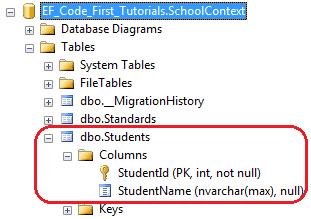
数据库中,Students表中的StudentKey列被创建成了主键
我们也可以用用Key特性和Column特性创建混合主键,如下代码所示:
using System.ComponentModel.DataAnnotations;

public class Student
{
    public Student()
    {

    }
    [Key]
    [Column(Order=1)]
    public int StudentKey1 { get; set; }

    [Key]
    [Column(Order=2)]
    public int StudentKey2 { get; set; }

    public string StudentName { get; set; }

}
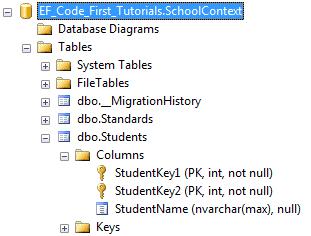
根据上面的代码,在Students表中,创建出了混合主键StudentKey1和StudentKey2
注意: 当Key特性应用在单整型类型的属性上时,会将其创建为一个标识列,而混合键无论它是不是整型类型,都不会创建标识列。Key特性除了无符号整型(unsinged integers),可以应用在如string、datatime、decimal等任何数据类型上。
2、TimeStamp:
TimeStamp特性只能用在数据类型为byte array的属性上,TimeStamp特性会在数据库表中创建一个timestamp属性的列,Code-First自动使用TimeStamp列进行并发检查。
(关于并发检查,可以参考Gyoung的笔记:Entity Framework 并发处理)
代码如下:
using System.ComponentModel.DataAnnotations;

public class Student
{
    public Student()
    {

    }

    public int StudentKey { get; set; }

    public string StudentName { get; set; }

    [TimeStamp]
    public byte[] RowVersion { get; set; }
}
再次强调,标记TimeStamp特性的属性类型必须是byte数组。
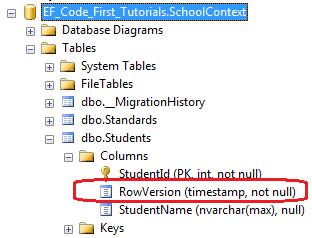
这样,在数据库Students表中就把RowVersion列创建成了timestamp(时间戳)
3、ConcurrencyCheck:
当EF对表执行update命令时,Code-First会把标记了ConcurrencyCheck特性的列中的值插入到SQL语句的“where”子句中来进行并发检查。如下代码:
using System.ComponentModel.DataAnnotations;

public class Student
{
    public Student()
    {

    }

    public int StudentId { get; set; }

    [ConcurrencyCheck]
    public string StudentName { get; set; }
}
如上所示,StudentName属性上标记了ConcurrencyCheck特性,所以Code-First会在update命令中把StudentName列包含进去以进行乐观并发检查(有关乐观并发和悲观并发,上面Gyoung的笔记有介绍,这里就不多讨论)。如下代码所示:
exec sp_executesql N\'UPDATE [dbo].[Students]
SET [StudentName] = @0
WHERE (([StudentId] = @1) AND ([StudentName] = @2))
\',N\'@0 nvarchar(max) ,@1 int,@2 nvarchar(max) \',@0=N\'Steve\',@1=1,@2=N\'Bill\'
go
注意:TimeStamp特性只能用在single byte数组属性上,然而ConcurrencyCheck特性可以用在任何数量和任何数据类型的属性上。
4、Required:
应用了Required特性的属性,将会在数据库表中创建一个不为null的列,需要留意的是,Required也是MVC的验证特性。
代码如下:
using System.ComponentModel.DataAnnotations;

public class Student
{
    public Student()
    {

    }
    public int StudentID { get; set; }

    [Required]
    public string StudentName { get; set; }

}
在数据库中,StudentName列已经被创建成不为空。
5、MaxLength & MinLength:
Maxlength特性用在String或array类型的属性上,EF Code-First将会把列的大小设置成指定值。值得注意的是,Maxlength也是MVC的验证特性。
代码如下:
using System.ComponentModel.DataAnnotations;

public class Student
{
    public Student()
    {

    }
    public int StudentID { get; set; }

    [MaxLength(50)]
    public string StudentName { get; set; }

}
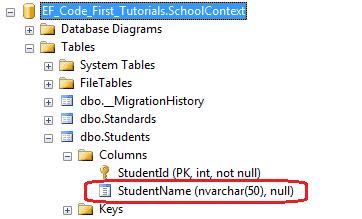
因为StudentName属性被指定了[Maxlength(50)]特性,所以在数据库中StudentName列被创建成nvarchar(50)。
Entity Framework也会验证被标记了MaxLength特性的属性的值,如果该值大于被标记的最大值,EF将会抛出EntityValidationError。
MinLength:
MinLength特性是EF的一个验证特性,其在数据库模式中不起作用。如果我们对标记了MinLength特性的属性赋值(string或者array),其长度小于指定的最小值,那么EF仍然会抛出EntityValidationError。
MinLength特性可以和MaxLength特性一起使用,如下代码所示:
using System.ComponentModel.DataAnnotations;

public class Student
{
    public Student()
    {

    }
    public int StudentID { get; set; }

    [MaxLength(50),MinLength(2)]
    public string StudentName { get; set; }

}
如上代码所示,StudentName属性取值指定了只能是2-50个字符长度之间。
6、StringLength:
StringLength应用在string类型的属性上,EF Code-First将会用StringLength指定的长度设置列的大小。和Required以及Maxlength一样,StringLength也是MVC的验证特性。
看下面的代码:
using System.ComponentModel.DataAnnotations;

public class Student
{
    public Student()
    {

    }
    public int StudentID { get; set; }

    [StringLength(50)]
    public string StudentName { get; set; }

}
根据代码中StudentName属性的[StringLength(50)]特性,在数据库中,将会创建一个nvarchar(50)的列,如下所示:
同理,EF也将会验证StringLength特性中的值,如果用户输入的值大于指定的长度,将会抛出EntityValidationError。
7、Table:
Table特性应用在类上,默认的Code-First约定将会创建一个和类名同名的表名,Table特性覆写默认的约定,EF Code-First将会创建一个以Table特性里指定的字符串为名称的表。
代码如下:
using System.ComponentModel.DataAnnotations.Schema;

[Table("StudentMaster")]
public class Student
{
    public Student()
    {

    }
    public int StudentID { get; set; }

    public string StudentName { get; set; }

}
如上所示,Student类上应用了Table["StudentMaster"]特性,所以Code-First会覆写默认的约定,创建一个名称为StudentMaster的表名
我们也可以用Table特性为表指定一个架构名,代码如下所示:
using System.ComponentModel.DataAnnotations.Schema;

[Table("StudentMaster", Schema="Admin")]
public class Student
{
    public Student()
    {

    }
    public int StudentID { get; set; }

    public string StudentName { get; set; }

}
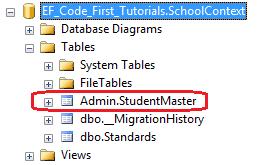
数据库如下,Code-First将会在Admin架构下创建一个StudentMaster表
8、Column:
Column特性应用在类的属性上,和Table特性一样,如果不指定Column特性的值,将会默认创建和属性同名的列,否则就会创建指定的值。
看如下代码:
using System.ComponentModel.DataAnnotations.Schema;

public class Student
{
    public Student()
    {

    }
    public int StudentID { get; set; }

    [Column("Name")]
    public string StudentName { get; set; }

}
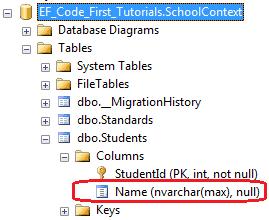
如上所示,Column["Name"]特性应用在StudentName属性上,所以Code-First将会创建一个以"Name"为名的列来代替默认的"StudentName"列名。数据库如下:
我们也可以使用Column特性为列指定排序(order)和类型(type),代码如下:
using System.ComponentModel.DataAnnotations.Schema;

public class Student
{
    public Student()
    {

    }
    public int StudentID { get; set; }

    [Column("Name", Order=1, TypeName="varchar")]
    public string StudentName { get; set; }

}
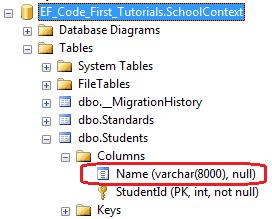
上面的代码在数据库Students表中创建了一个属性为varchar,排序第一的列Name
9、ForeignKey:
ForeignKey特性应用在类的属性上。默认的Code-First约定预料外键属性名与主键属性名匹配,如下代码:
public class Student
{
    public Student()
    {

    }
    public int StudentID { get; set; }
    public string StudentName { get; set; }

    //Foreign key for Standard
    public int StandardId { get; set; }

    public Standard Standard { get; set; }
}

public class Standard
{
    public Standard()
    {

    }
    public int StandardId { get; set; }
    public string StandardName { get; set; }

    public ICollection<Student> Students { get; set; }

    }
}
如上代码所示,Student类包含了外键属性StandardId,其又是Standard类的主键属性,这样,Code-First将会在Students表中创建一个StandardId外键列。
ForeignKey特性覆写了默认约定,我们可以把外键属性列设置成不同名称,代码如下:
public class Student
{
    public Student()
    {

    }
    public int StudentID { get; set; }
    public string StudentName { get; set; }

    //Foreign key for Standard
    public int StandardRefId { get; set; }

    [ForeignKey("StandardRefId")]
    public Standard Standard { get; set; }
}

public class Standard
{
    public Standard()
    {

    }
    public int StandardId { get; set; }
    public string StandardName { get; set; }

    public ICollection<Student> Students { get; set; }

}
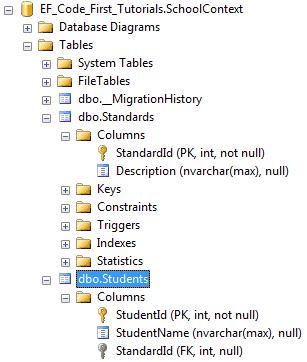
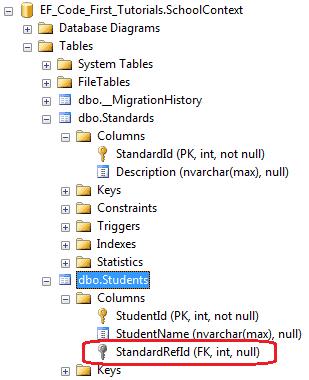
如上代码所示,Student类包含了StandardRefId外键属性,我们使用ForeignKey["StandardRefId"]特性指定在Standard导航属性上,所以Code-First将会把StandardRefId作为外键,生成数据库如下所示:
ForeignKey特性也可以用在外键属性上,只要指定好它的导航属性,即Standard属性,如下所示:
public class Student
{
    public Student()
    {

    }
    public int StudentID { get; set; }
    public string StudentName { get; set; }

    //Foreign key for Standard

    [ForeignKey("Standard")]
    public int StandardRefId { get; set; }

    public Standard Standard { get; set; }
}

public class Standard
{
    public Standard()
    {

    }
    public int StandardId { get; set; }
    public string StandardName { get; set; }

    public ICollection<Student> Students { get; set; }

}
这段代码和上面把ForeignKey特性定义在Standard属性上的效果是一样的,在数据库生成的Students表都创建了StandardRefId外键列。
10、NotMapped:
NotMapped特性用在类的属性上,默认Code-First约定会为那些所有包含了getter和setter的属性创建列,NotMapped可以覆写默认的约定,让那些标记了NotMapped特性的属性不会在数据库里创建列。代码如下:
using System.ComponentModel.DataAnnotations;

public class Student
{
    public Student()
    {

    }

    public int StudentId { get; set; }

    public string StudentName { get; set; }

    [NotMapped]
    public int Age { get; set; }
}
如上代码所示,NotMapped特性应用在Age属性上,所以Code-First不会在Students表中创建Age列。
Code-First也不会为那些没有getter和setter的属性创建列,在下面代码例子中,Code-First不会为FirstName和Age创建列。
using System.ComponentModel.DataAnnotations;

public class Student
{
    public Student()
    {

    }
    private int _age = 0;

    public int StudentId { get; set; }

    public string StudentName { get; set; }

    public string FirstName { get{ return StudentName;}  }
    public string Age { set{ _age = value;}  }

}
11、InverseProperty:
我们已经知道,如果类中没有包含外键属性,Code-First默认约定会创建一个{类名}_{主键}的外键列。当我们类与类之间有多个关系的时候,就可以使用InverseProperty特性。
代码如下:
public class Student
{
    public Student()
    {

    }
    public int StudentID { get; set; }
    public string StudentName { get; set; }

    public Standard CurrentStandard { get; set; }
    public Standard PreviousStandard { get; set; }
}

public class Standard
{
    public Standard()
    {

    }
    public int StandardId { get; set; }
    public string StandardName { get; set; }

    public ICollection<Student> CurrentStudents { get; set; }
    public ICollection<Student> PreviousStudents { get; set; }

    }
 }
如上代码所示,Student类包含了两个Standard类的导航属性,同样的,Standard类包含了两个Student类的集合导航属性,Code-First将会为这种关系创建4个列。如下所示:
InverseProperty覆写了这种默认约定并且指定对齐属性,下面的代码在Standard类中使用InverseProperty特性修复这个问题。
public class Student
{
    public Student()
    {

    }
    public int StudentID { get; set; }
    public string StudentName { get; set; }

    public Standard CurrentStandard { get; set; }
    public Standard PreviousStandard { get; set; }
}

public class Standard
{
    public Standard()
    {

    }
    public int StandardId { get; set; }
    public string StandardName { get; set; }

    [InverseProperty("CurrentStandard")]
    public ICollection<Student> CurrentStudents { get; set; }

    [InverseProperty("PreviousStandard")]
        public ICollection<Student> PreviousStudents { get; set; }

    }
 }
如上代码所示,我们在CurrentStudents和PreviousStudents属性上应用了InverseProperty特性,并且指定哪个Student类的引用属性属于它,所以现在,Code-First在Student表中仅仅会创建两个外键了。如下图所示:
当然,如果你想改外键名称,我们就给导航属性加上ForeignKey特性,如下代码所示:
public class Student
{
    public Student()
    {

    }
    public int StudentID { get; set; }
    public string StudentName { get; set; }

    public int CurrentStandardId { get; set; }
    public int PreviousStandardId { get; set; }

    [ForeignKey("CurrentStandardId")]
    public Standard CurrentStandard { get; set; }

    [ForeignKey("PreviousStandardId")]
    public Standard PreviousStandard { get; set; }
}

public class Standard
{
    public Standard()
    {

    }
    public int StandardId { get; set; }
    public string StandardName { get; set; }

    [InverseProperty("CurrentStandard")]
    public ICollection<Student> CurrentStudents { get; set; }

    [InverseProperty("PreviousStandard")]
    public ICollection<Student> PreviousStudents { get; set; }

}
上面的代码将会创建出下面的数据库表和列,我们可以看出,外键的名称已经改变了。
到此,DataAnnotation已经介绍完了,如果有什么不明白,或者我没讲清楚的地方,请大家留言~如有错误,也希望大神指出,不甚感激!
下篇开始,我们开始讲Fluent API,嗯,先睡了。。。
以上是关于EntityFramework Code-First 简易教程-------领域类配置之DataAnnotations的主要内容,如果未能解决你的问题,请参考以下文章
