网格布局之相关特性
Posted 紅葉
tags:
篇首语:本文由小常识网(cha138.com)小编为大家整理,主要介绍了网格布局之相关特性相关的知识,希望对你有一定的参考价值。
通过前面的知识,我们了解了关于网格布局的基本知识,但是在实际运用中,网格布局还有其特有的运用点,本文主要是探讨网格布局相关的独立源、网格分层和网格流动。
独立源
在web页面中,html结构是按照一种类似于树形结构的方向,根据从上到下,从前到后的顺序,依次出现,那么把这些HTML的标签元素称为源,而这些源的出现顺序被称为内容流。
.demo{
width:600px;
margin:20px auto;
}
.box{
background-color:#444;
color:#fff;
padding:10px;
margin-bottom:10px;
}
.advert1{
background-color:orange;
}
.advert2{
background-color:#f36;
}
<div class="demo">
<div class="box section1">section1</div>
<div class="box section2">section2</div>
<div class="box section3">section3</div>
<div class="box advert1">advert1</div>
<div class="box advert2">advert2</div>
</div>
在正常的web页面中,上面的结构在浏览器中的渲染结果为
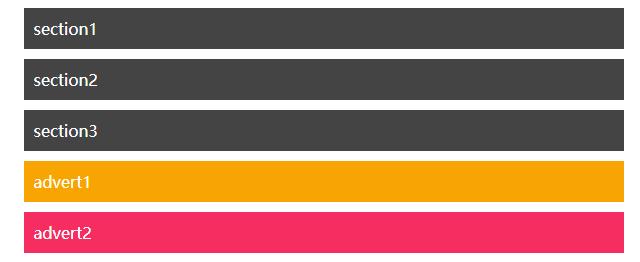
如果我们想要改变他们的位置,可以改变相应div的位置,也可以使用相对定位,计算每个的大小来确定定位位置,也就是说在不改变div的情况下,想要改变相关位置比较麻烦,此时,如果我们改用网格布局,情况就会好很多。
.demo{
display:grid;
grid-template-columns:600px;
grid-template-rows:auto;
}
.section1{grid-row:1 / 2;}
.section2{grid-row:3 / 4;}
.section3{grid-row:5 / 6;}
.advert1{grid-row:2 / 3;}
.advert1{grid-row:4 / 5;}
在第一段代码的基础上添加上面的代码,就可以得到下面的结果
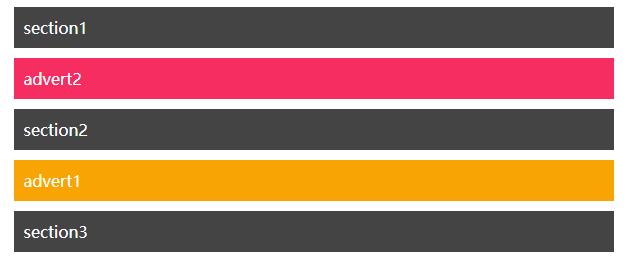
在前面的知识中我们已经了解到网格布局是通过设定网格区域的行列起止线来决定每个网格区域的位置,而不再是根据在文档流中的位置来决定每个的位置,这就是所谓的网格布局的独立源。利用网格布局的独立源,我们可以在不改变HTNL结构的情况下很容易的就根据需要实现了任何我们想要的布局效果,完全不需要考虑文档流结构的先后顺序,只需要根据设计需求,调整网格区域的行列起止线即可。
分层
在网格布局中,任何元素都是网格中的一个层,既然在一个网格中有多层存在,就会发生层与层之间的层叠,在网格布局中,网格单元格在交叉区域会发生重叠,或者在非交叉区域,使用margin负值、position定位也会发生重叠,而当网格单元格发生重叠时,可以通过z-index属相来控制网格单元在Z轴的顺序。
body{
padding: 50px;
}
.box{
background-color: #444;
color: #fff;
font-size: 150%;
padding: 20px;
text-align: center;
margin:10px;
}
.demo{
display: grid;
grid-template-columns:repeat(5,(col) 100px (gutter) 10px);
grid-template-rows:repeat(3,(row) auto (gutter) 10px);
}
.a{
grid-column:col / span gutter 2;
grid-row:row;
}
.b{
grid-column:col 3 / span gutter 3;
grid-row:row;
}
.c{
grid-column:col;
grid-row:row 2;
}
.d{
grid-column:col 2/ span gutter 3;
grid-row:row 2;
}
.e{
grid-column:col / span gutter 5;
grid-row:row 3;
background-color:rgb(56,36,136);
margin-top:-30px;
}
.f{
grid-column:col 3 / span gutter 3;
grid-row:row 2;
background-color:rgba(200,81,107,0.5);
}
<div class="demo">
<div class="box a">A</div>
<div class="box b">B</div>
<div class="box c">C</div>
<div class="box d">D</div>
<div class="box e">E</div>
<div class="box f">F</div>
</div>
在上面的代码中,我们可以看到网格区域CDEF发生了重叠,默认情况下,先渲染的在底层,后渲染的在上层,因此得到下面的效果。

我们知道,在使用相对定位布局的时候,当两个区域的定位发生重合时,可以使用z-index来决定显示顺序,在网格布局中,同样可以使用z-index来决定元素在Z轴的顺序。例如,我们在上面代码的基础上添加下面的代码,就可以得到不同的层次效果。
.c{z-index:10;}
.e{z-index: 5;}
.f{z-index: 4;}

流动
我们知道在HTML文档中存在着文档流,其实在网格布局中,同样存在网格流,就是,在一个被显式声明为网格的容器中,其所有子元素自动被认定为网格单元格,而这些网格单元格在没有被显式设置明确位置时,浏览器将会自动为这些网格单元格的位置进行计算,按照先后顺序从左向右,或从上到下排列。在这里把这种方式称之为网格的流动。
<div class="demo">
<div class="box a">A</div>
<div class="box b">B</div>
<div class="box c">C</div>
<div class="box d">D</div>
<div class="box e">E</div>
<div class="box f">F</div>
<div class="box g">G</div>
<div class="box h">H</div>
<div class="box i">I</div>
<div class="box j">J</div>
<div class="box k">K</div>
<div class="box l">L</div>
<div class="box m">M</div>
<div class="box n">N</div>
<div class="box o">O</div>
</div>
在上面的例子中,容器.demo中有14个div,后面的样式添加和改变都是基于上面的代码实现。首先,我们将上面的demo声明为网格,并添加基本样式
.demo{
width:500px;
border:1px solid orange;
padding:15px;
margin:20px auto;
display:grid;
grid-template-columns:repeat(5,100px);
grid-template-rows:auto;
}
.box{
background:orange;
height:100px;
width:100px;
line-height:100px;
text-align:center;
color:#fff;
font-size:3em;
margin-right:15px;
margin-bottom:15px;
}
.box:nth-child(even){
background:green;
}
得到如下的效果
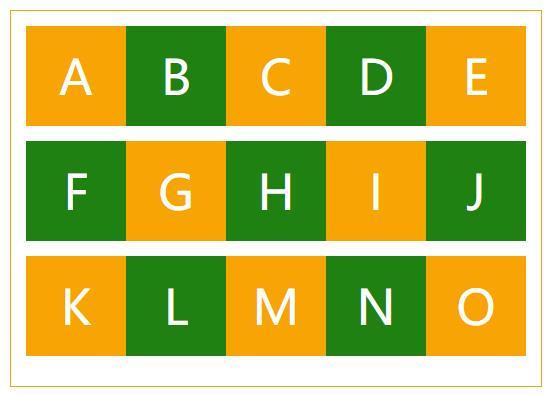
此时,容器.demo下的div都是按照先后顺序自动布局的,没有给每个.box做显式的位置定位,但此时整个.demo宽500px,平分5份,每个100px,然后每个.box有margin-right:10px,所以每个.box的宽度只有85px。默认情况下,网格流是以行来给元素布局的,也就是说grid-auto-flow的默认取值为row,因此,我们在上面的代码基础上添加下面的代码
.demo{grid-auto-flow:column;}
可以得到列布局的效果
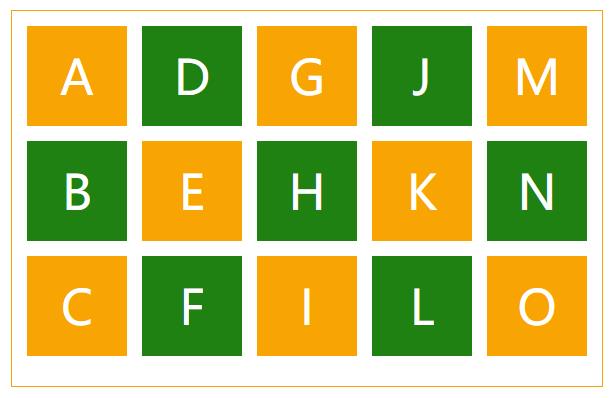
在上面的例子中,只是将自动流改为以列来布局,但所有的元素依旧 还是按照网格的自动流排列,但有些时候,仅仅改变这些是不够的,还需要为某些特定的网格做特殊的处理。
.demo{grid-auto-flow:row;}
.b {
grid-column: 3 / 6;
grid-row: 2 / 3;
outline: 2px solid red;
}
.f {
grid-area: 3 / 1 / 4 / 6;
background-color: #f36;
outline: 2px solid red;
}
在上面的代码中,我们对网格区域B和C做了特殊处理,得到如下的效果:
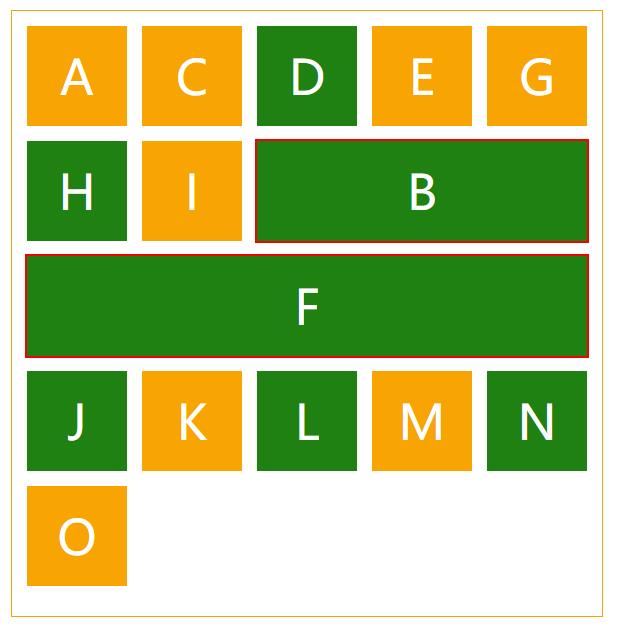
我们可以看到,盒子.b通过网格线,将B重新定位新位置上,但这样并没有影响网格的自动流。.b所在的默认位置将由其后面的.c元素补上。同样的,.f元素重新定位后,别的元素补上。而且.f扩展占有多个网格单元格,那么其他的单元格就会自动往后移。
参考资料
独立源与网格的层叠顺序:https://www.w3cplus.com/css3/source-independence-and-layering-items.html
网格的流动:https://www.w3cplus.com/css3/grid-auto-flow.html
以上是关于网格布局之相关特性的主要内容,如果未能解决你的问题,请参考以下文章