Flexbox布局
Posted 紅葉
tags:
篇首语:本文由小常识网(cha138.com)小编为大家整理,主要介绍了Flexbox布局相关的知识,希望对你有一定的参考价值。
Flexbox
Flexbox(伸缩布局盒)是css3中的一个新的布局模式,其主要思想是给容器控制项目的宽度、高度的能力,使flex项目可以自动充满容器的可用空间。
Flexbox由伸缩容器和伸缩项目组成。一个设有「display:flex」或「display:inline-flex」的元素是一个伸缩容器,伸缩容器的子元素被称为伸缩项目,这些子元素使用伸缩布局模型来排版。设置为flex 的容器被渲染为一个块级元素,而设置为inline-flex的容器则渲染为一个行内元素。
<style>
.display-test{
    width:50px;
    height:50px;
    margin:10px;
    border:1px solid red;
}
/*将伸缩容器渲染为行内元素*/
.display-test{
    display:-webkit-inline-flex;
    display: inline-flex;
}
</style>
<body>
    <div class="display-test">1</div>
    <div class="display-test">2</div>
    <div class="display-test">3</div>
    <div class="display-test">4</div>
</body>

<style>
.display-test{
    width:50px;
    height:50px;
    margin:10px;
    border:1px solid red;
}
/*将伸缩容器渲染为块级元素*/
.display-test{
    display:-webkit-flex;
    display: flex;
}
</style>
<body>
    <div class="display-test">1</div>
    <div class="display-test">2</div>
    <div class="display-test">3</div>
    <div class="display-test">4</div>
</body>

概念和术语

伸缩容器相关属性
flex-direction伸缩流的方向
在Flexbox中使用主轴和侧轴的概念,伸缩行跟随主轴,侧轴垂直于主轴,默认情况下,伸缩行和文本方向一致:从左至右,从上往下。而flex-direction允许我们更改伸缩容器的主轴方向,常见取值如下:
row:默认值,表示伸缩项目根据书写默认的方向布局(默认的从左至右,从上往下)。
row-reverse: 主轴起点和主轴终点交换。如果书写模式是从左至右,伸缩项目则是从右往左显示。
column: 主轴和侧轴交换。如果书写系统是垂直的,那么伸缩项目也是垂直显示的。
column-reverse: 和 column 一样,但是方向相反。
<style>
.flex-container{
display: flex;
width:200px;
height:200px;
border:1px solid blue;
}
.item{
width:60px;
height:40px;
border:1px solid red;
margin:5px;
}
.flex-container{
flex-direction:row;
}
</style>
<div class="flex-container">
<div class="item">第一个</div>
<div class="item">第二个</div>
<div class="item">第三个</div>
</div>


当flex-direction取默认值row时,伸缩行与文本方向保持一致,采用默认的从上到下,从左到右的布局,得到左图的效果。当我们更改flex-direction的值为column时,主轴和侧轴交换,得到右图的效果。
justify-content主轴对齐
justify-content属性用于在主轴上对齐伸缩项目。只有当一行上的所有伸缩项目都不能伸缩或可伸缩但是已经达到其最大长度时,这一属性才会对多余的空间进行分配。当项目溢出某一行时,这一属性也会在项目的对齐上施加一些控制。常见取值如下:
flex-start:默认值,伸缩项目向一行的起始位置靠齐(flex-direction为row时,是左对齐,为row-reverse是,则为右对齐,上下同理)。
flex-end:伸缩项目向一行的结束位置靠齐(flex-direction为row时,是右对齐,为row-reverse是,则为左对齐,上下同理)。
center:伸缩项目向一行的中间位置靠齐,该行的伸缩项目将相互对齐并在行中居中对齐,且第一个项目与起点边的距离等同于最后一个项目与终点边的距离(如果剩余空间为负数,则保持两端溢出的长度相等)。
space-between:伸缩项目会平均地分布在一行里,第一个项目和最后一个项目靠近边缘,其他项目在确保两两之间的空白空间相等的情况下平均分布。当剩余空间是负数,或该行只有一个伸缩项目,则此值等效于flex-start。
space-around:伸缩项目会平均地分布在行里,伸缩项目在确保两两之间的空白空间相等,同时第一个元素前的空间以及最后一个元素后的空间为其他空白空间的一半下平均分布。当剩余空间是负数,或该行只有一个伸缩项目,则该值等效于center。
<style>
.flex-container{
display: flex;
width:260px;
height:100px;
border:1px solid blue;
}
.item{
width:60px;
height:40px;
border:1px solid red;
}
.flex-container{
justify-content: space-between;
}
</style>
<div class="flex-container">
<div class="item">第一个</div>
<div class="item">第二个</div>
<div class="item">第三个</div>
</div>
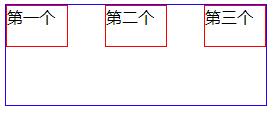

当justify-content的取值为 space-between时,得到左图的效果,此时主轴起点和终点位置没有空白,其他两两项目之间的空白相等;当justify-content的取值为 space-around时,得到右图效果,此时主轴起点和终点位置的空白等于其他两两项目之间的空白的一半。
align-items侧轴对齐
align-items属性用于在伸缩容器的当前行的侧轴上进行对齐,类似于justify-content属性,但是是另一个方向。常见取值有flex-start(默认值)、flex-end、center、baseline、stretch,其中stretch会将伸缩项目从侧轴起点拉伸至侧轴终点,baseline将参与基线对齐。所有参与该对齐方式的伸缩项目将按下列方式排列:首先将这些伸缩项目的基线进行对齐,随后其中基线至侧轴起点边的外边距距离最长的那个项目将紧靠住该行在侧轴起点的边。
.flex-container{
display: flex;
width:260px;
height:100px;
border:1px solid blue;
}
.item{
width:60px;
border:1px solid red;
margin:5px;
}
.one{height:30px;}
.two{height:50px;}
.three{height:80px;}
.flex-container{
align-items:center;
}
<div class="flex-container">
<div class="item one">第一个</div>
<div class="item two">第二个</div>
<div class="item three">第三个</div>
</div>

上图为align-items的取值为center时的效果,此时伸缩项目的外边距盒在该行的侧轴上居中放置(如果伸缩行的尺寸小于伸缩项目,则伸缩项目会向两个方向溢出相同的量),需要注意的是,当取值为baseline时,如果伸缩项目的行内轴与侧轴为同一条,则该值与flex-start等效。
flex-wrap伸缩行换行
默认情况下,每个伸缩容器都只有一个伸缩行,而使用 flex-wrap 时,我们可以为伸缩容器创建多个伸缩行。该属性常见取值如下:
nowrap:默认值,伸缩容器为单行。
wrap:伸缩容器为多行,在一个伸缩行容不下所有伸缩项目时,伸缩项目会换行到一条新增的伸缩行上。新增的伸缩行根据侧轴的方向添加。
wrap-reverse:和wrap一样,只是新的伸缩行会被添加到侧轴的反方向。
.flex-container{
display: flex;
width:200px;
height:100px;
border:1px solid blue;
}
.item{
width:80px;
height:30px;
border:1px solid red;
}
.flex-container{
flex-wrap:nowrap;
}
<div class="flex-container">
<div class="item">第一个</div>
<div class="item">第二个</div>
<div class="item">第三个</div>
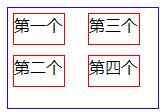
<div class="item">第四个</div>
</div>
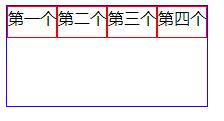

默认情况下,即flex-wrap 取值为nowrap时,伸缩容器为单行,如左图所示,当改变flex-wrap 的值为wrap-reverse时,伸缩容器为多行,且新的伸缩行被添加到侧轴的饭方向。
align-content堆栈伸缩行
align-content用于更改flex-wrap的行为,和align-items相似,但是不是对齐伸缩项目,它对齐的是伸缩行,因此本属性在只有一行的伸缩容器上没有效果,常见取值包括stretch(默认值)、flex-start、flex-end、center、space-between、space-around,这些值同justify-content和align-items中的值一样。
.flex-container{
display: flex;
width:200px;
height:150px;
border:1px solid blue;
flex-wrap:wrap;
}
.item{
width:80px;
height:30px;
border:1px solid red;
}
.flex-container{
align-content:space-around;
}
<div class="flex-container">
<div class="item">第一个</div>
<div class="item">第二个</div>
<div class="item">第三个</div>
<div class="item">第四个</div>
<div class="item">第五个</div>
<div class="item">第六个</div>
</div>
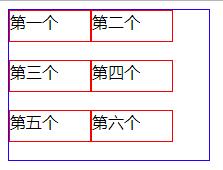

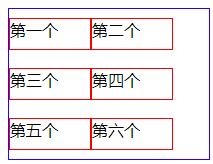
默认情况下,即align-content取值为stretch时,各行伸展平分剩余空间,如左图所示;当align-content取值为flex-end时,各行向伸缩容器的结束位置堆叠,且最后一行在靠近侧轴终点边位置没有空白,如中间图所示;当align-content取值为space-around时,各行会在保持两两之间的空间相等,同时第一行前面及最后一行后面的空间是其他空间的一半的状况下排列,如果剩余的空间是负数或伸缩容器中只有一行,该值等效于center,如右图所示。
flex-flow伸缩方向与换行
flex-flow是flex-direction和flex-wrap的缩写,常见取值如下:
row:主轴是行内方向,没有换行
column wrap:主轴是块的方向,换行往行内方向,在英文页面中,主轴是上往下,往右换行
row-reverse wrap-reverse:主轴与行内方向相反(右到左),新行换行向上。
.flex-container{
display: flex;
width:150px;
height:100px;
border:1px solid blue;
}
.item{
width:50px;
height:30px;
border:1px solid red;
margin:5px;
}
.flex-container{
flex-flow:row-reverse wrap-reverse;
}
<div class="flex-container">
<div class="item">第一个</div>
<div class="item">第二个</div>
<div class="item">第三个</div>
<div class="item">第四个</div>
</div>


当flex-flow取值为row时,效果如左图;当flex-flow取值为column wrap时,效果如中间图,当flex-flow取值为row-reverse wrap-reverse时,效果如右图。
伸缩项目的属性
order显示顺序
在伸缩项目中,可以通过设置order属性的值来调整它们渲染时的顺序,伸缩容器会从序号最小的项目开始排序。该属性默认值为0。
.flex-container{
display: flex;
width:200px;
height:80px;
border:1px solid blue;
}
.item{
width:60px;
height:40px;
border:1px solid red;
margin:5px;
}
.one{order:1;}
.two{order:-1;}
<div class="flex-container">
<div class="item one">第一个</div>
<div class="item two">第二个</div>
<div class="item three">第三个</div>
</div>

默认情况下,三个伸缩项目会按照顺序一次渲染,当为其中两个添加order值时,会按照-1、0、1的顺序依次渲染,得到上面所示效果。常用于点击事件中,将当前点击项提前。
margin外边距
在伸缩盒中,margin不仅能实现在常规布局中的功能,还可以更强大。一个“auto”的margin可以合并剩余空间,将伸缩项目挤到其他位置,类似于普通流中的自动外边距,在计算伸缩基准值和伸缩长度时,自动外边距相当于「0」。在使用justify-content和align-self控制对齐前,所有正值的空间会在对应维度上被自动外边距平均分配。在已要溢出的元素上,自动外边距没有作用,元素会往 “尾”/“脚” 边溢出。需要注意的是,如果空间被自动外边距平均分配了,则对齐相关的属性在这一维度上没有作用,因为外边距偷走了伸缩后所有的可用空间。
.flex-container{
display: flex;
width:160px;
height:100px;
border:1px solid blue;
}
.item{
height:40px;
border:1px solid red;
}
.item{
margin-right:auto;
}
<div class="flex-container">
<div class="item">第一个</div>
</div>


在上面的代码中,我们为伸缩项目添加了margin-right:auto,使得所有的剩余空间都被合并到了元素的右边,呈现上面左图的效果;当我们更改外边距为margin-left:auto时,所有的剩余空间都被合并到了元素的左边,呈现上面中间图的效果;继续修改,将外边距设置为margin:auto,就会得到经典的水平垂直居中效果,如上面右图所示。
flex伸缩性
伸缩布局决定性的特性是让伸缩项目「可伸缩」,也就是让伸缩项目的宽度或高度自动填充剩余的空间,这可以用flex属性完成,实现伸缩容器等比地按照各伸缩项目的扩展比率分配剩余空间,或按照收缩比率缩小各项目以避免溢出。
.flex-container{
display: flex;
width:200px;
height:100px;
border:1px solid blue;
}
.item{
border:1px solid red;
margin:5px;
flex:1;
}
.two{
flex:5;
}
<div class="flex-container">
<div class="item one">第一个</div>
<div class="item two">第二个</div>
<div class="item three">第三个</div>
</div>
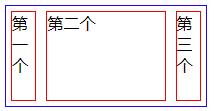
在上面例子中,第二个项目占用了剩余空间的5/7,其余两个各占用剩余空间的1/7。
参考资料
1、深入了解Flexbox伸缩盒模型 https://www.w3cplus.com/blog/666.html
2、https://www.w3.org/html/ig/zh/wiki/Css3-flexbox/zh-hans
以上是关于Flexbox布局的主要内容,如果未能解决你的问题,请参考以下文章