Elasticsearch学习笔记——安装和数据导入
Posted tags:
篇首语:本文由小常识网(cha138.com)小编为大家整理,主要介绍了Elasticsearch学习笔记——安装和数据导入相关的知识,希望对你有一定的参考价值。
到elasticsearch网站下载最新版本的elasticsearch 6.2.1
https://www.elastic.co/downloads/elasticsearch
其他版本
https://www.elastic.co/cn/downloads/past-releases/elasticsearch-6-4-2
嫌弃官方下载速度慢的可以去华为的镜像站去
https://mirrors.huaweicloud.com/elasticsearch/6.4.2/
中文文档请参考
https://www.elastic.co/guide/cn/elasticsearch/guide/current/index.html
英文文档及其Java API使用方法请参考,官方文档比任何博客都可信
https://www.elastic.co/guide/en/elasticsearch/client/java-api/current/index.html
Python API使用方法
http://elasticsearch-py.readthedocs.io/en/master/
下载tar包,然后解压到/usr/local目录下,修改一下用户和组之后可以使用非root用户启动,启动命令
./bin/elasticsearch
然后访问http://127.0.0.1:9200/

如果需要让外网访问Elasticsearch的9200端口的话,需要将es的host绑定到外网
修改 /configs/elasticsearch.yml文件,添加如下
network.host: 0.0.0.0
http.port: 9200
然后重启,如果遇到下面问题的话
[2018-01-28T23:51:35,204][INFO ][o.e.b.BootstrapChecks    ] [qR5cyzh] bound or publishing to a non-loopback address, enforcing bootstrap checks
ERROR: [2] bootstrap checks failed
[1]: max file descriptors [4096] for elasticsearch process is too low, increase to at least [65536]
[2]: max virtual memory areas vm.max_map_count [65530] is too low, increase to at least [262144]
解决方法
第一个ERROR,
在文件中添加 sudo vim /etc/security/limits.conf,然后重新登录
* soft nofile 65536
* hard nofile 131072
* soft nproc 2048
* hard nproc 4096
如果你是用supervisor启动es的话,需要修改文件 vim /etc/supervisor/supervisord.conf,然后重启supervisor
[supervisord]

minfds=65536
第二个ERROR,在root用户下执行
临时解决
sysctl -w vm.max_map_count=262144
永久解决
cat /proc/sys/vm/max_map_count
sudo vim /etc/sysctl.conf
添加
vm.max_map_count=262144
然后使其生效
sysctl -p
接下来导入json格式的数据,数据内容如下
{"index":{"_id":"1"}}
{"title":"许宝江","url":"7254863","chineseName":"许宝江","sex":"男","occupation":" 滦县农业局局长","nationality":"中国"}
{"index":{"_id":"2"}}
{"title":"鲍志成","url":"2074015","chineseName":"鲍志成","occupation":"医师","nationality":"中国","birthDate":"1901年","deathDate":"1973年","graduatedFrom":"香港大学"}
需要注意的是{"index":{"_id":"1"}}和文件末尾另起一行换行是不可少的
其中的id可以从0开始,甚至是abc等等
否则会出现400状态,错误提示分别为
Malformed action/metadata line [1], expected START_OBJECT or END_OBJECT but found [VALUE_STRING]
The bulk request must be terminated by a newline [\\n]"
使用下面命令来导入json文件
其中的people.json为文件的路径,可以是/home/common/下载/xxx.json
其中的es是index,people是type,在elasticsearch中的index和type可以理解成关系数据库中的database和table,两者都是必不可少的
curl -H "Content-Type: application/json" -XPOST \'localhost:9200/es/people/_bulk?pretty&refresh\' --data-binary "@people.json"
成功后的返回值是200,比如
{
  "took" : 233,
  "errors" : false,
  "items" : [
    {
      "index" : {
        "_index" : "es",
        "_type" : "people",
        "_id" : "1",
        "_version" : 1,
        "result" : "created",
        "forced_refresh" : true,
        "_shards" : {
          "total" : 2,
          "successful" : 1,
          "failed" : 0
        },
        "_seq_no" : 0,
        "_primary_term" : 1,
        "status" : 201
      }
    },
    {
      "index" : {
        "_index" : "es",
        "_type" : "people",
        "_id" : "2",
        "_version" : 1,
        "result" : "created",
        "forced_refresh" : true,
        "_shards" : {
          "total" : 2,
          "successful" : 1,
          "failed" : 0
        },
        "_seq_no" : 0,
        "_primary_term" : 1,
        "status" : 201
      }
    }
  ]
}
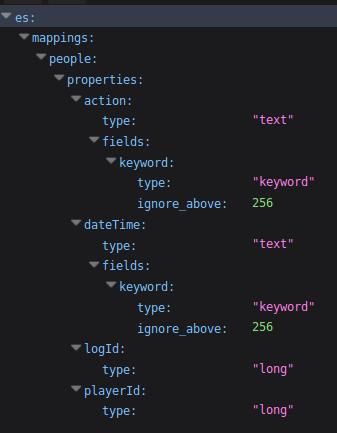
<0>查看字段的mapping
http://localhost:9200/es/people/_mapping

接下来可以使用对应的查询语句对数据进行查询
<1>按id来查询
http://localhost:9200/es/people/1

<2>简单的匹配查询,查询某个字段中包含某个关键字的数据(GET)
http://localhost:9200/es/people/_search?q=_id:1
http://localhost:9200/es/people/_search?q=title:许

<3>多字段查询,在多个字段中查询包含某个关键字的数据(POST)
可以使用Firefox中的RESTer插件来构造一个POST请求,在升级到Firefox quantum之后,原来使用的Poster插件挂了
在title和sex字段中查询包含 许 字的数据
{
    "query": {
        "multi_match" : {
            "query" : "许",
            "fields": ["title", "sex"]
        }
    }
}


还可以额外指定返回值
size指定返回的数量
from指定返回的id起始值
_source指定返回的字段
highlight指定语法高亮
{
    "query": {
        "multi_match" : {
            "query" : "中国",
            "fields": ["nationality", "sex"]
        }
    },
    "size": 2,
    "from": 0,
    "_source": [ "title", "sex", "nationality" ],
    "highlight": {
        "fields" : {
            "title" : {}
        }
    }
}
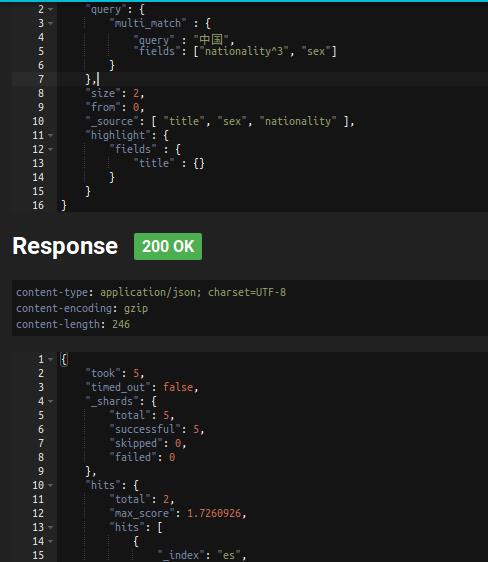
<4>Boosting
用于提升字段的权重,可以将max_score的分数乘以一个系数
{
    "query": {
        "multi_match" : {
            "query" : "中国",
            "fields": ["nationality^3", "sex"]
        }
    },
    "size": 2,
    "from": 0,
    "_source": [ "title", "sex", "nationality" ],
    "highlight": {
        "fields" : {
            "title" : {}
        }
    }
}

<5>组合查询,可以实现一些比较复杂的查询
AND -> must
NOT -> must not
OR -> should
{
    "query": {
        "bool": {
            "must": {
                "bool" : {
                    "should": [
                      { "match": { "title": "鲍" }},
                      { "match": { "title": "许" }} ],
                    "must": { "match": {"nationality": "中国" }}
                }
            },
            "must_not": { "match": {"sex": "女" }}
        }
    }
}
<6>模糊(Fuzzy)查询(POST)
{
    "query": {
        "multi_match" : {
            "query" : "厂长",
            "fields": ["title", "sex","occupation"],
            "fuzziness": "AUTO"
        }
    },
    "_source": ["title", "sex", "occupation"],
    "size": 1
}
通过模糊匹配将 厂长 和 局长 匹配上
AUTO的时候,当query的长度大于5的时候,模糊值指定为2

<7>通配符(Wildcard)查询(POST)
? 匹配任何字符
* 匹配零个或多个字
{
    "query": {
        "wildcard" : {
            "title" : "*宝"
        }
    },
    "_source": ["title", "sex", "occupation"],
    "size": 1
}
<8>正则(Regexp)查询(POST)
{
    "query": {
        "regexp" : {
            "authors" : "t[a-z]*y"
        }
    },
    "_source": ["title", "sex", "occupation"],
    "size": 3
}
<9>短语匹配(Match Phrase)查询(POST)
短语匹配查询 要求在请求字符串中的所有查询项必须都在文档中存在,文中顺序也得和请求字符串一致,且彼此相连。
默认情况下,查询项之间必须紧密相连,但可以设置 slop 值来指定查询项之间可以分隔多远的距离,结果仍将被当作一次成功的匹配。
{
    "query": {
        "multi_match" : {
            "query" : "许长江",
            "fields": ["title", "sex","occupation"],
            "type": "phrase"
        }
    },
    "_source": ["title", "sex", "occupation"],
    "size": 3
}
注意使用slop的时候距离是累加的,滦农局 和 滦县农业局 差了2个距离
{
    "query": {
        "multi_match" : {
            "query" : "滦农局",
            "fields": ["title", "sex","occupation"],
            "type": "phrase",
            "slop":2
        }
    },
    "_source": ["title", "sex", "occupation"],
    "size": 3
}
<10>短语前缀(Match Phrase Prefix)查询
https://www.elastic.co/guide/cn/elasticsearch/guide/current/prefix-query.html
比如
GET /my_index/address/_search
{
    "query": {
        "prefix": {
            "postcode": "W1"
        }
    }
}
一些比较复杂的DSL
GET index_*/_search
{
  "query": {
        "bool": {
            "must": [{
                "range" : {
                  "publish_date" : {
                      "gt" : "2014-01-01",
                      "lt" : "2019-01-07"
                  }
                }
            },
            { "multi_match": {
              "query": "免费",
              "fields":["name1","name2","name3","name4","name5","name6"]
              }
            },
            { "multi_match": {
              "query": "英语",
              "fields":["name1","name2","name3","name4","name5","name6"]
              }
            }

            ],
            "must_not": { "match": {"tags": "" }},
            "filter": {
                "range": { "count": { "gte": "30" ,"lte": "1000"}}
            }
        }
    },
  "aggs": {
    "by_tags": {
      "terms": { "field": "field1"
      },
      "aggs": {
      "sales": {
         "date_histogram": {
            "field": "date",
            "interval": "day",
            "format": "yyyy-MM-dd"
         }
      }
   }
    }
  },
  "_source": [],
  "size": 1
}
带有去重的
GET xxxx_2019-09-10/_search
{
  "query": {
        "bool": {
            "must": [
              {
                "range" : {
                  "xxxx" : {
                      "gt" : "2014-01-01",
                      "lt" : "2019-01-07"
                  }
                }
              },
              {
                "terms": {
                  "xxxx": ["xxx","xxx"]
                }
              },
              {
                "terms": {
                  "xxx": ["xxx","xxx"]
                }
              },
              {
                "terms": {
                  "xxx": ["xxx"]
                }
              },
              {
                "bool": {
                  "should": [
                      {
                          "range": {
                            "xxx": { "gte": 1 ,"lte": 2.99 }}
                      },
                      {"range": {
                        "xxx": { "gte": 3.99 ,"lte": 7.99 }}
                      }
              ]}},{
                "bool": {
                  "should": [
                      {
                          "range": {
                            "xxx": { "gte": 0 ,"lte": 100 }}
                      },
                      {"range": {
                        "xxx": { "gte": 1000 ,"lte": 10000 }}
                      }
              ]}}
          ],
          "must_not": { "match": {"xx": "" }}


        }
    },
    "collapse":{
        "field":"xxx"
    },
  "aggs": {
    "by_tags": {
      "terms": { "field": "xxx"
      },
      "aggs": {
      "sales": {
         "date_histogram": {
            "field": "xxx",
            "interval": "month",
            "format": "yyyy-MM-dd"
         }
      }
   }
    }
  },
  "_source":["xxx"],
  "size": 10
}
<11>带嵌套对象查询
参考:https://www.elastic.co/guide/cn/elasticsearch/guide/current/nested-query.html
由于嵌套对象 被索引在独立隐藏的文档中,我们无法直接查询它们。 相应地,我们必须使用 nested 查询 去获取它们:
对于nested对象的查询,需要套上一层nested
GET /xxxxx/_search
{
  "query": {
    "bool": {
      "must": [
        {
          "nested": {
            "path": "t4",
            "query": {
              "bool": {
                "must": [
                  {
                    "match": {
                      "t4.t1": "HelloWorld"
                    }
                  }
                ]
              }
            }
          }
        }
      ]
}}
}
或者
GET /xxxxx/_search
{
    "query": {
    "nested": {
      "path": "t4",
      "query": {
        "multi_match" : {
            "query" : "HelloWorld",
            "fields": ["t4.t1", "sex"]
        }
    }
    }}
}
Es优化:
Elasticsearch 技术分析(七): Elasticsearch 的性能优化
查看索引是否关闭
http://localhost:9200/_cat/indices/index_name?h=status
重建索引
因为数值类型的es字段,在query的字符串不能转换成数值的时候,需要把字段的类型从long改成keyword,先修改索引模板的字段的类型,然后执行reindex命令
POST _reindex
{
  "source": {
    "index": "twitter1"
  },
  "dest": {
    "index": "twitter1_new"
  }
}
以上是关于Elasticsearch学习笔记——安装和数据导入的主要内容,如果未能解决你的问题,请参考以下文章