因为有CMake自动化配置工具,在Windows平台上安装Geant4与Linux平台几乎同样方便。与使用Linux不同的是,官方更鼓励使用集成开发环境Visual Studio (VS)来编译安装。下面简单介绍一下。
系统环境: Windows10, Visual Studio 2017 (community), CMake 3.10, Geant4.10.04
1. 系统准备
首先下载安装Visual Studio 2017 和最新版本CMake,笔者这里使用的是社区(community)版本的VS和3.10版本的 CMake.
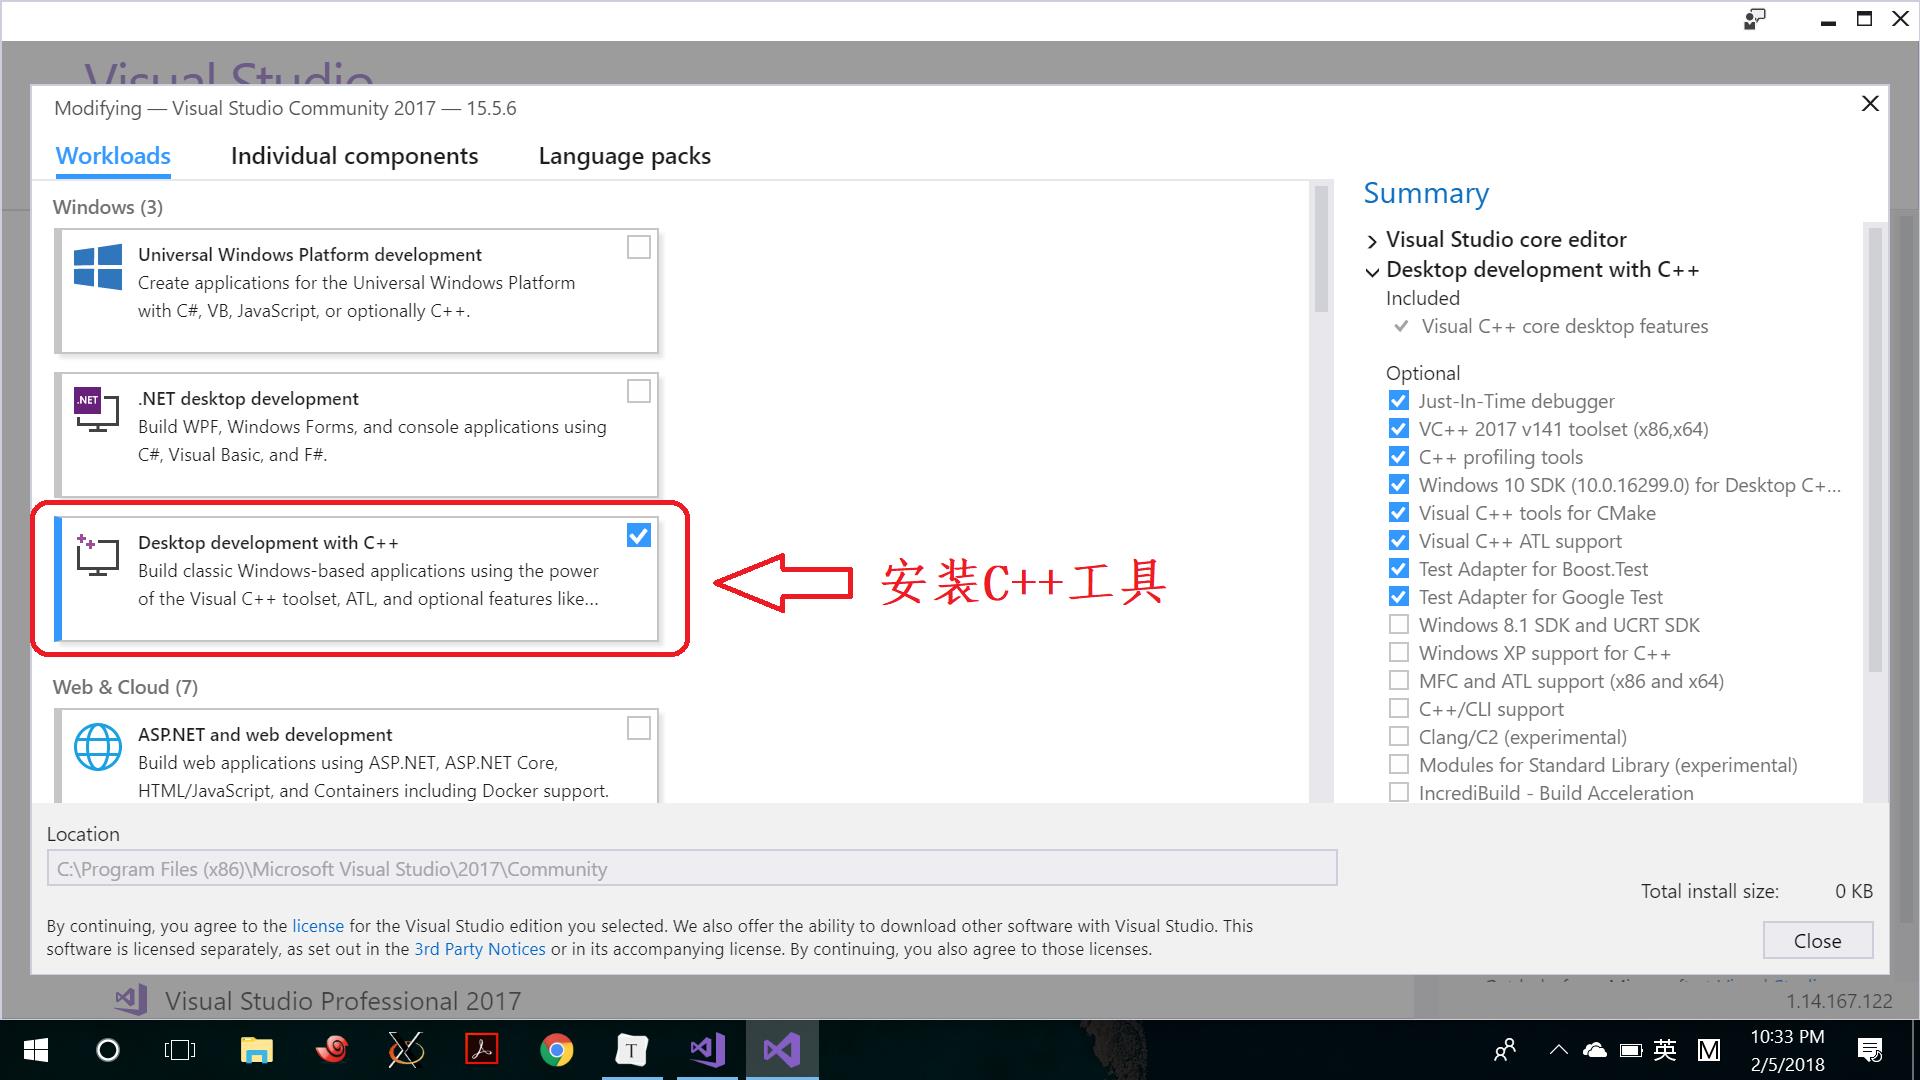
(a) 安装完VS后需要添加C++工具包:选中 Tools > Get Tools and Features 安装必需的C++编译工具。

要验证C++工具包是不是正确安装了,可以选中 Tools > Visual Studio Command Prompt ,在VS中打开命令终端, 输入cl. 如果没有找到这个命令,那就是没有成功。
D:\\>cl
Microsoft (R) C/C++ Optimizing Compiler Version 19.12.25835 for x86
Copyright (C) Microsoft Corporation.  All rights reserved.

usage: cl [ option... ] filename... [ /link linkoption... ]
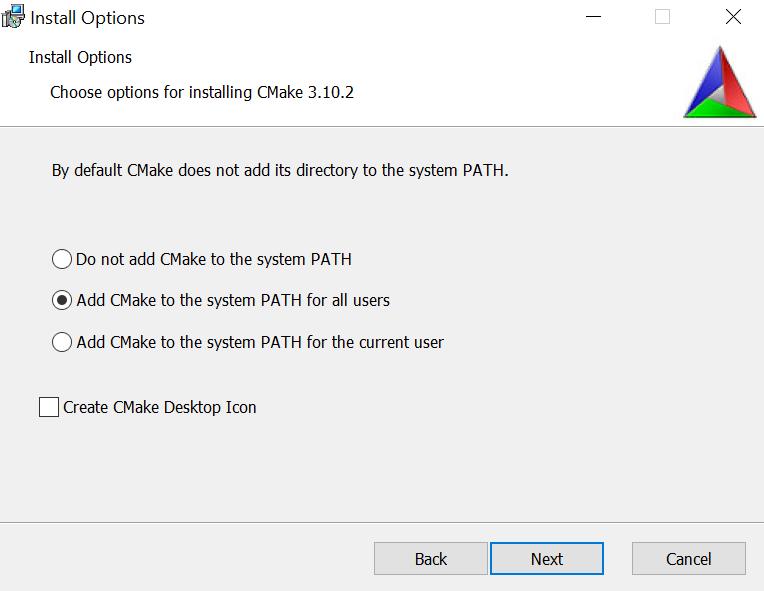
(b) CMake的安装过程中需要选择 Add CMake to the System PATH for all users.

2. 下载Geant4
到Geant4官网下载最新版本Geant4.10.04.zip, 解压到指定位置,譬如D盘,这样我们就有了文件夹D:\\geant4_10_04, 我们再创建文件夹D:\\geant4_10_04\\build用来存放编译安装的临时文件。
3. 编译
以下操作需要简单的DOS命令。
打开Tools > Visual Studio Command Prompt, 进入D盘的build文件夹中运行CMake.
> D:
> cd geant4_10_04/build
> cmake -DCMAKE_INSTALL_PREFIX="D:\\geant4_10_04" -DGEANT4_INSTALL_DATA=ON -DGEANT4_USE_OPENGL_WIN32=ON "D:\\geant4_10_04"
注意:这里的openGL选项不是GEANT4_USE_OPENGL_X11,而是_WIN32结尾.
如果你看到类似输出,那就是成功了,特别是dataset和openGL等选定的特性确实开启了。
-- Configuring download of missing dataset G4NEUTRONXS (1.4)
-- Configuring download of missing dataset G4PII (1.3)
-- Configuring download of missing dataset RealSurface (2.1)
-- Configuring download of missing dataset G4SAIDDATA (1.1)
-- Configuring download of missing dataset G4ABLA (3.1)
-- Configuring download of missing dataset G4ENSDFSTATE (2.2)
-- The following Geant4 features are enabled:
GEANT4_BUILD_CXXSTD: Compiling against C++ Standard \'11\'
GEANT4_USE_OPENGL_WIN32: Build OpenGL driver with Win32 support

-- Configuring done
-- Generating done
-- Build files have been written to: D:/geant4_10_04/build
运行以下命令编译Geant4.
> cmake --build . --config Release
如果输出结果有类似结尾,那么应该没有问题。
FinalizeBuildStatus:
  Deleting file "Win32\\Release\\ALL_BUILD\\ALL_BUILD.tlog\\unsuccessfulbuild".
  Touching "Win32\\Release\\ALL_BUILD\\ALL_BUILD.tlog\\ALL_BUILD.lastbuildstate".
Done Building Project "D:\\geant4_10_04\\build\\ALL_BUILD.vcxproj" (default targets).


Build succeeded.
    0 Warning(s)
    0 Error(s)
4. 安装
> cmake --build . --config Release --target install
输出结果应该类似这样结尾:
  -- Installing: D:/geant4_10_04/include/Geant4/G4VisTrajContext.hh
  -- Installing: D:/geant4_10_04/include/Geant4/G4VisTrajContext.icc
FinalizeBuildStatus:
  Deleting file "Win32\\Release\\INSTALL\\INSTALL.tlog\\unsuccessfulbuild".
  Touching "Win32\\Release\\INSTALL\\INSTALL.tlog\\INSTALL.lastbuildstate".
Done Building Project "D:\\geant4_10_04\\build\\install.vcxproj" (default targets).


Build succeeded.
    0 Warning(s)
    0 Error(s)
以上已经安装完成,但是在实际使用前还要设置环境变量。
5. 设置环境变量
如何添加环境变量请自行百度。
PATH 追加 D:\\geant4_10_04\\bin
G4ENSDFSTATEDATA D:\\geant4_10_04\\share\\Geant4-10.4.0\\data\\G4ENSDFSTATE2.2
G4LEDATA D:\\geant4_10_04\\share\\Geant4-10.4.0\\data\\G4EMLOW7.3
G4LEVELGAMMADATA D:\\geant4_10_04\\share\\Geant4-10.4.0\\data\\PhotonEvaporation5.2
G4SAIDXSDATA D:\\geant4_10_04\\share\\Geant4-10.4.0\\data\\G4SAIDDATA1.1
G4NEUTRONHPDATA D:\\geant4_10_04\\share\\Geant4-10.4.0\\data\\G4NDL4.5
G4NEUTRONXSDATA D:\\geant4_10_04\\share\\Geant4-10.4.0\\data\\G4NEUTRONXS1.4
G4PIIDATA D:\\geant4_10_04\\share\\Geant4-10.4.0\\data\\G4PII1.3
G4RADIOACTIVEDATA D:\\geant4_10_04\\share\\Geant4-10.4.0\\data\\RadioactiveDecay5.2
G4REALSURFACEDATA D:\\geant4_10_04\\share\\Geant4-10.4.0\\data\\RealSurface2.1
G4ABLADATA D:\\geant4_10_04\\share\\Geant4-10.4.0\\data\\G4ABLA3.1
示例example/basic/B1的测试
> cd example/basic/B1
> mkdir build
> cd build
> cmake -DGeant4_DIR="D:\\geant4_10_04\\lib\\Geant4-10.4.0" ..
> cmake --build . --config Release
第一个CMake的输出结果类似这样
-- Building for: Visual Studio 15 2017
-- The C compiler identification is MSVC 19.12.25835.0
-- The CXX compiler identification is MSVC 19.12.25835.0
-- Check for working C compiler: C:/Program Files (x86)/Microsoft Visual Studio/2017/Community/VC/Tools/MSVC/14.12.25827/bin/Hostx86/x86/cl.exe
-- Check for working C compiler: C:/Program Files (x86)/Microsoft Visual Studio/2017/Community/VC/Tools/MSVC/14.12.25827/bin/Hostx86/x86/cl.exe -- works
-- Detecting C compiler ABI info
-- Detecting C compiler ABI info - done
-- Check for working CXX compiler: C:/Program Files (x86)/Microsoft Visual Studio/2017/Community/VC/Tools/MSVC/14.12.25827/bin/Hostx86/x86/cl.exe
-- Check for working CXX compiler: C:/Program Files (x86)/Microsoft Visual Studio/2017/Community/VC/Tools/MSVC/14.12.25827/bin/Hostx86/x86/cl.exe -- works
-- Detecting CXX compiler ABI info
-- Detecting CXX compiler ABI info - done
-- Detecting CXX compile features
-- Detecting CXX compile features - done
-- Configuring done
-- Generating done
-- Build files have been written to: D:/examples/basic/B1/build
第二个CMake输出结果应会告诉你编译有没有成功。
Build succeeded.

"D:\\examples\\basic\\B1\\build\\ALL_BUILD.vcxproj" (default target) (1) ->
"D:\\examples\\basic\\B1\\build\\exampleB1.vcxproj" (default target) (3) ->
(ClCompile target) ->
  d:\\geant4_10_04\\include\\geant4\\g4mergemode.hh(75): warning C4715: \'G4Accumulables::GetMergeFunction<double>\': not all
 control paths return a value [D:\\examples\\basic\\B1\\build\\exampleB1.vcxproj]

    1 Warning(s)
    0 Error(s)
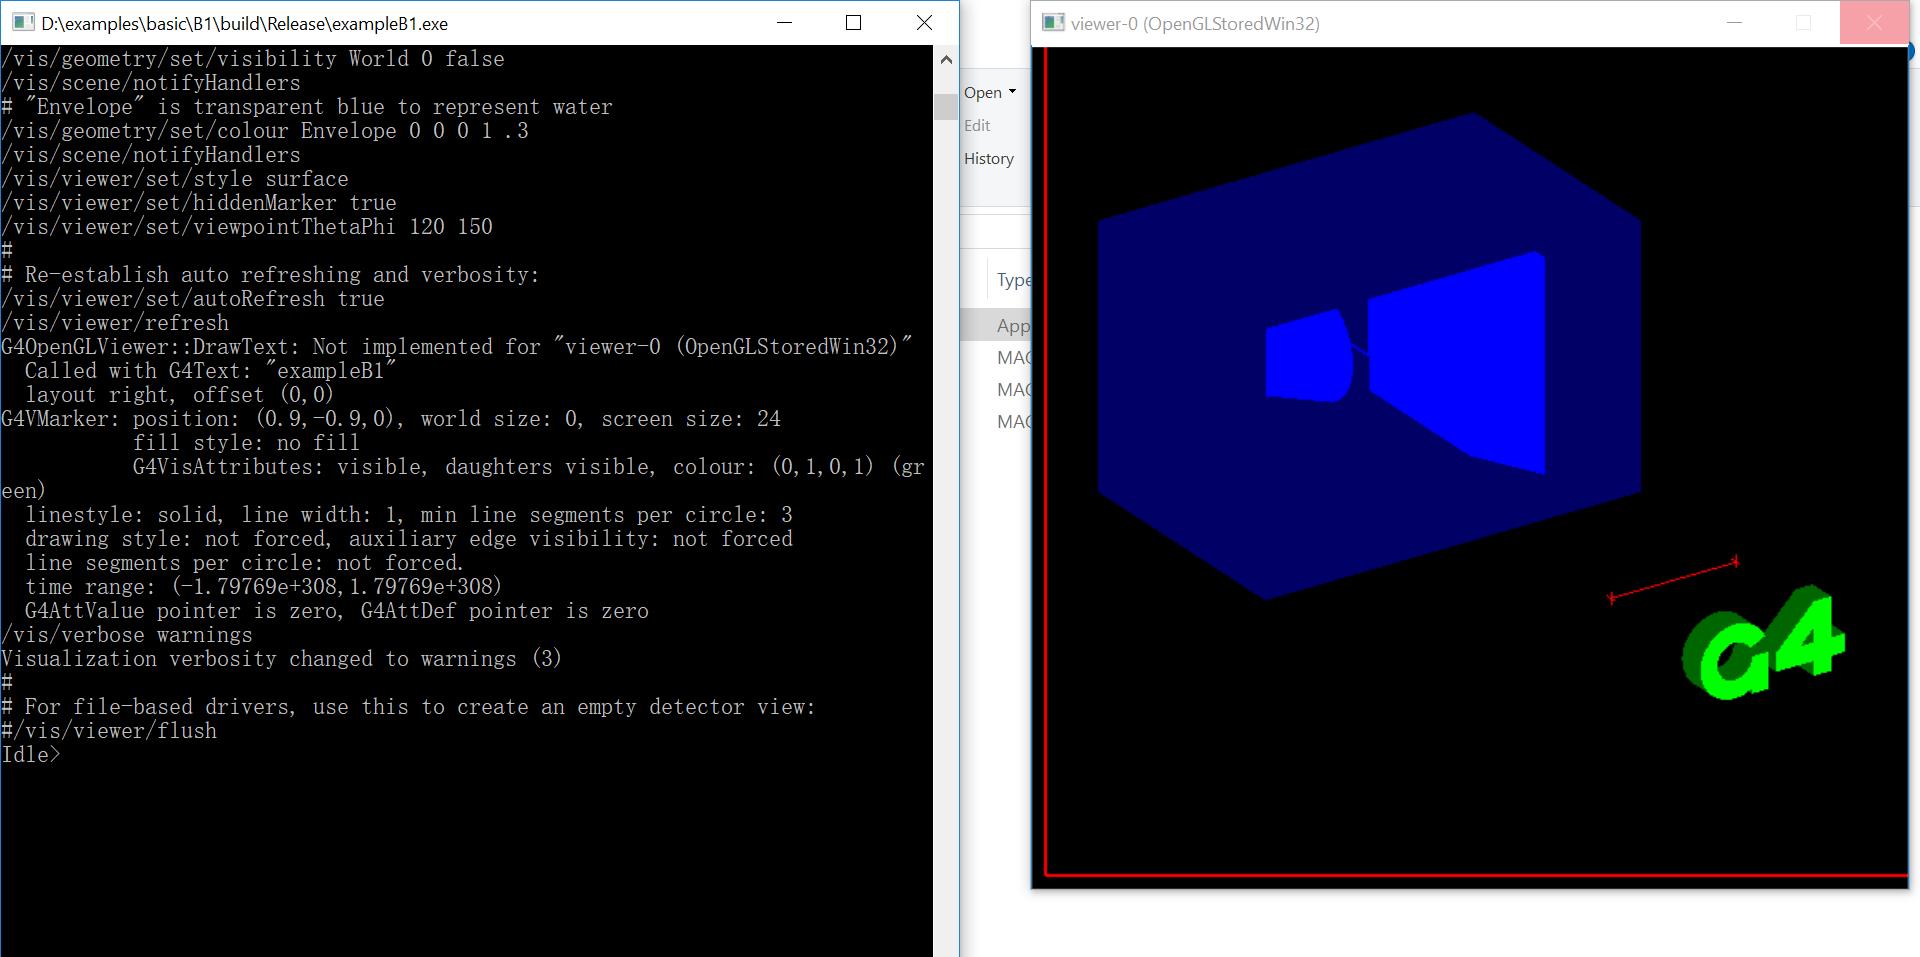
如果成功的话,我们就会有一个 Release文件夹,里面有可执行程序exampleB1.我们进入该文件夹双击就可以运行,不过这里使用了可视化,所以请复制build文件夹下的vis.mac 和init_vis.mac到Release.
双击运行后,如果你看到了可视化的探测器,那么恭喜你,安装成功了。

最后,笔者想要说明一下,虽然Geant4官方提供了Windows平台的解决方案,但是我们还是更推荐Linux系统下使用Geant4.
本文原载于微信订阅号 “Geant4不完全学习指南”
