Android探索之Service全面回顾及总结
Posted 总李写代码
tags:
篇首语:本文由小常识网(cha138.com)小编为大家整理,主要介绍了Android探索之Service全面回顾及总结相关的知识,希望对你有一定的参考价值。
什么是Service?
Service(服务)是android提供的四大组件之一,是一个没有用户界面的在后台运行执行耗时操作的应用组件。其他应用组件能够启动Service,并且当用户切换到另外的应用场景,Service将持续在后台运行。为了方便记忆,我们可以把Service看做是没有页面的Activity,它总是默默的后台处理一些耗时的操作或者不干扰用户使用的后台操作,例如,一个service可能会处理网络操作,播放音乐,操作文件I/O或者与内容提供者(content provider)交互,所有这些活动都是在后台进行。
Service都有哪些?
1)按照使用范围分类:
1.本地服务(Local Service):用于应用程序内部
Local Service运行于当前app的主进程中,如果当前app的进程被Kill掉了,Local Service也会随着随之终止。使用场景举例:音乐播放器服务
2.远程服务(Remote Service):用于android系统内部的应用程序之间
Remote Service是运行于一个独立的进程中,可以被多个app复用,可以使用android:process声明进程名字,由于运行于独立的进程,Activity所在进程被Kill的时候不会影响Remote Service。
2)按照运行类别分类:
1.前台服务
前台服务是那些被认为用户知道的并且在内存低的时候不允许系统杀死的服务,通过startForeground 使服务成为 前台服务。
2.后台服务
区别于前台服务,创建的服务默认是后台服务,在内存低的时候有可能被系统杀死。
3)按照使用方式分类:
1.context.startService()
2.context.bindService()
Service的如何使用?
1.Service AndroidManifest.xml 声明
<service android:enabled=["true" | "false"]
    android:exported=["true" | "false"]
    android:icon="drawable resource"
    android:isolatedProcess=["true" | "false"]
    android:label="string resource"
    android:name="string"
    android:permission="string"
    android:process="string" >
    . . .
</service>
具体参数解说:
android:name 服务类名
android:label 服务的名字,如果此项不设置,那么默认显示的服务名则为类名
android:icon 服务的图标
android:permission 申明此服务的权限,这意味着只有提供了该权限的应用才能控制或连接此服务
android:process 表示该服务是否运行在另外一个进程,如果设置了此项,那么将会在包名后面加上这段字符串表示另一进程的名字
android:enabled 如果此项设置为 true,那么 Service 将会默认被系统启动,不设置默认此项为 false
android:exported 表示该服务是否能够被其他应用程序所控制或连接,不设置默认此项为 false
具体写个测试Service

public class TestService extends Service {

    private TestBinder binder=new TestBinder();
    private Thread testThread;
    private boolean isStart=false;

    @Override
    public void onCreate() {
        super.onCreate();
        Log.e("TestService", "执行 onCreate()");
        startForeground();
    }

    private void startForeground(){
        Notification.Builder builder = new Notification.Builder(this);
        PendingIntent contentIntent = PendingIntent.getActivity(this, 0,
                new Intent(this, MainActivity.class), 0);
        builder.setContentIntent(contentIntent);//设置目标跳转
        builder.setSmallIcon(R.mipmap.ic_launcher);//设置显示的图片
        builder.setTicker("前台服务开启");// 状态栏上显示
        builder.setContentTitle("前台服务");//设置标题
        builder.setContentText("这是一个前台服务");
        Notification notification = builder.build();
        startForeground(1, notification);
    }

    @Override
    public int onStartCommand(Intent intent, int flags, int startId) {
        Log.e("TestService", "执行 onStartCommand()");
        //startThread();
        //testANR();
        return super.onStartCommand(intent, flags, startId);
    }

    @Override
    public void onDestroy() {
        super.onDestroy();
        Log.e("TestService", "执行 onDestroy()");
        stopThread();
        stopForeground(true);
    }


    @Override
    public IBinder onBind(Intent intent) {
        Log.e("TestService", "执行 onBind()");
        return binder;
    }

    class TestBinder extends Binder {

        public void testMethod() {
            Log.e("TestService", "执行 testMethod()");
        }

    }

    //测试是否ANR
    private  void testANR(){
        try {
            Thread.sleep(50000);
        } catch (Exception e) {
        }
    }

    private void startThread(){
        stopThread();
        isStart = true;
        if (testThread == null) {
            testThread = new Thread(runnable);
            testThread.start();
        }
    }

    private void stopThread(){
        try {
            isStart = false;
            if (null != testThread && Thread.State.RUNNABLE == testThread.getState()) {
                try {
                    Thread.sleep(500);
                    testThread.interrupt();
                } catch (Exception e) {
                    testThread = null;
                }
            }
            testThread = null;
        } catch (Exception e) {
            e.printStackTrace();
        } finally {
            testThread = null;
        }
    }

    private Runnable runnable=new Runnable() {
        @Override
        public void run() {
            while(isStart) {
                Log.e("TestService", "runnable");
            }

        }
    };
}
启动/关闭,绑定/解绑

         //开启service
                Log.e("TestService", "执行 startService()");
                Intent intent =new Intent(MainActivity.this,TestService.class);
                startService(intent);

               //停止service
                Log.e("TestService", "执行 stopService()");
                Intent intent =new Intent(MainActivity.this,TestService.class);
                stopService(intent);

                //绑定service
                Log.e("TestService", "执行 bindService()");
                Intent intent =new Intent(MainActivity.this,TestService.class);
                bindService(intent,connection,BIND_AUTO_CREATE);

                //解绑service
                Log.e("TestService", "执行 unbindService()");
                unbindService(connection);

   //测试ServiceConnection
    private ServiceConnection connection = new ServiceConnection() {

        @Override
        public void onServiceDisconnected(ComponentName name) {
        }

        @Override
        public void onServiceConnected(ComponentName name, IBinder service) {
            TestService.TestBinder testBinder = (TestService.TestBinder) service;
            testBinder.testMethod();
        }
    };
接下来了解下Service的生命周期:
1)startService()/stopService()方式 onCreate()---->onStartCommand()---->running()---->onDestory()

如果多次startService()会不会多次onCreate呢?Service只会调用一次onCreate(),但会多次调用onStartCommand()

如果多次调用stopService()呢?调用stopService()一次终止服务

2)bindService()/unbindService()方式 onCreate()---->onBind()---->running()---->onDestory()

3)同时调用了startService()/bindService()

首先看下我们调用stopService() 看下运行结果如下:未执行onDestory()服务无法关闭;所有两者同时使用时先调用unbindService()然后再调用stopService()才能真正关闭服务

接下来我们重点看下onStartCommand(Intent intent, int flags, int startId)方法中的flags参数。
START_NOT_STICKY:当Service因为内存不足而被系统kill后,接下来未来的某个时间内,即使系统内存足够可用,系统也不会尝试重新创建此Service。除非程序中Client明确再次调用startService(...)启动此Service。
START_STICKY:当Service因为内存不足而被系统kill后,接下来未来的某个时间内,当系统内存足够可用的情况下,系统将会尝试重新创建此Service,一旦创建成功后将回调onStartCommand(...)方法,但其中的Intent将是null,pendingintent除外。
START_REDELIVER_INTENT:与START_STICKY唯一不同的是,回调onStartCommand(...)方法时,其中的Intent将是非空,将是最后一次调用startService(...)中的intent。
START_STICKY_COMPATIBILITY:默认flags值
通常我们为了防止Service在内存不足的时候被系统杀死,把flags设置成START_STICKY 但是在4.0之后部分手机也是无效的,被杀死之后不会重启了。
我们该如何提供app服务不被杀死或者降低被杀死的概率呢?我们可以把设置服务为前台服务,比如音乐播放器,app退出之后就变成前台服务。直接看具体实现:
   //设置前台服务
    private void startForeground(){
        Notification.Builder builder = new Notification.Builder(this);
        PendingIntent contentIntent = PendingIntent.getActivity(this, 0,
                new Intent(this, MainActivity.class), 0);
        builder.setContentIntent(contentIntent);//设置目标跳转
        builder.setSmallIcon(R.mipmap.ic_launcher);//设置显示的图片
        builder.setTicker("前台服务开启");// 状态栏上显示
        builder.setContentTitle("前台服务");//设置标题
        builder.setContentText("这是一个前台服务");
        Notification notification = builder.build();
        startForeground(1, notification);
    }

   //关闭前台服务,参数true 代表remove状态栏通知
   stopForeground(true);
具体效果:

每当我们讨论Service的时候总是听到别人说:Service用来处理一个耗时的操作!!!接下来我们来验证一下Service里该如何处理耗时操作?
为了方便写了一个模拟耗时的函数:
    //测试是否ANR
    private  void testANR(){
        try {
            Thread.sleep(50000);
        } catch (Exception e) {
        }
    }
测试运行:
    @Override
    public int onStartCommand(Intent intent, int flags, int startId) {
        Log.e("TestService", "执行 onStartCommand()");
        //startThread();
        testANR();
        return super.onStartCommand(intent, flags, startId);
    }
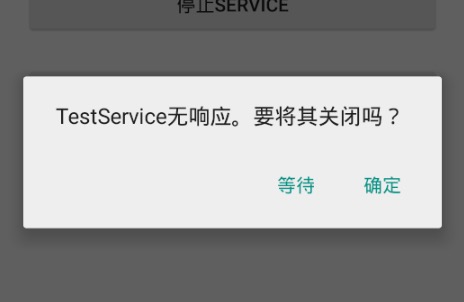
运行结果:

其实结果是在我们的意料之中的,经过上面的知识我们已经得知本地服务是依托附主进程的上的,处理耗时操作肯定会造成ANR的,如果改成远程服务就不会造成ANR了。所以我们在Service处理耗时操作也是要像Activity一样采用异步处理的。需要主要的时如果我们在Service中起了一个线程,我们必须在onDestory ()函数中销毁线程。因为我们stopService()的时候线程并不会随之销毁。因此可知:Service和Thread是两码事,没有一毛钱的关系。
知识拓展:
1)检查某个Service是否在运行中:
    private boolean isServiceRunning(String className) {
            boolean isRunning = false;
            ActivityManager activityManager = (ActivityManager) getSystemService(Context.ACTIVITY_SERVICE);
            List<ActivityManager.RunningServiceInfo> serviceList = activityManager.getRunningServices(30);

            if (!(serviceList.isEmpty())) {
                return false;
            }

            for (int i=0; i<serviceList.size(); i++) {
                if (serviceList.get(i).service.getClassName().equals(className) == true) {
                    isRunning = true;
                    break;
                }
            }
            return isRunning;
        }
2)本文中开启Service采用的显式Intent,同样采用隐式Intent开启Service,如果app被破译则有安全隐患。
<permission android:name="com.whoislcj.testservice.permission"/>
<uses-permission android:name="com.whoislcj.testservice.permission"/>
如果一个实体运行或绑定一个服务,必须要拥有该服务的权限。如果没有权限, startService() , bindService() 或 stopService() 方法将不执行, Intent 也不会传递到服务。
3)Service与UI之间的通讯。
UI----->Service :Intent传值
UI----->Service :绑定Service传值
UI<---->Service: 通过广播
4)Service与AIDL实现跨进程通信 总结文章地址:http://www.cnblogs.com/whoislcj/p/5509868.html
先认识几个名词:
- 进程间通信(IPC):Inter Process Communication
- AIDL:Android Interface Definition Language, Android接口定义语言
以上是关于Android探索之Service全面回顾及总结的主要内容,如果未能解决你的问题,请参考以下文章
