rsyslog及loganalyzer
Posted 唐僧还在拜佛求经路。
tags:
篇首语:本文由小常识网(cha138.com)小编为大家整理,主要介绍了rsyslog及loganalyzer相关的知识,希望对你有一定的参考价值。
日志:历史日志
历史事件:
时间记录,事件的关键性程度,loglevel
系统日志服务:
syslogd,守护进程
syslogd:system
klogd:kernel
rsyslog:
syslogd
klogd
多线程:
UDP,TCP,SSL,TLS,
mysql,PGSQL
强大的过滤器,可实现过滤日志信息中的任何部分;
自定义输出格式;
日志收集方:
priority:
debug,info,notice,warn(warning),err(error),crit(critical),alert,emerg(panic)
调试-信息级别-引起注意-警告-产生错误-蓝色警报-橙色警报-要挂了。
指定级别:
*:表示所以级别
none:没用级别
priority:此级别及更高级别的日志信息;
[root@localhost ~]# rpm -ql rsyslog
/etc/rsyslog.conf 主配置文件
rsyslogd 主程序;
/etc/rc.d/init.d/rsyslog 服务脚本;
root@localhost ~]# vim /etc/rsyslog.conf
# rsyslog v5 configuration file
# For more information see /usr/share/doc/rsyslog-*/rsyslog_conf.html
# If you experience problems, see http://www.rsyslog.com/doc/troubleshoot.html
#### MODULES ####
$ModLoad imuxsock # provides support for local system logging (e.g. via logger command) //支持本地日志收集的模块
$ModLoad imklog # provides kernel logging support (previously done by rklogd) //支持本地内核日志收集的模块
#$ModLoad immark # provides --MARK-- message capability
# Provides UDP syslog reception
#$ModLoad imudp
#$UDPServerRun 514
# Provides TCP syslog reception
#$ModLoad imtcp
#$InputTCPServerRun 514
#### GLOBAL DIRECTIVES #### 全局参数指定
# Use default timestamp format
$ActionFileDefaultTemplate RSYSLOG_TraditionalFileFormat
# File syncing capability is disabled by default. This feature is usually not required,
# not useful and an extreme performance hit
#$ActionFileEnableSync on
# Include all config files in /etc/rsyslog.d/
$IncludeConfig /etc/rsyslog.d/*.conf
#### RULES ####
# Log all kernel messages to the console.
# Logging much else clutters up the screen.
#kern.* /dev/console //
# Log anything (except mail) of level info or higher.
# Don\'t log private authentication messages!
*.info;mail.none;authpriv.none;cron.none /var/log/messages //
# The authpriv file has restricted access.
authpriv.* /var/log/secure
# Log all the mail messages in one place.
mail.* -/var/log/maillog //-号表示异步写入;
# Log cron stuff
cron.* /var/log/cron
# Everybody gets emergency messages
*.emerg * //通知所有用户在线的用户系统要挂了
# Save news errors of level crit and higher in a special file.
uucp,news.crit /var/log/spooler
# Save boot messages also to boot.log
local7.* /var/log/boot.log //自定义日志
# ### begin forwarding rule ###
# The statement between the begin ... end define a SINGLE forwarding
# rule. They belong together, do NOT split them. If you create multiple
# forwarding rules, duplicate the whole block!
# Remote Logging (we use TCP for reliable delivery)
#
# An on-disk queue is created for this action. If the remote host is
# down, messages are spooled to disk and sent when it is up again.
#$WorkDirectory /var/lib/rsyslog # where to place spool files
#$ActionQueueFileName fwdRule1 # unique name prefix for spool files
#$ActionQueueMaxDiskSpace 1g # 1gb space limit (use as much as possible)
#$ActionQueueSaveOnShutdown on # save messages to disk on shutdown
#$ActionQueueType LinkedList # run asynchronously
#$ActionResumeRetryCount -1 # infinite retries if host is down
# remote host is: name/ip:port, e.g. 192.168.0.1:514, port optional
#*.* @@remote-host:514
# ### end of the forwarding rule ###
# A template to for higher precision timestamps + severity logging
$template SpiceTmpl,"%TIMESTAMP%.%TIMESTAMP:::date-subseconds% %syslogtag% %syslogseverity-text%:%msg:::sp-if-no-1st-sp%%msg:::drop-last-lf%\\n"
:programname, startswith, "spice-vdagent" /var/log/spice-vdagent.log;SpiceTmpl
(END)
主服务器测试:
root@localhost ~]# vim /etc/ssh/sshd_config
添加:SyslogFacility local2
service sshd reload
root@localhost ~]# vim /etc/rsyslog.conf
local7.* /var/log/boot.log 下添加如下:
local2.* /var/log/sshd.log
重启服务:servicee rsyslog restart
测试:只要复制下当前xshell会话即可,然后查看日志;
总结:
文件记录的日志的格式:
时间产生记录的日期时间 主机 进程(PID) :事件内容
有些日志记录二进制格式:/var/log/wtmp,/var/logbtmp
/var/log/wtmp :当前系统上成功登陆的日志;
last 查看
/var/log/btmp:当前系统上失败的登陆尝试;
lastb
lastlog 查看哪些用户登陆过系统,
mail **Never logged in** 表示从来没用登陆过系统;
--------------------------------------------------------------------------------------------------
一:rsyslog服务器:
1,主服务器:root@localhost ~]# vim /etc/rsyslog.conf
# Provides UDP syslog reception
$ModLoad imudp 去掉#号
$UDPServerRun 514 去掉#号
# Provides TCP syslog reception
$ModLoad imtcp 去掉#号
$InputTCPServerRun 514 去掉#号
service rsyslog restart
netstat -tunl
3:主服务器查看日志:
tail /var/log/messages
2,从服务器:
主服务器:root@localhost ~]# vim /etc/rsyslog.conf
*.info;mail.none;authpriv.none;cron.none @172.16.100.6 //把从服务器的日志传输给主日志服务器;
service rsyslog restart
yum -y install vsftpd
二: 配置下rsyslog如何记录到mysql服务中;
1:从服务安装mysql;
查看包: rpm -q mariadb
安装: [root@localhost ~]# yum -y install mariadb-server
启动: [root@localhost ~]# systemctl start mariadb.service
查看监听:ss -tnlp
进入mysql数据库: [root@localhost ~]# mysql -uroot -p 直接回车,默认密码为空;
mariaDB [(none)]> use mysql;
MariaDB [mysql]> update user set password=password(\'password\') where user=\'root\';
MariaDB [(none)]> GRANT ALL ON Syslog.* TO \'syslog\'@\'192.168.%.%\' IDENTIFIED BY \'syslogpass\';
MariaDB [mysql]> flush privileges;
MariaDB [mysql]> quit
root@localhost ~]# vim /etc/my.cnf
[mysqld]
skip_name_resolve = on
innodb_file_per_table = on
[root@localhost ~]# systemctl restart mariadb.service
[root@localhost ~]# ss -tnl
测试:
[root@localhost ~]# mysql -usyslog -psyslogpass -h 192.168.214.140
Welcome to the MariaDB monitor. Commands end with ; or \\g.
Your MariaDB connection id is 3
Server version: 5.5.56-MariaDB MariaDB Server
Copyright (c) 2000, 2017, Oracle, MariaDB Corporation Ab and others.
Type \'help;\' or \'\\h\' for help. Type \'\\c\' to clear the current input statement.
MariaDB [(none)]> show databases;
+--------------------+
| Database |
+--------------------+
| information_schema |
| test |
+--------------------+
2 rows in set (0.00 sec)
MariaDB [(none)]>
4:验证
[root@localhost ~]# mysql -usyslog -psyslogpass -h 192.168.214.140
Welcome to the MariaDB monitor. Commands end with ; or \\g.
Your MariaDB connection id is 5
Server version: 5.5.56-MariaDB MariaDB Server
Copyright (c) 2000, 2017, Oracle, MariaDB Corporation Ab and others.
Type \'help;\' or \'\\h\' for help. Type \'\\c\' to clear the current input statement. MariaDB [(none)]> show databases;
+--------------------+
| Database |
+--------------------+
| information_schema |
| Syslog |
| test |
+--------------------+
3 rows in set (0.00 sec)
MariaDB [(none)]> use Syslog
Reading table information for completion of table and column names
You can turn off this feature to get a quicker startup with -A
Database changed
MariaDB [Syslog]> show tables;
+------------------------+
| Tables_in_Syslog |
+------------------------+
| SystemEvents |
| SystemEventsProperties |
+------------------------+
2 rows in set (0.00 sec)
6:查看日志
MariaDB [Syslog]> show tables;
+------------------------+
| Tables_in_Syslog |
+------------------------+
| SystemEvents |
| SystemEventsProperties |
+------------------------+
2 rows in set (0.00 sec)
MariaDB [Syslog]>
MariaDB [Syslog]> show tables;
+------------------------+
| Tables_in_Syslog |
+------------------------+
| SystemEvents |
| SystemEventsProperties |
+------------------------+
2 rows in set (0.00 sec)
MariaDB [Syslog]> select * from SystemEvents\\G;
2:主服务器端想要rsyslog日志存储到mysql服务器中,使用 yum list all rsyslog*,有一个rsyslog-mysql的程序包,安装即可。
yum -y install rsyslog-mysql
[root@localhost log]# rpm -ql rsyslog-mysql
/lib64/rsyslog/ommysql.so
/usr/share/doc/rsyslog-mysql-5.8.10
/usr/share/doc/rsyslog-mysql-5.8.10/createDB.sql
3:[root@localhost log]# mysql -usyslog -h192.168.214.140 -p < /usr/share/doc/rsyslog-mysql-5.8.10/createDB.sql
Enter password: syslogpass //192.168.214.140是从服务器的IP地址
5:[root@localhost log]# vim /etc/rsyslog.conf
#### MODULES ####
$ModLoad ommysql 手动添加;
#### RULES ####
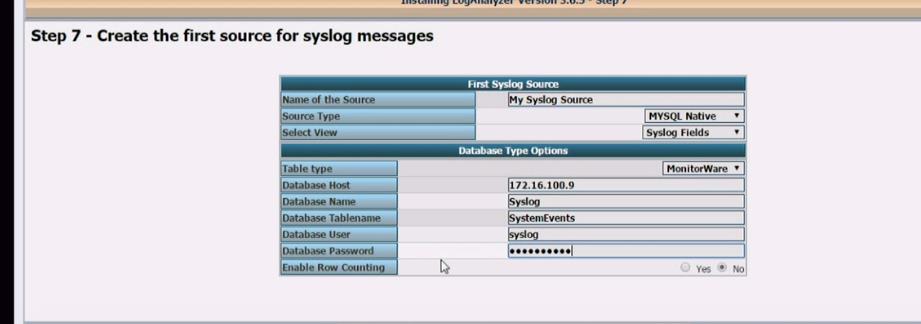
*.info;mail.none;authpriv.none;cron.none :ommysql:192.168.214.140,Syslog,syslog,syslogpass
service rsyslog restart
记录日志:yum -y install vsftp
---------------------------------------------
主服务器:
yum install httpd php php-mysql
vim /var/www/html/index.php
<?php
$conn = mysql_connect(\'192.168.214.140\',\'syslog\',\'syslogpass\');
if ($conn)
echo "OK";
else
echo "Failure";
?>
service httpd start
网页测试:192.168.214.146 是否显示OK
下载loganalyzer-3.6.5.tar.gz
tar xf alyzer-3.6.5.tar.gz
mv alyzer-3.6.5 /var/www/html/log
cd /var/www/html/log
ls
cd ..
ls
mv log/src loganalyzer
ls
cd loganalyzer
cd ..
cd log
ls
ls contrib/
cp conrtib/* ../loganalyzer/
cd ../loganalyzer/
chmod +x *.sh
./configure.sh
./secure.sh
chmod 666 config.php
访问:192.168.214.145/loganalyzer/install.php
~ 
yum -y install php-gd
service httpd restart
//支持本地日志收集的模块
以上是关于rsyslog及loganalyzer的主要内容,如果未能解决你的问题,请参考以下文章