计算机视觉之--使用opencv生成简笔画小视频
Posted 有梦想的小菜鸟
tags:
篇首语:本文由小常识网(cha138.com)小编为大家整理,主要介绍了计算机视觉之--使用opencv生成简笔画小视频相关的知识,希望对你有一定的参考价值。
本教程介绍了如何使用opencv生成一副简笔画视频,包括片头、如何做画等。
1、视频包括:
(1)片头:包括学号姓名,同时会出现"I Love CV"在学号和姓名的中央,而且他们是以动画方式“飞入”视频的,其中姓名从顶部“飞”到屏幕1/3处,学号信息从下“飞”到1/3处,I LOVE CV从左向右飞入。在片头显示完后,会停顿越三秒钟后,片头消失,正片开始。
下图为片头停顿处截图:
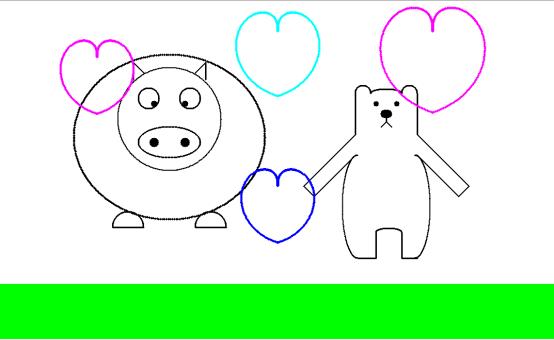
(2)正片:正片主要画了一头可爱的小熊和一头胖胖的小猪以及一个桃心(预示着小熊.....),其中所有的镜头最小单位都是像素,是一个点一个点画计算并画出的,并没有调用内置的画图函数(画点函数除外)以下是最终效果截图:

一、开发环境
1、开发环境:vs2015
2、Opencv库:opencv2.4
3、操作系统:windows10
二、实现方法
我把整个实现分为三步:
初始化、工具函数的编写、画图
下面将分开说明各部分实现步骤:
1、初始化:首先定义两个全局变量ViedoWriter writer和Mat image,并对其初始化,分别在规定路径创建一个空视频(writer)和空矩阵或图片(image)。我的想法是一个点一个点的画图,所以我需要每画一个点或者一个规定步长的点就网writer里写一帧,所以我封装了一个函数putPicture(Mat img)用于将参数传入writer中。在以后的画图工具函数中,我每描出一个点就调用一次putPicture函数。
2、对于工具函数的撰写,我主要写了以下几个函数:
(1)drawPoint(Mat img, Point center,Scalar color,int thick)
功能:可以再指定的center上画不同大小的点(大小由thick参数指定)。该函数是画所有图的核心函数
实现:调用opencv的circle函数
(2)drawLine(Mat mat, Point start, Point end,Scalar color,int thick)
功能:通过起始终止点画出一条线段并将每个点以一帧的形式存入视频。
实现:使用DDA算法画直线。
改进:DDA有舍入误差会影响精度,可以使用bersenham算法,但我没有时间了。。。
(3)drawArc(Mat img, Point center, double radius, double start_angle, double end_angle, Scalar color,int thick)
功能:通过给定参数逐点画圆弧并将每个点以一帧的形式存入视频。
实现:用圆的参数方程逐点描出
改进:可使用bersenham算法,但我个人觉得针对此问题没必要,增加很多算法上的负担。因为此问题不太要求精度。
(4)drawEarc(Mat img, Point center, double radius, double start_angle, double end_angle, float a,float b,Scalar color,int thick,bool is_x)
功能:通过给定参数画椭圆弧并将每个点以一帧的形式存入视频,其中通过is_x变量可以指定焦点位置,同时thick可以指定宽度,color指定颜色
实现:同样使用参数方程
(5)drawStar(Mat img,Point center,int a,Scalar color,int thick)
功能:通过给定参数画心形并将每个点以一帧的形式存入视频,其中a可指定心形的大小。
实现:
arc.x = center.x + a*i*sin(PI*sin(i) / i);
arc.y = center.y + a*abs(i)*cos(PI*sin(i) / i);
并没有使用经典的笛卡尔心形公式,而是使用的这个形状更好看的参数方程。
(6)drawBackground(bool flag)
功能:画一个白色的大矩形覆盖整个屏幕,起到画背景和清屏的作用
3、有了以上制作视频思路和工具最后的画图部分考验的更多的是时间,我主要分了三部分来画
(1)drawBear()
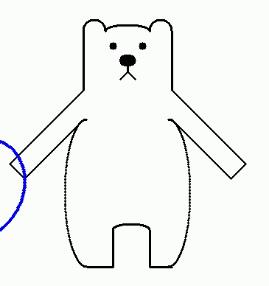
功能:顾名思义画熊。对于这个萌萌哒的小熊:

他的身子是椭圆的一部分弧,耳朵是圆的一部分,鼻子是一个小椭圆但是我增加了线的厚度。
改进:需要改进的部分太多了,由于我是“凭空”使用我的工具画的,并没有使用ps等工具具体的挖出精确的点来画,所以导致很多部分无法完成。这也导致只熊的身子和腿很丑。
(2)drawRh()
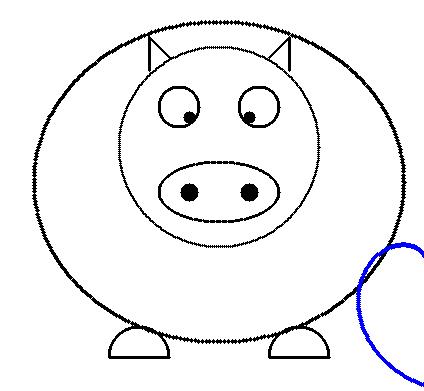
功能:画猪

这个猪的构造很简单,我没有选择有复杂曲线的猪,选择了这个可以由圆构成的猪。
改进:可以使用参数曲线算法来丰富他的身体。
(3)drawText()
功能:制作片头
实现方法:使用内置的puttext函数,加上清屏函数组合来完成文字的滑动,即每移动一次字幕调用清屏函数,最后使用临时变量保存的算法使三行字幕停顿几秒钟。
三、心得体会与优缺点:
缺点与不足:
1、没有对于中文的处理,本来学号和姓名我很想使用中文的,但是opencv不支持,后来又使用freetype包却出现很多编译错误,没办法由于时间紧迫没有实现
2、画图工具封装的太少,只做了几个最基本的函数,对于高级的函数如参数曲线等由于能力问题并没有用到
3、没有对颜色的处理
下面附上源代码:
#include <opencv2/opencv.hpp>
#include<string>
#include<io.h>
#include<math.h>
#include"base.h"
using namespace std;
using namespace cv;
#define NUM_FRAME 300
#define SIZE 5
#define W 1080
#define H 720
#define PI 3.1415926
char path[100];//输入文件路径
VideoWriter writer;
Mat image,temp;
Point s, e;
void convert(Point &a)
{
    a.x = a.x + W / 2;
    a.y = -a.y + H / 2;
}
void rconvert(Point &a)
{
    a.x = a.x - W / 2;
    a.y = -a.y + H / 2;
}

void init()
{
    //image= Mat::zeros(W, W, CV_8UC3);//创建一张空图像
    image = Mat(H, W, CV_8UC3);
    temp = Mat(H, W, CV_8UC3);
    strcpy(path, "G:\\\\image\\\\viedo.avi");
    writer = VideoWriter(path, CV_FOURCC(\'X\', \'V\', \'I\', \'D\'), 30, Size(W, H));
}
void putPicture(Mat img)
{
    writer.write(Mat(img));
}
void delay(int k)
{
    for (int i = 0; i <= k; i++)
    {
        putPicture(image);
    }
}
void play()
{
    VideoCapture capture(path);
    if (!capture.isOpened())
        cout << "fail to open!" << endl;
    ////获取整个帧数
    //long totalFrameNumber = capture.get(CV_CAP_PROP_FRAME_COUNT);
    //cout << "整个视频共" << totalFrameNumber << "帧" << endl;

    //设置开始帧()
    long frameToStart = 0;
    capture.set(CV_CAP_PROP_POS_FRAMES, frameToStart);
    cout << "从第" << frameToStart << "帧开始读" << endl;

    //获取帧率
    double rate = capture.get(CV_CAP_PROP_FPS);
    cout << "帧率为:" << rate << endl;
    //承载每一帧的图像
    Mat frame;
    //显示每一帧的窗口
    namedWindow("Viedo");
    //两帧间的间隔时间:
    int delay = 1000 / rate;
    long currentFrame = frameToStart;

    while (1)
    {
        //读取下一帧
        if (!capture.read(frame))
        {
            break;
            return;
        }
        //这里加滤波程序
        imshow("Extracted frame", frame);
        int c = waitKey(delay);
        //按下按键后会停留在当前帧,等待下一次按键
        if (c >= 0)
        {
            waitKey(0);
        }
        currentFrame++;
    }
    //关闭视频文件
    capture.release();
}
void drawLine(Mat mat, Point start, Point end,Scalar color,int thick)
{
    //printf("start Point: x=%d y=%d\\n", start.x, start.y);
    convert(start);
    convert(end);
    int x1, y1,step;
    Point center=start;
    x1 = start.x;
    y1 = start.y;
    double footx,footy;
    int dx = end.x - start.x;
    int dy = end.y - start.y;
    drawPoint(mat, center, color,thick);
    putPicture(mat);
    if (abs(dx) > abs(dy))
    {
        step = abs(dx);
    }
    else
    {
        step = abs(dy);
    }
    footx = (double)dx / step;
    footy = (double)dy / step;
    //printf("footy = %f\\n", footy);
    for (int i = 0; i<step; i++)
    {
        if (footx > 0) {
            x1 += int(footx + 0.5);
        }
        if (footx < 0)
        {
            x1 += int(footx - 0.5);
        }
        if (footy > 0)
        {
            y1 += int(footy + 0.5);
        }
        if (footy < 0)
        {
            y1 += int(footy - 0.5);
        }
        center.x = x1;
        center.y = y1;
        drawPoint(mat, center, color,thick);
        //printf("x=%d y=%d\\n", center.x, center.y);
        putPicture(mat);
    }
    rconvert(center);
    //printf("end Point: x=%d y=%d\\n", center.x, center.y);
    //printf("\\n");
}
void drawLine2(Mat mat, Point start, Point end, Scalar color,int thick)
{
    convert(start);
    convert(end);
    int x1, y1, step;
    double k;
    Point center = start;
    x1 = start.x;
    y1 = start.y;
    int dx = end.x - start.x;
    int dy = end.y - start.y;
    if (dx != 0)
    {
        k = dy / dx;
    }
    else
        k = 0;
    double d = k - 0.5;
    drawPoint(mat, center, color,thick);
    printf("start Point: x=%d y=%d\\n", center.x, center.y);
    putPicture(mat);
    while(x1!=end.x)
    {
        x1++;
        if (d >= 0)
        {
            y1++;
            d = d + k - 1;
        }
        else
        {
            d = d + k;
        }
        center.x = x1;
        center.y = y1;
        drawPoint(mat, center, color,thick);
        //printf("x=%d y=%d\\n", center.x, center.y);
        putPicture(mat);
    }
    printf("end Point: x=%d y=%d\\n", center.x, center.y);
}
void drawBackground(bool flag)
{
    rectangle(image,
        Point(0, 0),
        Point(W, W),
        Scalar(255, 255, 255),
        -1,
        8);
    if (flag == true)
    {
        putPicture(image);
    }
    rectangle(image,
        Point(0, 550),
        Point(W, W),
        Scalar(0, 255, 0),
        -1,
        8);
}
void drawText()
{
    int i = 0;
    int count = 30;
    String name = "name    :   Sunke";
    String number = "Student ID: 317040001";
    String other = "I Love CV";
    while(1)
    {
        i++;
        putText(image, number, Point(W / 3,H-i*(H/3)/count), CV_FONT_HERSHEY_COMPLEX, 1, Scalar(255, 0, 0));
        putText(image, name, Point(W/3, 0 + i*(H / 3) / count), CV_FONT_HERSHEY_COMPLEX, 1, Scalar(0, 0, 255));
        putPicture(image);
        if (i == count)
        {
            image.copyTo(temp);
            for (int j = 0; j <= count; j++)
            {
                temp.copyTo(image);
                putText(image, other, Point(75+j*(W/3)/count, H/2), CV_FONT_HERSHEY_TRIPLEX, 1.5, Scalar(0, 255, 0));
                putPicture(image);
                if (j == count)//片头延时
                {
                    delay(200);
                }
                drawBackground(false);
            }
            break;
        }
        else
        {
            drawBackground(false);//只是重置image变量,并不画这样避免了闪屏
        }
    }
    putPicture(image);
}
void drawArc(Mat img, Point center, double radius, double start_angle, double end_angle, Scalar color,int thick)
{
    convert(center);
    Point arc;
    double foot = 0.02;
    for (double r = start_angle; r <= end_angle; r = r + foot)
    {
        arc.x = center.x + radius*cos(r);
        arc.y = center.y + radius*sin(r);
        if (r == start_angle)
        {
            s = arc;
        }
        if (r == end_angle)
        {
            s = arc;
        }
        drawPoint(img, arc, color,thick);
        putPicture(image);
    }
}
void drawEarc(Mat img, Point center, double radius, double start_angle, double end_angle, float a,float b,Scalar color,int thick,bool is_x)
{
    convert(center);
    Point arc;
    double foot=0.02;
    for (double r = start_angle; r <= end_angle; r = r + foot)
    {
        if (is_x)
        {
            arc.x = center.x + a*cos(r);
            arc.y = center.y + b*sin(r);
        }
        else
        {
            arc.x = center.x + b*cos(r);
            arc.y = center.y + a*sin(r);
        }

        if (r == start_angle)
        {
            s = arc;
        }
        if (r == end_angle)
        {
            s = arc;
        }
        drawPoint(img, arc, color,thick);
        putPicture(image);
    }
}
void drawBear()
{
    Point left_eye(190, 160);
    Point right_eye(230, 160);
    convert(left_eye);
    convert(right_eye);
    drawLine(image, Point(150, 100), Point(150, 180), Scalar(0, 0, 0),1);
    //drawLine(image, Point(150, 220), Point(190, 200), Scalar(0, 0, 0),1);
    drawArc(image, Point(165, 180), 15, PI,2*PI,Scalar(0, 0, 0), 1);
    drawEarc(image, Point(210, 180), 50, PI, 2 * PI, 30, 8, Scalar(0, 0, 0),1,true);
    drawArc(image, Point(255, 180), 15, PI, 2 * PI, Scalar(0, 0, 0), 1);

    //drawLine(image, Point(230, 180), Point(270, 220), Scalar(0, 0, 0),1);
    drawLine(image, Point(270, 180), Point(270, 100), Scalar(0, 0, 0),1);
    //脸
    drawPoint(image, left_eye, Scalar(0, 0, 0),5);
    drawPoint(image, right_eye, Scalar(0, 0, 0),5);
    putPicture(image);

    drawEarc(image, Point(210, 140), 50, 0, 2 * PI, 6, 3, Scalar(0, 0, 0),5,true);
    drawLine(image, Point(210, 143), Point(210, 125), Scalar(0, 0, 0), 1);
    drawLine(image, Point(210, 125), Point(200, 115), Scalar(0, 0, 0), 1);
    drawLine(image, Point(210, 125), Point(220, 115), Scalar(0, 0, 0), 1);
    //手
    drawLine(image, Point(150, 100), Point(90, 0), Scalar(0, 0, 0), 1);
    drawLine(image, Point(270, 100), Point(330, 0), Scalar(0, 0, 0), 1);
      //左
    drawLine(image, Point(50, 0), Point(70, -20), Scalar(0, 0, 0), 1);
    drawLine(image, Point(70, -20), Point(150, 40), Scalar(0, 0, 0), 1);
      //右
    drawLine(image, Point(370, 0), Point(350, -20), Scalar(0, 0, 0), 1);
    drawLine(image, Point(350, -20), Point(270, 40), Scalar(0, 0, 0), 1);
    //身体
    //左
    drawEarc(image, Point(155, -40), 50, -1.5*PI, -0.5*PI, 100, 30, Scalar(0, 0, 0), 1,false);
    drawLine(image, Point(155, -140), Point(190, -140), Scalar(0, 0, 0), 1);
    drawLine(image, Point(190, -140), Point(190, -90), Scalar(0, 0, 0), 1);
    //右
    drawEarc(image, Point(265, -40), 50, -0.5*PI, 0.5*PI, 100, 30, Scalar(0, 0, 0), 1, false);
    drawLine(image, Point(270, -140), Point(240, -140), Scalar(0, 0, 0), 1);
    drawLine(image, Point(240, -140), Point(240, -90), Scalar(0, 0, 0), 1);

    //drawLine(image, Point(190, -90), Point(240, -90), Scalar(0, 0, 0), 1);
    drawEarc(image, Point(215, -90), 50, PI, 2 * PI, 25, 8, Scalar(0, 0, 0), 1, true);

}
void drawStar(Mat img,Point center,int a,Scalar color,int thick)
{
    convert(center);
    Point arc;
    double foot=2*PI/360;

    for (double i = -PI; i <= PI; i=i+foot)
    {
        /*arc.x = center.x + a*(2 * cos(i) - cos(2 * i));
        arc.y = center.y + a*(2 * sin(i) - sin(2 * i));*/
        arc.x = center.x + a*i*sin(PI*sin(i) / i);
        arc.y = center.y + a*abs(i)*cos(PI*sin(i) / i);
        drawPoint(img, arc, color, thick);
        putPicture(image);
    }
}
void drawRh()
{
    Point left_eye(-240, 160);
    Point right_eye(-180, 160);
    Point left_nose(-240,85);
    Point right_nose(-180,85);
    convert(left_eye);
    convert(right_eye);
    convert(left_nose);
    convert(right_nose);
    drawArc(image, Point(-210, 130), 100, 0, 2 * PI, Scalar(0, 0, 0), 1);
    //眼眶
    drawArc(image, Point(-170, 170), 20, 0, 2 * PI, Scalar(0, 0, 0), 1);
    drawArc(image, Point(-250, 170), 20, 0, 2 * PI, Scalar(0, 0, 0), 1);
    //眼球
    drawPoint(image, left_eye, Scalar(0, 0, 0), 6);
    putPicture(image);
    drawPoint(image, right_eye, Scalar(0, 0, 0), 6);
    putPicture(image);

    //鼻子
    drawEarc(image, Point(-210, 85), 50, 0, 2 * PI, 60, 30, Scalar(0, 0, 0), 1, true);

    //鼻孔
    drawPoint(image, left_nose, Scalar(0, 0, 0), 9);
    putPicture(image);
    drawPoint(image, right_nose, Scalar(0, 0, 0), 9);
    putPicture(image);

    //左耳朵
    drawLine(image, Point(-280, 207), Point(-280, 240), Scalar(0, 0, 0), 1);
    drawLine(image, Point(-280, 240), Point(-260, 220), Scalar(0, 0, 0), 1);
    //右耳朵
    drawLine(image, Point(-140, 207), Point(-140, 240), Scalar(0, 0, 0), 1);
    drawLine(image, Point(-140, 240), Point(-160, 220), Scalar(0, 0, 0), 1);

    //身子
    drawEarc(image, Point(-210, 95), 170, 0, 2*PI, 185,160,Scalar(0, 0, 0), 2,true);
    //脚
    drawArc(image, Point(-290, -80), 30, PI, 2 * PI, Scalar(0, 0, 0), 1);
    drawLine(image, Point(-320, -80), Point(-260, -80), Scalar(0, 0, 0), 1);

    drawArc(image, Point(-130, -80), 30, PI, 2 * PI, Scalar(0, 0, 0), 1);
    drawLine(image, Point(-160, -80), Point(-100, -80), Scalar(0, 0, 0), 1);


}
int main()
{
    printf("正在生成视频,请稍后");
    init();
    drawBackground(true);
    drawText();
    drawBear();
    drawRh();
    drawStar(image, Point(0, 300), 40, Scalar(255, 255, 0), 2);
    drawStar(image, Point(300, 300), 50, Scalar(255, 0, 255), 2);
    drawStar(image, Point(0, 0), 35, Scalar(255, 0, 0), 2);
    drawStar(image, Point(-350, 250), 35, Scalar(255, 0, 255), 2);
    imshow("pig", image);
    play();
    waitKey();
    return 0;
}
base.cpp
#include"base.h" #include<math.h> void MyLine(Mat img, Point start, Point end) { int thickness =以上是关于计算机视觉之--使用opencv生成简笔画小视频的主要内容,如果未能解决你的问题,请参考以下文章