从Request库理解HTTP消息
Posted yc紫日
tags:
篇首语:本文由小常识网(cha138.com)小编为大家整理,主要介绍了从Request库理解HTTP消息相关的知识,希望对你有一定的参考价值。
背景
requests库官方文档地址
http://docs.python-requests.org/en/master/
作者博客
github地址
https://github.com/requests/requests
环境搭建
基本环境
python、pip
注:pip freeze -- 查看当前已经安装的pip包
安装其他必须软件
virtualenv
作用
初始化一个空环境(也可以不初始化)
使用 pip / easy_install 是为了能够良好的管理起来你的包,这类似deb之流。
之所以需要用 VirtualEnv,关键的目的是把你当前开发/生产的 Python 环境和其他的 Python 环境隔离开来。例如你的 Proj1 需要用到 LibA 的版本1.0,而你的 Proj2 需要用到LibA的2.0,如果不加以区分,那么就会可能造成冲突。
在 VirtualEnv 中,每一个 VirtualEnv 的环境,都是隔离的,需要的包等都是单独的,你可以认为这是一个沙盒(SandBox),这时候 pip / easy_install 等运行时候依赖的 Python 也是隔离的,既 $VENV_HOME/bin/python 而非 /usr/bin/python。
一般的,yum / apt 安装的会安装在系统的路径中,针对 Python, 则是 Global 的 PYTHONPATH。很难做到隔离。
而从源代码安装的,一般的会根据你的运行时 Python 命令进行隔离。也就是如果你启用了 VirtualEnv (source $VENV_HOME/bin/activate)后,从源码安装的也会在这个 venv 下。
安装virtualenv
pip install virtualenv
使用virtualenv初始化当前文件夹
virtualenv .env
激活当前文件夹的virtualenv
windows:.env/Script/activate
linux:source .env/bin/activate
注:deactivate可以退出虚拟环境
requests库
pip install requests
httpbin.org
测试用,由于http://httpbin.org/服务器在美国,所以可以在本地搭建个类似环境测试
pip install gunicorn httpbin
gunicorn httpbin:app
注:windows上无法安装gunicorn
HTTP协议
概念
HyperText Transfer Protocol超文本传输协议
The Hypertext Transfer Protocol is a stateless(无状态的), application-level protocol(应用层协议) for distributed(分布式), collaborative(协作式), hepertext information system(超文本信息系统)
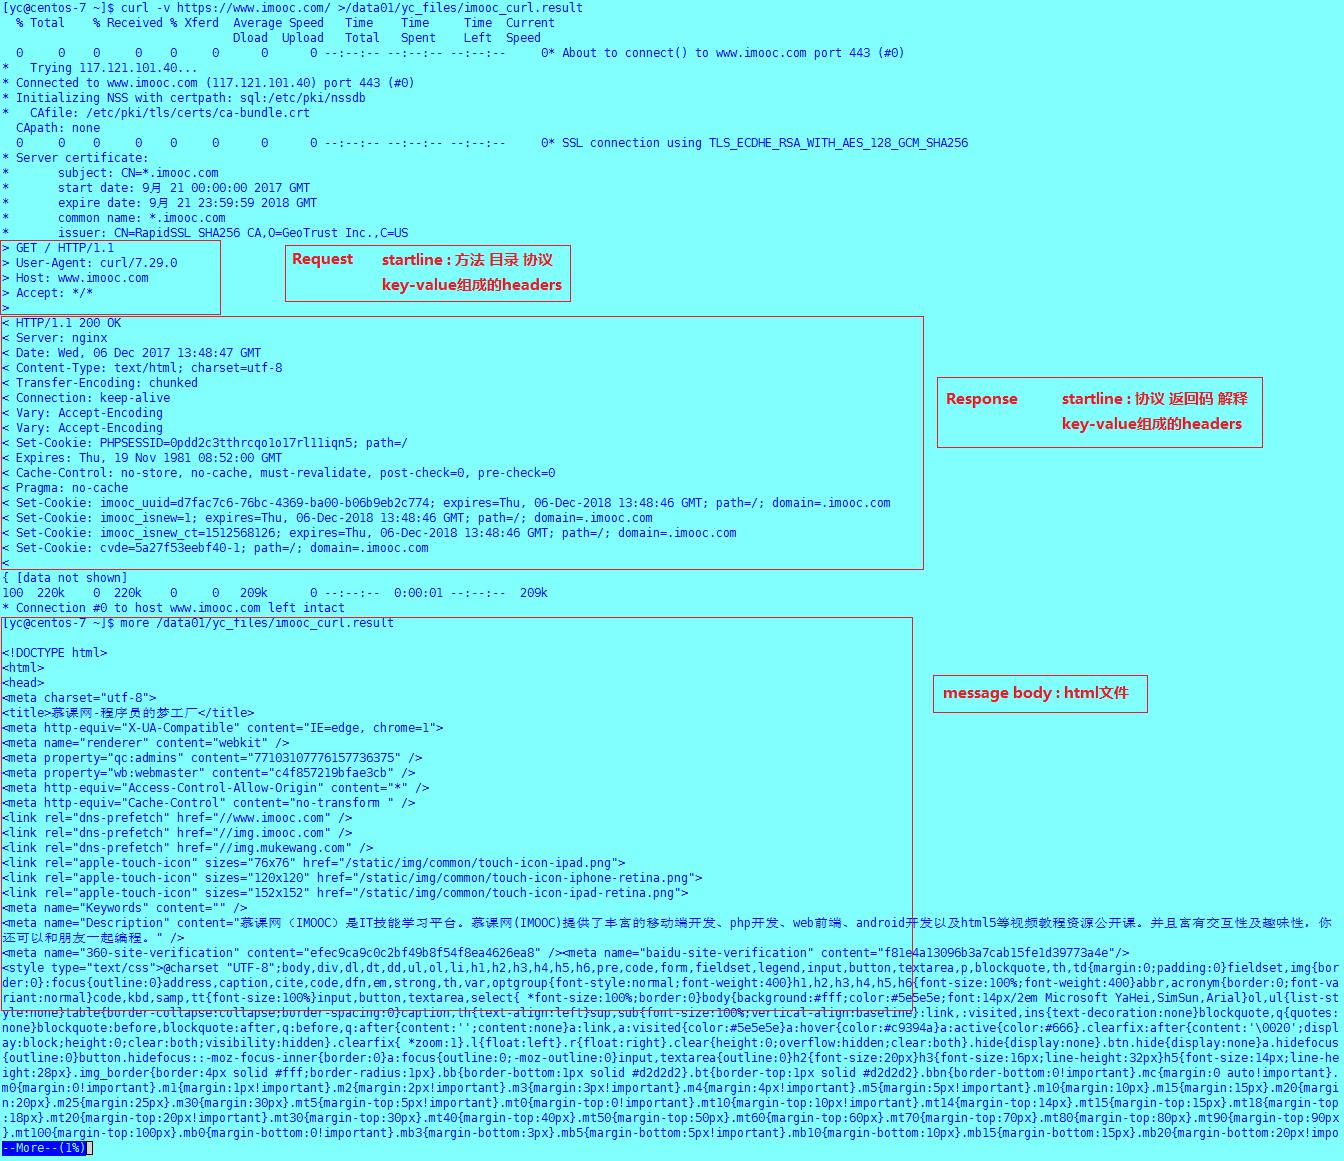
显示一次http通信的整个过程
curl -v https://www.imooc.com/ >/data01/yc_files/http_contact_demo.log
显示分析
urllib
概念
python原生网络库
urllib、urllib2、urllib3的关系
urllib和urllib2是独立的模块,并没有直接的关系,两者相互结合实现复杂的功能
urllib和urllib2在python2中才可以使用
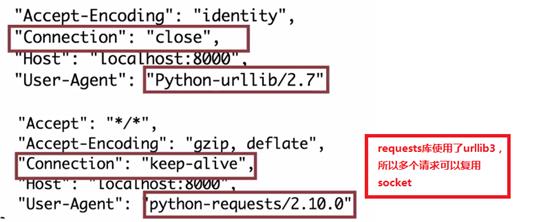
requests库中使用了urllib3(多次请求重复使用一个socket)
urllib和request区别
urlib_demo

# -*- coding:utf-8 -*-
import urllib2
import urllib

URL_simple="http://httpbin.org/ip"
URL_get="http://httpbin.org/get"

def urllib_simple_use():
    response = urllib2.urlopen(URL_simple)
    print( \'>>>>Response Headers:\')
    print( response.info())
    print( \'>>>>Response Status Code:\')
    print( response.getcode())
    print( \'>>>>Response :\')
    print( \'\'.join([line for line in response]))

def urllib_params_use():
    params = urllib.urlencode({\'param1\':\'hello\',\'param2\':\'world\'})
    response = urllib2.urlopen(\'?\'.join([URL_get,params]))
    print( \'>>>>Response Headers:\')
    print( response.info())
    print( \'>>>>Response Status Code:\')
    print( response.getcode())
    print( \'>>>>Response :\')
    print( \'\'.join([line for line in response]))

if __name__ == \'__main__\':
    print( \'>>>>Urllib Simple Use:\')
    urllib_simple_use()
    print( \'>>>>Urllib Params Use:\')
    urllib_params_use()
requests_demo
quick start: http://docs.python-requests.org/en/latest/user/quickstart/

# -*- coding:utf-8 -*-
import requests

URL_simple="http://httpbin.org/ip"
URL_get="http://httpbin.org/get"

def requests_simple_use():
    response = requests.get(URL_simple)
    print( \'>>>>Request Headers:\')
    print( response.request.headers)
    print( \'>>>>Request body:\')
    print( response.request.body)
    print( \'>>>>Response url:\')
    print( response.url)
    print( \'>>>>Response Headers:\')
    print( response.headers)
    print( \'>>>>Response Status Code:\')
    print( response.status_code)
    print( \'>>>>Response Status Code Reason:\')
    print( response.reason)
    print( \'>>>>Response :\')
    print( response.text)
    print( response.json())

def requests_params_use():
    params = {\'param1\':\'hello\',\'param2\':\'world\'}
    response = requests.get(URL_get,params=params)
    print( \'>>>>Request Headers:\')
    print( response.request.headers)
    print( \'>>>>Request body:\')
    print( response.request.body)
    print( \'>>>>Response url:\')
    print( response.url)
    print( \'>>>>Response Headers:\')
    print( response.headers)
    print( \'>>>>Response Status Code:\')
    print( response.status_code)
    print( \'>>>>Response Status Code Reason:\')
    print( response.reason)
    print( \'>>>>Response :\')
    print( response.text)
    print( response.json())

if __name__ == \'__main__\':
    print( \'>>>>Requests Simple Use:\')
    requests_simple_use()
    print( \'>>>>Requests Params Use:\')
    requests_params_use()
扩展
RFC7230 -> RFC7235阅读
发送请求

import requests
import json
from requests.exceptions import RequestException

ROOT_URL=\'https://api.github.com\'

def better_print(src_json):
    \'\'\'
        格式化打印json
    \'\'\'
    return json.dumps(src_json,indent=4)

def get_simple_use():
    \'\'\'
        API获得指定用户的用户信息
    \'\'\'
    response = requests.get(\'/\'.join([ROOT_URL,\'users/wahaha\']))
    print(\'>>>>Response text:\')
    print(better_print(response.json()))

def get_auth_use():
    \'\'\'
        API获得指定用户的email信息--明文,不建议方法。
        当然,123456是错误的密码。
        建议通过简易oauth认证。
    \'\'\'
    # response = requests.get(\'/\'.join([ROOT_URL,\'user/emails\']))
    response = requests.get(\'/\'.join([ROOT_URL,\'user/emails\']),auth=(\'wahaha\',\'123456\'))
    print(\'>>>>Response text:\')
    print(better_print(response.json()))

def get_params_use():
    \'\'\'
        get + 带参URL 获得11号之后的user信息
    \'\'\'
    response = requests.get(\'/\'.join([ROOT_URL,\'users\']),params={\'since\':11})
    print( \'>>>>Request Headers:\')
    print( response.request.headers)
    print( \'>>>>Request body:\')
    print( response.request.body)
    print( \'>>>>Response url:\')
    print( response.url)
    print(\'>>>>Response text:\')
    print(better_print(response.json()))

def patch_json_use():
    \'\'\'
        json参数 + patch 修改用户邮箱
    \'\'\'
    response = requests.patch(\'/\'.join([ROOT_URL,\'user\']),auth=(\'wahaha\',\'123456\'),json={\'name\':\'test_name\',\'email\':\'hello-world@163.com\'})
    print( \'>>>>Request Headers:\')
    print( response.request.headers)
    print( \'>>>>Request body:\')
    print( response.request.body)
    print( \'>>>>Response url:\')
    print( response.url)
    print(\'>>>>Response text:\')
    print(better_print(response.json()))

def request_exception_use():
    \'\'\'
        设定超时时间 + 异常处理
        timeout = x 握手+发送response超时时间-x
        timeout = ( x, y) 握手超时时间-x, 发送response超时时间-y
    \'\'\'
    try:
        response = requests.get(\'/\'.join([ROOT_URL,\'users\']),timeout=(0.1,0.2),params={\'since\':11})
    except RequestException as e:
        print(e)
    else:
        print( \'>>>>Request Headers:\')
        print( response.request.headers)
        print( \'>>>>Request body:\')
        print( response.request.body)
        print( \'>>>>Response url:\')
        print( response.url)
        print(\'>>>>Response text:\')
        print(better_print(response.json()))

def my_request_use():
    \'\'\'
        简单模拟requests库底层实现发送requset方法
    \'\'\'
    # 导库
    from requests import Request,Session
    # 初始化session
    my_session = Session()
    # 初始化headers
    my_headers = {\'User-Agent\':\'fake1.1.1\'}
    # 初始化request
    my_request = Request(\'GET\',\'/\'.join([ROOT_URL,\'users\']),headers=my_headers, params={\'since\':\'11\'})
    # 准备request
    my_prepared_request = my_request.prepare()
    # 发送request,并用response接受
    my_response = my_session.send(my_prepared_request,timeout=(3,3))
    print( \'>>>>Request Headers:\')
    print( json.dumps(dict(my_response.request.headers),indent=4))
    print( \'>>>>Request body:\')
    print( my_response.request.body)
    print( \'>>>>Response url:\')
    print( my_response.url)
    print( \'>>>>Response Headers:\')
    print( json.dumps(dict(my_response.headers),indent=4))
    print( \'>>>>Response Status Code:\')
    print( my_response.status_code)
    print( \'>>>>Response Status Code Reason:\')
    print( my_response.reason)
    # print( \'>>>>Response :\')
    # print(better_print(my_response.json()))

def hook_function(response, *args, **kw):
    print (\'回调函数>>>\',response.headers[\'Content-Type\'])

def event_hook_use():
    \'\'\'
        事件钩子,即回调函数,指定获得response时候调用的函数
    \'\'\'
    response = requests.get(\'http://www.baidu.com\',hooks={\'response\':hook_function})

if __name__=="__main__":
    # get_simple_use()
    # get_auth_use()
    # get_params_use()
    # patch_json_use()
    # request_exception_use()
    # my_request_use()
    event_hook_use()
参数类型
不同网站接口所对应的发送请求所需的参数类型不同
https://developer.github.com/v3/#parameters
1.URL参数
https://xxx/xx?a=1&b=2&c=3
request库中使用requests.get(url, params={\'a\':\'1\',\'b\':\'2\',\'c\':\'3\'})
优势:跳转方便,速度快
劣势:明文,长度有限制
2.表单参数提交
Content-Type: application/x-www-form-urlencoded
request库中使用requests.post(url, data={\'a\':\'1\',\'b\':\'2\',\'c\':\'3\'})
3.json参数提交
Content-Type: application/json
request库中使用request.post(url, json={\'a\':\'1\',\'b\':\'2\',\'c\':\'3\'})
举例网站
使用参考:https://developer.github.com/v3/guides/getting-started/
请求方法
GET -- 查看资源
POST -- 增加资源
PATCH -- 修改资源
PUT -- 修改资源(比PATCH修改的力度大)
DELETE -- 删除资源
HEAD -- 查看响应头
OPTIONS -- 查看可用请求方法
异常处理
requests库中显示引发的所有异常都继承自requests.exceptions.RequestException,所以直接捕获该异常即可。
自定义request
git@github.com:requests/requests.git
通过阅读request源码,了解Session(proxy,timeout,verify)、PreparedRequest(body,headers,auth)、Response(text,json...)
处理响应
响应基本API
响应的附加信息
status_code 响应码 E:\\yc_study\\python\\request\\request\\HTTP状态码.html
reason 响应码解释
headers 响应头
url 该响应是从哪个url发来的
history 重定向的历史信息
elapsed 接口调用时长
request 该响应对应的request
响应的主体内容
encoding 主体内容的编码格式
content 主体内容,str类型
text 主体内容,unicode类型
json 主体内容,json类型
raw 流模式下,返回一个urllib3.response.HTTPResponse类型的对象,可以分块取出数据
>>> r = requests.get(\'https://api.github.com/events\', stream=True)

>>> r.raw

<requests.packages.urllib3.response.HTTPResponse object at 0x101194810>

>>> r.raw.read(10)

\'\\x1f\\x8b\\x08\\x00\\x00\\x00\\x00\\x00\\x00\\x03\'
iter_content 流模式下,返回字节码,但会自动解码,可以分块取出数据
with open(filename, \'wb\') as fd:

    for chunk in r.iter_content(chunk_size=128):

        fd.write(chunk)
注1:iter_content和raw的区别
使用Response.iter_content会处理很多你直接使用Response.raw时必须处理的内容。在流式传输下载时,以上是检索内容的首选和推荐方式。请注意,chunk_size可以随意调整为更适合您的用例的数字。
Response.iter_content会自动解码gzip和deflate传输编码。Response.raw是一个原始的字节流,它不转换响应内容。如果您确实需要访问返回的字节,请使用Response.raw。
注2:使用流模式读取文件时,最终需要关闭流
http://www.cnblogs.com/Security-Darren/p/4196634.html

# -*- coding:utf-8 -*-

def get_image(img_url):
    import requests
    # response = requests.get(img_url,stream=True)
    # 引入上下文管理器的closing来实现关闭流
    from contextlib import closing
    # with closing(requests.get(img_url,stream=True,headers={\'User-Agent\':\'Mozilla/5.0 (Windows NT 6.1; WOW64) AppleWebKit/537.36 (KHTML, like Gecko) Chrome/55.0.2883.87 Safari/537.36\'})) as response:
    with closing(requests.get(img_url,stream=True)) as response:
        print(\'Request Headers>>:\\n\',response.request.headers)
        with open(\'demo1.jpg\',\'wb\') as img_file:
            for chunk in response.iter_content(128):
                img_file.write(chunk)


def main():
    img_url=\'https://timgsa.baidu.com/timg?image&quality=80&size=b9999_10000&sec=1512314249355&di=6371398ddfba39ce23fc02b74b2d59cf&imgtype=0&src=http%3A%2F%2Fpic.58pic.com%2F58pic%2F16%2F42%2F96%2F56e58PICAu9_1024.jpg\'
    # img_url=\'http://img5.imgtn.bdimg.com/it/u=2502798296,3184925683&fm=26&gp=0.jpg\'
    get_image(img_url)

if __name__ == \'__main__\':
    main()
事件钩子--回调函数
见 “发送请求” 下的代码
HTTP认证
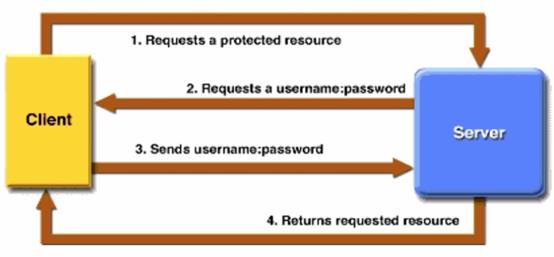
基本认证
原理
使用
即上面说过的明文auth
requests.get(\'https://api.github.com/user\',auth=(\'wahaha\', \'123456\'))
结果
此种方式在request库中是使用的base64编码的,直接解码可以得到用户名和密码
headers如下:

oauth认证
原理
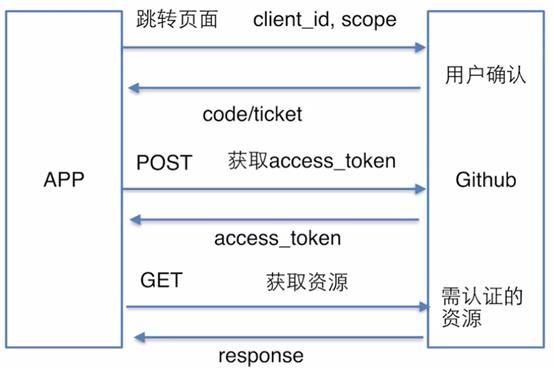
oauth的流程
http://www.barretlee.com/blog/2016/01/10/oauth2-introduce/
官方自定义oauth示例
http://www.python-requests.org/en/master/user/advanced/#custom-authentication
使用
简单使用:在settings->developer settings -> personal access tokens处生成一个测试token,并选择scope,将该token值放到request的headers中即可
结果
headers如下:

proxy代理
原理

背景
本机不可以访问外网
代理服务器可以访问外网
配置代理服务器后,所有访问外网的请求会被发送到代理服务器,然后代理服务器发送该请求到外网服务器,然后·外网服务器返回响应到代理服务器,代理服务器再返回到本机
更多
搜索 heroku + socks
cookie
原理
由于HTTP本身是无状态的,即每个HTTP请求应该是独立的,但是由于现实需要后面的请求需要依赖前面的请求所获得的结果,所以产生了cookie。
1.浏览器第一次发送HTTP请求(无cookie)
2.服务器返回带cookie的HTTP响应
3.浏览器解析相应中的cookie,并保存在本地
4.浏览器第二次发送请求(带cookie)
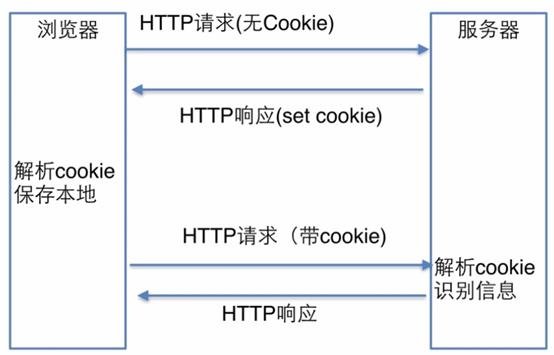
官方使用
http://docs.python-requests.org/en/master/user/quickstart/#cookies
session
原理
由于cookie需要将用户的数据在每次请求中都附带,而数据在网络上传输是不安全的,所以产生了session,session会将主要数据保存在服务器端,而只给浏览器端返回一个带session-id的cookie,一定保障了数据的安全性与传输效率
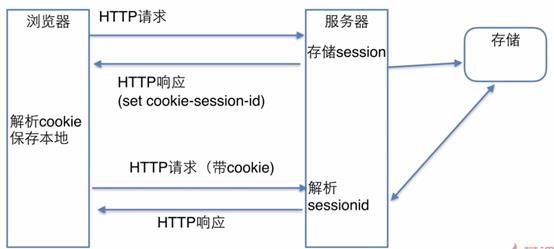
以上是关于从Request库理解HTTP消息的主要内容,如果未能解决你的问题,请参考以下文章
