ABP架构学习系列三:手工搭建ABP框架
Posted 心存善念
tags:
篇首语:本文由小常识网(cha138.com)小编为大家整理,主要介绍了ABP架构学习系列三:手工搭建ABP框架相关的知识,希望对你有一定的参考价值。
由于公司的项目才接触到ABP这个框架,当时就觉得高大上,什么IOC、AOP、ddd各种专业词汇让人激情 澎湃,但在使用过程中碰到了许多坑,可能也许是没有去看源码导致的,但工作确实没有那么多时间让人去慢慢研究。很久之前想手动搭建这个框架了,但是各种理由,你懂的。但是要在技术上得到大的提升就得静的下心去研究,学到大神的思想和精髓,运用到实际中去,才能去体验更开阔的天地。
本文以创建博客为思路,一步步构建整个项目,在摸索中进步,也希望能够帮助到有需要的人。
一、基础架构
第一部分主要是搭建好整个项目的骨架,连通各个项目
Install-Package Abp -Version 0.8.4
Install-Package Abp.EntityFramework -Version 0.8.4
Install-Package Abp.Web.Mvc -Version 0.8.4
Install-Package Abp.Web.Api -Version 0.8.4
二、ZmBlog.Core
namespace ZmBlog.Core
{
    public class ZmBlogCoreModule:AbpModule
    {
        public override void Initialize()
        {
            IocManager.RegisterAssemblyByConvention(Assembly.GetExecutingAssembly());
        }
    }
}
ZmBlogCoreModule必须依赖于AbpModule,ZmBlogCoreModule是自定义模块第一个启动的,另外,ZmBlogCoreModule启动之前,abp会先启用内部的AbpKernelModule。
AbpKernelModule类是Abp框架自己的Module,它也跟所有其他的Module一样继承自AbpModule,重写PreInitialize,Initialize,PostInitialize三个主要成员。
更详细的请参考:https://www.cnblogs.com/Azula/archive/2015/11/23/4989157.html
现在,定义一个实体文章分类Category,继承自Entity<TPrimaryKey>
    public class Category: Entity<string>
    {
        public Category()
        {
            Id = Guid.NewGuid().ToString();
        }
        /// <summary>
        /// 类别名称
        /// </summary>
        public string Name { get; set; }
        /// <summary>
        /// 状态(0隐藏1显示)
        /// </summary>
        public int Status { get; set; }
    }
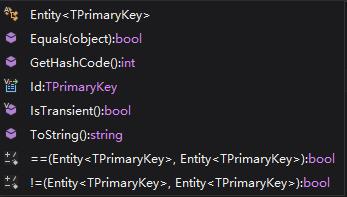
以下是Entity<TPrimaryKey>的成员,其中定义了主键Id(可重写)

接着,添加一个仓储接口ICategoryRepository
public interface ICategoryRepository : IRepository<Category,string>{}
另外,还可以添加领域服务ICategoryDomainService、CategoryDomainService,对于业务简单的模块,可以去掉领域服务,直接在应用层处理。
public interface ICategoryDomainService:IDomainService{}

public class CategoryDomainService : DomainService, ICategoryDomainService{}
三、ZmBlog.Infrastructure
1.定义模块
创建一个模块ZmBlogDataModule,依赖模块AbpEntityFrameworkModule会自动注册了所有仓储接口
[DependsOn(typeof(ZmBlogCoreModule),typeof(AbpEntityFrameworkModule))]
    public class ZmBlogDataModule : AbpModule
    {
        public override void Initialize()
        {
             IocManager.RegisterAssemblyByConvention(Assembly.GetExecutingAssembly());
        }
    }
2.使用EF作为orm
使用以下命令引入包
Install-Package EntityFramework -Version 6.1.3
Install-Package Castle.Windsor -Version 3.3.0
(1)创建ZmBlogDbContext
 public class ZmBlogDbContext: AbpDbContext
    {
        public ZmBlogDbContext()
            : base("DefaultConnection")
        {
        }

        public ZmBlogDbContext(string nameOrConnectionString)
            : base(nameOrConnectionString)
        {
        }

        //This constructor is used in tests
        public ZmBlogDbContext(DbConnection connection)
            : base(connection, true)
        {
        }

        public DbSet<Category> Categorys { get; set; }

        protected override void OnModelCreating(DbModelBuilder modelBuilder)
        {
            base.OnModelCreating(modelBuilder);
            modelBuilder.Conventions.Remove<OneToManyCascadeDeleteConvention>();


            modelBuilder.Configurations.Add(new CategoryCfg());//使用独立配置

        }
    }
DefaultConnection是连接字符串名称,在web项目添加或修改如下
<connectionStrings>
    <add name="DefaultConnection" connectionString="Data Source=.;Initial Catalog=ZmBlogDb;Integrated Security=True" providerName="System.Data.SqlClient" />
  </connectionStrings>
CategoryCfg是对实体类型的配置,如设置Id为主键
public class CategoryCfg: EntityTypeConfiguration<Category>
    {
        public CategoryCfg()
        {
            HasKey(s => s.Id);
        }
    }
(2)使用codefirst模式
1.启用迁移
(3)实现仓储
基础类BaseRepository,继承实现增删改查
public  abstract  class BaseRepository<TEntity, TPrimaryKey> :EfRepositoryBase<ZmBlogDbContext,TEntity,TPrimaryKey> where TEntity : class, IEntity<TPrimaryKey>
    {
        protected BaseRepository(IDbContextProvider<ZmBlogDbContext> dbContextProvider)
            : base(dbContextProvider)
        {

        }

        //add common methods for all repositories
    }
    public abstract class BaseRepository<TEntity> : BaseRepository<TEntity, string>
        where TEntity : class, IEntity<string>
    {
        protected BaseRepository(IDbContextProvider<ZmBlogDbContext> dbContextProvider)
            : base(dbContextProvider)
        {

        }

        //do not add any method here, add to the class above (since this inherits it)
    }
自定义的实现类,如下
 public class CategoryRepository : BaseRepository<Category, string>, ICategoryRepository
    {
        public CategoryRepository(IDbContextProvider<ZmBlogDbContext> dbContextProvider) : base(dbContextProvider)
        {
        }
    }
四、ZmBlog.Application
1.添加模块
添加模块 ZmBlogApplicationModule
namespace ZmBlog.Application
{
    [DependsOn(typeof(ZmBlogCoreModule), typeof(ZmBlogDataModule))]
    public class ZmBlogApplicationModule:AbpModule
    {
        public override void Initialize()
        {
            IocManager.RegisterAssemblyByConvention(Assembly.GetExecutingAssembly());
        }
    }
}
2.创建服务
在项目下添加文件夹Categories,然后添加服务接口和实现类,如
ICategoryApp
public interface ICategoryApp:IApplicationService
    {
        string GetCategoryName(string id);
    }
CategoryApp
namespace ZmBlog.Application.Categories
{
    public class CategoryApp : ApplicationService, ICategoryApp
    {
        private readonly IRepository<Category, string> _categoryRepository;

        public CategoryApp(IRepository<Category, string> categoryRepository)
        {
            _categoryRepository = categoryRepository;
        }

        //private readonly ICategoryRepository _categoryRepository;

        //public CategoryApp(ICategoryRepository categoryRepository)
        //{
        //    _categoryRepository = categoryRepository;
        //}


        public string GetCategoryName(string id)
        {
            //var categoryData = _categoryRepository.GetAll().FirstOrDefault(s=>s.Name == "硬件");

            var category = new Category()
            {
                Name = "硬件" + DateTime.Now.ToString("yy-MM-dd HH:mm:ss"),
                Status = 1
            };
            _categoryRepository.Insert(category);

            CurrentUnitOfWork.SaveChanges();
            return category.Name;
        }
    }
}
五、ZmBlog.Web修改
1.增加依赖
ZmBlogWebModule是web的模块,上一篇文章创建的,增加依赖ZmBlogApplicationModule
[DependsOn(typeof(AbpWebMvcModule),typeof(ZmBlogApplicationModule))]
    public class ZmBlogWebModule:AbpModule
{
    //...
}
2.修改控制器
public class HomeController : AbpController
    {
        private ICategoryApp _categoryApp;
        public HomeController(ICategoryApp categoryApp)
        {
            _categoryApp = categoryApp;
        }
        public ActionResult Index()
        {
            try
            {
                ViewBag.Name = _categoryApp.GetCategoryName("");
            }
            catch (Exception e)
            {
                ViewBag.Name = "默认分类";
                throw;
            }

            return View();
        }
//.....省略
3.页面修改
@{
    ViewBag.Title = "Home Page";
}

<div class="jumbotron">
    <h1>I Like @ViewBag.Name</h1>
</div>
去掉没用的,直接展示效果
六、展示
运行起来的效果

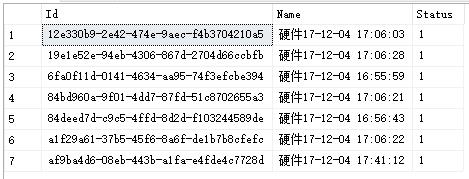
数据库

由于时间原因,一些细节没有详细讲,如有不清楚请留言
源码下载:https://github.com/jackchn/cnblogs-xcsn-source下的ZmBlogStudy.rar
以上是关于ABP架构学习系列三:手工搭建ABP框架的主要内容,如果未能解决你的问题,请参考以下文章