Elasticsearch6.0及其head插件安装
-
1.下载并解压elasticsearch
-
2.修改elasticsearch.yml文件
# 集群的名字
cluster.name: my-application
# 节点名字
node.name: node-1
# 数据存储目录(多个路径用逗号分隔)
path.data: /home/wjy/es/data
# 日志目录
path.logs: /home/wjy/es/logs
#本机的ip地址
network.host: 192.168.161.128
#设置集群中master节点的初始列表,可以通过这些节点来自动发现新加入集群的节点
discovery.zen.ping.unicast.hosts: ["192.168.161.128"]
# 设置节点间交互的tcp端口(集群),(默认9300)
transport.tcp.port: 9300
# 监听端口(默认)
http.port: 9200
# 增加参数,使head插件可以访问es
http.cors.enabled: true
http.cors.allow-origin: "*"
-
3.启动es ./elasticsearch
-
4.下载head插件
wget https://github.com/mobz/elasticsearch-head/archive/master.zip
- 5.安装node
wget https://npm.taobao.org/mirrors/node/latest-v4.x/node-v4.4.7-linux-x64.tar.gz
tar -zxvf node-v4.4.7-linux-x64.tar.gz
配置下环境变量,编辑/etc/profile添加<br/>
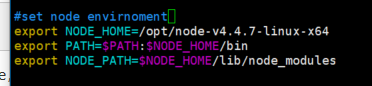
<br>
执行 source /etc/profile
* 6.安装grunt
>grunt是基于Node.js的项目构建工具,可以进行打包压缩、测试、执行等等的工作,head插件就是通过grunt启动
cd /opt/elasticsearch-head-master
npm install -g grunt-cli //执行后会生成node_modules文件夹
检查是否安装成功<br>

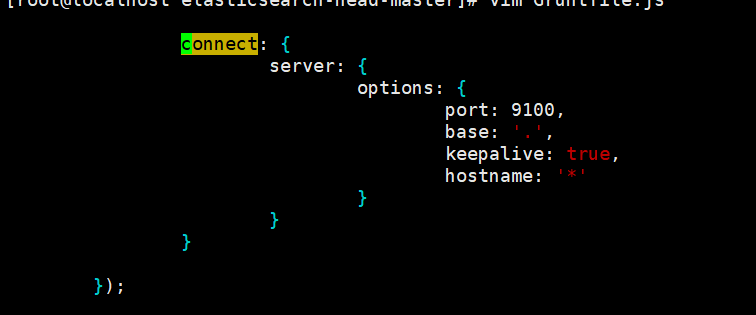
* 7.修改head插件源码
>修改服务器监听地址:Gruntfile.js<br>
修改连接地址:_site/app.js<br>

* 7.运行head
>在elasticsearch-head-master目录下
npm install(安装下载下来的包)
grunt server
* 8.访问http://xxx:9100
