CentOS7.2非HA分布式部署Openstack Pike版 (实验)
Posted
tags:
篇首语:本文由小常识网(cha138.com)小编为大家整理,主要介绍了CentOS7.2非HA分布式部署Openstack Pike版 (实验)相关的知识,希望对你有一定的参考价值。
部署环境
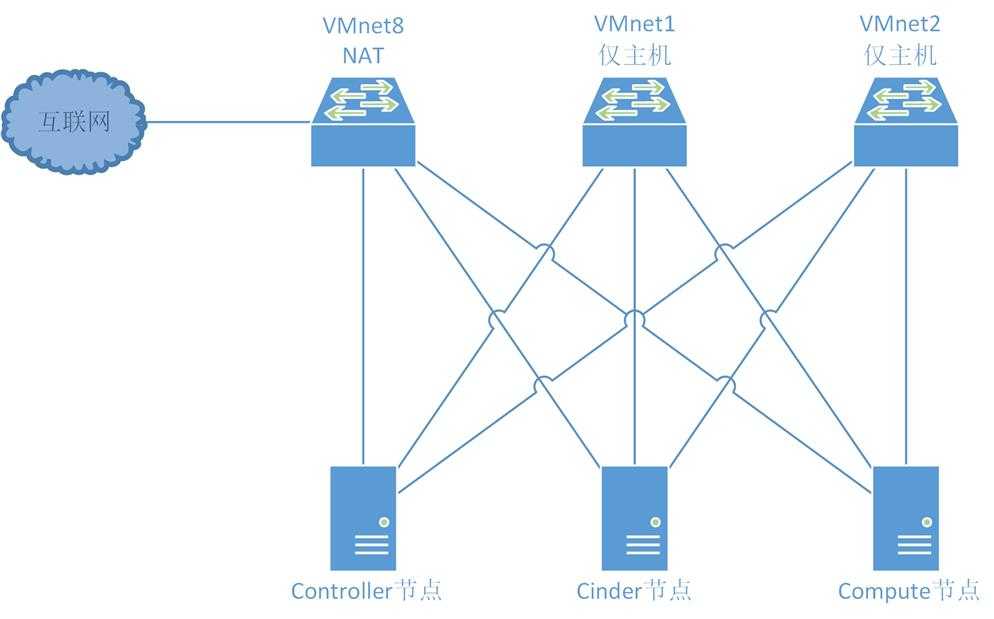
一、组网拓扑
二、设备配置
笔记本:联想L440
处理器:i3-4000M 2.40GHz
内存:12G
虚拟机软件:VMware? Workstation 12 Pro(12.5.2 build-4638234)
三、虚拟机配置
Controller节点:
系统:CentOS7.2 64位(最小化安装)
处理器:4核
内存:4G
硬盘:100G
网卡:3块
Compute节点:
系统:CentOS7.2 64位(最小化安装)
处理器:4核
内存:4G
硬盘:100G
网卡:3块
Cinder节点:
系统:CentOS7.2 64位(最小化安装)
处理器:4核
内存:1G
硬盘:100G+50G
网卡:3块
四、网络配置
VMnet8:
这个网络是链接外网的,也就是说openstack环境里的虚拟机要让用户访问,那必须有个网段是连外网的,用户通过这个网
络能访问到虚拟机。
同时各节点也通过这个网络进行yum安装,Compute节点和Cinder节点在部署完毕后可以需要这块网卡,具体地址可根据自己的需求更改。
网段:9.110.187.0/24
网关:9.110.187.2
DNS:114.114.114.114
Controller节点:9.110.187.120
Compute节点:9.110.187.121
Cinder节点:9.110.187.122
VMnet1:
这个网段是用来做管理网络的。管理网络,顾名思义,你的openstack环境里面各个模块之间需要交互,连接数据库,连
接Message Queue都是需要一个网络去支撑的,那么这个网段就是这个作用。最简单的理解,openstack自己本身用的IP段,具体地址可根据自己的需求更改。
网段:10.1.1.0/24
Controller节点:10.1.1.12
Compute节点:10.1.1.121
Cinder节点:10.1.1.122
VMnet2:
隧道网络,openstack里面使用gre或者vxlan模式,需要有隧道网络;隧道网络采用了点到点通信协议代替了交换连接,在
openstack里,这个tunnel就是虚拟机走网络数据流量用的,具体地址可根据自己的需求更改。
网段:10.2.2.0/24
Controller节点:10.2.2.120
Compute节点:10.2.2.121
Cinder节点:10.2.2.122
三种网络在生产环境里是必须分开的,有的生产环境还有分布式存储,所以还得额外给存储再添加一网络,storage段。网络分开的好处
就是数据分流、安全、不相互干扰。你想想,如果都整一块了,还怎么玩?用户访问虚拟机还使用你openstack的管理段,那太不安全
了...
Controller节点,Compute节点,Cinder节点软件环境准备
开始此步骤之前需要确认各节点已经可以正常访问互联网,可以ping www.baidu.com进行测试。
一、关闭firewall、NetworkManager服务
systemctl stop firewalld NetworkManager
systemctl disable firewalld NetworkManager
二、关闭selinex服务
编辑/etc/selinux/config,将“SELINUX”参数更改为“disabled”
# This file controls the state of SELinux on the system.
# SELINUX= can take one of these three values:
#     enforcing - SELinux security policy is enforced.
#     permissive - SELinux prints warnings instead of enforcing.
#     disabled - No SELinux policy is loaded.
SELINUX=disabled
# SELINUXTYPE= can take one of three two values:
#     targeted - Targeted processes are protected,
#     minimum - Modification of targeted policy. Only selected processes are protected.
#     mls - Multi Level Security protection.
SELINUXTYPE=targeted
setenforce 0
三、配置CentOS源,epel源,mariadb源,Openstack源
由于国内访问国外源速度非常慢,因此更换为从国内源下载。本文中除了mariadb源使用了中国科学技术大学的源以外,其余三个源均使用阿里的源,在配置新源之前,需要将/etc/yum.repos.d/目录下的文件都删除,源配置如下:
CentOS源:


# CentOS-Base.repo
#
# The mirror system uses the connecting IP address of the client and the
# update status of each mirror to pick mirrors that are updated to and
# geographically close to the client.  You should use this for CentOS updates
# unless you are manually picking other mirrors.
#
# If the mirrorlist= does not work for you, as a fall back you can try the
# remarked out baseurl= line instead.
#
#

[base]
name=CentOS-$releasever - Base - mirrors.aliyun.com
failovermethod=priority
baseurl=http://mirrors.aliyun.com/centos/$releasever/os/$basearch/
        http://mirrors.aliyuncs.com/centos/$releasever/os/$basearch/
#mirrorlist=http://mirrorlist.centos.org/?release=$releasever&arch=$basearch&repo=os
gpgcheck=1
gpgkey=http://mirrors.aliyun.com/centos/RPM-GPG-KEY-CentOS-7

#released updates
[updates]
name=CentOS-$releasever - Updates - mirrors.aliyun.com
failovermethod=priority
baseurl=http://mirrors.aliyun.com/centos/$releasever/updates/$basearch/
        http://mirrors.aliyuncs.com/centos/$releasever/updates/$basearch/
#mirrorlist=http://mirrorlist.centos.org/?release=$releasever&arch=$basearch&repo=updates
gpgcheck=1
gpgkey=http://mirrors.aliyun.com/centos/RPM-GPG-KEY-CentOS-7

#additional packages that may be useful
[extras]
name=CentOS-$releasever - Extras - mirrors.aliyun.com
failovermethod=priority
baseurl=http://mirrors.aliyun.com/centos/$releasever/extras/$basearch/
        http://mirrors.aliyuncs.com/centos/$releasever/extras/$basearch/
#mirrorlist=http://mirrorlist.centos.org/?release=$releasever&arch=$basearch&repo=extras
gpgcheck=1
gpgkey=http://mirrors.aliyun.com/centos/RPM-GPG-KEY-CentOS-7

#additional packages that extend functionality of existing packages
[centosplus]
name=CentOS-$releasever - Plus - mirrors.aliyun.com
failovermethod=priority
baseurl=http://mirrors.aliyun.com/centos/$releasever/centosplus/$basearch/
        http://mirrors.aliyuncs.com/centos/$releasever/centosplus/$basearch/
#mirrorlist=http://mirrorlist.centos.org/?release=$releasever&arch=$basearch&repo=centosplus
gpgcheck=1
enabled=0
gpgkey=http://mirrors.aliyun.com/centos/RPM-GPG-KEY-CentOS-7

#contrib - packages by Centos Users
[contrib]
name=CentOS-$releasever - Contrib - mirrors.aliyun.com
failovermethod=priority
baseurl=http://mirrors.aliyun.com/centos/$releasever/contrib/$basearch/
        http://mirrors.aliyuncs.com/centos/$releasever/contrib/$basearch/
#mirrorlist=http://mirrorlist.centos.org/?release=$releasever&arch=$basearch&repo=contrib
gpgcheck=1
enabled=0
gpgkey=http://mirrors.aliyun.com/centos/RPM-GPG-KEY-CentOS-7
epel源:
[epel]
name=Extra Packages for Enterprise Linux 7 - $basearch
baseurl=http://mirrors.aliyun.com/epel/7/$basearch
        http://mirrors.aliyuncs.com/epel/7/$basearch
#mirrorlist=https://mirrors.fedoraproject.org/metalink?repo=epel-7&arch=$basearch
failovermethod=priority
enabled=1
gpgcheck=0
gpgkey=file:///etc/pki/rpm-gpg/RPM-GPG-KEY-EPEL-7

[epel-debuginfo]
name=Extra Packages for Enterprise Linux 7 - $basearch - Debug
baseurl=http://mirrors.aliyun.com/epel/7/$basearch/debug
        http://mirrors.aliyuncs.com/epel/7/$basearch/debug
#mirrorlist=https://mirrors.fedoraproject.org/metalink?repo=epel-debug-7&arch=$basearch
failovermethod=priority
enabled=0
gpgkey=file:///etc/pki/rpm-gpg/RPM-GPG-KEY-EPEL-7
gpgcheck=0

[epel-source]
name=Extra Packages for Enterprise Linux 7 - $basearch - Source
baseurl=http://mirrors.aliyun.com/epel/7/SRPMS
        http://mirrors.aliyuncs.com/epel/7/SRPMS
#mirrorlist=https://mirrors.fedoraproject.org/metalink?repo=epel-source-7&arch=$basearch
failovermethod=priority
enabled=0
gpgkey=file:///etc/pki/rpm-gpg/RPM-GPG-KEY-EPEL-7
gpgcheck=0
mariadb源:
[mariadb]
name=mariadb
baseurl=https://mirrors.ustc.edu.cn/mariadb/yum/10.1/centos7-amd64/
gpgcheck=0
enabled=1
Openstack源:
[openstack]
name=pike
baseurl=https://mirrors.aliyun.com/centos/7/cloud/x86_64/openstack-pike/
gpgcheck=0
enabled=1
四、清除当前yum缓存并重新建立新的缓存
yum clean all
yum makecache
如果以上步骤不报错,则说明源配置的没问题。
五、安装必须的工具
由于系统为最小化安装,因此一些常用的工具如vim,net-tool等需要先行安装,方便后期部署。
yum install net-tools wget vim ntpdate ntp bash-completion -y
六、更改主机名
编辑/etc/hostname,将默认主机名改为你想要的主机名,本次实验的主机名如下:
Controller节点:controller
Compute节点:compute
Cinder节点:cinder
七、添加各节点的hosts信息
编译/etc/hosts,增加各节点IP及主机名的对应关系,这里IP地址使用VMnet1网段的IP,以下是Controller节点的hosts文件,其余节点同样添加:
127.0.0.1   localhost localhost.localdomain localhost4 localhost4.localdomain4
::1         localhost localhost.localdomain localhost6 localhost6.localdomain6
10.1.1.120 controller
10.1.1.121 compute
10.1.1.122 cinder
八、配置NTP时间同步
此步骤非常重要,由于本次实验中进行的是Openstack分布式部署,如果各节点的时间不同步,那么会出现很多问题。
编辑/etc/ntp.conf,将默认配置中的4个“server”注释掉3个,将剩下的那个server参数的域名改为阿里的时间同步服务器(ntp1.aliyun.com),其余节点由于无法访问互联网,可以向Controller节点同步。
# For more information about this file, see the man pages
# ntp.conf(5), ntp_acc(5), ntp_auth(5), ntp_clock(5), ntp_misc(5), ntp_mon(5).

driftfile /var/lib/ntp/drift

# Permit time synchronization with our time source, but do not
# permit the source to query or modify the service on this system.
restrict default nomodify notrap nopeer noquery

# Permit all access over the loopback interface.  This could
# be tightened as well, but to do so would effect some of
# the administrative functions.
restrict 127.0.0.1
restrict ::1

# Hosts on local network are less restricted.
#restrict 192.168.1.0 mask 255.255.255.0 nomodify notrap

# Use public servers from the pool.ntp.org project.
# Please consider joining the pool (http://www.pool.ntp.org/join.html).
server ntp1.aliyun.com iburst
#server 1.centos.pool.ntp.org iburst
#server 2.centos.pool.ntp.org iburst
#server 3.centos.pool.ntp.org iburst

#broadcast 192.168.1.255 autokey    # broadcast server
#broadcastclient            # broadcast client
#broadcast 224.0.1.1 autokey        # multicast server
#multicastclient 224.0.1.1        # multicast client
#manycastserver 239.255.254.254        # manycast server
#manycastclient 239.255.254.254 autokey # manycast client

# Enable public key cryptography.
#crypto

includefile /etc/ntp/crypto/pw

# Key file containing the keys and key identifiers used when operating
# with symmetric key cryptography.
keys /etc/ntp/keys

# Specify the key identifiers which are trusted.
#trustedkey 4 8 42

# Specify the key identifier to use with the ntpdc utility.
#requestkey 8

# Specify the key identifier to use with the ntpq utility.
#controlkey 8

# Enable writing of statistics records.
#statistics clockstats cryptostats loopstats peerstats

# Disable the monitoring facility to prevent amplification attacks using ntpdc
# monlist command when default restrict does not include the noquery flag. See
# CVE-2013-5211 for more details.
# Note: Monitoring will not be disabled with the limited restriction flag.
disable monitor
配置完成后,设置ntpd服务开机启动,并开启服务
systemctl enable ntpd
systemctl start ntpd
启动完成后查看时间是否已经同步:
ntpq -p
以上步骤配置完毕后,安装前的准备就已经差不多完成了,建议把虚拟机重启一下,确保前的配置都生效。
再提醒一下,以上所有步骤三个节点都需要配置。
Controller节点部署
Openstack主要的模块都安装在此节点上,需要安装的模块有Keystone、Glance、Nova、Neutron、Dashboard、Cinder,已经相配套的MariaDB、RabbitMQ也需要安装
一、MariaDB安装
1、本次实验安装的MariaDB版本为10.1
yum install -y MariaDB-server MariaDB-client
安装完成后,在/etc/my.cnf.d/目录中添加mariadb-openstack.cnf配置文件,填入下方配置,注意IP地址根据实际情况修改。
[mysqld]
default-storage-engine = innodb
innodb_file_per_table
collation-server = utf8_general_ci
init-connect = ‘SET NAMES utf8‘
character-set-server = utf8
bind-address = 10.1.1.120
2、启动数据库及设置mariadb开机启动
systemctl enable mariadb.service
systemctl restart mariadb.service
systemctl status mariadb.service
systemctl list-unit-files |grep mariadb.service
3、配置Mariadb,给root用户设置密码
mysql_secure_installation
先按回车,然后按Y,设置mysql密码,然后一直按y结束。密码配置成自己想要的密码。
二、安装RabbitMQ
1、安装RabbitMQ及依赖包
yum install -y erlang rabbitmq-server
2、安装完毕后开启RabbitMQ,并设置为开机启动
systemctl enable rabbitmq-server.service
systemctl restart rabbitmq-server.service
systemctl status rabbitmq-server.service
3、创建RabbitMQ的openstack用户,“password”可自行修改。
rabbitmqctl add_user openstack password
4、将openstack用户赋予权限,并设置为管理员角色
rabbitmqctl set_permissions openstack ".*" ".*" ".*"
rabbitmqctl set_user_tags openstack administrator
rabbitmqctl list_users
5、打开RabbitMQ相关插件
/usr/lib/rabbitmq/bin/rabbitmq-plugins enable rabbitmq_management mochiweb webmachine rabbitmq_web_dispatch amqp_client rabbitmq_management_agent
6、打开相关插件后,重启下rabbitmq服务
systemctl restart rabbitmq-server
7、用浏览器登录http://9.110.187.120:15672 输入openstack账户,验证是否可以登录。
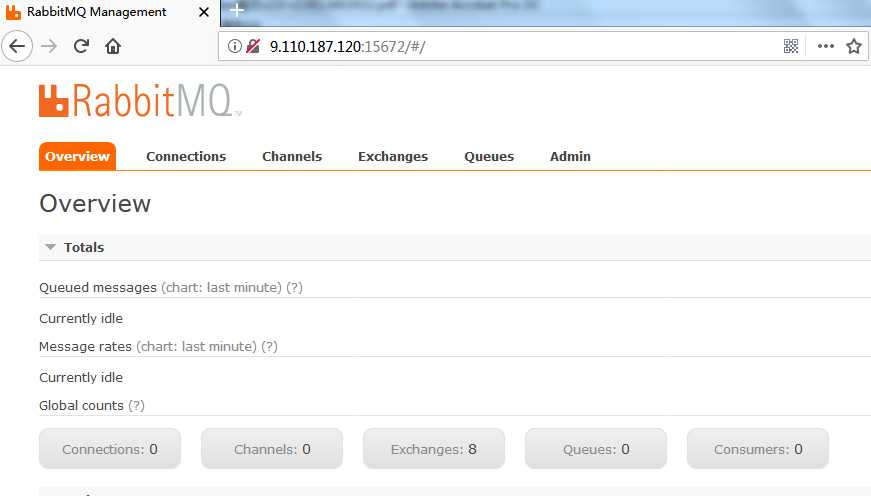
至此Openstack需要用到的数据库和消息队列软件已经安装完成。
三、安装Keystone组件
1、首先需要登录数据库,为Keystone创建database和用户
CREATE DATABASE keystone;
GRANT ALL PRIVILEGES ON keystone.* TO ‘keystone‘@‘localhost‘ IDENTIFIED BY ‘password‘;
GRANT ALL PRIVILEGES ON keystone.* TO ‘keystone‘@‘%‘ IDENTIFIED BY ‘password‘;
2、安装keystone和memcached
yum -y install openstack-keystone httpd mod_wsgi python-openstackclient memcached python-memcached openstack-utils
3、开启memcached并设置为开机启动
systemctl enable memcached.service
systemctl restart memcached.service
systemctl status memcached.service
4、配置/etc/keystone/keystone.conf文件
先将原配置文件备份并清空后执行以下openstack-config命令。
cp /etc/keystone/keystone.conf /etc/keystone/keystone.conf.bak
>/etc/keystone/keystone.conf
openstack-config --set /etc/keystone/keystone.conf DEFAULT transport_url rabbit://openstack:[email protected]
openstack-config --set /etc/keystone/keystone.conf database connection mysql://keystone:[email protected]/keystone
openstack-config --set /etc/keystone/keystone.conf cache backend oslo_cache.memcache_pool
openstack-config --set /etc/keystone/keystone.conf cache enabled true
openstack-config --set /etc/keystone/keystone.conf cache memcache_servers controller:11211
openstack-config --set /etc/keystone/keystone.conf memcache servers controller:11211
openstack-config --set /etc/keystone/keystone.conf token expiration 3600
openstack-config --set /etc/keystone/keystone.conf token provider fernet
5、配置httpd.conf文件&memcached文件
sed -i "s/#ServerName www.example.com:80/ServerName controller/" /etc/httpd/conf/httpd.conf
sed -i ‘s/OPTIONS*.*/OPTIONS="-l 127.0.0.1,::1,10.1.1.120"/‘ /etc/sysconfig/memcached
6、配置keystone与httpd结合
ln -s /usr/share/keystone/wsgi-keystone.conf /etc/httpd/conf.d/
7、配置Keystone与数据库同步
su -s /bin/sh -c "keystone-manage db_sync" keystone
8、初始化fernet
keystone-manage fernet_setup --keystone-user keystone --keystone-group keystone
keystone-manage credential_setup --keystone-user keystone --keystone-group keystone
9、启动httpd,并设置httpd开机启动
systemctl enable httpd.service
systemctl restart httpd.service
systemctl status httpd.service
10、在Keystone内创建 admin 用户角色
keystone-manage bootstrap --bootstrap-password password --bootstrap-username admin --bootstrap-project-name admin --bootstrap-role-name admin --bootstrap-service-name keystone --bootstrap-region-id RegionOne --bootstrap-admin-url http://controller:35357/v3 --bootstrap-internal-url http://controller:35357/v3 --bootstrap-public-url http://controller:5000/v3
11、验证admin用户是否创建
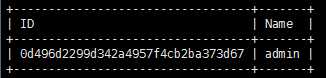
openstack project list --os-username admin --os-project-name admin --os-user-domain-id default --os-project-domain-id default --os-identity-api-version 3 --os-auth-url http://controller:5000 --os-password password
12、创建admin用户环境变量
创建/root/admin-openrc 文件并写入如下内容,后续的调试中需要先运行source /root/admin-openrc来获取权限:
vim /root/admin-openrc
添加以下内容:
export OS_USER_DOMAIN_ID=default
export OS_PROJECT_DOMAIN_ID=default
export OS_USERNAME=admin
export OS_PROJECT_NAME=admin
export OS_PASSWORD=password
export OS_IDENTITY_API_VERSION=3
export OS_IMAGE_API_VERSION=2
export OS_AUTH_URL=http://controller:35357/v3
13、创建service项目
source /root/admin-openrc
openstack project create --domain default --description "Service Project" service
14、创建demo项目
openstack project create --domain default --description "Demo Project" demo
15、创建demo用户
openstack user create --domain default demo --password password
16、创建user角色将demo用户赋予user角色
openstack role create user
openstack role add --project demo --user demo user
17、验证keystone
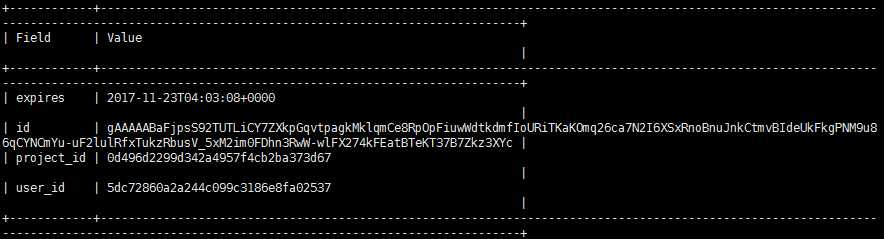
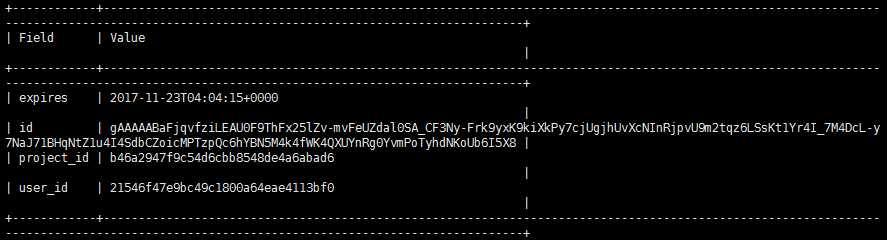
unset OS_TOKEN OS_URL
openstack --os-auth-url http://controller:35357/v3 --os-project-domain-name default --os-user-domain-name default --os-project-name admin --os-username admin token issue --os-password password
openstack --os-auth-url http://controller:5000/v3 --os-project-domain-name default --os-user-domain-name default --os-project-name demo --os-username demo token issue --os-password password
四、安装配置glance
1、首先需要登录数据库,为Glance创建database和用户
CREATE DATABASE glance;
GRANT ALL PRIVILEGES ON glance.* TO ‘glance‘@‘localhost‘ IDENTIFIED BY ‘password‘;
GRANT ALL PRIVILEGES ON glance.* TO ‘glance‘@‘%‘ IDENTIFIED BY ‘password‘;
2、创建glance用户及赋予admin权限
source /root/admin-openrc
openstack user create --domain default glance --password password
openstack role add --project service --user glance admin
3、创建image服务
openstack service create --name glance --description "OpenStack Image service" image
4、创建glance的endpoint
openstack endpoint create --region RegionOne image public http://controller:9292
openstack endpoint create --region RegionOne image internal http://controller:9292
openstack endpoint create --region RegionOne image admin http://controller:9292
5、安装glance相关rpm包
yum install openstack-glance -y
6、修改glance配置文件/etc/glance/glance-api.conf
cp /etc/glance/glance-api.conf /etc/glance/glance-api.conf.bak
>/etc/glance/glance-api.conf
openstack-config --set /etc/glance/glance-api.conf DEFAULT transport_url rabbit://openstack:[email protected]
openstack-config --set /etc/glance/glance-api.conf database connection mysql+pymysql://glance:[email protected]/glance
openstack-config --set /etc/glance/glance-api.conf keystone_authtoken auth_uri http://controller:5000
openstack-config --set /etc/glance/glance-api.conf keystone_authtoken auth_url http://controller:35357
openstack-config --set /etc/glance/glance-api.conf keystone_authtoken memcached_servers controller:11211
openstack-config --set /etc/glance/glance-api.conf keystone_authtoken auth_type password
openstack-config --set /etc/glance/glance-api.conf keystone_authtoken project_domain_name default
openstack-config --set /etc/glance/glance-api.conf keystone_authtoken user_domain_name default
openstack-config --set /etc/glance/glance-api.conf keystone_authtoken username glance
openstack-config --set /etc/glance/glance-api.conf keystone_authtoken password password
openstack-config --set /etc/glance/glance-api.conf keystone_authtoken project_name service
openstack-config --set /etc/glance/glance-api.conf paste_deploy flavor keystone
openstack-config --set /etc/glance/glance-api.conf glance_store stores file,http
openstack-config --set /etc/glance/glance-api.conf glance_store default_store file
openstack-config --set /etc/glance/glance-api.conf glance_store filesystem_store_datadir /var/lib/glance/images/
7、修改glance配置文件/etc/glance/glance-registry.conf
cp /etc/glance/glance-registry.conf /etc/glance/glance-registry.conf.bak
>/etc/glance/glance-registry.conf
openstack-config --set /etc/glance/glance-registry.conf DEFAULT transport_url rabbit://openstack:[email protected]
openstack-config --set /etc/glance/glance-registry.conf database connection mysql+pymysql://glance:[email protected]/glance
openstack-config --set /etc/glance/glance-registry.conf keystone_authtoken auth_uri http://controller:5000
openstack-config --set /etc/glance/glance-registry.conf keystone_authtoken auth_url http://controller:35357
openstack-config --set /etc/glance/glance-registry.conf keystone_authtoken memcached_servers controller:11211
openstack-config --set /etc/glance/glance-registry.conf keystone_authtoken auth_type password
openstack-config --set /etc/glance/glance-registry.conf keystone_authtoken project_domain_name default
openstack-config --set /etc/glance/glance-registry.conf keystone_authtoken user_domain_name default
openstack-config --set /etc/glance/glance-registry.conf keystone_authtoken project_name service
openstack-config --set /etc/glance/glance-registry.conf keystone_authtoken username glance
openstack-config --set /etc/glance/glance-registry.conf keystone_authtoken password password
openstack-config --set /etc/glance/glance-registry.conf paste_deploy flavor keystone
8、同步glance数据库
su -s /bin/sh -c "glance-manage db_sync" glance
9、启动glance及设置开机启动
systemctl enable openstack-glance-api.service openstack-glance-registry.service
systemctl restart openstack-glance-api.service openstack-glance-registry.service
systemctl status openstack-glance-api.service openstack-glance-registry.service
10、下载测试镜像文件
wget http://download.cirros-cloud.net/0.4.0/cirros-0.4.0-x86_64-disk.img
11、上传镜像到glance
source /root/admin-openrc
glance image-create --name "cirros-0.4.0-x86_64" --file cirros-0.4.0-x86_64-disk.img --disk-format qcow2 --container-format bare --visibility public --progress
12、查看镜像列表
glance image-list
五、安装Nova
1、创建nova数据库
CREATE DATABASE nova;
CREATE DATABASE nova_api;
CREATE DATABASE nova_cell0;
2、创建数据库用户并赋予权限
GRANT ALL PRIVILEGES ON nova.* TO ‘nova‘@‘localhost‘ IDENTIFIED BY ‘password‘;
GRANT ALL PRIVILEGES ON nova.* TO ‘nova‘@‘%‘ IDENTIFIED BY ‘password‘;
GRANT ALL PRIVILEGES ON nova_api.* TO ‘nova‘@‘localhost‘ IDENTIFIED BY ‘password‘;
GRANT ALL PRIVILEGES ON nova_api.* TO ‘nova‘@‘%‘ IDENTIFIED BY ‘password‘;
GRANT ALL PRIVILEGES ON nova_cell0.* TO ‘nova‘@‘localhost‘ IDENTIFIED BY ‘password‘;
GRANT ALL PRIVILEGES ON nova_cell0.* TO ‘nova‘@‘%‘ IDENTIFIED BY ‘password‘;
GRANT ALL PRIVILEGES ON *.* TO ‘root‘@‘controller‘ IDENTIFIED BY ‘password‘;
FLUSH PRIVILEGES;
3、创建nova用户及赋予admin权限
source /root/admin-openrc
openstack user create --domain default nova --password password
openstack role add --project service --user nova admin
4、创建computer服务
openstack service create --name nova --description "OpenStack Compute" compute
5、创建nova的endpoint
openstack endpoint create --region RegionOne compute public http://controller:8774/v2.1
openstack endpoint create --region RegionOne compute internal http://controller:8774/v2.1
openstack endpoint create --region RegionOne compute admin http://controller:8774/v2.1
6、安装nova相关软件
yum install -y openstack-nova-api openstack-nova-conductor openstack-nova-console openstack-nova-novncproxy openstack-nova-scheduler
7、配置nova的配置文件/etc/nova/nova.conf
cp /etc/nova/nova.conf /etc/nova/nova.conf.bak
>/etc/nova/nova.conf
openstack-config --set /etc/nova/nova.conf DEFAULT enabled_apis osapi_compute,metadata
openstack-config --set /etc/nova/nova.conf DEFAULT auth_strategy keystone
openstack-config --set /etc/nova/nova.conf DEFAULT my_ip 10.1.1.120
openstack-config --set /etc/nova/nova.conf DEFAULT use_neutron True
openstack-config --set /etc/nova/nova.conf DEFAULT firewall_driver nova.virt.firewall.NoopFirewallDriver
openstack-config --set /etc/nova/nova.conf DEFAULT transport_url rabbit://openstack:[email protected]
openstack-config --set /etc/nova/nova.conf database connection mysql+pymysql://nova:[email protected]/nova
openstack-config --set /etc/nova/nova.conf api_database connection mysql+pymysql://nova:[email protected]/nova_api
openstack-config --set /etc/nova/nova.conf scheduler discover_hosts_in_cells_interval 60
openstack-config --set /etc/nova/nova.conf api auth_strategy keystone
openstack-config --set /etc/nova/nova.conf keystone_authtoken auth_uri http://controller:5000
openstack-config --set /etc/nova/nova.conf keystone_authtoken auth_url http://controller:35357
openstack-config --set /etc/nova/nova.conf keystone_authtoken memcached_servers controller:11211
openstack-config --set /etc/nova/nova.conf keystone_authtoken auth_type password
openstack-config --set /etc/nova/nova.conf keystone_authtoken project_domain_name default
openstack-config --set /etc/nova/nova.conf keystone_authtoken user_domain_name default
openstack-config --set /etc/nova/nova.conf keystone_authtoken project_name service
openstack-config --set /etc/nova/nova.conf keystone_authtoken username nova
openstack-config --set /etc/nova/nova.conf keystone_authtoken password password
openstack-config --set /etc/nova/nova.conf keystone_authtoken service_token_roles_required True
openstack-config --set /etc/nova/nova.conf vnc enabled true
openstack-config --set /etc/nova/nova.conf vnc vncserver_listen 10.1.1.120
openstack-config --set /etc/nova/nova.conf vnc vncserver_proxyclient_address 10.1.1.120
openstack-config --set /etc/nova/nova.conf glance api_servers http://controller:9292
openstack-config --set /etc/nova/nova.conf oslo_concurrency lock_path /var/lib/nova/tmp
8、同步下nova数据库
su -s /bin/sh -c "nova-manage api_db sync" nova
su -s /bin/sh -c "nova-manage cell_v2 map_cell0" nova
su -s /bin/sh -c "nova-manage cell_v2 create_cell --name=cell1 --verbose" nova
su -s /bin/sh -c "nova-manage db sync" nova
9、查看已经创建好的单元格列表
nova-manage cell_v2 list_cells --verbose
10、安装placement
yum install openstack-nova-placement-api -y
11、创建placement用户和placement 服务
openstack user create --domain default placement --password password
openstack role add --project service --user placement admin
openstack service create --name placement --description "OpenStack Placement" placement
12、创建placement endpoint
openstack endpoint create --region RegionOne placement public http://controller:8778
openstack endpoint create --region RegionOne placement admin http://controller:8778
openstack endpoint create --region RegionOne placement internal http://controller:8778
13、把placement 整合到nova.conf里
openstack-config --set /etc/nova/nova.conf placement auth_url http://controller:35357/v3
openstack-config --set /etc/nova/nova.conf placement memcached_servers controller:11211
openstack-config --set /etc/nova/nova.conf placement auth_type password
openstack-config --set /etc/nova/nova.conf placement project_domain_name default
openstack-config --set /etc/nova/nova.conf placement user_domain_name default
openstack-config --set /etc/nova/nova.conf placement project_name service
openstack-config --set /etc/nova/nova.conf placement username placement
openstack-config --set /etc/nova/nova.conf placement password password
openstack-config --set /etc/nova/nova.conf placement os_region_name RegionOne
14、配置修改00-nova-placement-api.conf文件,在文件下添加如下配置
<Directory /usr/bin>
   <IfVersion >= 2.4>
      Require all granted
   </IfVersion>
   <IfVersion < 2.4>
      Order allow,deny
      Allow from all
   </IfVersion>
</Directory>
15、重启下httpd服务
systemctl restart httpd
16、检查下是否配置成功
nova-status upgrade check
17、设置nova相关服务开机启动
systemctl enable openstack-nova-api.service   openstack-nova-consoleauth.service openstack-nova-scheduler.service   openstack-nova-conductor.service openstack-nova-novncproxy.service
systemctl start openstack-nova-api.service   openstack-nova-consoleauth.service openstack-nova-scheduler.service   openstack-nova-conductor.service openstack-nova-novncproxy.service
systemctl status openstack-nova-api.service   openstack-nova-consoleauth.service openstack-nova-scheduler.service   openstack-nova-conductor.service openstack-nova-novncproxy.service
systemctl list-unit-files |grep openstack-nova-*
18、验证nova服务
unset OS_TOKEN OS_URL
source /root/admin-openrc
nova service-list
19、查看endpoint list
openstack endpoint list
看是否有结果正确输出
20、添加实例类型
openstack flavor create m1.tiny --id 1 --ram 512 --disk 1 --vcpus 1
openstack flavor create m1.small --id 2 --ram 2048 --disk 20 --vcpus 1
openstack flavor create m1.medium --id 3 --ram 4096 --disk 40 --vcpus 2
openstack flavor create m1.large --id 4 --ram 8192 --disk 80 --vcpus 4
openstack flavor create m1.xlarge --id 5 --ram 16384 --disk 160 --vcpus 8
openstack flavor list
六、安装Neutron
1、创建neutron数据库
CREATE DATABASE neutron;
2、创建数据库用户并赋予权限
GRANT ALL PRIVILEGES ON neutron.* TO ‘neutron‘@‘localhost‘ IDENTIFIED BY ‘password‘;
GRANT ALL PRIVILEGES ON neutron.* TO ‘neutron‘@‘%‘ IDENTIFIED BY ‘password‘;
3、创建neutron用户及赋予admin权限
source /root/admin-openrc
openstack user create --domain default neutron --password password
openstack role add --project service --user neutron admin
4、创建network服务
openstack service create --name neutron --description "OpenStack Networking" network
5、创建endpoint
openstack endpoint create --region RegionOne network public http://controller:9696
openstack endpoint create --region RegionOne network internal http://controller:9696
openstack endpoint create --region RegionOne network admin http://controller:9696
6、安装neutron相关软件
yum install openstack-neutron openstack-neutron-ml2 openstack-neutron-linuxbridge ebtables -y
7、配置neutron配置文件/etc/neutron/neutron.conf
cp /etc/neutron/neutron.conf /etc/neutron/neutron.conf.bak
>/etc/neutron/neutron.conf
openstack-config --set /etc/neutron/neutron.conf DEFAULT core_plugin ml2
openstack-config --set /etc/neutron/neutron.conf DEFAULT service_plugins router
openstack-config --set /etc/neutron/neutron.conf DEFAULT allow_overlapping_ips True
openstack-config --set /etc/neutron/neutron.conf DEFAULT auth_strategy keystone
openstack-config --set /etc/neutron/neutron.conf DEFAULT transport_url rabbit://openstack:[email protected]
openstack-config --set /etc/neutron/neutron.conf DEFAULT notify_nova_on_port_status_changes True
openstack-config --set /etc/neutron/neutron.conf DEFAULT notify_nova_on_port_data_changes True
openstack-config --set /etc/neutron/neutron.conf keystone_authtoken auth_uri http://controller:5000
openstack-config --set /etc/neutron/neutron.conf keystone_authtoken auth_url http://controller:35357
openstack-config --set /etc/neutron/neutron.conf keystone_authtoken memcached_servers controller:11211
openstack-config --set /etc/neutron/neutron.conf keystone_authtoken auth_type password
openstack-config --set /etc/neutron/neutron.conf keystone_authtoken project_domain_name default
openstack-config --set /etc/neutron/neutron.conf keystone_authtoken user_domain_name default
openstack-config --set /etc/neutron/neutron.conf keystone_authtoken project_name service
openstack-config --set /etc/neutron/neutron.conf keystone_authtoken username neutron
openstack-config --set /etc/neutron/neutron.conf keystone_authtoken password password
openstack-config --set /etc/neutron/neutron.conf database connection mysql+pymysql://neutron:[email protected]/neutron
openstack-config --set /etc/neutron/neutron.conf nova auth_url http://controller:35357
openstack-config --set /etc/neutron/neutron.conf nova auth_type password
openstack-config --set /etc/neutron/neutron.conf nova project_domain_name default
openstack-config --set /etc/neutron/neutron.conf nova user_domain_name default
openstack-config --set /etc/neutron/neutron.conf nova region_name RegionOne
openstack-config --set /etc/neutron/neutron.conf nova project_name service
openstack-config --set /etc/neutron/neutron.conf nova username nova
openstack-config --set /etc/neutron/neutron.conf nova password password
openstack-config --set /etc/neutron/neutron.conf oslo_concurrency lock_path /var/lib/neutron/tmp
8、配置/etc/neutron/plugins/ml2/ml2_conf.ini
openstack-config --set /etc/neutron/plugins/ml2/ml2_conf.ini ml2 type_drivers flat,vlan,vxlan
openstack-config --set /etc/neutron/plugins/ml2/ml2_conf.ini ml2 mechanism_drivers linuxbridge,l2population
openstack-config --set /etc/neutron/plugins/ml2/ml2_conf.ini ml2 extension_drivers port_security
openstack-config --set /etc/neutron/plugins/ml2/ml2_conf.ini ml2 tenant_network_types vxlan
openstack-config --set /etc/neutron/plugins/ml2/ml2_conf.ini ml2 path_mtu 1500
openstack-config --set /etc/neutron/plugins/ml2/ml2_conf.ini ml2_type_flat flat_networks provider
openstack-config --set /etc/neutron/plugins/ml2/ml2_conf.ini ml2_type_vxlan vni_ranges 1:1000
openstack-config --set /etc/neutron/plugins/ml2/ml2_conf.ini securitygroup enable_ipset True
9、配置/etc/neutron/plugins/ml2/linuxbridge_agent.ini
openstack-config --set /etc/neutron/plugins/ml2/linuxbridge_agent.ini DEFAULT debug false
openstack-config --set /etc/neutron/plugins/ml2/linuxbridge_agent.ini linux_bridge physical_interface_mappings provider:eno50332184
openstack-config --set /etc/neutron/plugins/ml2/linuxbridge_agent.ini vxlan enable_vxlan True
openstack-config --set /etc/neutron/plugins/ml2/linuxbridge_agent.ini vxlan local_ip 10.2.2.120
openstack-config --set /etc/neutron/plugins/ml2/linuxbridge_agent.ini vxlan l2_population True
openstack-config --set /etc/neutron/plugins/ml2/linuxbridge_agent.ini agent prevent_arp_spoofing True
openstack-config --set /etc/neutron/plugins/ml2/linuxbridge_agent.ini securitygroup enable_security_group True
openstack-config --set /etc/neutron/plugins/ml2/linuxbridge_agent.ini securitygroup firewall_driver neutron.agent.linux.iptables_firewall.IptablesFirewallDriver
特别要注意这边的“eno50332184”是系统中连接VMnet8网络的接口名,“10.2.2.120”是连接VMnet2网络的IP。
10、配置 /etc/neutron/l3_agent.ini
openstack-config --set /etc/neutron/l3_agent.ini DEFAULT interface_driver neutron.agent.linux.interface.BridgeInterfaceDriver
openstack-config --set /etc/neutron/l3_agent.ini DEFAULT external_network_bridge
openstack-config --set /etc/neutron/l3_agent.ini DEFAULT debug false
11、配置/etc/neutron/dhcp_agent.ini
openstack-config --set /etc/neutron/dhcp_agent.ini DEFAULT interface_driver neutron.agent.linux.interface.BridgeInterfaceDriver
openstack-config --set /etc/neutron/dhcp_agent.ini DEFAULT dhcp_driver neutron.agent.linux.dhcp.Dnsmasq
openstack-config --set /etc/neutron/dhcp_agent.ini DEFAULT enable_isolated_metadata True
openstack-config --set /etc/neutron/dhcp_agent.ini DEFAULT verbose True
openstack-config --set /etc/neutron/dhcp_agent.ini DEFAULT debug false
12、重新配置/etc/nova/nova.conf
配置这步的目的是让compute节点能使用上neutron网络
openstack-config --set /etc/nova/nova.conf neutron url http://controller:9696
openstack-config --set /etc/nova/nova.conf neutron auth_url http://controller:35357
openstack-config --set /etc/nova/nova.conf neutron auth_plugin password
openstack-config --set /etc/nova/nova.conf neutron project_domain_id default
openstack-config --set /etc/nova/nova.conf neutron user_domain_id default
openstack-config --set /etc/nova/nova.conf neutron region_name RegionOne
openstack-config --set /etc/nova/nova.conf neutron project_name service
openstack-config --set /etc/nova/nova.conf neutron username neutron
openstack-config --set /etc/nova/nova.conf neutron password password
openstack-config --set /etc/nova/nova.conf neutron service_metadata_proxy True
openstack-config --set /etc/nova/nova.conf neutron metadata_proxy_shared_secret password
13、将dhcp-option-force=26,1450写入/etc/neutron/dnsmasq-neutron.conf
echo "dhcp-option-force=26,1450" >/etc/neutron/dnsmasq-neutron.conf
14、配置/etc/neutron/metadata_agent.ini
openstack-config --set /etc/neutron/metadata_agent.ini DEFAULT nova_metadata_ip controller
openstack-config --set /etc/neutron/metadata_agent.ini DEFAULT metadata_proxy_shared_secret password
openstack-config --set /etc/neutron/metadata_agent.ini DEFAULT metadata_workers 4
openstack-config --set /etc/neutron/metadata_agent.ini DEFAULT verbose True
openstack-config --set /etc/neutron/metadata_agent.ini DEFAULT debug false
openstack-config --set /etc/neutron/metadata_agent.ini DEFAULT nova_metadata_protocol http
15、创建硬链接
ln -s /etc/neutron/plugins/ml2/ml2_conf.ini /etc/neutron/plugin.ini
16、同步数据库
su -s /bin/sh -c "neutron-db-manage --config-file /etc/neutron/neutron.conf --config-file /etc/neutron/plugins/ml2/ml2_conf.ini upgrade head" neutron
17、重启nova服务,因为刚才改了nova.conf
systemctl restart openstack-nova-api.service
systemctl status openstack-nova-api.service
18、重启neutron服务并设置开机启动
systemctl enable neutron-server.service neutron-linuxbridge-agent.service neutron-dhcp-agent.service neutron-metadata-agent.service
systemctl restart neutron-server.service neutron-linuxbridge-agent.service neutron-dhcp-agent.service neutron-metadata-agent.service
systemctl status neutron-server.service neutron-linuxbridge-agent.service neutron-dhcp-agent.service neutron-metadata-agent.service
19、启动neutron-l3-agent.service并设置开机启动
systemctl enable neutron-l3-agent.service
systemctl restart neutron-l3-agent.service
systemctl status neutron-l3-agent.service
20、执行验证
source /root/admin-openrc
neutron ext-list
neutron agent-list
21、配置网络
创建flat模式的public网络,注意这个public是外出网络,必须是flat模式的
neutron --debug net-create --shared provider --router:external True --provider:network_type flat --provider:physical_network provider
创建public网络子网,名为public-sub,网段就是9.110.187,并且IP范围是50-90(这个一般是给VM用的floating IP了),dns设置为114.114.114.114,网关为9.110.187.2
neutron subnet-create provider 9.110.187.0/24 --name provider-sub --allocation-pool start=9.110.187.100,end=9.110.187.120 --dns-nameserver 114.114.114.114 --gateway 9.110.187.2
创建名为private的私有网络, 网络模式为vxlan
neutron net-create private --provider:network_type vxlan --router:external False --shared
创建名为private-subnet的私有网络子网,网段为192.168.1.0, 这个网段就是虚拟机获取的私有的IP地址
neutron subnet-create private --name private-subnet --gateway 192.168.1.1 192.168.1.0/24
七、安装Cinder
1、创建数据库用户并赋予权限
CREATE DATABASE cinder;
GRANT ALL PRIVILEGES ON cinder.* TO ‘cinder‘@‘localhost‘ IDENTIFIED BY ‘password‘;
GRANT ALL PRIVILEGES ON cinder.* TO ‘cinder‘@‘%‘ IDENTIFIED BY ‘password‘;
2、创建cinder用户并赋予admin权限
source /root/admin-openrc
openstack user create --domain default cinder --password password
openstack role add --project service --user cinder admin
3、创建volume服务
openstack service create --name cinderv2 --description "OpenStack Block Storage" volumev2
openstack service create --name cinderv3 --description "OpenStack Block Storage" volumev3
4、创建endpoint
openstack endpoint create --region RegionOne volumev2 public http://controller:8776/v2/%\\(project_id\\)s
openstack endpoint create --region RegionOne volumev2 internal http://controller:8776/v2/%\\(project_id\\)s
openstack endpoint create --region RegionOne volumev2 admin http://controller:8776/v2/%\\(project_id\\)s
openstack endpoint create --region RegionOne volumev3 public http://controller:8776/v3/%\\(project_id\\)s
openstack endpoint create --region RegionOne volumev3 internal http://controller:8776/v3/%\\(project_id\\)s
openstack endpoint create --region RegionOne volumev3 admin http://controller:8776/v3/%\\(project_id\\)s
5、安装cinder相关服务
yum install openstack-cinder -y
6、配置cinder配置文件
cp /etc/cinder/cinder.conf /etc/cinder/cinder.conf.bak
>/etc/cinder/cinder.conf
openstack-config --set /etc/cinder/cinder.conf DEFAULT transport_url rabbit://openstack:[email protected]
openstack-config --set /etc/cinder/cinder.conf DEFAULT my_ip 10.1.1.120
openstack-config --set /etc/cinder/cinder.conf DEFAULT auth_strategy keystone
openstack-config --set /etc/cinder/cinder.conf database connection mysql+pymysql://cinder:[email protected]/cinder
openstack-config --set /etc/cinder/cinder.conf keystone_authtoken auth_uri http://controller:5000
openstack-config --set /etc/cinder/cinder.conf keystone_authtoken auth_url http://controller:35357
openstack-config --set /etc/cinder/cinder.conf keystone_authtoken memcached_servers controller:11211
openstack-config --set /etc/cinder/cinder.conf keystone_authtoken auth_type password
openstack-config --set /etc/cinder/cinder.conf keystone_authtoken project_domain_name default
openstack-config --set /etc/cinder/cinder.conf keystone_authtoken user_domain_name default
openstack-config --set /etc/cinder/cinder.conf keystone_authtoken project_name service
openstack-config --set /etc/cinder/cinder.conf keystone_authtoken username cinder
openstack-config --set /etc/cinder/cinder.conf keystone_authtoken password password
openstack-config --set /etc/cinder/cinder.conf oslo_concurrency lock_path /var/lib/cinder/tmp
7、配置nova配置文件
openstack-config --set /etc/nova/nova.conf cinder os_region_name RegionOne
8、同步数据库
su -s /bin/sh -c "cinder-manage db sync" cinder
9、启动cinder服务,并设置开机启动
systemctl enable openstack-cinder-api.service openstack-cinder-scheduler.service
systemctl restart openstack-cinder-api.service openstack-cinder-scheduler.service
systemctl status openstack-cinder-api.service openstack-cinder-scheduler.service
10、验证cinder服务是否正常
source /root/admin-openrc
cinder service-list

八、安装Dashboard
1、安装dashboard相关软件包
yum install openstack-dashboard -y
2、修改配置文件/etc/openstack-dashboard/local_settings
cp /etc/openstack-dashboard/local_settings /etc/openstack-dashboard/local_settings.bak
>/etc/openstack-dashboard/local_settings
将下方内容粘贴进local_settings文件中:
# -*- coding: utf-8 -*-

import os

from django.utils.translation import ugettext_lazy as _


from openstack_dashboard.settings import HORIZON_CONFIG

DEBUG = False

# This setting controls whether or not compression is enabled. Disabling
# compression makes Horizon considerably slower, but makes it much easier
# to debug JS and CSS changes
#COMPRESS_ENABLED = not DEBUG

# This setting controls whether compression happens on the fly, or offline
# with `python manage.py compress`
# See https://django-compressor.readthedocs.io/en/latest/usage/#offline-compression
# for more information
#COMPRESS_OFFLINE = not DEBUG

# WEBROOT is the location relative to Webserver root
# should end with a slash.
WEBROOT = ‘/dashboard/‘
#LOGIN_URL = WEBROOT + ‘auth/login/‘
#LOGOUT_URL = WEBROOT + ‘auth/logout/‘
#
# LOGIN_REDIRECT_URL can be used as an alternative for
# HORIZON_CONFIG.user_home, if user_home is not set.
# Do not set it to ‘/home/‘, as this will cause circular redirect loop
#LOGIN_REDIRECT_URL = WEBROOT

# If horizon is running in production (DEBUG is False), set this
# with the list of host/domain names that the application can serve.
# For more information see:
# https://docs.djangoproject.com/en/dev/ref/settings/#allowed-hosts
ALLOWED_HOSTS = [‘*‘,]

# Set SSL proxy settings:
# Pass this header from the proxy after terminating the SSL,
# and don‘t forget to strip it from the client‘s request.
# For more information see:
# https://docs.djangoproject.com/en/dev/ref/settings/#secure-proxy-ssl-header
#SECURE_PROXY_SSL_HEADER = (‘HTTP_X_FORWARDED_PROTO‘, ‘https‘)

# If Horizon is being served through SSL, then uncomment the following two
# settings to better secure the cookies from security exploits
#CSRF_COOKIE_SECURE = True
#SESSION_COOKIE_SECURE = True

# The absolute path to the directory where message files are collected.
# The message file must have a .json file extension. When the user logins to
# horizon, the message files collected are processed and displayed to the user.
#MESSAGES_PATH=None

# Overrides for OpenStack API versions. Use this setting to force the
# OpenStack dashboard to use a specific API version for a given service API.
# Versions specified here should be integers or floats, not strings.
# NOTE: The version should be formatted as it appears in the URL for the
# service API. For example, The identity service APIs have inconsistent
# use of the decimal point, so valid options would be 2.0 or 3.
# Minimum compute version to get the instance locked status is 2.9.
OPENSTACK_API_VERSIONS = {
#    "data-processing": 1.1,
    "identity": 3,
    "image": 2,
    "volume": 2,
#    "compute": 2,
}

# Set this to True if running on a multi-domain model. When this is enabled, it
# will require the user to enter the Domain name in addition to the username
# for login.
OPENSTACK_KEYSTONE_MULTIDOMAIN_SUPPORT = False

# Set this to True if you want available domains displayed as a dropdown menu
# on the login screen. It is strongly advised NOT to enable this for public
# clouds, as advertising enabled domains to unauthenticated customers
# irresponsibly exposes private information. This should only be used for
# private clouds where the dashboard sits behind a corporate firewall.
#OPENSTACK_KEYSTONE_DOMAIN_DROPDOWN = False

# If OPENSTACK_KEYSTONE_DOMAIN_DROPDOWN is enabled, this option can be used to
# set the available domains to choose from. This is a list of pairs whose first
# value is the domain name and the second is the display name.
#OPENSTACK_KEYSTONE_DOMAIN_CHOICES = (
#  (‘Default‘, ‘Default‘),
#)

# Overrides the default domain used when running on single-domain model
# with Keystone V3. All entities will be created in the default domain.
# NOTE: This value must be the name of the default domain, NOT the ID.
# Also, you will most likely have a value in the keystone policy file like this
#    "cloud_admin": "rule:admin_required and domain_id:<your domain id>"
# This value must be the name of the domain whose ID is specified there.
OPENSTACK_KEYSTONE_DEFAULT_DOMAIN = ‘Default‘

# Set this to True to enable panels that provide the ability for users to
# manage Identity Providers (IdPs) and establish a set of rules to map
# federation protocol attributes to Identity API attributes.
# This extension requires v3.0+ of the Identity API.
#OPENSTACK_KEYSTONE_FEDERATION_MANAGEMENT = False

# Set Console type:
# valid options are "AUTO"(default), "VNC", "SPICE", "RDP", "SERIAL" or None
# Set to None explicitly if you want to deactivate the console.
#CONSOLE_TYPE = "AUTO"

# If provided, a "Report Bug" link will be displayed in the site header
# which links to the value of this setting (ideally a URL containing
# information on how to report issues).
#HORIZON_CONFIG["bug_url"] = "http://bug-report.example.com"

# Show backdrop element outside the modal, do not close the modal
# after clicking on backdrop.
#HORIZON_CONFIG["modal_backdrop"] = "static"

# Specify a regular expression to validate user passwords.
#HORIZON_CONFIG["password_validator"] = {
#    "regex": ‘.*‘,
#    "help_text": _("Your password does not meet the requirements."),
#}

# Disable simplified floating IP address management for deployments with
# multiple floating IP pools or complex network requirements.
#HORIZON_CONFIG["simple_ip_management"] = False

# Turn off browser autocompletion for forms including the login form and
# the database creation workflow if so desired.
#HORIZON_CONFIG["password_autocomplete"] = "off"

# Setting this to True will disable the reveal button for password fields,
# including on the login form.
#HORIZON_CONFIG["disable_password_reveal"] = False

LOCAL_PATH = ‘/tmp‘

# Set custom secret key:
# You can either set it to a specific value or you can let horizon generate a
# default secret key that is unique on this machine, e.i. regardless of the
# amount of Python WSGI workers (if used behind Apache+mod_wsgi): However,
# there may be situations where you would want to set this explicitly, e.g.
# when multiple dashboard instances are distributed on different machines
# (usually behind a load-balancer). Either you have to make sure that a session
# gets all requests routed to the same dashboard instance or you set the same
# SECRET_KEY for all of them.
SECRET_KEY=‘c7f36617303e9c1cde26‘

# We recommend you use memcached for development; otherwise after every reload
# of the django development server, you will have to login again. To use
# memcached set CACHES to something like
#CACHES = {
#    ‘default‘: {
#        ‘BACKEND‘: ‘django.core.cache.backends.memcached.MemcachedCache‘,
#        ‘LOCATION‘: ‘127.0.0.1:11211‘,
#    },
#}

CACHES = {
    ‘default‘: {
        ‘BACKEND‘: ‘django.core.cache.backends.locmem.LocMemCache‘,
    ‘LOCATION‘: ‘controller:11211‘,
    },
}

# Send email to the console by default
EMAIL_BACKEND = ‘django.core.mail.backends.console.EmailBackend‘
# Or send them to /dev/null
#EMAIL_BACKEND = ‘django.core.mail.backends.dummy.EmailBackend‘

# Configure these for your outgoing email host
#EMAIL_HOST = ‘smtp.my-company.com‘
#EMAIL_PORT = 25
#EMAIL_HOST_USER = ‘djangomail‘
#EMAIL_HOST_PASSWORD = ‘top-secret!‘

# For multiple regions uncomment this configuration, and add (endpoint, title).
#AVAILABLE_REGIONS = [
#    (‘http://cluster1.example.com:5000/v2.0‘, ‘cluster1‘),
#    (‘http://cluster2.example.com:5000/v2.0‘, ‘cluster2‘),
#]

OPENSTACK_HOST = "controller"
OPENSTACK_KEYSTONE_URL = "http://%s:5000/v2.0" % OPENSTACK_HOST
OPENSTACK_KEYSTONE_DEFAULT_ROLE = "user"

# For setting the default service region on a per-endpoint basis. Note that the
# default value for this setting is {}, and below is just an example of how it
# should be specified.
#DEFAULT_SERVICE_REGIONS = {
#    OPENSTACK_KEYSTONE_URL: ‘RegionOne‘
#}

# Enables keystone web single-sign-on if set to True.
#WEBSSO_ENABLED = False

# Determines which authentication choice to show as default.
#WEBSSO_INITIAL_CHOICE = "credentials"

# The list of authentication mechanisms which include keystone
# federation protocols and identity provider/federation protocol
# mapping keys (WEBSSO_IDP_MAPPING). Current supported protocol
# IDs are ‘saml2‘ and ‘oidc‘  which represent SAML 2.0, OpenID
# Connect respectively.
# Do not remove the mandatory credentials mechanism.
# Note: The last two tuples are sample mapping keys to a identity provider
# and federation protocol combination (WEBSSO_IDP_MAPPING).
#WEBSSO_CHOICES = (
#    ("credentials", _("Keystone Credentials")),
#    ("oidc", _("OpenID Connect")),
#    ("saml2", _("Security Assertion Markup Language")),
#    ("acme_oidc", "ACME - OpenID Connect"),
#    ("acme_saml2", "ACME - SAML2"),
#)

# A dictionary of specific identity provider and federation protocol
# combinations. From the selected authentication mechanism, the value
# will be looked up as keys in the dictionary. If a match is found,
# it will redirect the user to a identity provider and federation protocol
# specific WebSSO endpoint in keystone, otherwise it will use the value
# as the protocol_id when redirecting to the WebSSO by protocol endpoint.
# NOTE: The value is expected to be a tuple formatted as: (<idp_id>, <protocol_id>).
#WEBSSO_IDP_MAPPING = {
#    "acme_oidc": ("acme", "oidc"),
#    "acme_saml2": ("acme", "saml2"),
#}

# The Keystone Provider drop down uses Keystone to Keystone federation
# to switch between Keystone service providers.
# Set display name for Identity Provider (dropdown display name)
#KEYSTONE_PROVIDER_IDP_NAME = "Local Keystone"
# This id is used for only for comparison with the service provider IDs. This ID
# should not match any service provider IDs.
#KEYSTONE_PROVIDER_IDP_ID = "localkeystone"

# Disable SSL certificate checks (useful for self-signed certificates):
#OPENSTACK_SSL_NO_VERIFY = True

# The CA certificate to use to verify SSL connections
#OPENSTACK_SSL_CACERT = ‘/path/to/cacert.pem‘

# The OPENSTACK_KEYSTONE_BACKEND settings can be used to identify the
# capabilities of the auth backend for Keystone.
# If Keystone has been configured to use LDAP as the auth backend then set
# can_edit_user to False and name to ‘ldap‘.
#
# TODO(tres): Remove these once Keystone has an API to identify auth backend.
OPENSTACK_KEYSTONE_BACKEND = {
    ‘name‘: ‘native‘,
    ‘can_edit_user‘: True,
    ‘can_edit_group‘: True,
    ‘can_edit_project‘: True,
    ‘can_edit_domain‘: True,
    ‘can_edit_role‘: True,
}

# Setting this to True, will add a new "Retrieve Password" action on instance,
# allowing Admin session password retrieval/decryption.
#OPENSTACK_ENABLE_PASSWORD_RETRIEVE = False

# This setting allows deployers to control whether a token is deleted on log
# out. This can be helpful when there are often long running processes being
# run in the Horizon environment.
#TOKEN_DELETION_DISABLED = False

# The Launch Instance user experience has been significantly enhanced.
# You can choose whether to enable the new launch instance experience,
# the legacy experience, or both. The legacy experience will be removed
# in a future release, but is available as a temporary backup setting to ensure
# compatibility with existing deployments. Further development will not be
# done on the legacy experience. Please report any problems with the new
# experience via the Launchpad tracking system.
#
# Toggle LAUNCH_INSTANCE_LEGACY_ENABLED and LAUNCH_INSTANCE_NG_ENABLED to
# determine the experience to enable.  Set them both to true to enable
# both.
#LAUNCH_INSTANCE_LEGACY_ENABLED = True
#LAUNCH_INSTANCE_NG_ENABLED = False

# A dictionary of settings which can be used to provide the default values for
# properties found in the Launch Instance modal.
#LAUNCH_INSTANCE_DEFAULTS = {
#    ‘config_drive‘: False,
#    ‘enable_scheduler_hints‘: True,
#    ‘disable_image‘: False,
#    ‘disable_instance_snapshot‘: False,
#    ‘disable_volume‘: False,
#    ‘disable_volume_snapshot‘: False,
#    ‘create_volume‘: True,
#}

# The Xen Hypervisor has the ability to set the mount point for volumes
# attached to instances (other Hypervisors currently do not). Setting
# can_set_mount_point to True will add the option to set the mount point
# from the UI.
OPENSTACK_HYPERVISOR_FEATURES = {
    ‘can_set_mount_point‘: False,
    ‘can_set_password‘: False,
    ‘requires_keypair‘: False,
    ‘enable_quotas‘: True
}

# The OPENSTACK_CINDER_FEATURES settings can be used to enable optional
# services provided by cinder that is not exposed by its extension API.
OPENSTACK_CINDER_FEATURES = {
    ‘enable_backup‘: False,
}

# The OPENSTACK_NEUTRON_NETWORK settings can be used to enable optional
# services provided by neutron. Options currently available are load
# balancer service, security groups, quotas, VPN service.
OPENSTACK_NEUTRON_NETWORK = {
    ‘enable_router‘: True,
    ‘enable_quotas‘: True,
    ‘enable_ipv6‘: True,
    ‘enable_distributed_router‘: False,
    ‘enable_ha_router‘: False,
    ‘enable_fip_topology_check‘: True,

    # Default dns servers you would like to use when a subnet is
    # created.  This is only a default, users can still choose a different
    # list of dns servers when creating a new subnet.
    # The entries below are examples only, and are not appropriate for
    # real deployments
    # ‘default_dns_nameservers‘: ["8.8.8.8", "8.8.4.4", "208.67.222.222"],

    # Set which provider network types are supported. Only the network types
    # in this list will be available to choose from when creating a network.
    # Network types include local, flat, vlan, gre, vxlan and geneve.
    # ‘supported_provider_types‘: [‘*‘],

    # You can configure available segmentation ID range per network type
    # in your deployment.
    # ‘segmentation_id_range‘: {
    #     ‘vlan‘: [1024, 2048],
    #     ‘vxlan‘: [4094, 65536],
    # },

    # You can define additional provider network types here.
    # ‘extra_provider_types‘: {
    #     ‘awesome_type‘: {
    #         ‘display_name‘: ‘Awesome New Type‘,
    #         ‘require_physical_network‘: False,
    #         ‘require_segmentation_id‘: True,
    #     }
    # },

    # Set which VNIC types are supported for port binding. Only the VNIC
    # types in this list will be available to choose from when creating a
    # port.
    # VNIC types include ‘normal‘, ‘direct‘, ‘direct-physical‘, ‘macvtap‘,
    # ‘baremetal‘ and ‘virtio-forwarder‘
    # Set to empty list or None to disable VNIC type selection.
    ‘supported_vnic_types‘: [‘*‘],

    # Set list of available physical networks to be selected in the physical
    # network field on the admin create network modal. If it‘s set to an empty
    # list, the field will be a regular input field.
    # e.g. [‘default‘, ‘test‘]
    ‘physical_networks‘: [],

}

# The OPENSTACK_HEAT_STACK settings can be used to disable password
# field required while launching the stack.
OPENSTACK_HEAT_STACK = {
    ‘enable_user_pass‘: True,
}

# The OPENSTACK_IMAGE_BACKEND settings can be used to customize features
# in the OpenStack Dashboard related to the Image service, such as the list
# of supported image formats.
#OPENSTACK_IMAGE_BACKEND = {
#    ‘image_formats‘: [
#        (‘‘, _(‘Select format‘)),
#        (‘aki‘, _(‘AKI - Amazon Kernel Image‘)),
#        (‘ami‘, _(‘AMI - Amazon Machine Image‘)),
#        (‘ari‘, _(‘ARI - Amazon Ramdisk Image‘)),
#        (‘docker‘, _(‘Docker‘)),
#        (‘iso‘, _(‘ISO - Optical Disk Image‘)),
#        (‘ova‘, _(‘OVA - Open Virtual Appliance‘)),
#        (‘qcow2‘, _(‘QCOW2 - QEMU Emulator‘)),
#        (‘raw‘, _(‘Raw‘)),
#        (‘vdi‘, _(‘VDI - Virtual Disk Image‘)),
#        (‘vhd‘, _(‘VHD - Virtual Hard Disk‘)),
#        (‘vhdx‘, _(‘VHDX - Large Virtual Hard Disk‘)),
#        (‘vmdk‘, _(‘VMDK - Virtual Machine Disk‘)),
#    ],
#}

# The IMAGE_CUSTOM_PROPERTY_TITLES settings is used to customize the titles for
# image custom property attributes that appear on image detail pages.
IMAGE_CUSTOM_PROPERTY_TITLES = {
    "architecture": _("Architecture"),
    "kernel_id": _("Kernel ID"),
    "ramdisk_id": _("Ramdisk ID"),
    "image_state": _("Euca2ools state"),
    "project_id": _("Project ID"),
    "image_type": _("Image Type"),
}

# The IMAGE_RESERVED_CUSTOM_PROPERTIES setting is used to specify which image
# custom properties should not be displayed in the Image Custom Properties
# table.
IMAGE_RESERVED_CUSTOM_PROPERTIES = []

# Set to ‘legacy‘ or ‘direct‘ to allow users to upload images to glance via
# Horizon server. When enabled, a file form field will appear on the create
# image form. If set to ‘off‘, there will be no file form field on the create
# image form. See documentation for deployment considerations.
#HORIZON_IMAGES_UPLOAD_MODE = ‘legacy‘

# Allow a location to be set when creating or updating Glance images.
# If using Glance V2, this value should be False unless the Glance
# configuration and policies allow setting locations.
#IMAGES_ALLOW_LOCATION = False

# A dictionary of default settings for create image modal.
#CREATE_IMAGE_DEFAULTS = {
#    ‘image_visibility‘: "public",
#}

# OPENSTACK_ENDPOINT_TYPE specifies the endpoint type to use for the endpoints
# in the Keystone service catalog. Use this setting when Horizon is running
# external to the OpenStack environment. The default is ‘publicURL‘.
#OPENSTACK_ENDPOINT_TYPE = "publicURL"

# SECONDARY_ENDPOINT_TYPE specifies the fallback endpoint type to use in the
# case that OPENSTACK_ENDPOINT_TYPE is not present in the endpoints
# in the Keystone service catalog. Use this setting when Horizon is running
# external to the OpenStack environment. The default is None. This
# value should differ from OPENSTACK_ENDPOINT_TYPE if used.
#SECONDARY_ENDPOINT_TYPE = None

# The number of objects (Swift containers/objects or images) to display
# on a single page before providing a paging element (a "more" link)
# to paginate results.
API_RESULT_LIMIT = 1000
API_RESULT_PAGE_SIZE = 20

# The size of chunk in bytes for downloading objects from Swift
SWIFT_FILE_TRANSFER_CHUNK_SIZE = 512 * 1024

# The default number of lines displayed for instance console log.
INSTANCE_LOG_LENGTH = 35

# Specify a maximum number of items to display in a dropdown.
DROPDOWN_MAX_ITEMS = 30

# The timezone of the server. This should correspond with the timezone
# of your entire OpenStack installation, and hopefully be in UTC.
TIME_ZONE = "Asia/Shanghai"

# When launching an instance, the menu of available flavors is
# sorted by RAM usage, ascending. If you would like a different sort order,
# you can provide another flavor attribute as sorting key. Alternatively, you
# can provide a custom callback method to use for sorting. You can also provide
# a flag for reverse sort. For more info, see
# http://docs.python.org/2/library/functions.html#sorted
#CREATE_INSTANCE_FLAVOR_SORT = {
#    ‘key‘: ‘name‘,
#     # or
#    ‘key‘: my_awesome_callback_method,
#    ‘reverse‘: False,
#}

# Set this to True to display an ‘Admin Password‘ field on the Change Password
# form to verify that it is indeed the admin logged-in who wants to change
# the password.
#ENFORCE_PASSWORD_CHECK = False

# Modules that provide /auth routes that can be used to handle different types
# of user authentication. Add auth plugins that require extra route handling to
# this list.
#AUTHENTICATION_URLS = [
#    ‘openstack_auth.urls‘,
#]

# The Horizon Policy Enforcement engine uses these values to load per service
# policy rule files. The content of these files should match the files the
# OpenStack services are using to determine role based access control in the
# target installation.

# Path to directory containing policy.json files
POLICY_FILES_PATH = ‘/etc/openstack-dashboard‘

# Map of local copy of service policy files.
# Please insure that your identity policy file matches the one being used on
# your keystone servers. There is an alternate policy file that may be used
# in the Keystone v3 multi-domain case, policy.v3cloudsample.json.
# This file is not included in the Horizon repository by default but can be
# found at
# http://git.openstack.org/cgit/openstack/keystone/tree/etc/ \\
# policy.v3cloudsample.json
# Having matching policy files on the Horizon and Keystone servers is essential
# for normal operation. This holds true for all services and their policy files.
#POLICY_FILES = {
#    ‘identity‘: ‘keystone_policy.json‘,
#    ‘compute‘: ‘nova_policy.json‘,
#    ‘volume‘: ‘cinder_policy.json‘,
#    ‘image‘: ‘glance_policy.json‘,
#    ‘orchestration‘: ‘heat_policy.json‘,
#    ‘network‘: ‘neutron_policy.json‘,
#}

# TODO: (david-lyle) remove when plugins support adding settings.
# Note: Only used when trove-dashboard plugin is configured to be used by
# Horizon.
# Trove user and database extension support. By default support for
# creating users and databases on database instances is turned on.
# To disable these extensions set the permission here to something
# unusable such as ["!"].
#TROVE_ADD_USER_PERMS = []
#TROVE_ADD_DATABASE_PERMS = []

# Change this patch to the appropriate list of tuples containing
# a key, label and static directory containing two files:
# _variables.scss and _styles.scss
#AVAILABLE_THEMES = [
#    (‘default‘, ‘Default‘, ‘themes/default‘),
#    (‘material‘, ‘Material‘, ‘themes/material‘),
#]

LOGGING = {
    ‘version‘: 1,
    # When set to True this will disable all logging except
    # for loggers specified in this configuration dictionary. Note that
    # if nothing is specified here and disable_existing_loggers is True,
    # django.db.backends will still log unless it is disabled explicitly.
    ‘disable_existing_loggers‘: False,
    # If apache2 mod_wsgi is used to deploy OpenStack dashboard
    # timestamp is output by mod_wsgi. If WSGI framework you use does not
    # output timestamp for logging, add %(asctime)s in the following
    # format definitions.
    ‘formatters‘: {
        ‘console‘: {
            ‘format‘: ‘%(levelname)s %(name)s %(message)s‘
        },
        ‘operation‘: {
            # The format of "%(message)s" is defined by
            # OPERATION_LOG_OPTIONS[‘format‘]
            ‘format‘: ‘%(message)s‘
        },
    },
    ‘handlers‘: {
        ‘null‘: {
            ‘level‘: ‘DEBUG‘,
            ‘class‘: ‘logging.NullHandler‘,
        },
        ‘console‘: {
            # Set the level to "DEBUG" for verbose output logging.
            ‘level‘: ‘INFO‘,
            ‘class‘: ‘logging.StreamHandler‘,
            ‘formatter‘: ‘console‘,
        },
        ‘operation‘: {
            ‘level‘: ‘INFO‘,
            ‘class‘: ‘logging.StreamHandler‘,
            ‘formatter‘: ‘operation‘,
        },
    },
    ‘loggers‘: {
        # Logging from django.db.backends is VERY verbose, send to null
        # by default.
        ‘django.db.backends‘: {
            ‘handlers‘: [‘null‘],
            ‘propagate‘: False,
        },
        ‘requests‘: {
            ‘handlers‘: [‘null‘],
            ‘propagate‘: False,
        },
        ‘horizon‘: {
            ‘handlers‘: [‘console‘],
            ‘level‘: ‘DEBUG‘,
            ‘propagate‘: False,
        },
        ‘horizon.operation_log‘: {
            ‘handlers‘: [‘operation‘],
            ‘level‘: ‘INFO‘,
            ‘propagate‘: False,
        },
        ‘openstack_dashboard‘: {
            ‘handlers‘: [‘console‘],
            ‘level‘: ‘DEBUG‘,
            ‘propagate‘: False,
        },
        ‘novaclient‘: {
            ‘handlers‘: [‘console‘],
            ‘level‘: ‘DEBUG‘,
            ‘propagate‘: False,
        },
        ‘cinderclient‘: {
            ‘handlers‘: [‘console‘],
            ‘level‘: ‘DEBUG‘,
            ‘propagate‘: False,
        },
        ‘keystoneclient‘: {
            ‘handlers‘: [‘console‘],
            ‘level‘: ‘DEBUG‘,
            ‘propagate‘: False,
        },
        ‘glanceclient‘: {
            ‘handlers‘: [‘console‘],
            ‘level‘: ‘DEBUG‘,
            ‘propagate‘: False,
        },
        ‘neutronclient‘: {
            ‘handlers‘: [‘console‘],
            ‘level‘: ‘DEBUG‘,
            ‘propagate‘: False,
        },
        ‘heatclient‘: {
            ‘handlers‘: [‘console‘],
            ‘level‘: ‘DEBUG‘,
            ‘propagate‘: False,
        },
        ‘swiftclient‘: {
            ‘handlers‘: [‘console‘],
            ‘level‘: ‘DEBUG‘,
            ‘propagate‘: False,
        },
        ‘openstack_auth‘: {
            ‘handlers‘: [‘console‘],
            ‘level‘: ‘DEBUG‘,
            ‘propagate‘: False,
        },
        ‘nose.plugins.manager‘: {
            ‘handlers‘: [‘console‘],
            ‘level‘: ‘DEBUG‘,
            ‘propagate‘: False,
        },
        ‘django‘: {
            ‘handlers‘: [‘console‘],
            ‘level‘: ‘DEBUG‘,
            ‘propagate‘: False,
        },
        ‘iso8601‘: {
            ‘handlers‘: [‘null‘],
            ‘propagate‘: False,
        },
        ‘scss‘: {
            ‘handlers‘: [‘null‘],
            ‘propagate‘: False,
        },
    },
}

# ‘direction‘ should not be specified for all_tcp/udp/icmp.
# It is specified in the form.
SECURITY_GROUP_RULES = {
    ‘all_tcp‘: {
        ‘name‘: _(‘All TCP‘),
        ‘ip_protocol‘: ‘tcp‘,
        ‘from_port‘: ‘1‘,
        ‘to_port‘: ‘65535‘,
    },
    ‘all_udp‘: {
        ‘name‘: _(‘All UDP‘),
        ‘ip_protocol‘: ‘udp‘,
        ‘from_port‘: ‘1‘,
        ‘to_port‘: ‘65535‘,
    },
    ‘all_icmp‘: {
        ‘name‘: _(‘All ICMP‘),
        ‘ip_protocol‘: ‘icmp‘,
        ‘from_port‘: ‘-1‘,
        ‘to_port‘: ‘-1‘,
    },
    ‘ssh‘: {
        ‘name‘: ‘SSH‘,
        ‘ip_protocol‘: ‘tcp‘,
        ‘from_port‘: ‘22‘,
        ‘to_port‘: ‘22‘,
    },
    ‘smtp‘: {
        ‘name‘: ‘SMTP‘,
        ‘ip_protocol‘: ‘tcp‘,
        ‘from_port‘: ‘25‘,
        ‘to_port‘: ‘25‘,
    },
    ‘dns‘: {
        ‘name‘: ‘DNS‘,
        ‘ip_protocol‘: ‘tcp‘,
        ‘from_port‘: ‘53‘,
        ‘to_port‘: ‘53‘,
    },
    ‘http‘: {
        ‘name‘: ‘HTTP‘,
        ‘ip_protocol‘: ‘tcp‘,
        ‘from_port‘: ‘80‘,
        ‘to_port‘: ‘80‘,
    },
    ‘pop3‘: {
        ‘name‘: ‘POP3‘,
        ‘ip_protocol‘: ‘tcp‘,
        ‘from_port‘: ‘110‘,
        ‘to_port‘: ‘110‘,
    },
    ‘imap‘: {
        ‘name‘: ‘IMAP‘,
        ‘ip_protocol‘: ‘tcp‘,
        ‘from_port‘: ‘143‘,
        ‘to_port‘: ‘143‘,
    },
    ‘ldap‘: {
        ‘name‘: ‘LDAP‘,
        ‘ip_protocol‘: ‘tcp‘,
        ‘from_port‘: ‘389‘,
        ‘to_port‘: ‘389‘,
    },
    ‘https‘: {
        ‘name‘: ‘HTTPS‘,
        ‘ip_protocol‘: ‘tcp‘,
        ‘from_port‘: ‘443‘,
        ‘to_port‘: ‘443‘,
    },
    ‘smtps‘: {
        ‘name‘: ‘SMTPS‘,
        ‘ip_protocol‘: ‘tcp‘,
        ‘from_port‘: ‘465‘,
        ‘to_port‘: ‘465‘,
    },
    ‘imaps‘: {
        ‘name‘: ‘IMAPS‘,
        ‘ip_protocol‘: ‘tcp‘,
        ‘from_port‘: ‘993‘,
        ‘to_port‘: ‘993‘,
    },
    ‘pop3s‘: {
        ‘name‘: ‘POP3S‘,
        ‘ip_protocol‘: ‘tcp‘,
        ‘from_port‘: ‘995‘,
        ‘to_port‘: ‘995‘,
    },
    ‘ms_sql‘: {
        ‘name‘: ‘MS SQL‘,
        ‘ip_protocol‘: ‘tcp‘,
        ‘from_port‘: ‘1433‘,
        ‘to_port‘: ‘1433‘,
    },
    ‘mysql‘: {
        ‘name‘: ‘MYSQL‘,
        ‘ip_protocol‘: ‘tcp‘,
        ‘from_port‘: ‘3306‘,
        ‘to_port‘: ‘3306‘,
    },
    ‘rdp‘: {
        ‘name‘: ‘RDP‘,
        ‘ip_protocol‘: ‘tcp‘,
        ‘from_port‘: ‘3389‘,
        ‘to_port‘: ‘3389‘,
    },
}

# Deprecation Notice:
#
# The setting FLAVOR_EXTRA_KEYS has been deprecated.
# Please load extra spec metadata into the Glance Metadata Definition Catalog.
#
# The sample quota definitions can be found in:
# <glance_source>/etc/metadefs/compute-quota.json
#
# The metadata definition catalog supports CLI and API:
#  $glance --os-image-api-version 2 help md-namespace-import
#  $glance-manage db_load_metadefs <directory_with_definition_files>
#
# See Metadata Definitions on: http://docs.openstack.org/developer/glance/

# TODO: (david-lyle) remove when plugins support settings natively
# Note: This is only used when the Sahara plugin is configured and enabled
# for use in Horizon.
# Indicate to the Sahara data processing service whether or not
# automatic floating IP allocation is in effect.  If it is not
# in effect, the user will be prompted to choose a floating IP
# pool for use in their cluster.  False by default.  You would want
# to set this to True if you were running Nova Networking with
# auto_assign_floating_ip = True.
#SAHARA_AUTO_IP_ALLOCATION_ENABLED = False

# The hash algorithm to use for authentication tokens. This must
# match the hash algorithm that the identity server and the
# auth_token middleware are using. Allowed values are the
# algorithms supported by Python‘s hashlib library.
#OPENSTACK_TOKEN_HASH_ALGORITHM = ‘md5‘

# AngularJS requires some settings to be made available to
# the client side. Some settings are required by in-tree / built-in horizon
# features. These settings must be added to REST_API_REQUIRED_SETTINGS in the
# form of [‘SETTING_1‘,‘SETTING_2‘], etc.
#
# You may remove settings from this list for security purposes, but do so at
# the risk of breaking a built-in horizon feature. These settings are required
# for horizon to function properly. Only remove them if you know what you
# are doing. These settings may in the future be moved to be defined within
# the enabled panel configuration.
# You should not add settings to this list for out of tree extensions.
# See: https://wiki.openstack.org/wiki/Horizon/RESTAPI
REST_API_REQUIRED_SETTINGS = [‘OPENSTACK_HYPERVISOR_FEATURES‘,
                              ‘LAUNCH_INSTANCE_DEFAULTS‘,
                              ‘OPENSTACK_IMAGE_FORMATS‘,
                              ‘OPENSTACK_KEYSTONE_DEFAULT_DOMAIN‘,
                              ‘CREATE_IMAGE_DEFAULTS‘]

# Additional settings can be made available to the client side for
# extensibility by specifying them in REST_API_ADDITIONAL_SETTINGS
# !! Please use extreme caution as the settings are transferred via HTTP/S
# and are not encrypted on the browser. This is an experimental API and
# may be deprecated in the future without notice.
#REST_API_ADDITIONAL_SETTINGS = []

# DISALLOW_IFRAME_EMBED can be used to prevent Horizon from being embedded
# within an iframe. Legacy browsers are still vulnerable to a Cross-Frame
# Scripting (XFS) vulnerability, so this option allows extra security hardening
# where iframes are not used in deployment. Default setting is True.
# For more information see:
# http://tinyurl.com/anticlickjack
#DISALLOW_IFRAME_EMBED = True

# Help URL can be made available for the client. To provide a help URL, edit the
# following attribute to the URL of your choice.
#HORIZON_CONFIG["help_url"] = "http://openstack.mycompany.org"

# Settings for OperationLogMiddleware
# OPERATION_LOG_ENABLED is flag to use the function to log an operation on
# Horizon.
# mask_targets is arrangement for appointing a target to mask.
# method_targets is arrangement of HTTP method to output log.
# format is the log contents.
#OPERATION_LOG_ENABLED = False
#OPERATION_LOG_OPTIONS = {
#    ‘mask_fields‘: [‘password‘],
#    ‘target_methods‘: [‘POST‘],
#    ‘ignored_urls‘: [‘/js/‘, ‘/static/‘, ‘^/api/‘],
#    ‘format‘: ("[%(client_ip)s] [%(domain_name)s]"
#        " [%(domain_id)s] [%(project_name)s]"
#        " [%(project_id)s] [%(user_name)s] [%(user_id)s] [%(request_scheme)s]"
#        " [%(referer_url)s] [%(request_url)s] [%(message)s] [%(method)s]"
#        " [%(http_status)s] [%(param)s]"),
#}

# The default date range in the Overview panel meters - either <today> minus N
# days (if the value is integer N), or from the beginning of the current month
# until today (if set to None). This setting should be used to limit the amount
# of data fetched by default when rendering the Overview panel.
#OVERVIEW_DAYS_RANGE = 1

# To allow operators to require users provide a search criteria first
# before loading any data into the views, set the following dict
# attributes to True in each one of the panels you want to enable this feature.
# Follow the convention <dashboard>.<view>
#FILTER_DATA_FIRST = {
#    ‘admin.instances‘: False,
#    ‘admin.images‘: False,
#    ‘admin.networks‘: False,
#    ‘admin.routers‘: False,
#    ‘admin.volumes‘: False,
#    ‘identity.users‘: False,
#    ‘identity.projects‘: False,
#    ‘identity.groups‘: False,
#    ‘identity.roles‘: False
#}

# Dict used to restrict user private subnet cidr range.
# An empty list means that user input will not be restricted
# for a corresponding IP version. By default, there is
# no restriction for IPv4 or IPv6. To restrict
# user private subnet cidr range set ALLOWED_PRIVATE_SUBNET_CIDR
# to something like
#ALLOWED_PRIVATE_SUBNET_CIDR = {
#    ‘ipv4‘: [‘10.0.0.0/8‘, ‘192.168.0.0/16‘],
#    ‘ipv6‘: [‘fc00::/7‘]
#}
ALLOWED_PRIVATE_SUBNET_CIDR = {‘ipv4‘: [], ‘ipv6‘: []}

# Projects and users can have extra attributes as defined by keystone v3.
# Horizon has the ability to display these extra attributes via this setting.
# If you‘d like to display extra data in the project or user tables, set the
# corresponding dict key to the attribute name, followed by the display name.
# For more information, see horizon‘s customization (http://docs.openstack.org/developer/horizon/topics/customizing.html#horizon-customization-module-overrides)
#PROJECT_TABLE_EXTRA_INFO = {
#   ‘phone_num‘: _(‘Phone Number‘),
#}
#USER_TABLE_EXTRA_INFO = {
#   ‘phone_num‘: _(‘Phone Number‘),
#}

# Password will have an expiration date when using keystone v3 and enabling the
# feature.
# This setting allows you to set the number of days that the user will be alerted
# prior to the password expiration.
# Once the password expires keystone will deny the access and users must
# contact an admin to change their password.
#PASSWORD_EXPIRES_WARNING_THRESHOLD_DAYS = 0
3、启动dashboard服务并设置开机启动
systemctl restart httpd.service memcached.service
systemctl status httpd.service memcached.service
4、打开firefox浏览器即可访问http://9.110.187.120/dashboard/ 可进入openstack界面
到此Controller节点安装完成,建议重启一下,确保之前的配置都生效。
Cinder节点部署
安装Cinder节点之前需要确认已经添加一个硬盘(/dev/sdb)用作cinder的存储服务
一、安装LVM
1、安装LVM包
yum install lvm2 -y
2、启动服务并设置为开机自启
systemctl enable lvm2-lvmetad.service
systemctl start lvm2-lvmetad.service
systemctl status lvm2-lvmetad.service
3、创建lvm, 这里的/dev/sdb就是额外添加的硬盘
fdisk -l
pvcreate /dev/sdb
vgcreate cinder-volumes /dev/sdb
4、编辑存储节点lvm.conf文件
vim /etc/lvm/lvm.conf
# filter = [ "a|.*/|" ] 改为 filter = [ "a/sda/", "a/sdb/", "r/.*/"] ,130行 ,如图:

5、然后重启下lvm2服务
systemctl restart lvm2-lvmetad.service
systemctl status lvm2-lvmetad.service
二、安装cinder
1、安装openstack-cinder相关包
yum install openstack-cinder openstack-utils targetcli python-keystone ntpdate -y
2、配置cinder配置文件
cp /etc/cinder/cinder.conf /etc/cinder/cinder.conf.bak
>/etc/cinder/cinder.conf
openstack-config --set /etc/cinder/cinder.conf DEFAULT auth_strategy keystone
openstack-config --set /etc/cinder/cinder.conf DEFAULT my_ip 10.1.1.122
openstack-config --set /etc/cinder/cinder.conf DEFAULT enabled_backends lvm
openstack-config --set /etc/cinder/cinder.conf DEFAULT glance_api_servers http://controller:9292
openstack-config --set /etc/cinder/cinder.conf DEFAULT glance_api_version 2
openstack-config --set /etc/cinder/cinder.conf DEFAULT enable_v1_api True
openstack-config --set /etc/cinder/cinder.conf DEFAULT enable_v2_api True
openstack-config --set /etc/cinder/cinder.conf DEFAULT enable_v3_api True
openstack-config --set /etc/cinder/cinder.conf DEFAULT storage_availability_zone nova
openstack-config --set /etc/cinder/cinder.conf DEFAULT default_availability_zone nova
openstack-config --set /etc/cinder/cinder.conf DEFAULT os_region_name RegionOne
openstack-config --set /etc/cinder/cinder.conf DEFAULT api_paste_config /etc/cinder/api-paste.ini
openstack-config --set /etc/cinder/cinder.conf DEFAULT transport_url rabbit://openstack:[email protected]
openstack-config --set /etc/cinder/cinder.conf database connection mysql+pymysql://cinder:[email protected]/cinder
openstack-config --set /etc/cinder/cinder.conf keystone_authtoken auth_uri http://controller:5000
openstack-config --set /etc/cinder/cinder.conf keystone_authtoken auth_url http://controller:35357
openstack-config --set /etc/cinder/cinder.conf keystone_authtoken memcached_servers controller:11211
openstack-config --set /etc/cinder/cinder.conf keystone_authtoken auth_type password
openstack-config --set /etc/cinder/cinder.conf keystone_authtoken project_domain_name default
openstack-config --set /etc/cinder/cinder.conf keystone_authtoken user_domain_name default
openstack-config --set /etc/cinder/cinder.conf keystone_authtoken project_name service
openstack-config --set /etc/cinder/cinder.conf keystone_authtoken username cinder
openstack-config --set /etc/cinder/cinder.conf keystone_authtoken password password
openstack-config --set /etc/cinder/cinder.conf lvm volume_driver cinder.volume.drivers.lvm.LVMVolumeDriver
openstack-config --set /etc/cinder/cinder.conf lvm volume_group cinder-volumes
openstack-config --set /etc/cinder/cinder.conf lvm iscsi_protocol iscsi
openstack-config --set /etc/cinder/cinder.conf lvm iscsi_helper lioadm
openstack-config --set /etc/cinder/cinder.conf oslo_concurrency lock_path /var/lib/cinder/tmp
3、启动openstack-cinder-volume和target并设置开机启动
systemctl enable openstack-cinder-volume.service target.service
systemctl restart openstack-cinder-volume.service target.service
systemctl status openstack-cinder-volume.service target.service
4、在Contrller节点上验证cinder服务是否正常
(注意,是在Controller节点上验证)
source /root/admin-openrc
cinder service-list

Compute节点部署
一、安装Nova
1、安装Nova-compute相关依赖包
yum install openstack-selinux python-openstackclient yum-plugin-priorities openstack-nova-compute openstack-utils ntpdate -y
2、升级QEMU
由于PIKE版的openstack-nova-compute服务依赖于2.1.0以上版本的QEMU包,如果系统自带的QEMU版本低于2.1.0,就需要执行此操作,否则计算节点无法启动。
这里的升级方法我采用的是源码编译安装,所以需要事先安装几个依赖包。
yum install gcc gcc-c++ automake libtool zlib-devel glib2-devel bzip2-devel libuuid-devel spice-protocol spice-server-devel usbredir-devel libaio-devel automake libtool -y
3、下载QEMU源码
wget http://wiki.qemu-project.org/download/qemu-2.11.0-rc2.tar.bz2
4、编译安装
tar xf qemu-2.11.0-rc2.tar.bz2
cd qemu-2.11.0-rc2
./configure --enable-usb-redir --enable-libusb --enable-spice --enable-uuid --enable-kvm --enable-bzip2 --prefix=/usr/local/qemu --enable-linux-aio --enable-system
make && make install
5、编译完成之后做链接
由于YUM安装openstack-nova-compute时会自动安装低版本的QEMU包,如提示文件已存在,需要先删除后再做连接
ln -s /usr/local/qemu/bin/qemu-system-x86_64 /usr/bin/qemu-kvm
ln -s /usr/local/qemu/bin/qemu-system-x86_64 /usr/libexec/qemu-kvm
ln -s /usr/local/qemu/bin/qemu-img /usr/bin/qemu-img
6、配置nova.conf
cp /etc/nova/nova.conf /etc/nova/nova.conf.bak
>/etc/nova/nova.conf
openstack-config --set /etc/nova/nova.conf DEFAULT auth_strategy keystone
openstack-config --set /etc/nova/nova.conf DEFAULT my_ip 10.1.1.121
openstack-config --set /etc/nova/nova.conf DEFAULT use_neutron True
openstack-config --set /etc/nova/nova.conf DEFAULT firewall_driver nova.virt.firewall.NoopFirewallDriver
openstack-config --set /etc/nova/nova.conf DEFAULT transport_url rabbit://openstack:[email protected]
openstack-config --set /etc/nova/nova.conf api auth_strategy keystone
openstack-config --set /etc/nova/nova.conf keystone_authtoken auth_uri http://controller:5000
openstack-config --set /etc/nova/nova.conf keystone_authtoken auth_url http://controller:35357
openstack-config --set /etc/nova/nova.conf keystone_authtoken memcached_servers controller:11211
openstack-config --set /etc/nova/nova.conf keystone_authtoken auth_type password
openstack-config --set /etc/nova/nova.conf keystone_authtoken project_domain_name default
openstack-config --set /etc/nova/nova.conf keystone_authtoken user_domain_name default
openstack-config --set /etc/nova/nova.conf keystone_authtoken project_name service
openstack-config --set /etc/nova/nova.conf keystone_authtoken username nova
openstack-config --set /etc/nova/nova.conf keystone_authtoken password password
openstack-config --set /etc/nova/nova.conf placement auth_uri http://controller:5000
openstack-config --set /etc/nova/nova.conf placement auth_url http://controller:35357/v3
openstack-config --set /etc/nova/nova.conf placement memcached_servers controller:11211
openstack-config --set /etc/nova/nova.conf placement auth_type password
openstack-config --set /etc/nova/nova.conf placement project_domain_name default
openstack-config --set /etc/nova/nova.conf placement user_domain_name default
openstack-config --set /etc/nova/nova.conf placement project_name service
openstack-config --set /etc/nova/nova.conf placement username placement
openstack-config --set /etc/nova/nova.conf placement password password
openstack-config --set /etc/nova/nova.conf placement os_region_name RegionOne
openstack-config --set /etc/nova/nova.conf vnc enabled True
openstack-config --set /etc/nova/nova.conf vnc keymap en-us
openstack-config --set /etc/nova/nova.conf vnc vncserver_listen 0.0.0.0
openstack-config --set /etc/nova/nova.conf vnc vncserver_proxyclient_address 10.1.1.121
openstack-config --set /etc/nova/nova.conf vnc novncproxy_base_url http://9.110.187.120:6080/vnc_auto.html
openstack-config --set /etc/nova/nova.conf glance api_servers http://controller:9292
openstack-config --set /etc/nova/nova.conf oslo_concurrency lock_path /var/lib/nova/tmp
openstack-config --set /etc/nova/nova.conf libvirt virt_type qemu
7、设置libvirtd.service 和openstack-nova-compute.service开机启动
systemctl enable libvirtd.service openstack-nova-compute.service
systemctl restart libvirtd.service openstack-nova-compute.service
systemctl status libvirtd.service openstack-nova-compute.service
8、到controller上执行验证
source /root/admin-openrc
openstack compute service list

二、安装Neutron
1、安装Neutron相关包
yum install openstack-neutron-linuxbridge ebtables ipset -y
2、配置neutron.conf
cp /etc/neutron/neutron.conf /etc/neutron/neutron.conf.bak
>/etc/neutron/neutron.conf
openstack-config --set /etc/neutron/neutron.conf DEFAULT auth_strategy keystone
openstack-config --set /etc/neutron/neutron.conf DEFAULT advertise_mtu True
openstack-config --set /etc/neutron/neutron.conf DEFAULT dhcp_agents_per_network 2
openstack-config --set /etc/neutron/neutron.conf DEFAULT control_exchange neutron
openstack-config --set /etc/neutron/neutron.conf DEFAULT nova_url http://controller:8774/v2
openstack-config --set /etc/neutron/neutron.conf DEFAULT transport_url rabbit://openstack:[email protected]
openstack-config --set /etc/neutron/neutron.conf keystone_authtoken auth_uri http://controller:5000
openstack-config --set /etc/neutron/neutron.conf keystone_authtoken auth_url http://controller:35357
openstack-config --set /etc/neutron/neutron.conf keystone_authtoken memcached_servers controller:11211
openstack-config --set /etc/neutron/neutron.conf keystone_authtoken auth_type password
openstack-config --set /etc/neutron/neutron.conf keystone_authtoken project_domain_name default
openstack-config --set /etc/neutron/neutron.conf keystone_authtoken user_domain_name default
openstack-config --set /etc/neutron/neutron.conf keystone_authtoken project_name service
openstack-config --set /etc/neutron/neutron.conf keystone_authtoken username neutron
openstack-config --set /etc/neutron/neutron.conf keystone_authtoken password password
openstack-config --set /etc/neutron/neutron.conf oslo_concurrency lock_path /var/lib/neutron/tmp
3、配置/etc/neutron/plugins/ml2/linuxbridge_agent.ini
openstack-config --set /etc/neutron/plugins/ml2/linuxbridge_agent.ini vxlan enable_vxlan True
openstack-config --set /etc/neutron/plugins/ml2/linuxbridge_agent.ini vxlan local_ip 10.2.2.121
openstack-config --set /etc/neutron/plugins/ml2/linuxbridge_agent.ini vxlan l2_population True
openstack-config --set /etc/neutron/plugins/ml2/linuxbridge_agent.ini securitygroup enable_security_group True
openstack-config --set /etc/neutron/plugins/ml2/linuxbridge_agent.ini securitygroup firewall_driver neutron.agent.linux.iptables_firewall.IptablesFirewallDriver
4、配置nova.conf
openstack-config --set /etc/nova/nova.conf neutron url http://controller:9696
openstack-config --set /etc/nova/nova.conf neutron auth_url http://controller:35357
openstack-config --set /etc/nova/nova.conf neutron auth_type password
openstack-config --set /etc/nova/nova.conf neutron project_domain_name default
openstack-config --set /etc/nova/nova.conf neutron user_domain_name default
openstack-config --set /etc/nova/nova.conf neutron region_name RegionOne
openstack-config --set /etc/nova/nova.conf neutron project_name service
openstack-config --set /etc/nova/nova.conf neutron username neutron
openstack-config --set /etc/nova/nova.conf neutron password password
5、计算节点结合Cinder
openstack-config --set /etc/nova/nova.conf cinder os_region_name RegionOne
6、重启和enable相关服务
systemctl restart libvirtd.service openstack-nova-compute.service
systemctl enable neutron-linuxbridge-agent.service
systemctl restart neutron-linuxbridge-agent.service
systemctl status libvirtd.service openstack-nova-compute.service neutron-linuxbridge-agent.service
7、然后在controller上重启nova服务
(注意这一步是在Controller上操作)
systemctl restart openstack-nova-api.service
systemctl status openstack-nova-api.service
到这里,CentOS7.2非HA分布式部署Openstack Pike版已经完成了。
以上是关于CentOS7.2非HA分布式部署Openstack Pike版 (实验)的主要内容,如果未能解决你的问题,请参考以下文章