vue2.0 自定义 图片上传( UpLoader )组件
Posted 每天都要进步一点点
tags:
篇首语:本文由小常识网(cha138.com)小编为大家整理,主要介绍了vue2.0 自定义 图片上传( UpLoader )组件相关的知识,希望对你有一定的参考价值。
1.自定义组件
UpLoader.vue
<!-- 上传图片 组件 -->
<template>
  <div class="vue-uploader">
    <!-- 添加图片 及 显示效果 -->
    <div class="file-list">
      <!-- 图片列表 files -->
      <section v-for="(file, index) of files" class="file-item draggable-item">
        <img :src="file.src" alt="" ondragstart="return false;">
        <p class="file-name">{{file.name}}</p>
        <span class="file-remove" @click="remove(index)">+</span>
      </section>
      <!-- 添加图片按钮 -->
      <section v-if="status == \'ready\'" class="file-item">
        <div @click="add" class="add">
          <span>+</span>
        </div>
      </section>
    </div>
    <!-- 上传图片操作 及 显示进程 -->
    <section v-if="files.length != 0" class="upload-func">
      <!-- 上传进度 -->
      <div class="progress-bar">
        <section v-if="uploading" :width="(percent * 100) + \'%\'">{{(percent * 100) + \'%\'}}</section>
      </div>
      <!-- 操作按钮 -->
      <div class="operation-box">
        <button v-if="status == \'ready\'" @click="submit">上传</button>
        <button v-if="status == \'finished\'" @click="finished">完成</button>
      </div>
    </section>
    <!-- 调用相机/图库 ref="file" 指定DOM节点 -->
    <!-- <input type="file" accept="image/*" @change="fileChanged" ref="file" multiple="multiple"> -->
    <input type="file" accept="image/*" @change="fileChanged" ref="file" capture="camera"  multiple>
  </div>
</template>

<script>
  export default {
    props: {
      src: { // 后台接受图片的http地址
        type: String,
        required: true
      }
    },
    data() {
      return {
        status: \'ready\', // 状态
        files: [], // 图片数组
        uploading: false, // 进度条
        percent: 0, // 上传进度
      }
    },
    methods: {
      // 添加图片操作
      add() {
        this.$refs.file.click();
      },
      // 上传图片操作
      submit() {
        if (this.files.length === 0) {
          console.warn(\'no file!\');
          return
        }
        // 创建formData对象
        const formData = new FormData();
        this.files.forEach((item) => {
          formData.append(item.name, item.file)
        })
        const xhr = new XMLHttpRequest()
        xhr.upload.addEventListener(\'progress\', this.uploadProgress, false)
        xhr.open(\'POST\', this.src, true)
        this.uploading = true
        xhr.send(formData)
        xhr.onload = () => {
          this.uploading = false
          if (xhr.status === 200 || xhr.status === 304) {
            this.status = \'finished\'
            console.log(\'upload success!\')
          } else {
            console.log(`error:error code ${xhr.status}`)
          }
        }
      },
      // 完成操作 还原状态
      finished() {
        this.files = []
        this.status = \'ready\'
      },
      // 上传图片列表中的某个图片
      remove(index) {
        this.files.splice(index, 1)
      },
      // 唤醒相机/图库
      fileChanged() {
        const list = this.$refs.file.files
        for (let i = 0; i < list.length; i++) {
          if (!this.isContain(list[i])) {
            const item = {
              name: list[i].name,
              size: list[i].size,
              file: list[i]
            }
            // 转换图片格式
            this.html5Reader(list[i], item)
            this.files.push(item)
          }
        }
        this.$refs.file.value = \'\'
      },
      // 将图片文件转成BASE64格式
      html5Reader(file, item){
        const reader = new FileReader()
        reader.onload = (e) => {
          this.$set(item, \'src\', e.target.result)
        }
        reader.readAsDataURL(file)
      },
      // 判断是否包含
      isContain(file) {
        this.files.forEach((item) => {
          if(item.name === file.name && item.size === file.size) {
            return true
          }
        })
        return false
      },
      // 上传进度
      uploadProgress(evt) {
        const component = this
        if (evt.lengthComputable) {
          const percentComplete = Math.round((evt.loaded * 100) / evt.total)
          component.percent = percentComplete / 100
        } else {
          console.warn(\'upload progress unable to compute\')
        }
      }
    }
  }
</script>

<style lang="less" scoped>
  .vue-uploader {
    border: 1px solid #e5e5e5;
    .file-list {
      padding: 10px 0px;
      &:after {
        content: \'\';
        display: block;
        clear: both;
        visibility: hidden;
        line-height: 0;
        height: 0;
        font-size: 0;
      }
      .file-item {
        float: left;
        position: relative;
        width: 100px;
        text-align: center;
        img{
          width: 80px;
          height: 80px;
          border: 1px solid #ececec;
        }
        .file-remove {
          position: absolute;
          right: 12px;
          display: none;
          top: 4px;
          width: 14px;
          height: 14px;
          color: white;
          cursor: pointer;
          line-height: 12px;
          border-radius: 100%;
          transform: rotate(45deg);
          background: rgba(0, 0, 0, 0.5);
        }
        &:hover{
          .file-remove {
            display: inline;
          }
        }
        .file-name {
          margin: 0;
          height: 40px;
          word-break: break-all;
          font-size: 14px;
          overflow: hidden;
          text-overflow: ellipsis;
          display: -webkit-box;
          -webkit-line-clamp: 2;
          -webkit-box-orient: vertical;
        }
      }
    }
    .add {
      width: 80px;
      height: 80px;
      margin-left: 10px;
      float: left;
      text-align: center;
      line-height: 80px;
      border: 1px dashed #ececec;
      font-size: 30px;
      cursor: pointer;
    }
    .upload-func {
      display: flex;
      padding: 10px;
      margin: 0px;
      background: #f8f8f8;
      border-top: 1px solid #ececec;
      .progress-bar {
        flex-grow: 1;
        section {
          margin-top: 5px;
          background: #00b4aa;
          border-radius: 3px;
          text-align: center;
          color: #fff;
          font-size: 12px;
          transition: all .5s ease;
        }
      }
      .operation-box {
        flex-grow: 0;
        padding-left: 10px;
        button {
          padding: 4px 12px;
          color: #fff;
          background: #007ACC;
          border: none;
          border-radius: 2px;
          cursor: pointer;
        }
      }
    }
    & > input[type="file"] {
      display: none;
    }
  }
</style>
2.页面调用
UpLoadImg.vue
<!-- 上传图片 -->
<template>
  <div>
    <!-- 标题栏 -->
    <mt-header title="上传图片">
      <router-link to="/" slot="left">
        <mt-button icon="back">返回</mt-button>
      </router-link>
    </mt-header>
    <!-- 内容 -->
    <div style="width: 100%;">
      <m-up-loader :src="src"></m-up-loader>
    </div>
  </div>
</template>

<script>
  // 上传图片组件
  import mUpLoader from \'../components/UpLoader\'

  export default {
    name: \'UploadImg\',
    components: {
      mUpLoader
    },
    data () {
      return {
        src: \'/api/imgs\', // 后台接受图片的路径
      }
    },
    mounted () {
      //
    },
    methods: {
      //
    }
  }
</script>

<style lang="less" scoped>
  //
</style>
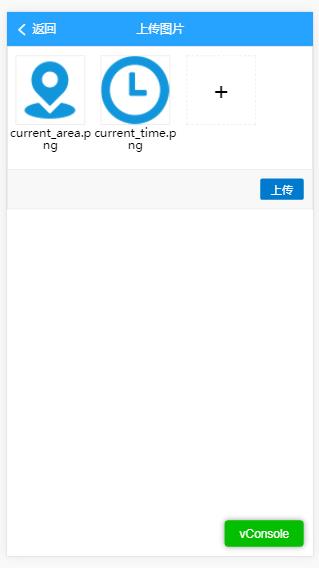
3.效果图

.
以上是关于vue2.0 自定义 图片上传( UpLoader )组件的主要内容,如果未能解决你的问题,请参考以下文章