Ansible
Posted 罗穆瑞,卡子火,crabluo,luomurui,kazih
tags:
篇首语:本文由小常识网(cha138.com)小编为大家整理,主要介绍了Ansible相关的知识,希望对你有一定的参考价值。
1.1 基础
1.1.1 简介
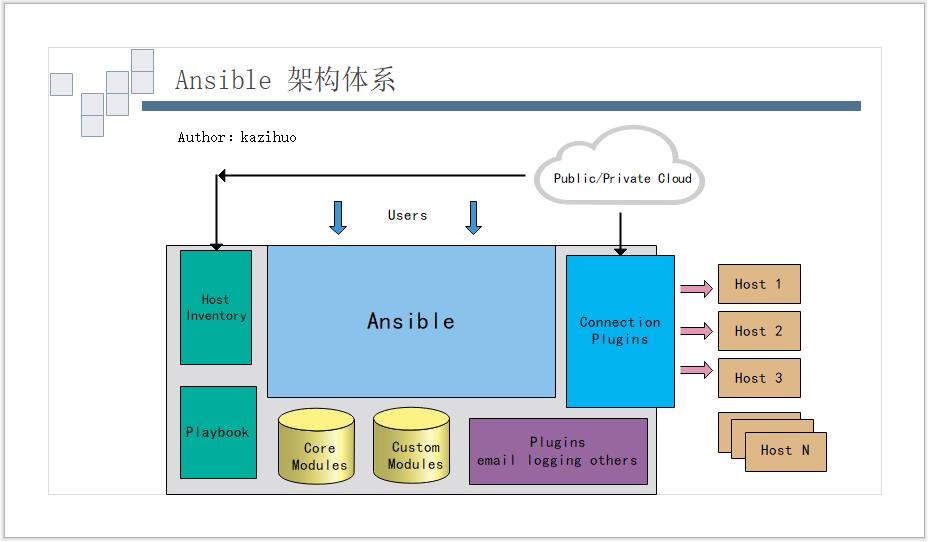
ansible基于python开发,集合众多运维工具(puppet ,cfengine ,chef ,func ,fabric)的优点,实现了批量系统配置、批量程序部署、批量运行命令等功能。其基于模块工作,本身没有批量部署能力,真正具有批量部署的是ansible所运行的模块,ansible只是提供一种框架。包括:
1)connection plugins:负责和被监控端实现通信;
2)host inventory:指定操作主机,是一个配置文件里面定义监控的主机;
3)modules:核心模块、command模块、自定义模块;
4)plugins:借助插件完成记录日志邮件等功能;
5)playbook:可实现一次性运行多个任务。
1.1.2 架构
1.1.3 特性
1)no agents:被管控主机上不需安装任何客户端;
2)no server:无服务器端,使用时直接运行命令即可;
3)modules in any languages:基于模块工作,可使用任意语言开发模块;
4)yaml:使用yml定制剧本playbook;
5)ssh by default:基于SSH工作;
6)strong multi-tier solution:可实现多机指挥。
1.1.4 优点
1)轻量级,客户端不需agent;
2)批量执行任务可写成脚本,不用分发到远程就可执行;
3)使用python编写,维护更简单;
4)支持sudo。
1.2 安装
依赖于epel源,可通过阿里云镜像站配置,使用前基于ssh无密认证。
# yum -y install ansible
配置文件:/etc/ansible/ansible.cfg
Invertory:/etc/ansible/hosts
# cat /etc/ansible/hosts
[webserver]
192.168.11.11
[dbserver]
192.168.11.12
1.3 结构
Inventory
Modules
AD Hoc Commands
Playbooks
Tasks:任务
Variables:变量
Templates:模板
Handlers:处理器,由某事件触发执行的操作
Roles:角色
1.4 帮助
# man ansible
SEE ALSO
ansible-playbook(1), ansible-pull(1), ansible-doc(1), ansible-vault(1), ansible-galaxy(1)
# man ansible-doc
# ansible-doc -l
# ansible-doc -s MODULE_NAME
# man ansible-play
1.5 模块
常见模块
command
#命令模块,默认模块(不写时默认有),用于远程执行命令;
# ansible all -a \'date\'
cron
# ansible webserver -m cron -a \'minute="*/10" job="/bin/echo kazihuo" name="test cron job" state=present\'
# ansible webserver -a \'crontab -l\'
group
#ansible webserver -m group -a \'name=mysql gid=306 system=yes\'
user
#ansible webserver -m user -a \'name=mysql uid=306 system=yes group=mysql\'
copy
# ansible all -m copy -a \'src=/etc/fstab dest=/tmp/fstab.ansible owner=root mode=640\'
# ansible all -m copy -a \'content="Hello Ansible\\nHi\\n" dest=/tmp/kazihuo.ansible\'
template
file
# ansible all -m file -a \'owner=mysql group=mysql mode=777 path=/tmp/kazihuo.ansible\'
#link
# ansible all -m file -a \'path=/tmp/fstab.link src=/tmp/fstab.ansible state=link\'
ping
# ansible all -m ping
service
# ansible all -a \'systemctl status httpd.service\'
# ansible all -m service -a \'enabled=true name=httpd state=started\'
shell
# ansible all -m user -a \'name=u1 password=000\'
# ansible all -m shell -a \'echo 000000|passwd --stdin u1\'
script
#将本地脚本复制到远程主机并运行
# cat /tmp/test.sh
#!/bin/bash
echo "ansible from script" > /tmp/script.ansible
# ansible all -m script -a \'/tmp/test.sh\'
# ansible all -m command -a \'cat /tmp/script.ansible\'
yum
# ansible all -m yum -a \'name=zsh state=present\'
# ansible dbserver -m yum -a \'name=httpd state=absent\'
setup
#收集远程主机的facts(每个被管理节点在接收并运行管理命令之前,会将自己主机相关信息,如操作系统版本、IP地址等报告给远程的ansible主机)
# ansible all -m setup
1.6 YAML
介绍
YAML是一个可读性高的用来表达资料序列的格式。其参考了多种语言,包括:XML、C语言、Perl以及电子邮件格式RFC2822等。
特性
可读性好;
和脚本语言的交互性好;
有一个一致的信息模型;
易于实现;
可基于流来处理;
表达能力强,扩展性好;
语法
YAML语法和其他高阶语言类似,且可简单表达清单、散列表、标量等数据结构,其结构(Structure)通过空格来展示,序列(Sequence)里的项用“-”来表示,Map里的键值对用“:”分隔。
1.7 Inventory
用于将批量操作主机分组命名,默认的inventory file是/etc/ansible/hosts;其可以有多个,也可通过Dynamic Inventory动态生成。
inventory文件遵循INI文件风格,中括号中字符为组名,同一个主机可同时归并到多个不同的组中;
当目标主机使用了非默认SSH端口,可在主机名称后使用冒号+端口号来标明。
eg:
[webserver]
192.168.10.11
192.168.10.12:222
当主机名遵循一定的命名模式,可用列表方式标识各个主机;
eg:
[webserver]
www[01:30].kazihuo.command
[dbserver]
db[a:e].kazihuo.com
主机变量
在inventory中定义主机时为其添加主机变量以便于在playbook中使用。
eg:
[webservers]
192.168.10.11 http_port=80 maxRequestsPerChild=808
组变量
指赋予给指定组内所有主机上的在playbook中的可用变量。
eg:
[webservers]
192.168.10.11
[webservers:vars]
ntp_server=ntp.kazihuo.com
组嵌套
inventoy中,组可以包含其他的组,也可向组中的主机指定变量,这些变量只能在ansible-playbook中使用,而ansible不支持。
eg:
[apache]
192.168.10.11
[nginx]
192.168.10.12
[webservers:children]
apache
nginx
[webservers:vars]
ntp_server=ntp.kazihuo.com
inventory参数
基于ssh连接inventory中指定的远程主机时,可通过参数指定其交互方式;
ansible_ssh_host
ansible_ssh_port
ansible_ssh_user
ansible_ssh_pass
ansible_sudo_pass
ansible_connection
ansible_ssh_private_key_file
ansible_shell_type
ansible_python_interpreter
ansible\\_\\*\\_interpreter
1.8 playbook
playbook是由一个或多个“play”组成的列表。play的主要功能是将事先归并为一组的主机装扮成事先通过ansible中的task定义好的角色。从根本上来讲,所谓task无非是调用ansible的一个module。将多个play组织在一个playbook中,即可以让它们联同起来按事先编排的机制同唱一台大戏。
1.8.1 实例说明
1.8.1.1 创建用户
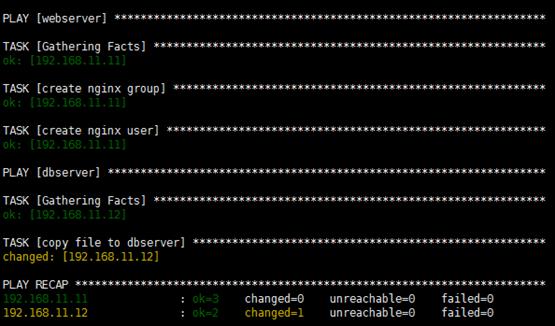
指定创建用户与组、传输文件;
# cat nginx.yml

 1 - hosts: webserver
 2
 3   remote_user: root
 4
 5   tasks:
 6
 7   - name: create nginx group
 8
 9     group: name=nginx system=yes gid=208
10
11   - name: create nginx user
12
13     user: name=nginx uid=208 group=nginx system=yes
14
15
16
17 - hosts: dbserver
18
19   remote_user: root
20
21   tasks:
22
23   - name: copy file to dbserver
24
25     copy: src=/etc/passwd dest=/tmp/passwd.ansible
# ansible-playbook nginx.yml
1.8.1.2 处理器
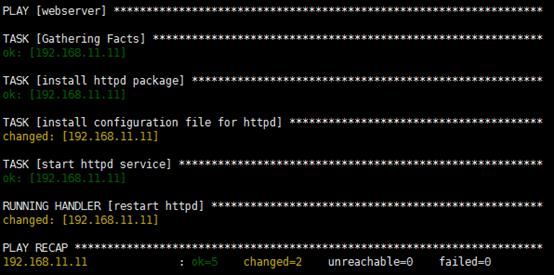
指定主机通过yum部署httpd,设置开机自启,并指定配置文件,当配置文件发生改变后,再次执行,将重启httpd;
[root@k2 ~]# cat apache.yml

 1 - hosts: webserver
 2
 3   remote_user: root
 4
 5   tasks:
 6
 7   - name: install httpd package
 8
 9     yum: name=httpd state=present
10
11   - name: install configuration file for httpd
12
13     copy: src=/root/conf/httpd.conf dest=/etc/httpd/conf/httpd.conf
14
15     notify:
16
17     - restart httpd
18
19   - name: start httpd service
20
21     service: enabled=true name=httpd state=started
22
23   handlers:
24
25   - name: restart httpd
26
27     service: name=httpd state=restarted
[root@k2 ~]# ansible-playbook apache.yml
1.8.1.3 基础变量
基础变量应用;
[root@k2 ~]# cat /etc/ansible/hosts
1 [webserver]
2
3 192.168.11.11 testvar="q1"
4
5 192.168.11.13 testvar="q3"
6
7 [dbserver]
8
9 192.168.11.12
[root@k2 ~]# cat test.yml

1 - hosts: webserver
2
3   remote_user: root
4
5   tasks:
6
7   - name: copy file
8
9     copy: content="{{ ansible_all_ipv4_addresses }},{{ testvar }}\\n"  dest=/tmp/vars.ans
[root@k2 ~]# ansible-playbook test.yml
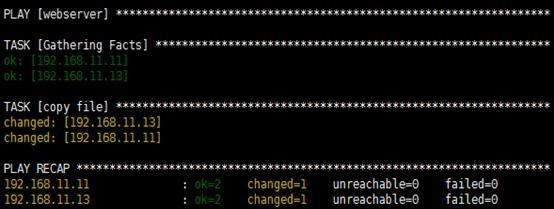
[root@Q1 /tmp]# cat vars.ans
[u\'192.168.11.11\', u\'192.168.10.11\'],q1
[root@Q3 /tmp]# cat vars.ans
[u\'192.168.11.13\'],q3
1.8.1.4 进阶变量
通过变量实现对不同主机提供不同的配置文件;
[root@k2 ~]# cat /etc/ansible/hosts

1 [webserver]
2
3 192.168.11.11 http_port=80
4
5 192.168.11.13 http_port=90
6
7 [root@k2 ~]# cat template/httpd.conf.jinja2 |grep Listen
8
9 Listen {{ http_port }}
[root@k2 ~]# cat apache.yml

 1 - hosts: webserver
 2
 3   remote_user: root
 4
 5   vars:
 6
 7   - package: httpd
 8
 9   - service: httpd
10
11   tasks:
12
13   - name: install httpd package
14
15     yum: name={{ package }} state=present
16
17   - name: install configuration file for httpd
18
19     template: src=/root/template/httpd.conf.jinja2 dest=/etc/httpd/conf/httpd.conf
20
21     notify:
22
23     - restart httpd
24
25   - name: start httpd service
26
27     service: enabled=true name={{ service }} state=started
28
29   handlers:
30
31   - name: restart httpd
32
33     service: name=httpd state=restarted
[root@k2 ~]# ansible-playbook apache.yml
[root@Q1 ~]# netstat -atunpl |grep 80

[root@Q3 ~]# netstat -atunpl |grep 90

1.8.1.5 条件判断
条件判断,当满足某条件的主机才执行操作;
[root@k2 ~]# cat cond.yml

 1 - hosts: all
 2
 3   remote_user: root
 4
 5   vars:
 6
 7   - username: user10
 8
 9   tasks:
10
11   - name: create {{ username }} user
12
13     user: name={{ username }}
14
15     when: ansible_fqdn == "node1,kaizhuo.com"
1.8.1.6 迭代机制
迭代,当有重复性执行的任务时,可使用迭代机制;
- name: add several users
user: name={{ item }} state=present groups=wheel
with_items:
- testuser1
- testuser2
上面语句的功能等同于下面的语句:
- name: add user testuser1
user: name=testuser1 state=present groups=wheel
- name: add user testuser2
user: name=testuser2 state=present groups=wheel
事实上,with_items中可以使用元素还可为hashes,例如:
- name: add several users
user: name={{ item.name }} state=present groups={{ item.groups }}
with_items:
- { name: \'testuser1\', groups: \'wheel\' }
- { name: \'testuser2\', groups: \'root\' }
1.8.2 roles
1.8.2.1 基础说明
roles能够根据层次型结构自动装载vars、tasks、handlers等,通过分别将变量、文件、任务、模板及处理器放置与单独的目录中,并可便捷的include所有的一种机制。
roles目录下包含:
tasks目录:至少包含一个main.yml文件,定义角色的任务列表;此文件可使用include包含其他的位于此目录中的task文件;
files目录:存放由copy或script等模块调用的文件;
template目录:template模块自动在此目录中寻找jinja2模板文件;
handlers目录:此目录中因包含一个main.yml文件,定义各handlers;
vars目录:包含一个main.yml文件,用于定义此角色中用到的变量;
meta目录:包含一个main.yml文件,用于定义特殊设定及其依赖关系;
default目录:包含一个main.yml,为当前角色设定默认变量时使用此目录;
1.8.2.2 实例说明
[root@k2 ~]# mkdir -pv ansible_playbooks/roles/{websrvs,dbsrvs}/{tasks,files,templates,meta,handlers,vars}
[root@k2 ~/ansible_playbooks]# tree

 1 .
 2
 3 ├── roles
 4
 5 │   ├── dbsrvs
 6
 7 │   │   ├── files
 8
 9 │   │   │   └── my.cnf
10
11 │   │   ├── handlers
12
13 │   │   │   └── main.yml
14
15 │   │   ├── meta
16
17 │   │   ├── tasks
18
19 │   │   │   └── main.yml
20
21 │   │   ├── templates
22
23 │   │   └── vars
24
25 │   └── websrvs
26
27 │       ├── files
28
29 │       │   └── httpd.conf
30
31 │       ├── handlers
32
33 │       │   └── main.yml
34
35 │       ├── meta
36
37 │       ├── tasks
38
39 │       │   └── main.yml
40
41 │       ├── templates
42
43 │       └── vars
44
45 └── site.yml
46
47 15 directories, 8 files
[root@k2 ~/ansible_playbooks]# cat site.yml

 1 - hosts: 192.168.11.11
 2
 3   remote_user: root
 4
 5   roles:
 6
 7   - websrvs
 8
 9 - hosts: 192.168.11.12
10
11   remote_user: root
12
13   roles:
14
15   - dbsrvs
16
17 - hosts: 192.168.11.13
18
19   remote_user: root
20
21   roles:
22
23   - websrvs
24
25   - dbsrvs
[root@k2 ~/ansible_playbooks]# cat roles/dbsrvs/handlers/main.yml

 1 - name: restart mariadb
 2
 3   service: name=mariadb state=restarted
 4
 5 [root@k2 ~/ansible_playbooks]# cat roles/dbsrvs/tasks/main.yml
 6
 7 - name: install mariadb package
 8
 9   yum: name={{ item }} state=present
10
11   with_items:
12
13   - mariadb
14
15   - mariadb-devel
16
17   - mariadb-server
18
19 - name: install configuration file
20
21   copy: src=my.cnf dest=/etc/my.cnf
22
23   tags:
24
25   - myconf
26
27   notify:
28
29   - restart mariadb
30
31 - name: start mariadb service
32
33   service: name=mariadb enabled=true state=started
34
35 [root@k2 ~/ansible_playbooks]# cat roles/websrvs/handlers/main.yml
36
37 - name: restart httpd
38
39   service: name=httpd state=restarted
40
41 [root@k2 ~/ansible_playbooks]# cat roles/websrvs/tasks/main.yml
42
43 - name: install httpd package
44
45   yum: name=httpd
46
47 - name: install configuration file
48
49   copy: src=httpd.conf dest=/etc/httpd/conf/httpd.conf
50
51   tags:
52
53   - conf
54
55   notify:
56
57   - restart httpd
58
59 - name: start httpd
60
61   service: name=httpd state=started
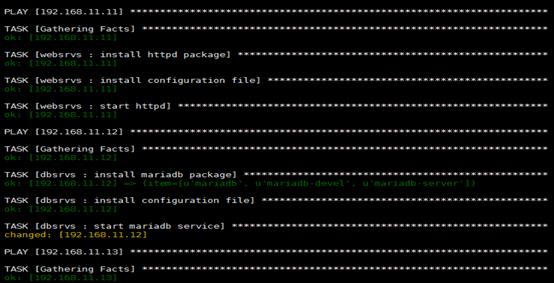
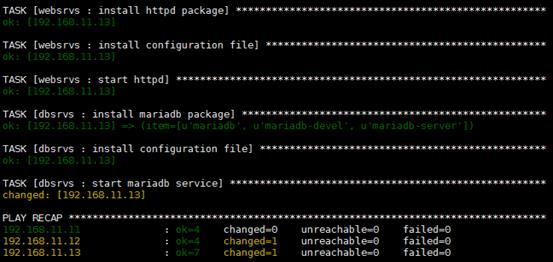
[root@k2 ~/ansible_playbooks]# ansible-playbook site.yml
以上是关于Ansible的主要内容,如果未能解决你的问题,请参考以下文章
