freemarker实现通用布局的模板拆分与复用
Posted 大肥龙
tags:
篇首语:本文由小常识网(cha138.com)小编为大家整理,主要介绍了freemarker实现通用布局的模板拆分与复用相关的知识,希望对你有一定的参考价值。
原文:http://www.hawu.me/coding/733
一、基础页面布局
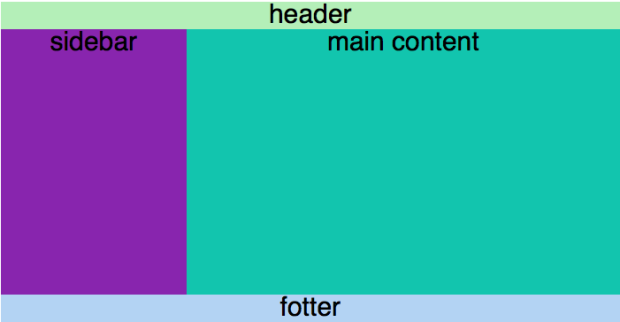
假设我们项目页面的通用布局如下图所示:
实现这样的布局的基本html代码如下:
|
1
2
3
4
5
6
7
8
9
10
11
12
13
14
|
<html>
<head>
</head>
<body>
<div style="width: 700px; text-align:center; font-size:30px;">
<div style="">header</div>
<div style="width:30%; height:300px; float:left; ">
sidebar</div>
<div style="width:70%; height:300px; float:left; ">
main content</div>
<div style="">fotter</div>
</div>
</body>
</html>
|
这样看起来很简洁是吧,但实际上一个页面的代码是很凌乱的。如果我们每个前端页面都是基于这个布局,只是main content的内容有所不同。那么从模板的可复用角度来考虑,我们就应该header、siderbar、fotter作为单独的模板剥离出来。然后在渲染main content页面时候加载这些通用的模板。
二、freemarker基础语法
2.1 插值 ${…}
freemarker会将花括号内表达式的计算结果替换到这个花括号的位置${…}。比如
|
1
2
|
<b>hello, ${user.name}</b>
5 + 2 = ${5+2}
|
那么这个模板在freemarker处理后会输出(假定user.name=”funway”)
|
1
2
|
<b>hello, funway</b>
5 + 2 = 7
|
2.2 <#…>与<@…>
<#…>表示freemarker内建的指令,比如<#macro>、<#if>、<#list>、<#assign>。
<@…>表示用户自定义的指令,自定义指令要先用<#macro>宏来定义。(参见2.4)
2.3 <#include>与<#import>
include指令表示在当前位置插入其他文件的内容。比如<#include “/copyright.html”>
import指令表示将一个文件作为一个命名空间引入到当前文件。标准写法是<#import “filePath” as nameSpace>。就像java的命名空间一样,防止两个文件中相同的变量名或者自定义指令名冲突。然后就可以在当前模板中使用${nameSpace.variable}和<@nameSpace.command>来调用该命名空间的变量与指令了。
include引入文件的内容(包括其中自定义的变量与指令),但import只会引入变量与指令,不会把html写入。
2.4 <#macro>
参考官方文档
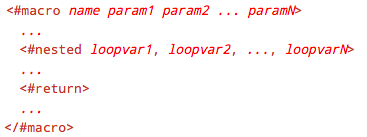
macro宏用来定义自定义指令。基本语法是
name 表示自定义的指令名
param 可选,表示指令参数
nested 可选,表示嵌套内容
return 可选,表示到这就结束了,后面代码不执行了
2.4.1 简单的macro
|
1
2
3
4
5
6
7
|
<#-- 用macro定义一个sayHello指令 -->
<#macro sayHello>
<b>hello, world</b>
</#macro>
<#-- 调用上面定义的sayHello指令 -->
<@sayHello/>
|
上面这段模板输出的html文本如下:
|
1
|
<b>hello, world</b>
|
2.4.2 带参数的macro
|
1
2
3
4
5
6
7
|
<#-- 用macro定义一个带参的sayHelloTo指令 -->
<#macro sayHelloTo person>
hello, <b>${person}</b>
</#macro>
<#-- 调用上面定义的带参sayHelloTo指令 -->
<@sayHelloTo person="funway"/>
|
这个模板的输出结果如下:
|
1
|
hello, <b>funway</b>
|
2.4.3 嵌套内容
|
1
2
3
4
5
6
7
8
9
10
11
12
13
|
<#macro sayHello>
hello, world.
<br/>
<#-- 在这里嵌入指令调用时候要嵌套的内容 -->
<#nested>
<br/>
form: funway
</#macro>
<@sayHello>
<#-- 这里写上需要嵌套的内容 -->
this is nested content.
</@sayHello>
|
这段模板的输出如下:
|
1
2
3
4
5
|
hello, world.
<br/>
this is nested content.
<br/>
form: funway
|
三、布局模板拆分
使用freemarker的macro、import、include指令,我们可以将布局模板拆分为如下几个文件
|
1
2
3
4
5
6
7
8
9
10
11
12
13
14
15
16
17
18
|
<#macro layout>
<html>
<head>
</head>
<body>
<div style="width: 700px; text-align:center; font-size:30px;">
<#include "header.ftl">
<#include "sidebar.ftl">
<#-- 在这里嵌入main content -->
<#nested>
<#include "footer.ftl">
</div>
</body>
</html>
</#macro>
|
|
1
|
<div style="">header</div>
|
|
1
2
3
|
<div style="width:30%; height:300px; float:left; ">
sidebar
</div>
|
|
1
|
<div style="">fotter</div>
|
那么在任何一个使用该布局的页面,我们只要写如下的代码,修改要嵌入到layout中的main content就好了。
|
1
2
3
4
5
6
7
8
9
10
11
|
<#-- 引入布局指令的命名空间 -->
<#import "../layout/defaultLayout.ftl" as defaultLayout>
<#-- 调用布局指令 -->
<@defaultLayout.layout>
<#-- 将下面这个main content嵌入到layout指令的nested块中 -->
<div style="width:70%; height:300px; float:left; ">
main content</div>
</@defaultLayout.layout>
|
而且如果要更换布局,比如修改header,也不用每个页面都去改一遍了。这就实现了模板的可复用。
四、题外话,关于freemarker的一些小细节
4.1 判断变量是否存在或者为null
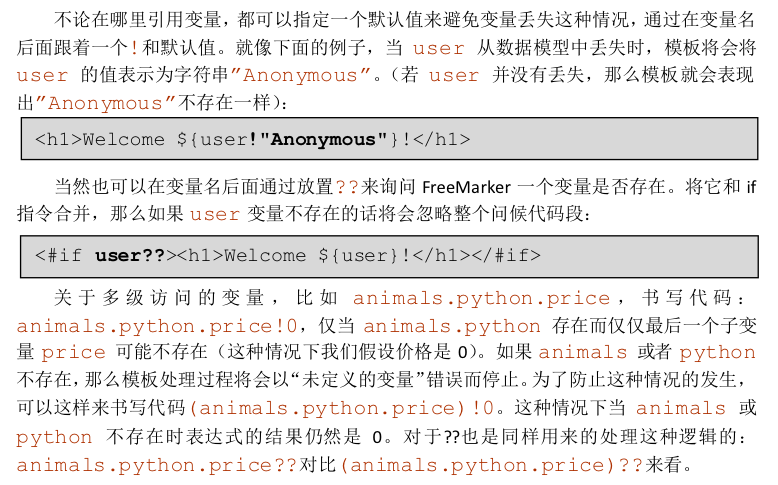
freemarker不允许在模板中调用一个不存在或者为null的变量,否则会直接出错退出。所以在输出一个变量之前尽量先判断该变量是否存在:
以上是关于freemarker实现通用布局的模板拆分与复用的主要内容,如果未能解决你的问题,请参考以下文章


