ExtremeComponents源码解析
Posted 小杜比亚
tags:
篇首语:本文由小常识网(cha138.com)小编为大家整理,主要介绍了ExtremeComponents源码解析相关的知识,希望对你有一定的参考价值。
一、前言
因参与公司框架改造,在负责前端table组件选型时,原本选了jqGrid和Bootstraptable作为备选方案,评审会上,武哥提了EXtremeComponents,让我也去了解下,看下合不合适,在此机缘下,我便按照网络上的教程搭建了演示实例,使用起来也挺简单,功能确实挺强大,当时虽然没有深入研究,但是看过几个扩展现有功能的例子,发现它扩展性挺好,但是因其导出xls依赖的jar包太过老旧,现有系统使用高版本的jar包和ExtremeComponents结合使用时,功能不能正常使用,所以放弃了这个方案。当初在整理这个方案时,看到挺多人说其框架设计的不错,于是便决定通读其源码,以窥其精妙,自我提升一番~这篇我仅仅介绍如何安装ExtremeComponents的及简单的使用~
二、正文
1. 开发环境介绍
本文使用的开发环境如下:
jdk1.8
eclipse Mars.2 Release (4.5.2)
依赖的jar包如下:

因本工程使用maven创建,所以顺带附上pom.xml文件的配置:
<project xmlns="http://maven.apache.org/POM/4.0.0" xmlns:xsi="http://www.w3.org/2001/XMLSchema-instance"
  xsi:schemaLocation="http://maven.apache.org/POM/4.0.0 http://maven.apache.org/maven-v4_0_0.xsd">
  <modelVersion>4.0.0</modelVersion>
  <groupId>org.extremeComponents.com</groupId>
  <artifactId>ExtremeComponents</artifactId>
  <packaging>war</packaging>
  <version>1.0-SNAPSHOT</version>
  <name>ExtremeComponents Maven Webapp</name>
  <url>http://maven.apache.org</url>
  <dependencies>
    <dependency>
      <groupId>junit</groupId>
      <artifactId>junit</artifactId>
      <version>3.8.1</version>
      <scope>test</scope>
    </dependency>
    <dependency>
        <groupId>javax.servlet</groupId>
        <artifactId>servlet-api</artifactId>
        <version>3.0-alpha-1</version>
        <scope>provided</scope>
    </dependency>
    <dependency>
        <groupId>org.extremecomponents</groupId>
        <artifactId>extremecomponents</artifactId>
        <version>1.0.1</version>
    </dependency>

  </dependencies>
  <build>
    <finalName>ExtremeComponents</finalName>
    <plugins>
        <plugin>
            <groupId>org.apache.tomcat.plugin</groupId>
            <artifactId>tomcat7-maven-plugin</artifactId>
            <version>2.2</version>
            <configuration>
                <port>8080</port>
            </configuration>
        </plugin>
    </plugins>
  </build>
</project>
这边特别说明下:ExtremeComponents最新版本就是1.0.1,并且是更新于2006年5月30日,如果不使用Maven的童鞋,可以直接到官网上面去下载对应的压缩包解压(使用Maven,有些静态文件还是需要从压缩包中获取,所以都要下载),传送门:https://sourceforge.net/projects/extremecomp/files/eXtremeComponents/,下载的话,下载eXtremeComponents-1.0.1-with-dependencies.zip,安装使用指南也可以参考这篇博文:http://www.blogjava.net/i369/articles/237808.html
2. extremeComponents安装
下面也简要的说下安装extremeComponents(以Maven为例说明,如果非Maven工程,请自己将extremeComponents所需的jar加入build path),像笔者一样配置好pom.xml文件,Maven会自动下载如下包:

这是使用Maven下载的jar,但是需要使用extremeComponents的css及某些js函数,这时候就需要从下载的压缩包:eXtremeComponents-1.0.1-with-dependencies.zip中拷贝到工程里面:

比如我将extremecomponents.css拷贝至webapp/styles,extremecomponents.js拷贝到webapp/js,images文件夹直接复制到webapp下,如下:

3. tld文件的使用
到目前为止,extremecomponent基础使用环境已经搭建完毕(目前的配置还不能支持导出excel和pdf,如何配置才能支持,请往后看)。eXtremeComponents-1.0.1-with-dependencies.zip压缩包解压后,在dist目录下有个extremecomponents.tld文件,我相信有自定义过jstl标签的人,应该知道这个文件的作用,就是标签的配置文件(不知道的可以自行百度),extremecomponent是开源标签库,那么我们是否有必要将这个拷贝到我们工程目录的WEB-INF目录下呢?处理tld文件有两种方式:
1)你可以把extremecomponents.tld文件放到WEB-INF目录下的任何地方。 不过,为了便于管理,可以将TLD文件都放到/WEB-INF/tld(自行建立这个目录)目录下,然后你需要根据你的extremecomponents.tld 文件的位置来修改/WEB-INF/web.xml文件的标签映射:
<taglib>
    <taglib-uri>/tld/extremecomponents</taglib-uri>
    <taglib-location>/WEB-INF/tld/extremecomponents.tld</taglib-location>
</taglib>
在使用的时候:
<%@ taglib uri="/tld/extremecomponents" prefix="ec" %>
特别说明:有些人在web.xml中添加<taglib />标签的时候报错:

这是什么原因呢?这就要看你web.xml中根节点是怎么声明了,如果类似如下形式声明:
<?xml version="1.0" encoding="UTF-8"?>
<web-app version="2.5"
    xmlns="http://java.sun.com/xml/ns/javaee"
    xmlns:xsi="http://www.w3.org/2001/XMLSchema-instance"
    xmlns:web="http://java.sun.com/xml/ns/javaee"
    xsi:schemaLocation="http://java.sun.com/xml/ns/javaee
    http://java.sun.com/xml/ns/javaee/web-app_2_5.xsd">
  ..................................
</web-app>
那么在声明<taglib />标签的时候应该这样:
<?xml version="1.0" encoding="UTF-8"?>
<web-app version="2.5"
    xmlns="http://java.sun.com/xml/ns/javaee"
    xmlns:xsi="http://www.w3.org/2001/XMLSchema-instance"
    xmlns:web="http://java.sun.com/xml/ns/javaee"
    xsi:schemaLocation="http://java.sun.com/xml/ns/javaee
    http://java.sun.com/xml/ns/javaee/web-app_2_5.xsd">
  ..................................
  <jsp-config>
      <taglib>
        <taglib-uri>/tld/extremecomponents</taglib-uri>
        <taglib-location>/WEB-INF/tld/extremecomponents.tld</taglib-location>
      </taglib>
  </jsp-config>
 ..................................
</web-app>
如果web.xml是如下形式的:
<!DOCTYPE web-app PUBLIC
 "-//Sun Microsystems, Inc.//DTD Web Application 2.3//EN"
 "http://java.sun.com/dtd/web-app_2_3.dtd" >

<web-app>
  ....................
</web-app>
那么taglib应该按如下方式声明:
<!DOCTYPE web-app PUBLIC
 "-//Sun Microsystems, Inc.//DTD Web Application 2.3//EN"
 "http://java.sun.com/dtd/web-app_2_3.dtd" >

<web-app>
    ......................................
    <taglib>
            <taglib-uri>/tld/extremecomponents</taglib-uri>
            <taglib-location>/WEB-INF/tld/extremecomponents.tld</taglib-location>
    </taglib>
    ......................................
</web-app>
2)如果你的servlet容器支持JSP 1.2 (或更高版本),它将能够自动发现TLD文件,那么你什么也不需要做。 当extremecomponents.jar被容器加载的时候,在它的META-INF目录下的extremecomponents.tld(jar包本身包含这个tld文件,可以将jar解压看到)文件将被找到。 这时,你需要向下面一样在你的JSP里把eXtremeTable包含进来:
<%@ taglib uri="http://www.extremecomponents.org" prefix="ec" %>

4. extremecomponent效果展示
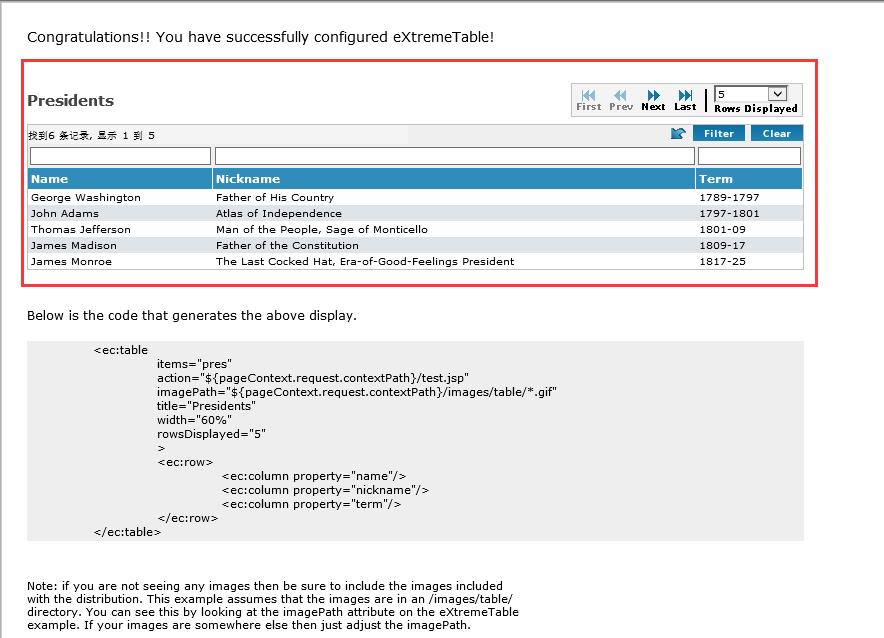
说了半天,extremecomponent的使用效果如何,没有一个直观的感受,那么我先po上一张图:

红色部分就是这个jstl标签最终的显示效果。这个页面的源码如下:
<%@page contentType="text/html;charset=utf-8" %>
<!--如何之前有在web.xml配置了tablib标签,那么这边uri要和那边<taglib-uri />配置的一致--> <%@taglib uri="http://www.extremecomponents.org" prefix="ec" %>
<html> <head> <title>eXtremeTest</title> <style type="text/css"> .eXtremeTable { margin: 0; padding: 0; } .eXtremeTable select { font-family: Verdana; font-size: 9px; border: solid 1px #EEE; width: 75px; } .eXtremeTable .tableRegion { border: 1px solid silver; padding: 2px; font-family:Verdana; font-size: 10px; margin-top: 7px; } .eXtremeTable .filter { background-color: #efefef; } .eXtremeTable .filter input { font-family: Verdana; font-size: 10px; width: 100%; } .eXtremeTable .filter select { font-family: Verdana; font-size: 9px; border: solid 1px #EEE; width: 100%; } .eXtremeTable .tableHeader { background-color: #308dbb; color: white; font-family:Verdana; font-size: 11px; font-weight: bold; text-align: left; padding-right: 3px; padding-left: 3px; padding-top: 4; padding-bottom: 4; margin: 0; border-right-style: solid; border-right-width: 1px; border-color: white; } .eXtremeTable .tableHeaderSort { background-color: #3a95c2; color: white; font-family:Verdana; font-size: 11px; font-weight: bold; text-align: left; padding-right: 3px; padding-left: 3px; padding-top: 4; padding-bottom: 4; border-right-style: solid; border-right-width: 1px; border-color: white; } .eXtremeTable .odd a, .even a { color: Black; font-size: 10px; } .eXtremeTable .odd td, .eXtremeTable .even td { padding-top: 2px; padding-right: 3px; padding-bottom: 2px; padding-left: 3px; vertical-align: middle; font-family:Verdana; font-size: 10px; } .eXtremeTable .odd { background-color: #FFFFFF; } .eXtremeTable .even { background-color: #dfe4e8; } .eXtremeTable .highlight td { color: black; font-size: 10px; padding-top: 2px; padding-right: 3px; padding-bottom: 2px; padding-left: 3px; vertical-align: middle; background-color: #fdecae; } .eXtremeTable .highlight a, .highlight a { color: black; font-size: 10px; } .eXtremeTable .toolbar { background-color: #F4F4F4; font-family:Verdana; font-size: 9px; margin-right: 1px; border-right: 1px solid silver; border-left: 1px solid silver; border-top: 1px solid silver; border-bottom: 1px solid silver; } .eXtremeTable .toolbar td { color: #444444; padding: 0px 3px 0px 3px; text-align:center; } .eXtremeTable .separator { width: 7px; } .eXtremeTable .statusBar { background-color: #F4F4F4; font-family:Verdana; font-size:解释器在解析JavaScript代码时对于这两种方式片段(Java) | 机试题+算法思路+考点+代码解析 2023
Android 逆向类加载器 ClassLoader ( 类加载器源码简介 | BaseDexClassLoader | DexClassLoader | PathClassLoader )(代码片段
初识Spring源码 -- doResolveDependency | findAutowireCandidates | @Order@Priority调用排序 | @Autowired注入(代码片段