https和server-status配置案例
Posted 尹正杰
tags:
篇首语:本文由小常识网(cha138.com)小编为大家整理,主要介绍了https和server-status配置案例相关的知识,希望对你有一定的参考价值。
https和server-status配置案例
作者:尹正杰
版权声明:原创作品,谢绝转载!否则将追究法律责任。
一.https协议
我们知道http协议是明文的,所以,你的数据发送不管是请求报文(request)还是响应报文(response)统统都是明文的。对于很多数据来讲都是无所谓的,因为你的网站就是让别人来访问的,但是你想访问一些敏感的资源(比如,你登录支付宝,登录淘宝账号,银行网站等等)就显得不是那么靠谱了,你想想把你的银行卡号和密码以及你的身份证ID直接放在互联网上裸奔这意味着什么?你就不怕骇客搞事情吗?这个时候我们就需要一个比较安全的协议来帮我们发送或接受这些数据。因此我们想要实现网页间的数据加密发送,这个时候https就出现啦。
http协议是基于SSL(Secure Socket Layer,安全的套接字层)或TLS(Transport Layer Security ,传输层安全)协议实现的,但是很多时候我们都把它们通常为SSL协议。事实上SSL和TLS的功能是一样的,因为SSL早期是网景公司所研发的,所以为了避免受制于人,国际标准化组织又重新利用了一种类似的机制研制了一套开发的标准。其中SSL协议比较流行的版本是:sslv3,而TLS协议用的比较流行的是tlsv1版本。现如今网景公司已经被解散,关于更多的八卦请参考:https://baike.baidu.com/item/%E7%BD%91%E6%99%AF/70176?fr=aladdin&fromid=15469634&fromtitle=%E7%BD%91%E6%99%AF%E5%85%AC%E5%8F%B8
1.SSL会话的建立
第一步:客户端和服务器端先建立TCP/IP的三次握手,双方建立连接;
第二步:建立连接之后,在TCP会话的基础上二者开始做SSL之间的协商(由于客户端(如浏览器)对一些加解密算法的支持程度不一样,双方要选择都支持的对称加密非对称加密以及单向加密算法等等),客户端会将自己支持的加密套件(Cipher Suite)的列表传送给服务端。除此之外,客户端还要产生一个随机数,这个随机数一方面需要在客户端保存,另一方面需要传送给服务端;
第三步:服务端接收到客户端的请求之后,服务端需要从中选出一种加密算法和HASH算,并将自己的身份信息以证书的形式发回给客户端。
第四步:客户端需要对接收到的服务端的证书进行检查,验证证书的合法性(颁发证书的机构是否合法,证书中包含的网站地址是否与正在访问的地址一致等),如果证书(公钥)受信任,则浏览器栏里面会显示一个小锁头,否则会给出证书不受信的提示。客户端在验证服务器端身份是可信任的之后,就会用服务器端提供的证书(公钥)去加密一个临时对称秘钥发送给服务端;
第五步:服务端用自己的私钥去解密客户端发来的信息,就会拿到客户端发来的临时对称秘钥,换句话说,这个过程就是实现了秘钥交换(有两种秘钥交换机制),服务器端要生产一个双方都支持的对称加密秘钥;
第六歩:接下来,双方都达成了相应的通信机制,接下来所有的网页请求发送都以加密的方式实现啦。
我们知道HTTP协议是无状态的,那么HTTPS当然也是无状态的,那就意味着每次发送数据都得去验证等等,这样无疑会浪费很多时间,索性我们可以将这一系列结果临时缓存到浏览器本地上,这样我们就在短时间类每次发送数据都如此麻烦了。但一般来讲,为了可靠性起见,SSL有效的会话期是你当前浏览器的进程周期,这意味着你浏览器关闭之后,你就得重新验证。以上六个步骤是一个大致的SSL会话机制,实际会话比这个要复杂的多,我这里只是列出了一个大致的步骤方便我自己后期理解。我们也可以说SSL握手要完成的工作:交换协议版本号;选择一个双方都支持的加密方式;对两端实现身份验证;密钥交换等等。
扩展小知识:密钥交换的两种机制
a>.公钥加密实现:发送方用接收方的公钥加密自己的密钥,接收方用自己的私钥解密得到发送方的密钥,逆过来亦然,从而实现密钥交换。
b>.使用DH算法:前提发送方和接受方协商使用同一个大素数P和生成数g,各自产生的随机数X和Y。发送方将g的X次方mod P产生的数值发送给接收方,接受方将g的Y次方mod P产生的数值发送给发送方,发送方再对接收的结果做X次方运算,接受方对接收的结果做Y次方运算,最终密码形成,密钥交换完成。
2.数字证书格式
数字证书的基本格式如下:
a>.证书格式的版本号( 格式普遍采用的是X.509V3国际标准)
b>.证书序列号
c>.证书签名算法
d>.证书颁发者
e>.有效期
f>.持有者的名称(对象名称)
g>.持有者的公钥(对象的公开秘钥)
h>.CA的ID
i>.持有者的ID
j>.其他扩展信息
基本约束
证书策略
密钥的使用限制
k>.CA签名
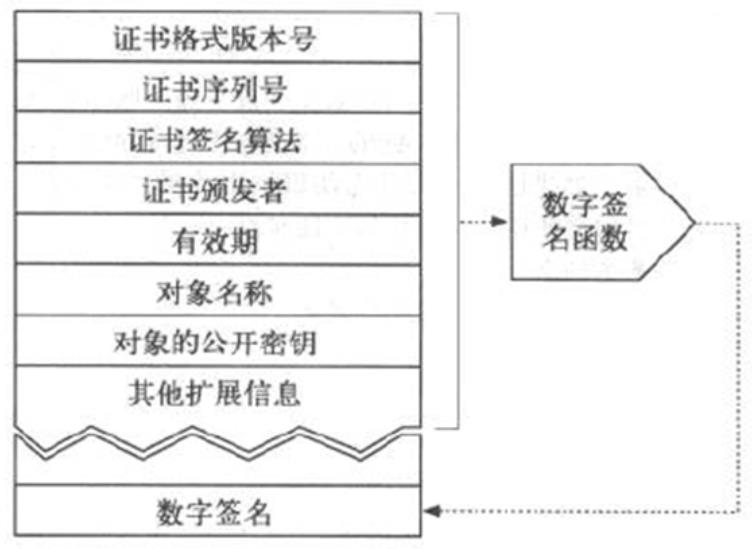
如上图所示,证书在数字签名的时候是将证书格式版本号,证书序列号,....,其他扩展信息等这些有效信息做一下单向加密算法取出来数字摘要信息(也就是指纹信息)然后用自己的私钥去加密这个信息的结果就是数字签名。把数字签名的结果放再数字证书的最后端。
扩展小知识:什么是PKI(Public Key Infrastructure)
PKI是Public Key Infrastructure的首字母缩写,翻译过来就是公钥基础设施;PKI是一种遵循标准的利用公钥加密技术为电子商务的开展提供一套安全基础平台的技术和规范。它主要包括:
a>.端实体(申请者)
b>.注册机构(RC)
c>.签证机构(CA)------->签证机构(CA)
d>.证书撤销列表(CRL)发布机构
e>.证书存取库
3.HTTTP和HTTPS事务对比
HTTPS并非是应用层的一种新协议。只是HTTP通信接口部分用SSL(Secure Socker Layer)和 TLS(Transport Layer Security)协议代替而已。简言之,所谓HTTPS,其实就是身披 SSL 协议这层外壳的HTTP。TLS/SSL 是独立于HTTP的协议,是介于 TCP 和 HTTP 之间的一层安全协议,不影响原有的 TCP 协议和 HTTP 协议,所以使用 HTTPS 基本上不需要对 HTTP 页面进行太多的改造。不光是HTTP协议,其他运行在应用层的SMTP 和 Telnet等协议均可配合SSL协议的使用。下图就是一次http和https处理事务的对比图:
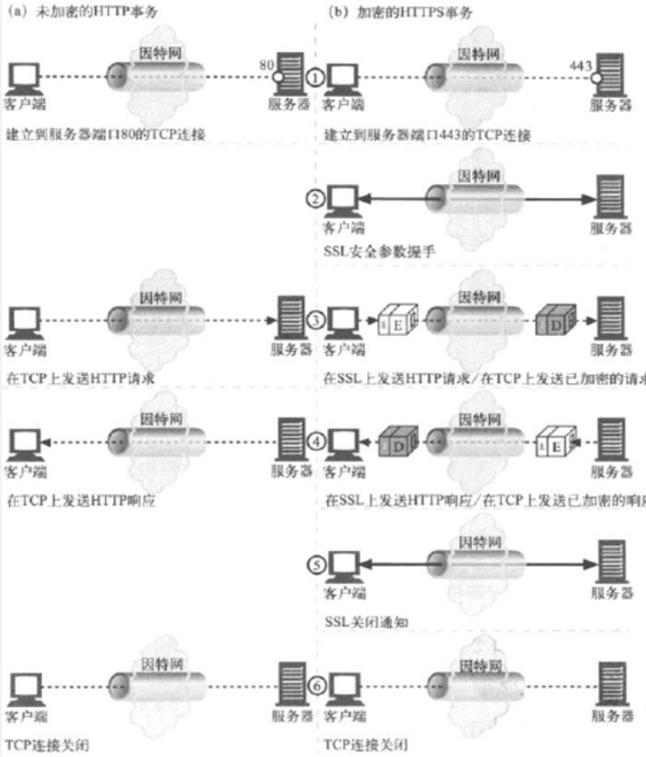
要注意的是:http是文本协议而https则是二进制格式的协议。http基于的是80端口,而https默认使用的端口是443端口。 因为SSL会话是基于IP地址进行的,所以不支持在基于主机名(FQDN)的虚拟主机上实现。
4.为什么不都使用HTTPS
既然HTTPS那么完全可靠,那为何所有的Web网站不一直使用HTTPS?主要是因为以下几个原因:
a>.与纯文本通信相比,加密通信会消耗更多的CPU及内存资源。
如果每次通信都加密,会消耗相当多的资源,平摊到一台计算机上时,能处理的请求数量必定会随之减少。因此,如果是非敏感信息还是用HTTP通信,只有在包含个人敏感数据时,才利用HTTPS加密通信。特别是每当那些访问量较多的Web网站在进行加密处理时,并非对所有内容都进行加密处理,而是仅对那些需要信息隐藏时才会加密,以节约资源。
b>.节约购买证书的开销。
要进行HTTPS通信,证书是必不可少的。而使用的证书必须向认证机构(CA)购买。证书价格根据不同的认证机构略有不同,一年几百到几千的都有,那些购买证书并不合算的服务以及一些个人网站,可能只会选择采用HTTP的通信方式。
c>.HTTPS使用SSL时,它的处理速度会变慢。
SSL的慢有两种,一是通信慢,二是大量消耗CPU及内存等资源,导致处理速度变慢。和HTTP相比,网络负载可能会慢2到100倍。除去和TCP连接、发送HTTP请求和响应以外,还必须进行SSL通信,因此整体上处理通行量不可避免会增加。SSL必须进行加密处理。在服务器和客户端都需要进行加密和解密的运算处理。因此,比起HTTP会更多地消耗服务器和客户端的硬件资源,导致负载增强。当然,可以通过使用SSL加速器这种硬件来改善该问题。
5.客户端验证服务器端证书的步骤
我们知道验证是双方都可以验证的,不仅仅是客户端验证服务器端,服务器端照样是可以验证客户端的。一般来讲,在互联网应用上我们客户端要证书也没有用,所以通常都是客户端验证服务器端,而客户端验证服务器端证书时,它的验证方式又是如何进行的呢?我们大致归为以下几点:
a>.日期检查,证书是否在有效期内;
b>.证书颁发者的可信度;
c>.证书的签名检测;
d>.持有者的身份检测;
二.基于httpd实现https机制的配置过程
1.httpd配置https的必要条件
a>.我们知道httpd是基于mod_ssl模块实现对ssl的支持的,因此我们要实现https基于httpd来实现,首先我们得安装这个模块并且需要加载这个模块;
b>.要确保httpd能够监听在443端口上;
c>.要想使用https服务器需要有证书(我们可以自建CA证书也可以在互联网上去申请一个CA证书,当然你是需要支付费用的)和私钥;
2.自建CA证书配置
[root@yinzhengjie ~]# cd /etc/pki/CA/
[root@yinzhengjie CA]# ls
certs crl newcerts private
[root@yinzhengjie CA]#
[root@yinzhengjie CA]# (umask 077;openssl genrsa 2048 > private/cakey.pem) ------>自建CA证书
Generating RSA private key, 2048 bit long modulus
......................................................................+++
..........................+++
e is 65537 (0x10001)
[root@yinzhengjie CA]#
[root@yinzhengjie CA]# ls -l private/
total 4
-rw-------. 1 root root 1675 Oct 22 07:58 cakey.pem
[root@yinzhengjie CA]#
3.配置自签证书(该证书主要是给客户端用的,然后安装该证书即可)
在修改之前为了我们不用每次都输入证书信息,可以编辑配置证书的文件/etc/pki/tls/openssl.cnf,我们只需要修改以下几项即可,其他选项可以修改也可以不修改。如果没有修改的部分在签发证书的时候需要手动输入,具体的可以看以下的演示过程。
 1 [root@yinzhengjie ~]# more /etc/pki/tls/openssl.cnf  | grep countryName_default
 2 #countryName_default            = XX
 3 countryName_default             = CN            ------>修改国家名字为中国
 4 [root@yinzhengjie ~]#
 5 [root@yinzhengjie ~]# more /etc/pki/tls/openssl.cnf  | grep stateOrProvinceName_default
 6 #stateOrProvinceName_default    = Default Province
 7 stateOrProvinceName_default     = BeiJing    ------->修改省份为北京
 8 [root@yinzhengjie ~]#
 9 [root@yinzhengjie ~]# more /etc/pki/tls/openssl.cnf  | grep localityName_default
10 #localityName_default   = Default City
11 localityName_default    = Yizhuang Economic Development Zone        ----->修改所在区域
12 [root@yinzhengjie ~]#
13 [root@yinzhengjie ~]# more /etc/pki/tls/openssl.cnf  | grep 0.organizationName_default
14 #0.organizationName_default     = Default Company Ltd
15 0.organizationName_default      = Chinese Academy of Medical Sciences    ---->修改你所在的单位
16 [root@yinzhengjie ~]#
17 [root@yinzhengjie ~]#
18 [root@yinzhengjie ~]# more /etc/pki/tls/openssl.cnf  | grep organizationalUnitName_default
19 #organizationalUnitName_default = World Wide Web Pty Ltd
20 organizationalUnitName_default  = LinuxOperation        ------>修改你担任的职位
21 [root@yinzhengjie ~]#
22 [root@yinzhengjie CA]# openssl req -new -x509 -key private/cakey.pem -days 3650 -out cacert.pem
23 You are about to be asked to enter information that will be incorporated
24 into your certificate request.
25 What you are about to enter is what is called a Distinguished Name or a DN.
26 There are quite a few fields but you can leave some blank
27 For some fields there will be a default value,
28 If you enter \'.\', the field will be left blank.
29 -----
30 Country Name (2 letter code) [CN]:
31 State or Province Name (full name) [BeiJing]:
32 Locality Name (eg, city) [Yizhuang Economic Development Zone]:
33 Organization Name (eg, company) [Chinese Academy of Medical Sciences]:
34 Organizational Unit Name (eg, section) [LinuxOperation]:
35 Common Name (eg, your name or your server\'s hostname) []:ca.yinzhengjie.org.cn
36 Email Address []:caadmin@yinzhengjie.org.cn
37 You have new mail in /var/spool/mail/root
38 [root@yinzhengjie CA]#
39 [root@yinzhengjie CA]# ls
40 cacert.pem  certs  crl  newcerts  private
41 [root@yinzhengjie CA]#
42 [root@yinzhengjie CA]# touch index.txt serial crlnumber
43 [root@yinzhengjie CA]# echo 01 > serial
44 [root@yinzhengjie CA]# ls
45 cacert.pem  certs  crl  crlnumber  index.txt  newcerts  private  serial
46 [root@yinzhengjie CA]#
4.在web服务器端生成秘钥
 1 [root@yinzhengjie ~]# cd /etc/httpd/conf
 2 [root@yinzhengjie conf]#
 3 [root@yinzhengjie conf]# mkdir ssl
 4 [root@yinzhengjie conf]# cd ssl/
 5 [root@yinzhengjie ssl]#
 6 [root@yinzhengjie ssl]# (umask 077;openssl genrsa 1024 > http.key)    ----生成服务器的私钥
 7 Generating RSA private key, 1024 bit long modulus
 8 ..........++++++
 9 ...++++++
10 e is 65537 (0x10001)
11 [root@yinzhengjie ssl]#
12 [root@yinzhengjie ssl]# ll
13 total 4
14 -rw-------. 1 root root 887 Oct 22 08:22 http.key
15 [root@yinzhengjie ssl]#
5.生成证书签署请求
 1 [root@yinzhengjie ssl]# openssl req -new -key http.key -out httpd.csr
 2 You are about to be asked to enter information that will be incorporated
 3 into your certificate request.
 4 What you are about to enter is what is called a Distinguished Name or a DN.
 5 There are quite a few fields but you can leave some blank
 6 For some fields there will be a default value,
 7 If you enter \'.\', the field will be left blank.
 8 -----
 9 Country Name (2 letter code) [CN]:
10 State or Province Name (full name) [BeiJing]:
11 Locality Name (eg, city) [Yizhuang Economic Development Zone]:
12 Organization Name (eg, company) [Chinese Academy of Medical Sciences]:
13 Organizational Unit Name (eg, section) [LinuxOperation]:
14 Common Name (eg, your name or your server\'s hostname) []:www.yinzhengjie.org.cn
15 Email Address []:webadmin@yinzhengjie.org.cn
16
17 Please enter the following \'extra\' attributes
18 to be sent with your certificate request
19 A challenge password []:            ------>此处的密码可以设置为空,直接回车即可。
20 An optional company name []:
21 [root@yinzhengjie ssl]#
22 [root@yinzhengjie ssl]# ll
23 total 8
24 -rw-r--r--. 1 root root 814 Oct 22 08:27 httpd.csr
25 -rw-------. 1 root root 887 Oct 22 08:22 http.key
26 [root@yinzhengjie ssl]#
6.进行CA签名
 1 [root@yinzhengjie ssl]# openssl ca -in httpd.csr -out httpd.crt        ----->进行CA签名生成一个证书。
 2 Using configuration from /etc/pki/tls/openssl.cnf
 3 Check that the request matches the signature
 4 Signature ok
 5 Certificate Details:
 6         Serial Number: 2 (0x2)
 7         Validity
 8             Not Before: Oct 22 15:38:27 2017 GMT
 9             Not After : Oct 22 15:38:27 2018 GMT
10         Subject:
11             countryName               = CN
12             stateOrProvinceName       = BeiJing
13             organizationName          = Chinese Academy of Medical Sciences
14             organizationalUnitName    = LinuxOperation
15             commonName                =  www.yinzhengjie.org.cn
16             emailAddress              = webadmin@yinzhengjie.org.cn
17         X509v3 extensions:
18             X509v3 Basic Constraints:
19                 CA:FALSE
20             Netscape Comment:
21                 OpenSSL Generated Certificate
22             X509v3 Subject Key Identifier:
23                 34:91:A0:33:0C:2C:FB:16:64:9D:E8:D7:1D:B5:10:84:F7:E5:40:6A
24             X509v3 Authority Key Identifier:
25                 keyid:3E:ED:2C:12:AF:F5:98:40:31:01:E7:8F:51:39:0B:24:4C:ED:41:4B
26
27 Certificate is to be certified until Oct 22 15:38:27 2018 GMT (365 days)
28 Sign the certificate? [y/n]:y
29
30
31 1 out of 1 certificate requests certified, commit? [y/n]y
32 Write out database with 1 new entries
33 Data Base Updated
34 [root@yinzhengjie ssl]#
35 [root@yinzhengjie ssl]# ll
36 total 16
37 -rw-r--r--. 1 root root 4203 Oct 22 08:38 httpd.crt
38 -rw-r--r--. 1 root root  822 Oct 22 08:37 httpd.csr
39 -rw-------. 1 root root  887 Oct 22 08:37 http.key
40 [root@yinzhengjie ssl]#
7.安装mod_ssl模块
 1 [root@yinzhengjie ssl]# grep mod_ssl /etc/httpd/conf/httpd.conf     ---->查看是否已经安装mod_ssl模块。
 2 # (e.g. :80) if mod_ssl is being used, due to the nature of the
 3 [root@yinzhengjie ssl]#
 4 [root@yinzhengjie ssl]# grep mod_ssl /etc/httpd/conf.d/*.conf     ----->去子目录也查一遍;
 5 [root@yinzhengjie ssl]#
 6 [root@yinzhengjie ssl]# yum -y install mod_ssl                ----->安装mod_ssl模块;
 7 [root@yinzhengjie ssl]# rpm -ql mod_ssl                        ------>查mod_ssl安装的文件;
 8 /etc/httpd/conf.d/ssl.conf
 9 /usr/lib64/httpd/modules/mod_ssl.so
10 /var/cache/mod_ssl
11 /var/cache/mod_ssl/scache.dir
12 /var/cache/mod_ssl/scache.pag
13 /var/cache/mod_ssl/scache.sem
14 [root@yinzhengjie ssl]#
8.编辑ssl的配置文件
 1 [root@yinzhengjie ssl]# more /etc/httpd/conf.d/ssl.conf | grep DocumentRoot
 2 DocumentRoot "/var/www/html"            ---->设置网站的根目录
 3 [root@yinzhengjie ssl]#
 4 [root@yinzhengjie ssl]# more /etc/httpd/conf.d/ssl.conf | grep ServerName
 5 ServerName www.yinzhengjie.org.cn:443    ------>设置主机名
 6 [root@yinzhengjie ssl]#
 7 [root@yinzhengjie ssl]# more /etc/httpd/conf.d/ssl.conf | grep ErrorLog
 8 ErrorLog logs/ssl_error_log                ------->定义错误日志路径
 9 [root@yinzhengjie ssl]#
10 [root@yinzhengjie ssl]# more /etc/httpd/conf.d/ssl.conf | grep TransferLog
11 TransferLog logs/ssl_access_log            ------->定义访问日志路径,注意,由于https是二进制格式的协议,因此和httpd的主配置文件定义访问日志的指令是不一样的哟
12 [root@yinzhengjie ssl]#
13 [root@yinzhengjie ssl]# more /etc/httpd/conf.d/ssl.conf | grep LogLevel | grep -v ^#
14 LogLevel warn                            --------->定义日志级别
15 [root@yinzhengjie ssl]#
16 [root@yinzhengjie ssl]# more /etc/httpd/conf.d/ssl.conf | grep SSLEngine
17 SSLEngine on                            --------->将SSL功能开启,启用基于SSL的虚拟主机;
18 [root@yinzhengjie ssl]#
19 [root@yinzhengjie ssl]# more /etc/httpd/conf.d/ssl.conf | grep SSLProtocol
20 SSLProtocol all -SSLv2                    ---------->表示支持所有的SSL协议,处理-SSLv2版本,换句话说它就只剩下-SSLv3以及TLSv1啦。
21 [root@yinzhengjie ssl]#
22 [root@yinzhengjie ssl]# more /etc/httpd/conf.d/ssl.conf | grep SSLCipherSuite
23 SSLCipherSuite DEFAULT:!EXP:!SSLv2:!DES:!IDEA:!SEED:+3DES    ------>指定SSL的加密套件,注意,感叹号(!)表示不支持的算法,加号(+)表示支持加密算法。
24 [root@yinzhengjie ssl]#
25 [root@yinzhengjie ssl]# more /etc/httpd/conf.d/ssl.conf | grep SSLCertificateFile | grep -v ^#
26 SSLCertificateFile /etc/httpd/conf/ssl/httpd.crt            ------>指定WEB服务器端证书
27 [root@yinzhengjie ssl]#
28 [root@yinzhengjie ssl]# more /etc/httpd/conf.d/ssl.conf | grep SSLCertificateKeyFile
29 SSLCertificateKeyFile /etc/httpd/conf/ssl/http.key        ------->指定WEB服务器的私钥
30 [root@yinzhengjie ssl]#
31 [root@yinzhengjie ssl]# httpd -t            ---------->检查配置是否正确
32 httpd: apr_sockaddr_info_get() failed for yinzhengjie
33 httpd: Could not reliably determine the server\'s fully qualified domain name, using 127.0.0.1 for ServerName
34 Syntax OK                            -------->说明语法配置无误!
35 [root@yinzhengjie ssl]#
36 [root@yinzhengjie ssl]# service httpd restart    ------->重启web服务。
37 Stopping httpd: [  OK  ]
38 Starting httpd: httpd: apr_sockaddr_info_get() failed for yinzhengjie
39 httpd: Could not reliably determine the server\'s fully qualified domain name, using 127.0.0.1 for ServerName
40 [  OK  ]
41 [root@yinzhengjie ssl]#
42 [root@yinzhengjie ssl]# ss -tnl | grep 443    ------->查看443端口是否正常监听
43 LISTEN     0      128                      :::443                     :::*
44 [root@yinzhengjie ssl]#
45 [root@yinzhengjie ~]# openssl s_client -connect www.yinzhengjie.org.cn:443 -CAfile /etc/pki/CA/cacert.pem                     ------->我们可以基于本地的命令行进行测试。当然也可以在客户端的浏览器测试,只不过需要安装证书。
46 [root@yinzhengjie ~]#
9.客户端安装证书
[root@yinzhengjie CA]# sz cacert.pem -----将证书下载到windows中并将后缀改为crt双击即可安装
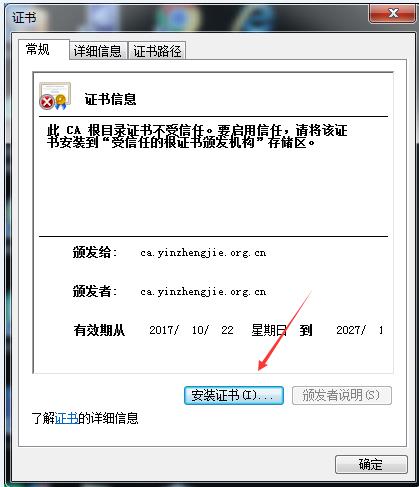
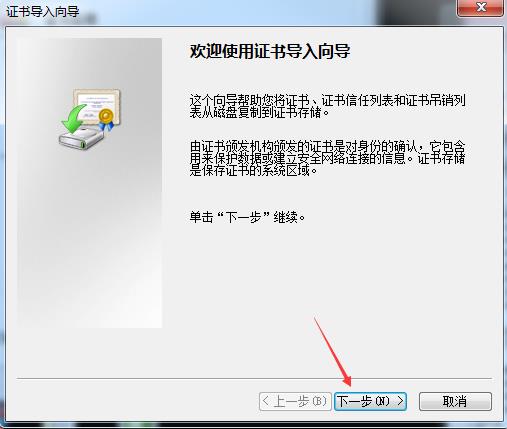
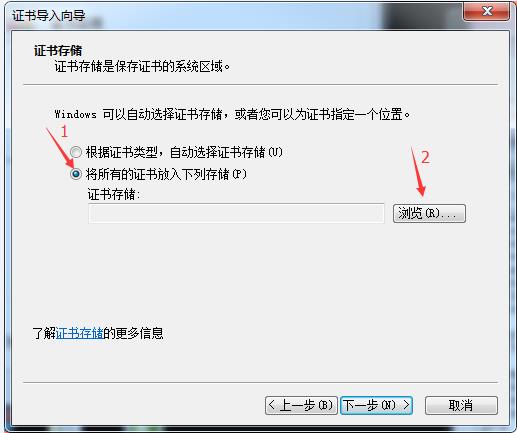
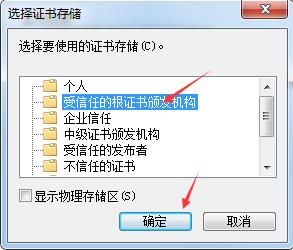
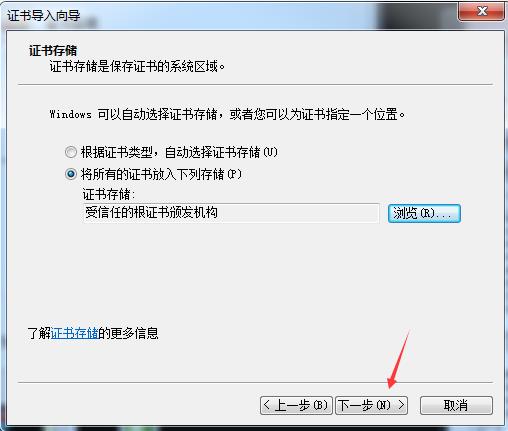
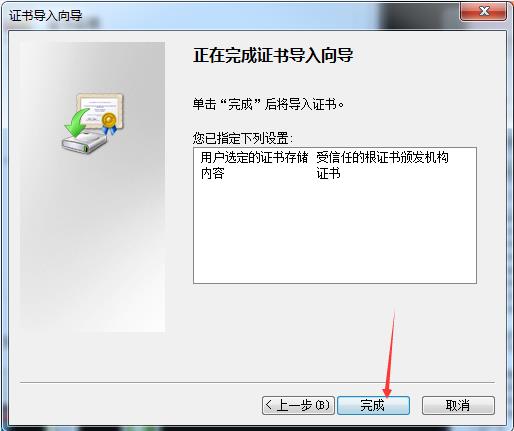
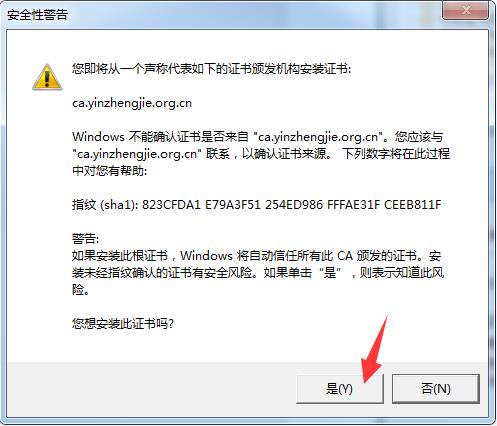
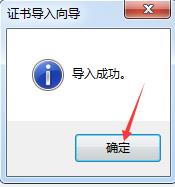
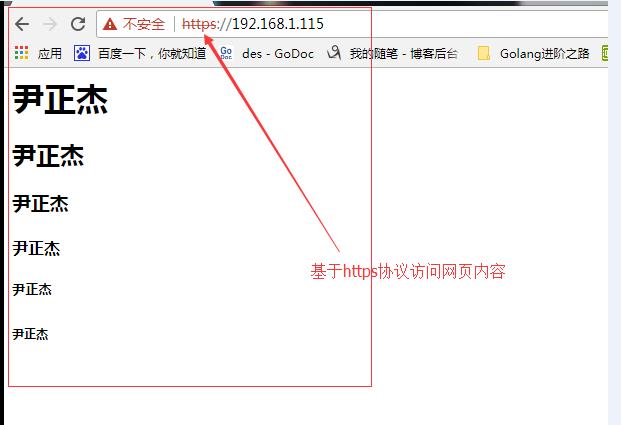
还有一种方式也可以继续访问:
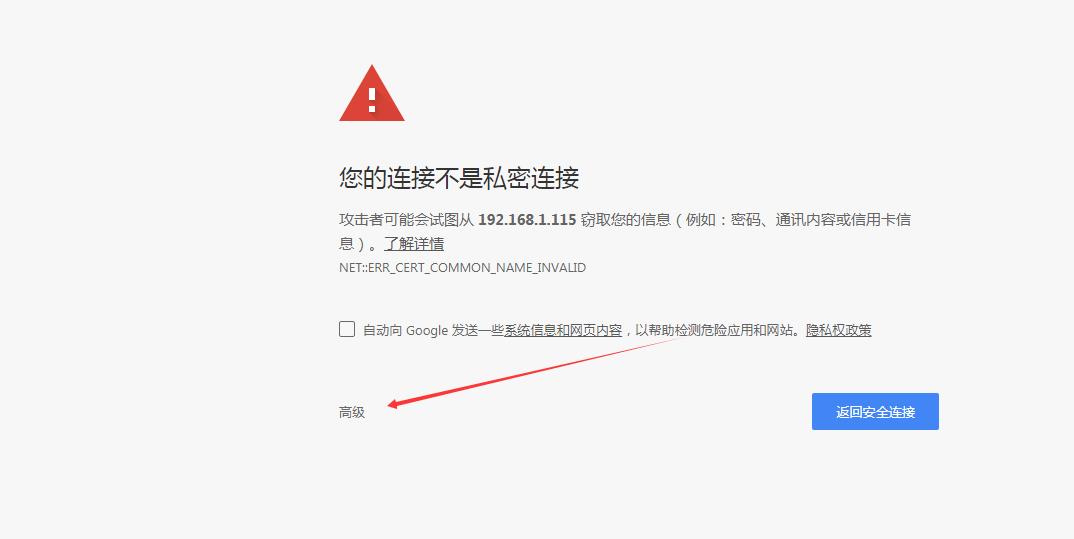
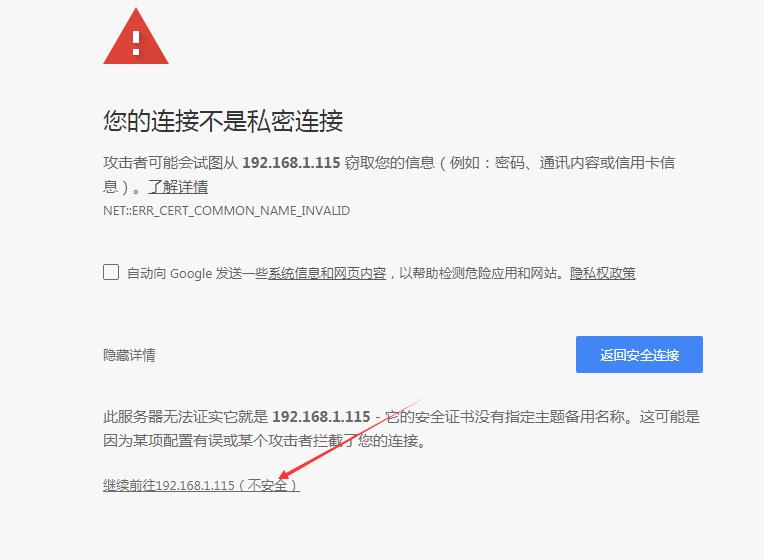
10.扩展知识:快速创建证书
我们可以在/etc/pki/tls/certs这目录下执行make命令来创建证书,所有的make内容执行时都需要先看该目录下的Makefile文件。
常用后缀结尾的代表的含义:
pem:测试证书(包含了公钥私钥证书签名都有了,一般用于内部测试,实际生产环境中千万别这么玩。)
key:私钥
csr:证书签署请求
crt:直接创建一个证书
案例:创建一个私钥文件(需要输入密码)
 1 [root@yinzhengjie certs]# pwd
 2 /etc/pki/tls/certs
 3 [root@yinzhengjie certs]# make yinzhengjie.key
 4 umask 77 ; \\
 5         /usr/bin/openssl genrsa -aes128 2048 > yinzhengjie.key
 6 Generating RSA private key, 2048 bit long modulus
 7 ........................+++
 8 .......................................................................................+++
 9 e is 65537 (0x10001)
10 Enter pass phrase:                ------>要求你输入密码,这里是强制你输入密码,不能为空!
11 Verifying - Enter pass phrase:        ------>要求你重复上次输入的密码
12 [root@yinzhengjie certs]#
13 [root@yinzhengjie certs]# ll
14 total 1772
15 -rw-r--r--. 1 root root  786601 Jul 14  2014 ca-bundle.crt
16 -rw-r--r--. 1 root root 1005005 Jul 14  2014 ca-bundle.trust.crt
17 -rwxr-xr-x. 1 root root     610 Oct 15  2014 make-dummy-cert
18 -rw-r--r--. 1 root root    2242 Oct 15  2014 Makefile
19 -rwxr-xr-x. 1 root root     829 Oct 15  2014 renew-dummy-cert
20 -rw-------. 1 root root    1766 Oct 22 07:02 yinzhengjie.key
21 [root@yinzhengjie certs]#
案例:创建测试证书(可以自动帮我们生成一个测试证书,里面既包含了公钥又包含了私钥,虽然用起来很方便,但是你将私钥和公钥都公开了也就没有太大意义了,一般用户内部测试使用。)
 1 [root@yinzhengjie certs]# make yinzhengjie.pem
 2 umask 77 ; \\
 3         PEM1=`/bin/mktemp /tmp/openssl.XXXXXX` ; \\
 4         PEM2=`/bin/mktemp /tmp/openssl.XXXXXX` ; \\
 5         /usr/bin/openssl req -utf8 -newkey rsa:2048 -keyout $PEM1 -nodes -x509 -days 365 -out $PEM2 -set_serial 0 ; \\
 6         cat $PEM1 >  yinzhengjie.pem ; \\
 7         echo ""    >> yinzhengjie.pem ; \\
 8         cat $PEM2 >> yinzhengjie.pem ; \\
 9         rm -f $PEM1 $PEM2
10 Generating a 2048 bit RSA private key
11 ..+++
12 ......................................................................+++
13 writing new private key to \'/tmp/openssl.Ra7W2f\'
14 -----
15 You are about to be asked to enter information that will be incorporated
16 into your certificate request.
17 What you are about to enter is what is called a Distinguished Name or a DN.
18 There are quite a few fields but you can leave some blank
19 For some fields there will be a default value,
20 If you enter \'.\', the field will be left blank.
21 -----
22 Country Name (2 letter code) [XX]:            ------->一路回车即可,我们这里只是测试。
23 State or Province Name (full name) []:
24 Locality Name (eg, city) [Default City]:
25 Organization Name (eg, company) [Default Company Ltd]:
26 Organizational Unit Name (eg, section) []:
27 Common Name (eg, your name or your server\'s hostname) []:
28 Email Address []:
29 You have new mail in /var/spool/mail/root
30 [root@yinzhengjie certs]#
三.服务器status页面
一般来讲,无论是nginx,haproxy还是httpd他们都通常自己提供内生的status信息,且此信息可以通过web页面预以显示。我们只需要开启这个功能即可。这个网页就是记录着服务器的详细信息,建议不要让所有人访问,因为它不仅仅记录着你的web服务器的搭建时间,支持的模块,重启服务的时间等等,所以这个信息最好要配置权限。
1>.说起配置权限,我们知道配置文件系统路径访问属性可以选择两种容器:
<Directory [~]"">
</Directory>
或
<File [~]"">
</File>
2>.而说起配置URL访问属性时也可以选择两种容器
<Location [~]"">
</Location>
或
<LocationMatch "">
</LocationMatch>
如果要配置其属性的URL能映射到某具体文件系统路径,建议说用<Directory></Directorry>容器。
以上是关于https和server-status配置案例的主要内容,如果未能解决你的问题,请参考以下文章